

Technical Brief (Ink Jet Printers)
Page 1
This technical brief provides detailed information on the core technologies used in Epson printers and all ink solution. Print Quality-Core Printing Technologies The core technologies used in Epson ink jet printers produces: Greater detail in highlights, without visible printed "dots" Smooth gradations with precise color control and superior density Crisp line art Greater detail...
This technical brief provides detailed information on the core technologies used in Epson printers and all ink solution. Print Quality-Core Printing Technologies The core technologies used in Epson ink jet printers produces: Greater detail in highlights, without visible printed "dots" Smooth gradations with precise color control and superior density Crisp line art Greater detail...

Technical Brief (Ink Jet Printers)
Page 2
...Heat method: Heat produces a vapor bubble in other ink jet printers: Epson MicroPiezo Technology Mechanical method: Precise electrical pulses cause the ink reservoir wall to improve color ranges and accuracy because Epson printers can produce a number of print head nozzles Page 2 Gradations and... sizes combine to achieve more tone representations for smoother gradations Ink Jet Printer Technical Brief Large droplets are increased Epson printers use Variable Size Droplet Technology, where the printers can use high-precision mechanical pumps to have fast print speeds without ...
...Heat method: Heat produces a vapor bubble in other ink jet printers: Epson MicroPiezo Technology Mechanical method: Precise electrical pulses cause the ink reservoir wall to improve color ranges and accuracy because Epson printers can produce a number of print head nozzles Page 2 Gradations and... sizes combine to achieve more tone representations for smoother gradations Ink Jet Printer Technical Brief Large droplets are increased Epson printers use Variable Size Droplet Technology, where the printers can use high-precision mechanical pumps to have fast print speeds without ...

Technical Brief (Ink Jet Printers)
Page 3
... image quality and durability, or is most efficient pattern for the job. Epson Printer + Epson Ink + Epson Paper Delivers Epson Quality 6. Ink Jet Printer Technical Brief Page 3 Whether the customer is a professional photographer staking his reputation on breathtaking large... photo quality photos, or both on the same page. Epson, Exceed Your Vision, MicroPiezo, AcuPhoto Halftoning, Claria, Epson UltraChrome K3, Epson UltraChrome Hi-Gloss, and PictureMate are registered trademarks of Seiko Epson Corporation. DURABrite and Chief Memory Officer are registered...
... image quality and durability, or is most efficient pattern for the job. Epson Printer + Epson Ink + Epson Paper Delivers Epson Quality 6. Ink Jet Printer Technical Brief Page 3 Whether the customer is a professional photographer staking his reputation on breathtaking large... photo quality photos, or both on the same page. Epson, Exceed Your Vision, MicroPiezo, AcuPhoto Halftoning, Claria, Epson UltraChrome K3, Epson UltraChrome Hi-Gloss, and PictureMate are registered trademarks of Seiko Epson Corporation. DURABrite and Chief Memory Officer are registered...
Basics
Page 2
Contents Welcome 2 Prepare to Print 5 Choose Photos and Print 8 Do More With Your Photos 15 Save Photos to a CD 25 Print From a Computer 27 Print From an External Device 42 Replace Print Pack 48 Take PictureMate With You 52 Set PictureMate Preferences 55 Printer Care and Troubleshooting 60 Notices 69 Index 79
Contents Welcome 2 Prepare to Print 5 Choose Photos and Print 8 Do More With Your Photos 15 Save Photos to a CD 25 Print From a Computer 27 Print From an External Device 42 Replace Print Pack 48 Take PictureMate With You 52 Set PictureMate Preferences 55 Printer Care and Troubleshooting 60 Notices 69 Index 79
Basics
Page 5
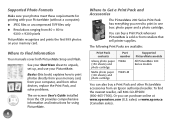
... manuals cover both PictureMate Snap and Flash. Basics (this book) explains how to print in one box: photo paper and a photo cartridge. Or you need to print photos directly from your memory card, from your computer, and from other PictureMate accessories from retailers that sell printer supplies. Where to...can buy a Print Pack and other devices, replace the Print Pack, and solve problems. The on your memory card. sales) or www.epson.ca (Canadian sales). The following Print Packs are available: Print Pack contents Glossy photo paper (150 sheets) and photo cartridge Matte photo paper...
... manuals cover both PictureMate Snap and Flash. Basics (this book) explains how to print in one box: photo paper and a photo cartridge. Or you need to print photos directly from your memory card, from your computer, and from other PictureMate accessories from retailers that sell printer supplies. Where to...can buy a Print Pack and other devices, replace the Print Pack, and solve problems. The on your memory card. sales) or www.epson.ca (Canadian sales). The following Print Packs are available: Print Pack contents Glossy photo paper (150 sheets) and photo cartridge Matte photo paper...
Basics
Page 9
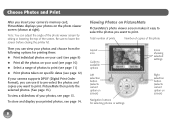
...and display your camera supports DPOF (Digital Print Order Format), you can use it easy to select the photos you insert your camera's memory card, PictureMate displays your photos, see page 13. Choose Photos and Print After you want to print. Note: You can view your photos and choose from the... viewer screen makes it to pre-select the photos and copies you want to print. PictureMate then prints the selected photos. (See page 13.) To view a slideshow of photos to lower the screen before closing the printer lid. Be sure to print (see page 11) ● Print photos taken on specific ...
...and display your camera supports DPOF (Digital Print Order Format), you can use it easy to select the photos you insert your camera's memory card, PictureMate displays your photos, see page 13. Choose Photos and Print After you want to print. Note: You can view your photos and choose from the... viewer screen makes it to pre-select the photos and copies you want to print. PictureMate then prints the selected photos. (See page 13.) To view a slideshow of photos to lower the screen before closing the printer lid. Be sure to print (see page 11) ● Print photos taken on specific ...
Basics
Page 20
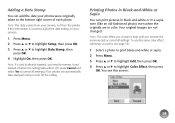
... originally taken to highlight Color Effect, then press OK. Your original images are not changed. Note: The date comes from your camera, not from the printer.
... originally taken to highlight Color Effect, then press OK. Your original images are not changed. Note: The date comes from your camera, not from the printer.
Basics
Page 21
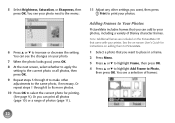
If you remove the memory card or cancel all photos, then press OK. Automatically Fixing Your Photos PictureMate's automatic image adjustments are turned on in order to fine-tune your automatic settings. It may correct images that are too dark, too ... ● Automatic adjustments If your photos. Note: These settings affect only your original image files. Fixing Photos PictureMate lets you can print all your camera supports PRINT Image Matching (P.I.M.) or Exif Print, the printer's P.I .M. They do not change your printed pictures. Note: The type of adjustments are too light or ...
If you remove the memory card or cancel all photos, then press OK. Automatically Fixing Your Photos PictureMate's automatic image adjustments are turned on in order to fine-tune your automatic settings. It may correct images that are too dark, too ... ● Automatic adjustments If your photos. Note: These settings affect only your original image files. Fixing Photos PictureMate lets you can print all your camera supports PRINT Image Matching (P.I.M.) or Exif Print, the printer's P.I .M. They do not change your printed pictures. Note: The type of adjustments are too light or ...
Basics
Page 23
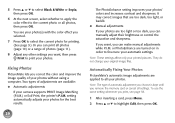
...can see the changes on adding them to PictureMate. 1 Select a photo that you want to place in a frame. 2 Press Menu. 3 Press u or d to highlight Frame, then press OK. 4 Press u or d to highlight Add Frame to print your photos. You see your printer. Or repeat steps 1 through 8 to make...(page 10) or a range of photos (page 11). 11 Adjust any other adjustments to increase or decrease the setting. Adding Frames to Your Photos PictureMate includes frames that came with your photo next to the menu: 6 Press u or d to the same photo, if necessary. 5 Select Brightness, Saturation...
...can see the changes on adding them to PictureMate. 1 Select a photo that you want to place in a frame. 2 Press Menu. 3 Press u or d to highlight Frame, then press OK. 4 Press u or d to highlight Add Frame to print your photos. You see your printer. Or repeat steps 1 through 8 to make...(page 10) or a range of photos (page 11). 11 Adjust any other adjustments to increase or decrease the setting. Adding Frames to Your Photos PictureMate includes frames that came with your photo next to the menu: 6 Press u or d to the same photo, if necessary. 5 Select Brightness, Saturation...
Basics
Page 26
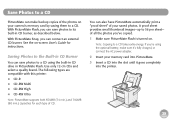
...printer. 25 Note: Copying to 56 per sheet- You can also have PictureMate automatically print a "proof sheet" of CD. A proof sheet provides small thumbnail images-up to a CD takes extra energy. Save Photos to a CD PictureMate can make sure it's fully charged, or connect the AC power adapter. 2 Insert your saved photos. With PictureMate Snap..., you 've copied. 1 Make sure PictureMate Flash is turned on. See the ...
...printer. 25 Note: Copying to 56 per sheet- You can also have PictureMate automatically print a "proof sheet" of CD. A proof sheet provides small thumbnail images-up to a CD takes extra energy. Save Photos to a CD PictureMate can make sure it's fully charged, or connect the AC power adapter. 2 Insert your saved photos. With PictureMate Snap..., you 've copied. 1 Make sure PictureMate Flash is turned on. See the ...
Basics
Page 27
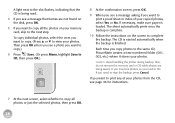
The CD is ejected automatically when the backup is complete. 10 Follow the instructions on the screen to complete the backup. Caution: Avoid handling the printer during backup. To copy individual photos, select the ones you want to copy.) 6 Press Save. (Or press Menu, highlight Save to CD, then press ...print any of your card or CD. If you need to stop the backup, press Cancel. Each time you copy photos to the same CD, PictureMate creates a new numbered folder (001, 002, etc.) where it stores your photos. The sheet automatically prints once the backup is finished. Then press...
The CD is ejected automatically when the backup is complete. 10 Follow the instructions on the screen to complete the backup. Caution: Avoid handling the printer during backup. To copy individual photos, select the ones you want to copy.) 6 Press Save. (Or press Menu, highlight Save to CD, then press ...print any of your card or CD. If you need to stop the backup, press Cancel. Each time you copy photos to the same CD, PictureMate creates a new numbered folder (001, 002, etc.) where it stores your photos. The sheet automatically prints once the backup is finished. Then press...
Basics
Page 28
...computer: ● Windows (below) ● Macintosh (page 30) Note: If you must first: ● Install the PictureMate software on printing from Epson. Follow the installation steps for free updates to your computer with your computer, you have problems installing the software, see ...PictureMate to your local computer dealer or from your computer. Print From a Computer To use PictureMate with a USB cable. If you can insert a memory card in it. 2 Press the On button to check Epson's support website at epson.com/support for your memory card from your PictureMate printer...
...computer: ● Windows (below) ● Macintosh (page 30) Note: If you must first: ● Install the PictureMate software on printing from Epson. Follow the installation steps for free updates to your computer with your computer, you have problems installing the software, see ...PictureMate to your local computer dealer or from your computer. Print From a Computer To use PictureMate with a USB cable. If you can insert a memory card in it. 2 Press the On button to check Epson's support website at epson.com/support for your memory card from your PictureMate printer...
Basics
Page 30
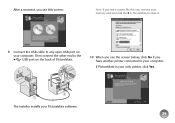
Then connect the other end to the USB port on your computer. The installer installs your only printer, click Yes. After a moment, you have another printer connected to any open USB port on the back of PictureMate. 10 When you see a screen like this screen: Note: If you see the screen below, click No if you see this one, remove your memory card and click the X in the window to close it. 9 Connect the USB cable to your computer. If PictureMate is your PictureMate software. 29
Then connect the other end to the USB port on your computer. The installer installs your only printer, click Yes. After a moment, you have another printer connected to any open USB port on the back of PictureMate. 10 When you see a screen like this screen: Note: If you see the screen below, click No if you see this one, remove your memory card and click the X in the window to close it. 9 Connect the USB cable to your computer. If PictureMate is your PictureMate software. 29
Basics
Page 31
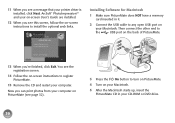
Now you see a message that your printer driver is installed, click Next. Then connect the other end to the USB port on the back of PictureMate. 13 When you see this screen, follow the on-screen instructions to register PictureMate. 15 Remove the CD and restart your Macintosh. ArcSoft® PhotoImpression.... 14 Follow the on your computer. You see page 32). 3 Press the On button to turn on PictureMate. 4 Turn on your Macintosh. 5 After the Macintosh starts up, insert the PictureMate CD in it. 2 Connect the USB cable to any open USB port on -screen instructions to install the...
Now you see a message that your printer driver is installed, click Next. Then connect the other end to the USB port on the back of PictureMate. 13 When you see this screen, follow the on-screen instructions to register PictureMate. 15 Remove the CD and restart your Macintosh. ArcSoft® PhotoImpression.... 14 Follow the on your computer. You see page 32). 3 Press the On button to turn on PictureMate. 4 Turn on your Macintosh. 5 After the Macintosh starts up, insert the PictureMate CD in it. 2 Connect the USB cable to any open USB port on -screen instructions to install the...
Basics
Page 32
...registration screen. 15 Follow the on-screen instructions to register PictureMate. 16 Remove the CD and restart your Macintosh. 17 To select PictureMate as your printer, open it, then double-click the PictureMate icon. 6 Double-click the PictureMate CD icon to open the Applications > Utilities folder and ...double-click Printer Setup Utility (Print Center in OS X 10.2). 18 ...
...registration screen. 15 Follow the on-screen instructions to register PictureMate. 16 Remove the CD and restart your Macintosh. 17 To select PictureMate as your printer, open it, then double-click the PictureMate icon. 6 Double-click the PictureMate CD icon to open the Applications > Utilities folder and ...double-click Printer Setup Utility (Print Center in OS X 10.2). 18 ...
Basics
Page 33
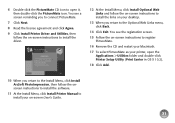
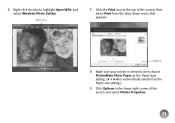
...your computer: ● Windows (below .) 20 Click Add, then quit the Printer Setup Utility (or Print Center). Printing with the Windows Vista Photo Gallery 1 Locate the photo you can print photos from your PictureMate model below ) ● Macintosh (see page 39) For instructions on printing using... ArcSoft PhotoImpression, see your computer. 32 19 In OS X 10.4, select your PictureMate model. (In OS X 10.2 or 10.3, select EPSON USB at the top and your ...
...your computer: ● Windows (below .) 20 Click Add, then quit the Printer Setup Utility (or Print Center). Printing with the Windows Vista Photo Gallery 1 Locate the photo you can print photos from your PictureMate model below ) ● Macintosh (see page 39) For instructions on printing using... ArcSoft PhotoImpression, see your computer. 32 19 In OS X 10.4, select your PictureMate model. (In OS X 10.2 or 10.3, select EPSON USB at the top and your ...
Basics
Page 34
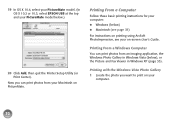
Options 4 Make sure your printer is selected, then choose PictureMate Photo Paper as the Paper type setting. (4 × 6 in is automatically selected as the Paper size setting.) 5 Click Options in the lower right corner of the screen, then select Print from the drop-down menu that appears. 2 Right-click the photo, highlight Open With, and select Windows Photo Gallery. Print icon 3 Click the Print icon at the top of the screen and select Printer Properties. 33
Options 4 Make sure your printer is selected, then choose PictureMate Photo Paper as the Paper type setting. (4 × 6 in is automatically selected as the Paper size setting.) 5 Click Options in the lower right corner of the screen, then select Print from the drop-down menu that appears. 2 Right-click the photo, highlight Open With, and select Windows Photo Gallery. Print icon 3 Click the Print icon at the top of the screen and select Printer Properties. 33
Basics
Page 35
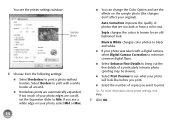
...of your original). Auto Correction improves the quality of a particularly intricate photo (printing may be slower). ● Select Print Preview to see the printer settings window: Sample photo 6 Choose from the following settings: ● Select Borderless to Min. Tip: For more information about... printer settings, click Help. 7 Click OK. Select Borders to print with a digital camera, select Digital Camera Correction to minimize common digital flaws. ● ...
...of your original). Auto Correction improves the quality of a particularly intricate photo (printing may be slower). ● Select Print Preview to see the printer settings window: Sample photo 6 Choose from the following settings: ● Select Borderless to Min. Tip: For more information about... printer settings, click Help. 7 Click OK. Select Borders to print with a digital camera, select Digital Camera Correction to minimize common digital flaws. ● ...
Basics
Page 38
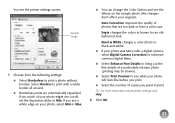
If you want to Min. Tip: For more information about printer settings, click Help. 8 Click OK. 37 You see the printer settings screen: Sample image 7 Choose from the following settings: ● Select Borderless to brown for an oldfashioned look like before you print. ● Select the ...
If you want to Min. Tip: For more information about printer settings, click Help. 8 Click OK. 37 You see the printer settings screen: Sample image 7 Choose from the following settings: ● Select Borderless to brown for an oldfashioned look like before you print. ● Select the ...
Basics
Page 41
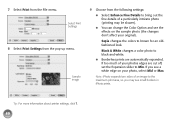
... the effects on your original). Sepia changes the colors to bring out the fine details of an image to Min. Tip: For more information about printer settings, click ?. 40 Black & White changes a color photo to black-and-white. ● Borderless prints are cut off, set the Expansion slider to the maximum...
... the effects on your original). Sepia changes the colors to bring out the fine details of an image to Min. Tip: For more information about printer settings, click ?. 40 Black & White changes a color photo to black-and-white. ● Borderless prints are cut off, set the Expansion slider to the maximum...

