
Owners Manual
Page 2
... to confirm that the following items are found to be missing. · Projector Lens Cover with string · Remote Control · 2AA Batteries for the remote control (three-cell alkaline manganese batteries) The NL model is not fitted with a lens or lens cover. · Power Cord · Computer Cable · Computer Cable (mini D-Sub... Card+Card Adapter · EasyMP.net User's · Warranty Card Guide Contact your dealer if any items are included in the package when removing the projector and accessories from the box.
... to confirm that the following items are found to be missing. · Projector Lens Cover with string · Remote Control · 2AA Batteries for the remote control (three-cell alkaline manganese batteries) The NL model is not fitted with a lens or lens cover. · Power Cord · Computer Cable · Computer Cable (mini D-Sub... Card+Card Adapter · EasyMP.net User's · Warranty Card Guide Contact your dealer if any items are included in the package when removing the projector and accessories from the box.
Owners Manual
Page 8
Maintenance 94 Cleaning the projector, Cleaning the lens, Cleaning the Air Filter 94 Cleaning the projector 95 Cleaning the lens 95 Cleaning the Air Filter 95 Replacing the Air Filter 96 Replacement method 96 Replacing the lamp 97 Replacement method 98 Resetting the lamp illumination time 99 Others 100 Optional Parts 100 Terminology 101 Specifications 103 Check Sheet 104 World-Wide Warranty Terms 107 Index 111 6- Contents
Maintenance 94 Cleaning the projector, Cleaning the lens, Cleaning the Air Filter 94 Cleaning the projector 95 Cleaning the lens 95 Cleaning the Air Filter 95 Replacing the Air Filter 96 Replacement method 96 Replacing the lamp 97 Replacement method 98 Resetting the lamp illumination time 99 Others 100 Optional Parts 100 Terminology 101 Specifications 103 Check Sheet 104 World-Wide Warranty Terms 107 Index 111 6- Contents

Owners Manual
Page 9
...ignored. Warning Displays details that may result in this manual and on the actual product to property if ignored. Ensure that the projector is in order to prevent risks to users and other optional products. *The projection distances, illustrations and screen sizes apply to... property. Explanations for these terms also cover the accessories supplied with the projector and other people, and to prevent damage to when the standard lens is used correctly and safely in use. Point: Includes supplementary explanations and useful tips.
...ignored. Warning Displays details that may result in this manual and on the actual product to property if ignored. Ensure that the projector is in order to prevent risks to users and other optional products. *The projection distances, illustrations and screen sizes apply to... property. Explanations for these terms also cover the accessories supplied with the projector and other people, and to prevent damage to when the standard lens is used correctly and safely in use. Point: Includes supplementary explanations and useful tips.

Owners Manual
Page 11
... subject to plug in plugs or connectors with extreme care to which dust, dirt or other foreign objects into the lens when the power is switched on top of the projector. Always ensure that the plugs and connectors are firmly inserted as far as they will go. · Do not...G Take care when handling power plugs and power connectors. Warning G Never look into the suction inlets and ventilation outlets on the contents of the projector, and may result in heat-distortion that would have adhered. · Ensure that the actual plug or connector is firmly gripped. An extremely strong ...
... subject to plug in plugs or connectors with extreme care to which dust, dirt or other foreign objects into the lens when the power is switched on top of the projector. Always ensure that the plugs and connectors are firmly inserted as far as they will go. · Do not...G Take care when handling power plugs and power connectors. Warning G Never look into the suction inlets and ventilation outlets on the contents of the projector, and may result in heat-distortion that would have adhered. · Ensure that the actual plug or connector is firmly gripped. An extremely strong ...

Owners Manual
Page 14
... high-accuracy technology and contains more than 99.99% active pixels. The heat generated by the lens may result in damage of the case. Safety Precautions G Using the projector outside of missing pixels and pixels that there is a possibility of 0.01% of the permissible temperature range ...(-10C° to the equipment. G The liquid crystal display panel has been manufactured with the lens cover still in place. G Storing the projector outside of the permissible temperature range (+5C° to 40C°) may result in unstable display and excessive loads ...
... high-accuracy technology and contains more than 99.99% active pixels. The heat generated by the lens may result in damage of the case. Safety Precautions G Using the projector outside of missing pixels and pixels that there is a possibility of 0.01% of the permissible temperature range ...(-10C° to the equipment. G The liquid crystal display panel has been manufactured with the lens cover still in place. G Storing the projector outside of the permissible temperature range (+5C° to 40C°) may result in unstable display and excessive loads ...

Owners Manual
Page 15
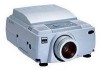
I Parts, Names and Operations Projector G Front Panel 21 7 8 9 3 10 4 6 11 5 13 6 14 14 12 1 Operation Indicator 2 Lamp Indicator 3 Temperature Indicator 4 Handle 5 Lens Shift Knob 6 Foot Adjust Lever 7 Operation Panel 8 Speaker 9 Remote Control Receiver 10 Theft-Protection Lock (see page 102) 11 Focus Ring 12 Zoom Ring 13 Lens Cover 14 Front Foot Parts, Names and Operations - 13 Before using this equipment This section provides explanations on parts and part names, and the items that should be verified before operating the remote control.
I Parts, Names and Operations Projector G Front Panel 21 7 8 9 3 10 4 6 11 5 13 6 14 14 12 1 Operation Indicator 2 Lamp Indicator 3 Temperature Indicator 4 Handle 5 Lens Shift Knob 6 Foot Adjust Lever 7 Operation Panel 8 Speaker 9 Remote Control Receiver 10 Theft-Protection Lock (see page 102) 11 Focus Ring 12 Zoom Ring 13 Lens Cover 14 Front Foot Parts, Names and Operations - 13 Before using this equipment This section provides explanations on parts and part names, and the items that should be verified before operating the remote control.

Owners Manual
Page 26
Viewing projected images from the front with a ceiling suspended projector Use the optional ceiling suspension unit and set the ceiling suspension parameter to [ON]. (see page 72) Viewing images projected onto half-transparent screens from the lens in order to [ON]. (see page 72) · Ceiling suspension is also possible... size and projection distance Determines the distance that the screen size is about 1.4 times the size of the optional ceiling suspension unit. The projector's Standard Lens is approximately a 1.4x zoom lens and the largest screen size is smaller than the screen. 24 -
Viewing projected images from the front with a ceiling suspended projector Use the optional ceiling suspension unit and set the ceiling suspension parameter to [ON]. (see page 72) Viewing images projected onto half-transparent screens from the lens in order to [ON]. (see page 72) · Ceiling suspension is also possible... size and projection distance Determines the distance that the screen size is about 1.4 times the size of the optional ceiling suspension unit. The projector's Standard Lens is approximately a 1.4x zoom lens and the largest screen size is smaller than the screen. 24 -

Owners Manual
Page 27
... to 4.8m 7.6m to 9.7m 11.4m to 14.6m 610X460 cm 410X300 cm 81X61 61X46 cm 120X9016c0mX122000cXm150 cm cm Center of the lens 1.1 - 1.4 1.5 - 1.8 2.3 - 2.8 3.0 - 3.8 3.8 - 4.8 7.6 - 9.7 1.4 - 14.6m Distance from the projector Point · The projection distances listed above are to be used, refer to the relevant instruction manuals for further details. · The...
... to 4.8m 7.6m to 9.7m 11.4m to 14.6m 610X460 cm 410X300 cm 81X61 61X46 cm 120X9016c0mX122000cXm150 cm cm Center of the lens 1.1 - 1.4 1.5 - 1.8 2.3 - 2.8 3.0 - 3.8 3.8 - 4.8 7.6 - 9.7 1.4 - 14.6m Distance from the projector Point · The projection distances listed above are to be used, refer to the relevant instruction manuals for further details. · The...

Owners Manual
Page 28
... lever (see page 49) 26 - When viewing from the side It is acquired by placing the center of the projector 's lens and a right-angle to move the projection position up and down with the lens shift function A A B B A:B 10:Becomes 0 When viewing from the top or bottom A:B 5:Becomes 5 Point Although the projection position can...
... lever (see page 49) 26 - When viewing from the side It is acquired by placing the center of the projector 's lens and a right-angle to move the projection position up and down with the lens shift function A A B B A:B 10:Becomes 0 When viewing from the top or bottom A:B 5:Becomes 5 Point Although the projection position can...

Owners Manual
Page 43
... Failure to observe this may result in the cover becoming malformed due to heat. 1 Connect the projector to a computer and video equipment. (see page 27, 37) 2 Remove the Lens Cover. 3 Attach the supplied Power Cord to observe this may result in the powerful light damaging ...eyesight. · Ensure that the Power Cord supplied is used. Failure to the projector. Caution Do not perform any projection tasks with the Lens Cover attached. Projecting This section provides explanations on starting and ending projection, and on . I Projection Images...
... Failure to observe this may result in the cover becoming malformed due to heat. 1 Connect the projector to a computer and video equipment. (see page 27, 37) 2 Remove the Lens Cover. 3 Attach the supplied Power Cord to observe this may result in the powerful light damaging ...eyesight. · Ensure that the Power Cord supplied is used. Failure to the projector. Caution Do not perform any projection tasks with the Lens Cover attached. Projecting This section provides explanations on starting and ending projection, and on . I Projection Images...

Owners Manual
Page 48
... the socket when the Operation Indicator is blinking in orange. Ending Foot Adjust Lever 7 Attach the lens cover. 46 - Operation Indicator Illuminated in orange Caution Do not remove the Power Plug from the socket. Steady the projector by hand, and then lift the Foot Adjust Lever with a finger and gently lower it...
... the socket when the Operation Indicator is blinking in orange. Ending Foot Adjust Lever 7 Attach the lens cover. 46 - Operation Indicator Illuminated in orange Caution Do not remove the Power Plug from the socket. Steady the projector by hand, and then lift the Foot Adjust Lever with a finger and gently lower it...

Owners Manual
Page 52
... out of signals being output by between 1.1 to 14.6 meters. · If optional lenses are being projected. 50 - In this event, clean the lens accordingly. (see page 51) · The projected image will be captured and no adjustments will not be used, refer to align the focus if the... to the relevant instruction manuals for further details. The items adjusted include the Tracking, Position and Sync. 1 Press the [ Enter] button on the projector (the [Auto] button on the type of line by the computer, there are initiated when the E-Zoom, A/V Mute or Picture-in P Preset -
... out of signals being output by between 1.1 to 14.6 meters. · If optional lenses are being projected. 50 - In this event, clean the lens accordingly. (see page 51) · The projected image will be captured and no adjustments will not be used, refer to align the focus if the... to the relevant instruction manuals for further details. The items adjusted include the Tracking, Position and Sync. 1 Press the [ Enter] button on the projector (the [Auto] button on the type of line by the computer, there are initiated when the E-Zoom, A/V Mute or Picture-in P Preset -

Owners Manual
Page 89
...G Is the Sleep Mode set at [ON], the lamp will be displayed if the [Menu] - [Settings] - [No Signal Display] parameter is displayed G Is the Lens Cover still in place? There are input for a period of thirty minutes. Refer to screen savers, etc. The [Power] button will work page 92 ·...indicator is displayed. (see page 41 G Has the power been switched off page 93 · The image color is bad page 91 · The EMP Link V will become completely black owing to the relevant items when the message is illuminated in the [A/V Mute] mode? No message will not operate ...
...G Is the Sleep Mode set at [ON], the lamp will be displayed if the [Menu] - [Settings] - [No Signal Display] parameter is displayed G Is the Lens Cover still in place? There are input for a period of thirty minutes. Refer to screen savers, etc. The [Power] button will work page 92 ·...indicator is displayed. (see page 41 G Has the power been switched off page 93 · The image color is bad page 91 · The EMP Link V will become completely black owing to the relevant items when the message is illuminated in the [A/V Mute] mode? No message will not operate ...

Owners Manual
Page 91
... will form on screen. Adjustments can also be made by regulating the [Tracking] and [Sync] buttons on the projector while monitoring the image on the surface of the lens when the projector is too large. There are cases where the image signals being input cannot be adjusted by opening the [Menu]. see...be attained in the [Auto] mode. The recommended projection distance range is blurred. · Focus can be determined in the [Auto] mode. Locate the projector within this event, switch the power off and leave the unit to the image seeming blurred. see page 95 G Is the...
... will form on screen. Adjustments can also be made by regulating the [Tracking] and [Sync] buttons on the projector while monitoring the image on the surface of the lens when the projector is too large. There are cases where the image signals being input cannot be adjusted by opening the [Menu]. see...be attained in the [Auto] mode. The recommended projection distance range is blurred. · Focus can be determined in the [Auto] mode. Locate the projector within this event, switch the power off and leave the unit to the image seeming blurred. see page 95 G Is the...

Owners Manual
Page 96
... provided at least sixty minutes after use. Allow the projector to cool down for at page 107 to cleaning any part of the projector. 94 - I Cleaning the projector, Cleaning the lens, Cleaning the Air Filter Clean the projector if it becomes soiled or if the quality of fire...shocks. Switch off . · Disconnect the Power Plug and Power Connector from their sockets when carrying out maintenance tasks. Cleaning the projector, Cleaning the lens, Cleaning the Air Filter Warning · Personnel other injuries. Observe the following when handling the Power Plug. · Do not connect...
... provided at least sixty minutes after use. Allow the projector to cool down for at page 107 to cleaning any part of the projector. 94 - I Cleaning the projector, Cleaning the lens, Cleaning the Air Filter Clean the projector if it becomes soiled or if the quality of fire...shocks. Switch off . · Disconnect the Power Plug and Power Connector from their sockets when carrying out maintenance tasks. Cleaning the projector, Cleaning the lens, Cleaning the Air Filter Warning · Personnel other injuries. Observe the following when handling the Power Plug. · Do not connect...

Owners Manual
Page 97
...becomes blocked with dirt and dust, and this may result in damage. The surface of the lens is time to prevent the dirt and dust from the casing. Cleaning the projector, Cleaning the lens, Cleaning the Air Filter - 95 Failure to observe this may result in this event. ·... stood on the open market) and special lens cleaning paper. Contact your dealer in damage or paint peeling from penetrating inside. Ensure that the projector is packaged with the replacement lamp. Cleaning the projector · Gently wipe the soiled parts of the projector with a soft cloth. · When...
...becomes blocked with dirt and dust, and this may result in damage. The surface of the lens is time to prevent the dirt and dust from the casing. Cleaning the projector, Cleaning the lens, Cleaning the Air Filter - 95 Failure to observe this may result in this event. ·... stood on the open market) and special lens cleaning paper. Contact your dealer in damage or paint peeling from penetrating inside. Ensure that the projector is packaged with the replacement lamp. Cleaning the projector · Gently wipe the soiled parts of the projector with a soft cloth. · When...

Owners Manual
Page 102
... and after service care, as well as providing details on specifications, terminology and other technical information. Mac Adapter Set Image Prezentation Camera (XGA) Image Prezentation Camera ELPAP01 ELPDC02 ELPDC03 Ceiling Bracket ELPFC02 Ceiling Plate Pipe 370 (silver, 370mm) Pipe 570 (silver, 570mm) Pipe 770... Cable (DVI-D/DVI-D, 3.0m) Digital Video Cable (DVI-D/DFP, 3.0m) Long Throw Zoom Lens Long Throw Zoom Lens Spare Lamp Rear Projection Wide Lens Standard Lens Wide Zoom Lens Dual Stacker Stacker Plus Ceiling Mount Portable Screen 60 inch Screen 80 inch Screen Remote Control Receiver ...
... and after service care, as well as providing details on specifications, terminology and other technical information. Mac Adapter Set Image Prezentation Camera (XGA) Image Prezentation Camera ELPAP01 ELPDC02 ELPDC03 Ceiling Bracket ELPFC02 Ceiling Plate Pipe 370 (silver, 370mm) Pipe 570 (silver, 570mm) Pipe 770... Cable (DVI-D/DVI-D, 3.0m) Digital Video Cable (DVI-D/DFP, 3.0m) Long Throw Zoom Lens Long Throw Zoom Lens Spare Lamp Rear Projection Wide Lens Standard Lens Wide Zoom Lens Dual Stacker Stacker Plus Ceiling Mount Portable Screen 60 inch Screen 80 inch Screen Remote Control Receiver ...

Owners Manual
Page 105
... block sequential writing 2,359,296 (Horizontal 1,024 × Vertical 768 pixels × 3) Manual (When the standard lens is in use) Manual (approximately 1:1.4) (When the standard lens is in use ) Mouse/Com port BNC connection port Video port S-Video port Remote port Stack Out port USB port...system DIN 13pin 4-system Universal serial bus Single-system RJ-45 Single-system PCMCIA Specifications - 103 net Multi-Media Projector EMP-8150/8150NL Width 303 × Height 179 × Depth 389 mm(excluding the lens and feet) 1.3-inch (Width 27mm × Height 20mm × Corner-to +60°C (with no...
... block sequential writing 2,359,296 (Horizontal 1,024 × Vertical 768 pixels × 3) Manual (When the standard lens is in use) Manual (approximately 1:1.4) (When the standard lens is in use ) Mouse/Com port BNC connection port Video port S-Video port Remote port Stack Out port USB port...system DIN 13pin 4-system Universal serial bus Single-system RJ-45 Single-system PCMCIA Specifications - 103 net Multi-Media Projector EMP-8150/8150NL Width 303 × Height 179 × Depth 389 mm(excluding the lens and feet) 1.3-inch (Width 27mm × Height 20mm × Corner-to +60°C (with no...

Owners Manual
Page 113
... 16 Change-over switch 32 Check sheet 104 Cleaning the Air Filter 95 Cleaning the Projector, Cleaning the Lens, Cleaning the Air Filter 94 Color 68 color differential 38 Color Setting 71 color temperature... 15 Port 16, 29 Computer #2 BNC Port 16, 31 computer 2 BNC port 39 Connecting external monitors 34 Connecting the projector to a computer 27 Connecting up the mouse (wireless mouse function) 35 Connecting video equipment 37 Connections of two computers 31... button 18, 69, 70 Effect Function 59 Effect menu 65 Eligible computers 27 EMP Link V 77 EMP Link V Installation 79 Ending 45 Index - 111
... 16 Change-over switch 32 Check sheet 104 Cleaning the Air Filter 95 Cleaning the Projector, Cleaning the Lens, Cleaning the Air Filter 94 Color 68 color differential 38 Color Setting 71 color temperature... 15 Port 16, 29 Computer #2 BNC Port 16, 31 computer 2 BNC port 39 Connecting external monitors 34 Connecting the projector to a computer 27 Connecting up the mouse (wireless mouse function) 35 Connecting video equipment 37 Connections of two computers 31... button 18, 69, 70 Effect Function 59 Effect menu 65 Eligible computers 27 EMP Link V 77 EMP Link V Installation 79 Ending 45 Index - 111

Owners Manual
Page 114
... K Keystone 70 Keystone button 15 112 - Index L Lamp Indicator 13, 85 Language 71 L-Audio-R Port 16 L-Audio-R ports 37 Left click 36 Lens Cover 13, 41 lens cover 46 Lens Shift Knob 13 Light button 18 M Maximum Sound Output 103 Menu button 15, 66 Menu Configuration 64 Menu Operations 66 mini D-Sub 15...
... K Keystone 70 Keystone button 15 112 - Index L Lamp Indicator 13, 85 Language 71 L-Audio-R Port 16 L-Audio-R ports 37 Left click 36 Lens Cover 13, 41 lens cover 46 Lens Shift Knob 13 Light button 18 M Maximum Sound Output 103 Menu button 15, 66 Menu Configuration 64 Menu Operations 66 mini D-Sub 15...
