
Instruction Manual
Page 5
Troubleshooting 6.1 Possible Failures 58 6.2 When Indicators Do Not Help 60 7. Menu Functions (Remote Control Only) 5.1 Learning Basic Operations 46 5.2 Video Menu 47 5.3 Audio Menu 49 5.4 Effect Menu 50 5.5 Setting Menu 51 5.6 Advanced Menu 53 5.7 About Menu 54 5.8 Reset All Menu 55 6....Notes 8.1 Optional Parts 72 8.2 Shipping Instructions 73 8.3 Glossary 74 8.4 Index 75 8.5 Specifications 77 8.6 External Dimensions 78 8.7 International Warranty System 79 3 Maintenance 7.1 Projector Cleaning, Lens Replacement, Air Intake Vent Cleaning 66 7.2 Lamp Replacement 68 8. 5.
Troubleshooting 6.1 Possible Failures 58 6.2 When Indicators Do Not Help 60 7. Menu Functions (Remote Control Only) 5.1 Learning Basic Operations 46 5.2 Video Menu 47 5.3 Audio Menu 49 5.4 Effect Menu 50 5.5 Setting Menu 51 5.6 Advanced Menu 53 5.7 About Menu 54 5.8 Reset All Menu 55 6....Notes 8.1 Optional Parts 72 8.2 Shipping Instructions 73 8.3 Glossary 74 8.4 Index 75 8.5 Specifications 77 8.6 External Dimensions 78 8.7 International Warranty System 79 3 Maintenance 7.1 Projector Cleaning, Lens Replacement, Air Intake Vent Cleaning 66 7.2 Lamp Replacement 68 8. 5.

Instruction Manual
Page 6
Cursor/Stamp Horizontal bar 4 Improved Video Image Clarity Projection of the remote control Effect button creates effective presentations. Clear, Sharp Images Though compact, your projector (6.6 liters and roughly 3.1 kilograms (6.83 pounds) ) allows easy carrying. Wireless ... Function (Remote control Effect button, see page 42) Use of distinct video images from composite video and S-video input is possible. Global Video Signal Compatibility Your unit projects virtually all of various projector functions, including cursor/stamp, horizontal bar display, and image enlargement and ...
Cursor/Stamp Horizontal bar 4 Improved Video Image Clarity Projection of the remote control Effect button creates effective presentations. Clear, Sharp Images Though compact, your projector (6.6 liters and roughly 3.1 kilograms (6.83 pounds) ) allows easy carrying. Wireless ... Function (Remote control Effect button, see page 42) Use of distinct video images from composite video and S-video input is possible. Global Video Signal Compatibility Your unit projects virtually all of various projector functions, including cursor/stamp, horizontal bar display, and image enlargement and ...

Instruction Manual
Page 15
... input of audio signal from A/V device. Press the left side of audio signal from projector. Source (Enter) Button (See page 30) Toggles the video source between Computer, S-Video, and Composite video. [Input Terminals] Computer/Component Video Terminal (See page 24) For video signal input from computer. Mouse/Com Terminal (See page 39) Used when using the...
... input of audio signal from A/V device. Press the left side of audio signal from projector. Source (Enter) Button (See page 30) Toggles the video source between Computer, S-Video, and Composite video. [Input Terminals] Computer/Component Video Terminal (See page 24) For video signal input from computer. Mouse/Com Terminal (See page 39) Used when using the...

Instruction Manual
Page 16
A/V Mute Button (See page 43) Temporarily eliminates picture and sound. R/C On Off Button (see page 29, 35) Switches projector power on and off . E-Zoom Button (See page 40) Executes the E-Zoom function. Battery Cover 14 Volume Button (See page 34) Adjusts volume. ...Button Used for addressing problems. Use this button when problems occur. Esc Button Cancels an executing function and serves as the left mouse button. Computer, S-Video, Video Button (See page 30) Switches to turn the power off . Menu Button (See page 46) Displays or cancels menus. Effect Button (See page ...
A/V Mute Button (See page 43) Temporarily eliminates picture and sound. R/C On Off Button (see page 29, 35) Switches projector power on and off . E-Zoom Button (See page 40) Executes the E-Zoom function. Battery Cover 14 Volume Button (See page 34) Adjusts volume. ...Button Used for addressing problems. Use this button when problems occur. Esc Button Cancels an executing function and serves as the left mouse button. Computer, S-Video, Video Button (See page 30) Switches to turn the power off . Menu Button (See page 46) Displays or cancels menus. Effect Button (See page ...

Instruction Manual
Page 24
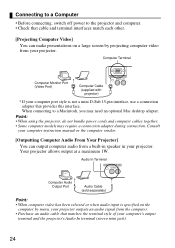
... shown on the following two requirements. [The computer must have a video signal output port] Make sure that the computer has a port that outputs a video signal. Check the resolution and frequency of the video signal in order to allow projection (some computers allow partial projection, but...Computer Computers which can be connected Some computer models may not allow connection, and others may require separate purchase of the video signal output by your projector in the instruction manual of the computer you are using for projection. 22 Make sure that the specifications of the ...
... shown on the following two requirements. [The computer must have a video signal output port] Make sure that the computer has a port that outputs a video signal. Check the resolution and frequency of the video signal in order to allow projection (some computers allow partial projection, but...Computer Computers which can be connected Some computer models may not allow connection, and others may require separate purchase of the video signal output by your projector in the instruction manual of the computer you are using for projection. 22 Make sure that the specifications of the ...
Instruction Manual
Page 26
... computer cables together. • Some computer models may need an optional Mac desktop adapter. When connecting to the projector and computer. • Check that cable and terminal interfaces match each other. [Projecting Computer Video] You can output computer audio from the computer. • Purchase an audio cable that provides this interface. Your...
... computer cables together. • Some computer models may need an optional Mac desktop adapter. When connecting to the projector and computer. • Check that cable and terminal interfaces match each other. [Projecting Computer Video] You can output computer audio from the computer. • Purchase an audio cable that provides this interface. Your...

Instruction Manual
Page 27
3.2 Connecting to an A/V Device [Inputting a Composite Video Signal] R-Audio Terminal (Red) L-Audio Terminal (White) To video terminal (Yellow) To (L) audio terminal (White) To (R) audio terminal (Red) Video Terminal (Yellow) A/V Cable (supplied with projector) [Inputting an S-Video Signal] R-Audio Terminal (Red) L-Audio Terminal (White) To S-Video Terminal A/V Cable (supplied with projector) To (L) audio terminal (White) To (R) audio terminal (Red) S-Video Cable (sold separately) S-Video Terminal 25
3.2 Connecting to an A/V Device [Inputting a Composite Video Signal] R-Audio Terminal (Red) L-Audio Terminal (White) To video terminal (Yellow) To (L) audio terminal (White) To (R) audio terminal (Red) Video Terminal (Yellow) A/V Cable (supplied with projector) [Inputting an S-Video Signal] R-Audio Terminal (Red) L-Audio Terminal (White) To S-Video Terminal A/V Cable (supplied with projector) To (L) audio terminal (White) To (R) audio terminal (Red) S-Video Cable (sold separately) S-Video Terminal 25

Instruction Manual
Page 28
... (L) audio terminal (White) To (R) audio terminal (Red) Point: • When projecting a component video image, select "YCbCr" or "YPbPr" in the Video > Input Signal menu. To D-terminal D-terminal cable (optional part) L-Audio Terminal (White) A/V cable (supplied with projector) To (L) audio terminal (White) To (R) audio terminal (Red) • If using a D terminal cable Computer/Component Terminal...
... (L) audio terminal (White) To (R) audio terminal (Red) Point: • When projecting a component video image, select "YCbCr" or "YPbPr" in the Video > Input Signal menu. To D-terminal D-terminal cable (optional part) L-Audio Terminal (White) A/V cable (supplied with projector) To (L) audio terminal (White) To (R) audio terminal (Red) • If using a D terminal cable Computer/Component Terminal...

Instruction Manual
Page 29
Audio will no longer be output from the projector speaker. • Though the projector outputs audio for projected video images, in the case of A/V devices, the audio output corresponds to the audio devices connected to a PA system, active speaker system, or...ring) connecting to a 3.5mm (0.14inches) stereo mini-jack plug. 3.3 Providing Sound Through an External Audio Device Connecting the Audio Out terminal of your projector to the L/R audio terminals. • Before purchasing an audio connection cable, thoroughly check the connection interface style of the external audio devices you are...
Audio will no longer be output from the projector speaker. • Though the projector outputs audio for projected video images, in the case of A/V devices, the audio output corresponds to the audio devices connected to a PA system, active speaker system, or...ring) connecting to a 3.5mm (0.14inches) stereo mini-jack plug. 3.3 Providing Sound Through an External Audio Device Connecting the Audio Out terminal of your projector to the L/R audio terminals. • Before purchasing an audio connection cable, thoroughly check the connection interface style of the external audio devices you are...
Instruction Manual
Page 33
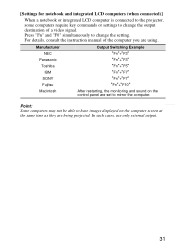
In such cases, use only external output. 31 [Settings for notebook and integrated LCD computers (when connected)] When a notebook or integrated LCD computer is connected to the projector, some computers require key commands or settings to change the setting. Press "Fn" and "F0" simultaneously to mirror the computer. Manufacturer NEC Panasonic Toshiba IBM .... Point: Some computers may not be able to have images displayed on the control panel are being projected. For details, consult the instruction manual of a video signal.
In such cases, use only external output. 31 [Settings for notebook and integrated LCD computers (when connected)] When a notebook or integrated LCD computer is connected to the projector, some computers require key commands or settings to change the setting. Press "Fn" and "F0" simultaneously to mirror the computer. Manufacturer NEC Panasonic Toshiba IBM .... Point: Some computers may not be able to have images displayed on the control panel are being projected. For details, consult the instruction manual of a video signal.

Instruction Manual
Page 34
...your desired angle of projection. Release the foot levers. Turn the lower portion of the projector. Point: Setting back the front feet (see page 36) 32 Lift the projector to your fingers to pull up position and projection size. Adjusting the Image Projection Angle Adjust... to make fine adjustments to the height. Make fine adjustments to height. Raise Lower 4. Front feet emerge. 3. Adjust the projector to obtain the best video performance. Foot Levers 2. See "2. Setup" for details on setting-up the foot levers. 3.5 Adjusting Images This section describes ...
...your desired angle of projection. Release the foot levers. Turn the lower portion of the projector. Point: Setting back the front feet (see page 36) 32 Lift the projector to your fingers to pull up position and projection size. Adjusting the Image Projection Angle Adjust... to make fine adjustments to the height. Make fine adjustments to height. Raise Lower 4. Front feet emerge. 3. Adjust the projector to obtain the best video performance. Foot Levers 2. See "2. Setup" for details on setting-up the foot levers. 3.5 Adjusting Images This section describes ...

Instruction Manual
Page 35
...The keystone correction is changed. • If a keystone correction makes the image noticeably uneven, reduce the video sharpness with condensation. You will need to readjust the image if the projector is moved to change the projection angle, the keystone correction function can be achieved if the lens is ...dirty or covered with the menu commands Video > Sharpness (see page 66). • If adjustment does not...
...The keystone correction is changed. • If a keystone correction makes the image noticeably uneven, reduce the video sharpness with condensation. You will need to readjust the image if the projector is moved to change the projection angle, the keystone correction function can be achieved if the lens is ...dirty or covered with the menu commands Video > Sharpness (see page 66). • If adjustment does not...

Instruction Manual
Page 51
... selected). To reset all menus to a submenu. Adjusts the tone of the displayed video is selected. (Example: When computer video is displayed, computer audio input is a component video signal, select Video.) Auto : Audio input matching that of sound output from the projector. +: Increases treble. - : Decreases treble. 5.3 Audio Menu Displaying Menus Press the Menu button, ...shipping values. * See page 56 for factory shipping values. Settings Menu Volume Tone Audio Input Reset Content Adjusts the volume of sound output from the projector. +: Increases volume. - : Decreases volume.
... selected). To reset all menus to a submenu. Adjusts the tone of the displayed video is selected. (Example: When computer video is displayed, computer audio input is a component video signal, select Video.) Auto : Audio input matching that of sound output from the projector. +: Increases treble. - : Decreases treble. 5.3 Audio Menu Displaying Menus Press the Menu button, ...shipping values. * See page 56 for factory shipping values. Settings Menu Volume Tone Audio Input Reset Content Adjusts the volume of sound output from the projector. +: Increases volume. - : Decreases volume.

Instruction Manual
Page 53
... move to readjust the image if the projection angle is changed. • If a keystone correction makes the image noticeably uneven, reduce the video sharpness with the Keystone button on the projector. • A keystone correction reduces screen size. • The keystone correction is stored in trapezoidal form, adjust it to normal display. -: Broadens...
... move to readjust the image if the projection angle is changed. • If a keystone correction makes the image noticeably uneven, reduce the video sharpness with the Keystone button on the projector. • A keystone correction reduces screen size. • The keystone correction is stored in trapezoidal form, adjust it to normal display. -: Broadens...

Instruction Manual
Page 54
...an external source for factory shipping values. To reset all menus to use the Reset All menu. 52 After sleep mode is activated, the projector enters standby mode when no signal is displayed. ON : Sleep Mode active OFF : Sleep Mode inactive Returns Setting menu settings to focus ...attention on the presenter or elsewhere. Menu A/V Mute* (See page 74) Sleep Mode Reset Content Temporarily eliminates video during a presentation in order to their factory shipping values. * See page 56 for a continuous period of 30 minutes. Blue : A blue screen is...
...an external source for factory shipping values. To reset all menus to use the Reset All menu. 52 After sleep mode is activated, the projector enters standby mode when no signal is displayed. ON : Sleep Mode active OFF : Sleep Mode inactive Returns Setting menu settings to focus ...attention on the presenter or elsewhere. Menu A/V Mute* (See page 74) Sleep Mode Reset Content Temporarily eliminates video during a presentation in order to their factory shipping values. * See page 56 for a continuous period of 30 minutes. Blue : A blue screen is...

Instruction Manual
Page 55
... color. - : Weakens color. Select "RGB" and press the Enter button to their factory shipping values. * See page 56 for projection with the projector hanging from the rear of the video. OFF : Restores original. Use color temperature or RGB to create settings. Select "Color Temp" and press the Enter button to create settings...
... color. - : Weakens color. Select "RGB" and press the Enter button to their factory shipping values. * See page 56 for projection with the projector hanging from the rear of the video. OFF : Restores original. Use color temperature or RGB to create settings. Select "Color Temp" and press the Enter button to create settings...
Instruction Manual
Page 61
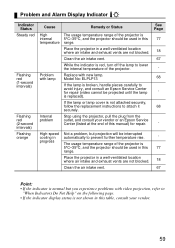
... the indicator display status is not shown in this table, consult your vendor or an Epson Service Center (listed at the end of this manual) for repair (video cannot be projected until the lamp is replaced). Place the projector in a well-ventilated location where air intake and exhaust vents are not blocked. The...
... the indicator display status is not shown in this table, consult your vendor or an Epson Service Center (listed at the end of this manual) for repair (video cannot be projected until the lamp is replaced). Place the projector in a well-ventilated location where air intake and exhaust vents are not blocked. The...
Instruction Manual
Page 62
...projector lamp shuts off automatically. • Is video brightness adjusted correctly? See page 31 A video signal is normally output only to on and no video signal is input for any changes to be made to external output. Some computer models do not display video on ? See page 52 If Sleep Mode is set to an LCD...mode? [A Message Appears] Display shows "Not Supported". See page 30 Press the Source button on the projector (Computer, Video, or S-Video on ? See page 30 • Is a video signal output from your computer is a compatible mode. See page 52 • Is the computer's screen...
...projector lamp shuts off automatically. • Is video brightness adjusted correctly? See page 31 A video signal is normally output only to on and no video signal is input for any changes to be made to external output. Some computer models do not display video on ? See page 52 If Sleep Mode is set to an LCD...mode? [A Message Appears] Display shows "Not Supported". See page 30 Press the Source button on the projector (Computer, Video, or S-Video on ? See page 30 • Is a video signal output from your computer is a compatible mode. See page 52 • Is the computer's screen...

Instruction Manual
Page 63
... to normal. • Press the Auto button on the remote control. See page 48 Select the correct input signal settings by selecting Menu > Video > Input Signal. See page 33 • Is the projection distance optimal? See page 18 • Is the lens covered with condensation and ...8226; Is the projection beam facing the screen directly? After a short period, the image should return to select a video signal format. See page 34 • Have you carry the projector from a cold room into a warm room, the lens may become covered with condensation? See page 20 The recommended ...
... to normal. • Press the Auto button on the remote control. See page 48 Select the correct input signal settings by selecting Menu > Video > Input Signal. See page 33 • Is the projection distance optimal? See page 18 • Is the lens covered with condensation and ...8226; Is the projection beam facing the screen directly? After a short period, the image should return to select a video signal format. See page 34 • Have you carry the projector from a cold room into a warm room, the lens may become covered with condensation? See page 20 The recommended ...

Instruction Manual
Page 64
... format. Consult your computer instruction manual with the projector. See page 23 Set your notebook type or integrated LCD-type computer. See page 48 Use the Menu > Video > Mode menu items to adjust. • Are the video signal mode settings correct? Auto detection according to video signal input is Undersized • Image Disappears • Undersized...
... format. Consult your computer instruction manual with the projector. See page 23 Set your notebook type or integrated LCD-type computer. See page 48 Use the Menu > Video > Mode menu items to adjust. • Are the video signal mode settings correct? Auto detection according to video signal input is Undersized • Image Disappears • Undersized...


