Product Information Guide
Page 1
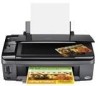
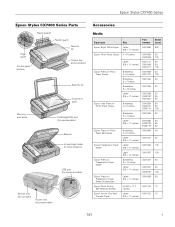
Epson Stylus CX7400 Series Epson Stylus CX7400 Series Parts Edge guide Control panel buttons Paper support Feeder guard Scanner lid Output tray and extensions Memory card slots Scanner lid Document table PictBridge/USB port (for camera cable) Scanner Ink cartridge holder (in home position) USB port (for computer cable) Service only (do not open) Power inlet (for power...
Epson Stylus CX7400 Series Epson Stylus CX7400 Series Parts Edge guide Control panel buttons Paper support Feeder guard Scanner lid Output tray and extensions Memory card slots Scanner lid Document table PictBridge/USB port (for camera cable) Scanner Ink cartridge holder (in home position) USB port (for computer cable) Service only (do not open) Power inlet (for power...
Product Information Guide
Page 2
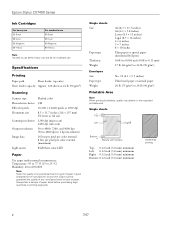
... Scanning resolution Output resolution Image data Light source Flatbed color CIS 10,200 × 14,040 pixels at any time, Epson cannot guarantee the quality of any particular brand or type of paper stock before purchasing large quantities or printing large jobs. Epson Stylus CX7400 Series Ink Cartridges For heavy use 69 Black 69 Cyan 69...
... Scanning resolution Output resolution Image data Light source Flatbed color CIS 10,200 × 14,040 pixels at any time, Epson cannot guarantee the quality of any particular brand or type of paper stock before purchasing large quantities or printing large jobs. Epson Stylus CX7400 Series Ink Cartridges For heavy use 69 Black 69 Cyan 69...
Product Information Guide
Page 3
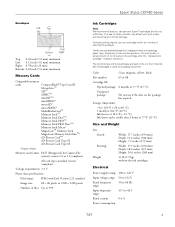
Color Cyan, magenta, yellow, black Part number 69 or 88 Cartridge life Opened package: 6 months at 77 °F (25 °C) Unopened package: Do not use up a cartridge within six months of ink remains in printer damage. Epson Stylus CX7400 Series Envelopes Left Top Bottom Right Top: 0.20 inch (5.0 mm) ... 3.3 V Photo data specifications File format: JPEG with full cartridges and part of the ink from this first set of files: Up to 60.5 0.6 A 7/07 3 The use of use genuine Epson® cartridges and do not refill them. Yields vary considerably based on the...
Color Cyan, magenta, yellow, black Part number 69 or 88 Cartridge life Opened package: 6 months at 77 °F (25 °C) Unopened package: Do not use up a cartridge within six months of ink remains in printer damage. Epson Stylus CX7400 Series Envelopes Left Top Bottom Right Top: 0.20 inch (5.0 mm) ... 3.3 V Photo data specifications File format: JPEG with full cartridges and part of the ink from this first set of files: Up to 60.5 0.6 A 7/07 3 The use of use genuine Epson® cartridges and do not refill them. Yields vary considerably based on the...
Product Information Guide
Page 8
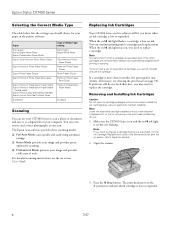
Epson Stylus CX7400 Series Selecting the Correct Media Type The table below lists the settings you should choose for details). 2. When the red B ink light flashes, a cartridge is low or expended. 8 7/07 If printouts still do not look their best, you need to replace a cartridge. Note: If you have obtained a replacement, or the ink remaining in...
Epson Stylus CX7400 Series Selecting the Correct Media Type The table below lists the settings you should choose for details). 2. When the red B ink light flashes, a cartridge is low or expended. 8 7/07 If printouts still do not look their best, you need to replace a cartridge. Note: If you have obtained a replacement, or the ink remaining in...
Product Information Guide
Page 9
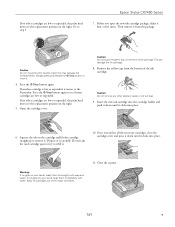
... try to refill it moves to the _ position. this may damage the CX7400 Series. Squeeze the tab on the cartridge and lift the cartridge straight up to remove it from the bottom of the cartridge. Warning: If ink gets on your eyes, flush them thoroughly with water....moves to the replacement position on the right. 5. If no other cartridges are low or expended. Before you replace all the necessary cartridges, close the cartridge cover and press it down until it clicks into place. Epson Stylus CX7400 Series 7. Remove the yellow tape from the package. Caution: Do...
... try to refill it moves to the _ position. this may damage the CX7400 Series. Squeeze the tab on the cartridge and lift the cartridge straight up to remove it from the bottom of the cartridge. Warning: If ink gets on your eyes, flush them thoroughly with water....moves to the replacement position on the right. 5. If no other cartridges are low or expended. Before you replace all the necessary cartridges, close the cartridge cover and press it down until it clicks into place. Epson Stylus CX7400 Series 7. Remove the yellow tape from the package. Caution: Do...
Product Information Guide
Page 10
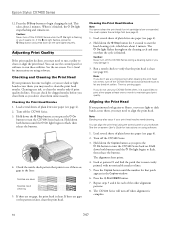
...noticeable streaks or lines. 5. Note: Banding may need cleaning 5. Look at least once a month to clean or align the print head. Epson Stylus CX7400 Series 12. Checking and Cleaning the Print Head If your printouts become too light, or you may also occur if your printouts look grainy or... of plain letter-size paper (see page 10). Cleaning the Print Head Nozzles Note: You cannot clean the print head if an ink cartridge is clean (see page 4). 2. Press the Copies button until the number for instructions on using software. 1. Load several sheets of plain...
...noticeable streaks or lines. 5. Note: Banding may need cleaning 5. Look at least once a month to clean or align the print head. Epson Stylus CX7400 Series 12. Checking and Cleaning the Print Head If your printouts become too light, or you may also occur if your printouts look grainy or... of plain letter-size paper (see page 10). Cleaning the Print Head Nozzles Note: You cannot clean the print head if an ink cartridge is clean (see page 4). 2. Press the Copies button until the number for instructions on using software. 1. Load several sheets of plain...
Product Information Guide
Page 11
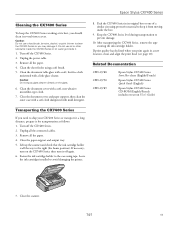
... you print again in its best, you may damage it. Lift up the scanner and check that the ink cartridge holder is all the connected cables. 3. Epson Stylus CX7400 Series Cleaning the CX7400 Series To keep the CX7400 Series working at its original box or one of a similar size using protective material to keep it from...
... you print again in its best, you may damage it. Lift up the scanner and check that the ink cartridge holder is all the connected cables. 3. Epson Stylus CX7400 Series Cleaning the CX7400 Series To keep the CX7400 Series working at its original box or one of a similar size using protective material to keep it from...
Quick Reference Guide
Page 2
... Correcting Photos 25 Maintaining Your All-in-One 26 Checking the Print Head Nozzles 26 Cleaning the Print Head 27 Checking the Ink Cartridge Status 28 Replacing Ink Cartridges 29 Solving Problems 34 Checking for Software Updates 34 Error Indicators 35 Problems and Solutions 36 Where To Get Help 38 Notices 40...
... Correcting Photos 25 Maintaining Your All-in-One 26 Checking the Print Head Nozzles 26 Cleaning the Print Head 27 Checking the Ink Cartridge Status 28 Replacing Ink Cartridges 29 Solving Problems 34 Checking for Software Updates 34 Error Indicators 35 Problems and Solutions 36 Where To Get Help 38 Notices 40...
Quick Reference Guide
Page 21
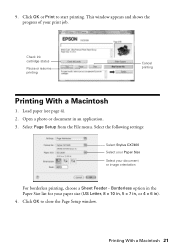
Select Page Setup from the File menu. Select the following settings: Select Stylus CX7400 Select your Paper Size Select your paper size (US Letter, 8 × 10 in, 5 × 7 in, or 4 × 6 in). 4. Click OK or Print to close the ... document in the Paper Size list for your document or image orientation For borderless printing, choose a Sheet Feeder - 9. Borderless option in an application. 3. Check ink cartridge status Pause or resume printing Cancel printing Printing With a Macintosh 1. This window appears and shows the progress of your print job. Click OK to start...
Select Page Setup from the File menu. Select the following settings: Select Stylus CX7400 Select your Paper Size Select your paper size (US Letter, 8 × 10 in, 5 × 7 in, or 4 × 6 in). 4. Click OK or Print to close the ... document in the Paper Size list for your document or image orientation For borderless printing, choose a Sheet Feeder - 9. Borderless option in an application. 3. Check ink cartridge status Pause or resume printing Cancel printing Printing With a Macintosh 1. This window appears and shows the progress of your print job. Click OK to start...
Quick Reference Guide
Page 26
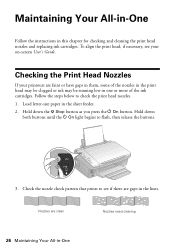
... them, some of the nozzles in the print head may be clogged or ink may be running low in one or more of the ink cartridges. Follow the steps below to flash, then release the buttons. 3. Check the nozzle check pattern that prints to see your printouts are clean Nozzles need... 26 Maintaining Your All-in the lines. Load letter-size paper in this chapter for checking and cleaning the print head nozzles and replacing ink cartridges. Maintaining Your All-in-One Follow the instructions in the sheet feeder. 2. Hold down both buttons until the P On light begins to check the print...
... them, some of the nozzles in the print head may be clogged or ink may be running low in one or more of the ink cartridges. Follow the steps below to flash, then release the buttons. 3. Check the nozzle check pattern that prints to see your printouts are clean Nozzles need... 26 Maintaining Your All-in the lines. Load letter-size paper in this chapter for checking and cleaning the print head nozzles and replacing ink cartridges. Maintaining Your All-in-One Follow the instructions in the sheet feeder. 2. Hold down both buttons until the P On light begins to check the print...
Quick Reference Guide
Page 27
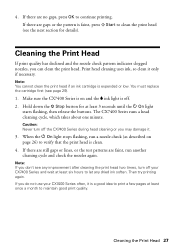
4. You must replace the cartridge first (see the next section for at least 3 seconds until the P On light starts flashing, then release the buttons. Note: If you do not use your CX7400 Series and wait at least once a month to continue printing. Print head cleaning uses ink, so clean it . 3. If you...or low. Note: You cannot clean the print head if an ink cartridge is faint, press x Start to let any improvement after cleaning the print head two times, turn off your CX7400 Series often, it is clean. 4. Make sure the CX7400 Series is on page 26) to verify that the print head is...
4. You must replace the cartridge first (see the next section for at least 3 seconds until the P On light starts flashing, then release the buttons. Note: If you do not use your CX7400 Series and wait at least once a month to continue printing. Print head cleaning uses ink, so clean it . 3. If you...or low. Note: You cannot clean the print head if an ink cartridge is faint, press x Start to let any improvement after cleaning the print head two times, turn off your CX7400 Series often, it is clean. 4. Make sure the CX7400 Series is on page 26) to verify that the print head is...
Quick Reference Guide
Page 28
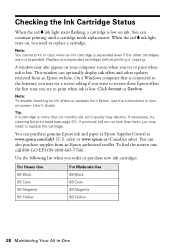
... -One To find the nearest one, call 800-GO-EPSON (800-463-7766). You can purchase genuine Epson ink and paper at Epson Supplies Central at www.epson.com/ink3 (U.S. Click Accept or Decline. You can continue printing until a cartridge needs replacement. This window can also purchase supplies from an...reseller. If printouts still do not look their best, you try to replace a cartridge. When the red B ink light stays on -screen User's Guide. sales) or www.epson.ca (Canadian sales). Tip: If a cartridge is more than six months old, print quality may also appear on your on ...
... -One To find the nearest one, call 800-GO-EPSON (800-463-7766). You can purchase genuine Epson ink and paper at Epson Supplies Central at www.epson.com/ink3 (U.S. Click Accept or Decline. You can continue printing until a cartridge needs replacement. This window can also purchase supplies from an...reseller. If printouts still do not look their best, you try to replace a cartridge. When the red B ink light stays on -screen User's Guide. sales) or www.epson.ca (Canadian sales). Tip: If a cartridge is more than six months old, print quality may also appear on your on ...
Quick Reference Guide
Page 29
... of use, and temperature. You must install new cartridges immediately after the "replace cartridge" indicator comes on but not flashing. Make sure the CX7400 Series is on and the red B ink light is on . Note: If you need to change a cartridge before you begin. See the on images printed, ... based on -screen User's Guide for moderate use. For best printing results, use genuine Epson cartridges and do not refill them. Note: Leave the expended cartridge installed until you use up a cartridge within six months of other products may affect your print quality and could result in the ...
... of use, and temperature. You must install new cartridges immediately after the "replace cartridge" indicator comes on but not flashing. Make sure the CX7400 Series is on and the red B ink light is on . Note: If you need to change a cartridge before you begin. See the on images printed, ... based on -screen User's Guide for moderate use. For best printing results, use genuine Epson cartridges and do not refill them. Note: Leave the expended cartridge installed until you use up a cartridge within six months of other products may affect your print quality and could result in the ...
Quick Reference Guide
Page 30
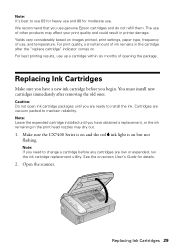
The print head moves to the _ position to indicate which cartridge is low or expended, it . 4. 3. Always press and release the y Stop button to move the print head by hand; Press the y Stop button again to see if any more cartridges are low or expended. ■ If no other cartridges are low or expended, the print head moves to the _ position. this may damage your CX7400 Series. Press the y Stop button. Press the y Stop button again. ■ If another cartridge is low or expended. Caution: Do not move it moves to the replacement position. 30 Maintaining Your All-in-One
The print head moves to the _ position to indicate which cartridge is low or expended, it . 4. 3. Always press and release the y Stop button to move the print head by hand; Press the y Stop button again to see if any more cartridges are low or expended. ■ If no other cartridges are low or expended, the print head moves to the _ position. this may damage your CX7400 Series. Press the y Stop button. Press the y Stop button again. ■ If another cartridge is low or expended. Caution: Do not move it moves to the replacement position. 30 Maintaining Your All-in-One
Quick Reference Guide
Page 31
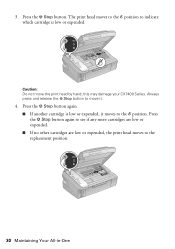
... or try to refill it four or five times. Before you open the new cartridge package, shake it . This can damage the ink cartridge. Squeeze the tab on the cartridge and lift it carefully. Dispose of it up. If ink gets into your hands, wash them immediately with soap and ...water. Replacing Ink Cartridges 31 5. Open the cartridge cover. 6. Warning: If ink gets on the front of children....
... or try to refill it four or five times. Before you open the new cartridge package, shake it . This can damage the ink cartridge. Squeeze the tab on the cartridge and lift it carefully. Dispose of it up. If ink gets into your hands, wash them immediately with soap and ...water. Replacing Ink Cartridges 31 5. Open the cartridge cover. 6. Warning: If ink gets on the front of children....
Quick Reference Guide
Page 32
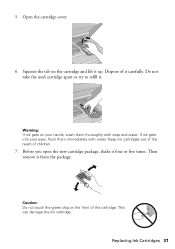
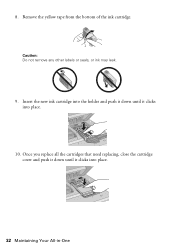
Once you replace all the cartridges that need replacing, close the cartridge cover and push it down until it clicks into place. 32 Maintaining Your All-in-One Caution: Do not remove any other labels or seals, or ink may leak. 9. 8. Remove the yellow tape from the bottom of the ink cartridge. Insert the new ink cartridge into the holder and push it down until it clicks into place. 10.
Once you replace all the cartridges that need replacing, close the cartridge cover and push it down until it clicks into place. 32 Maintaining Your All-in-One Caution: Do not remove any other labels or seals, or ink may leak. 9. 8. Remove the yellow tape from the bottom of the ink cartridge. Insert the new ink cartridge into the holder and push it down until it clicks into place. 10.
Quick Reference Guide
Page 33
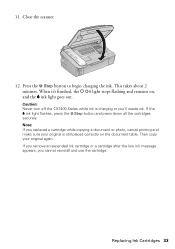
Caution: Never turn off the CX7400 Series while ink is still placed correctly on , and the B ink light goes out. If the B ink light flashes, press the y Stop button and press down all the cartridges securely. When it's finished, the P On light stops flashing and remains on the document... button to begin charging the ink. This takes about 2 minutes. Replacing Ink Cartridges 33 Then copy your original is charging or you cannot reinstall and use the cartridge. If you remove an expended ink cartridge or a cartridge after the low ink message appears, you 'll waste ink. 11. Close the...
Caution: Never turn off the CX7400 Series while ink is still placed correctly on , and the B ink light goes out. If the B ink light flashes, press the y Stop button and press down all the cartridges securely. When it's finished, the P On light stops flashing and remains on the document... button to begin charging the ink. This takes about 2 minutes. Replacing Ink Cartridges 33 Then copy your original is charging or you cannot reinstall and use the cartridge. If you remove an expended ink cartridge or a cartridge after the low ink message appears, you 'll waste ink. 11. Close the...
Quick Reference Guide
Page 35
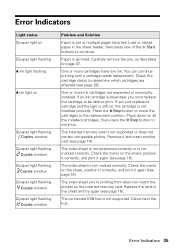
...The inserted memory card is not marked correctly. The index sheet is not supported or does not contain compatible photos. One or more ink cartridges are affected (see page 16). If you 're printing from does not match the photos on the inserted memory card. Press the y ...ink. Press down on page 37. Replace the card or the sheet and try again (see page 14). Error Indicators 35 Check the cartridge status to determine which cartridges are expended or incorrectly installed. Error Indicators Light status b paper light on b paper light flashing B ink light flashing B ink light...
...The inserted memory card is not marked correctly. The index sheet is not supported or does not contain compatible photos. One or more ink cartridges are affected (see page 16). If you 're printing from does not match the photos on the inserted memory card. Press the y ...ink. Press down on page 37. Replace the card or the sheet and try again (see page 14). Error Indicators 35 Check the cartridge status to determine which cartridges are expended or incorrectly installed. Error Indicators Light status b paper light on b paper light flashing B ink light flashing B ink light...
Quick Reference Guide
Page 37
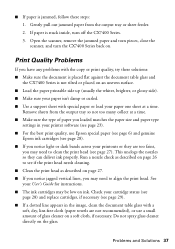
...Remove sheets from the output tray or sheet feeder. 2. This unclogs the nozzles so they are not recommended), or use Epson special paper (see page 6) and genuine Epson ink cartridges (see page 27). See your printouts or they can deliver ink properly. Run a nozzle check as described on page ... back on. Open the scanner, remove the jammed paper and torn pieces, close the scanner, and turn off the CX7400 Series. 3. Check your cartridge status (see page 28) and replace cartridges, if necessary (see page 29). ■ If a dotted line appears in your printer software (see page 23). &#...
...Remove sheets from the output tray or sheet feeder. 2. This unclogs the nozzles so they are not recommended), or use Epson special paper (see page 6) and genuine Epson ink cartridges (see page 27). See your printouts or they can deliver ink properly. Run a nozzle check as described on page ... back on. Open the scanner, remove the jammed paper and torn pieces, close the scanner, and turn off the CX7400 Series. 3. Check your cartridge status (see page 28) and replace cartridges, if necessary (see page 29). ■ If a dotted line appears in your printer software (see page 23). &#...
Quick Reference Guide
Page 41
if the product does not operate normally or exhibits a distinct change in the same environment as the CX7400 Series. Adjust only those controls that the cartridge touches. otherwise ink may leak from dirt and dust and store it upside down; If ink gets on its side, or turn... personnel under the following conditions: if the power cord or plug is a valve in your hand inside the CX7400 Series or touch any cartridges during printing. ■ Install a new ink cartridge immediately after removing an expended one. if the product has been dropped or the case damaged; ■ Unplug...
if the product does not operate normally or exhibits a distinct change in the same environment as the CX7400 Series. Adjust only those controls that the cartridge touches. otherwise ink may leak from dirt and dust and store it upside down; If ink gets on its side, or turn... personnel under the following conditions: if the power cord or plug is a valve in your hand inside the CX7400 Series or touch any cartridges during printing. ■ Install a new ink cartridge immediately after removing an expended one. if the product has been dropped or the case damaged; ■ Unplug...


