
User Manual
Page 4
... Wired Network Settings 52 Wireless Network Projection ...55 Installing the Wireless LAN Module 56 Using Quick Wireless Connection (Windows Only 57 Selecting Wireless Network Settings Manually 58 Wireless LAN Menu Settings ...61 Selecting Wireless Network Settings in Windows 62 Selecting Wireless Network Settings in Mac OS X 62 Setting Up Wireless Network...
... Wired Network Settings 52 Wireless Network Projection ...55 Installing the Wireless LAN Module 56 Using Quick Wireless Connection (Windows Only 57 Selecting Wireless Network Settings Manually 58 Wireless LAN Menu Settings ...61 Selecting Wireless Network Settings in Windows 62 Selecting Wireless Network Settings in Mac OS X 62 Setting Up Wireless Network...

User Manual
Page 6
... 108 Installing a Security Cable ...108 Creating a User Pattern to Display 109 Using the Interactive Pens...110 Using the Pens ...110 Calibrating Automatically ...112 Calibrating Manually ...114 Using BrightLink With a Computer 117 Adjusting the Pen Operation Area 118 Easy Interactive Tools ...120 Easy Interactive Tools System Requirements 120 Installing Easy Interactive Tools 121...
... 108 Installing a Security Cable ...108 Creating a User Pattern to Display 109 Using the Interactive Pens...110 Using the Pens ...110 Calibrating Automatically ...112 Calibrating Manually ...114 Using BrightLink With a Computer 117 Adjusting the Pen Operation Area 118 Easy Interactive Tools ...120 Easy Interactive Tools System Requirements 120 Installing Easy Interactive Tools 121...

User Manual
Page 9
... Appears 198 Solutions When "Error Occurred in the Easy Interactive Function" Message Appears 198 Solutions When the Interactive Pens Do Not Work 198 Solutions When Manual Calibration is Difficult 199 Solutions When the Built-In Toolbar Does Not Work 199 Solutions When the Interactive Pen Position Is Not Accurate 200 Solutions...
... Appears 198 Solutions When "Error Occurred in the Easy Interactive Function" Message Appears 198 Solutions When the Interactive Pens Do Not Work 198 Solutions When Manual Calibration is Difficult 199 Solutions When the Built-In Toolbar Does Not Work 199 Solutions When the Interactive Pen Position Is Not Accurate 200 Solutions...
User Manual
Page 12
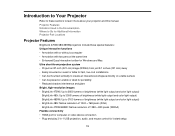
... include these sections to 3100 lumens of brightness (white light output and color light output) • BrightLink 480i: Native resolution of 1024 × 768 pixels (XGA) BrightLink 475Wi/485Wi: Native resolution of 1280 × 800 pixels (WXGA) Flexible connectivity • HDMI port for computer..., high-resolution images • BrightLink 475Wi: Up to 2600 lumens of brightness (white light output and color light output) BrightLink 480i: Up to 3000 lumens of brightness (white light output and color light output) BrightLink 485Wi: Up to learn more about your projector and this manual.
... include these sections to 3100 lumens of brightness (white light output and color light output) • BrightLink 480i: Native resolution of 1024 × 768 pixels (XGA) BrightLink 475Wi/485Wi: Native resolution of 1280 × 800 pixels (WXGA) Flexible connectivity • HDMI port for computer..., high-resolution images • BrightLink 475Wi: Up to 2600 lumens of brightness (white light output and color light output) BrightLink 480i: Up to 3000 lumens of brightness (white light output and color light output) BrightLink 485Wi: Up to learn more about your projector and this manual.

User Manual
Page 18
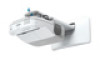
... and e-mail your projector. Front/Top Projector Parts - Remote Control Parent topic: Introduction to get help after checking this manual and the sources listed above, you can use the EPSON PrivateLine Support service to Your Projector Projector Parts - Base Projector Parts - Front/Top 18 Projector Parts - Parent topic: ...Parts - Control Panel Projector Parts - Interactive Pens Projector Parts - For details, see "Where to learn about the parts on your questions to Epson technical support 24 hours a day. • If you still need help fast. Side Projector Parts -
... and e-mail your projector. Front/Top Projector Parts - Remote Control Parent topic: Introduction to get help after checking this manual and the sources listed above, you can use the EPSON PrivateLine Support service to Your Projector Projector Parts - Base Projector Parts - Front/Top 18 Projector Parts - Parent topic: ...Parts - Control Panel Projector Parts - Interactive Pens Projector Parts - For details, see "Where to learn about the parts on your questions to Epson technical support 24 hours a day. • If you still need help fast. Side Projector Parts -

User Manual
Page 47
...the document camera's manual for instructions. 1. Connect the other end of different types, or mix new and old batteries. 47 Connecting to a Document Camera You can connect the EPSON DC-06 document camera to your projector's Computer port. You may be able to connect different EPSON document camera models... to your projector's USB-A port to project images viewed by software, connect the EPSON DC-06 document camera to your computer instead of batteries specified in the Remote ...
...the document camera's manual for instructions. 1. Connect the other end of different types, or mix new and old batteries. 47 Connecting to a Document Camera You can connect the EPSON DC-06 document camera to your projector's Computer port. You may be able to connect different EPSON document camera models... to your projector's USB-A port to project images viewed by software, connect the EPSON DC-06 document camera to your computer instead of batteries specified in the Remote ...

User Manual
Page 54
... on the remote control to highlight characters and press Enter to select them. 7. Press the arrow buttons on the remote control. You must set addresses manually, turn on a security password to prevent access to enter the name, passwords and keyword. To select a highlighted number, press Enter. 54 Note: Use the displayed...
... on the remote control to highlight characters and press Enter to select them. 7. Press the arrow buttons on the remote control. You must set addresses manually, turn on a security password to prevent access to enter the name, passwords and keyword. To select a highlighted number, press Enter. 54 Note: Use the displayed...
User Manual
Page 55
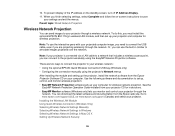
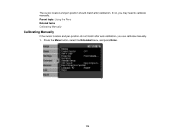
... Software CD on your wireless network: • Using the optional EPSON Quick Wireless Connection USB key (Windows only) • Configuring the connection manually using the EasyMP Network Projection software. Go to www.epson.com/support (U.S.) or www.epson.ca/support (Canada) and select your projector is connected via a LAN cable to the projector wirelessly...
... Software CD on your wireless network: • Using the optional EPSON Quick Wireless Connection USB key (Windows only) • Configuring the connection manually using the EasyMP Network Projection software. Go to www.epson.com/support (U.S.) or www.epson.ca/support (Canada) and select your projector is connected via a LAN cable to the projector wirelessly...

User Manual
Page 58
... Quick Wireless Connection driver. After a few minutes, your computer or notebook. Run your wireless LAN connection. Parent topic: Wireless Network Projection Selecting Wireless Network Settings Manually Before you must select the network settings for the projector using its menu system. 1. Turn on -screen instructions to reactivate your presentation as necessary. 7. Follow...
... Quick Wireless Connection driver. After a few minutes, your computer or notebook. Run your wireless LAN connection. Parent topic: Wireless Network Projection Selecting Wireless Network Settings Manually Before you must select the network settings for the projector using its menu system. 1. Turn on -screen instructions to reactivate your presentation as necessary. 7. Follow...
User Manual
Page 62
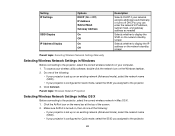
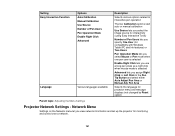
... wireless network in Windows Before connecting to the projector, select the correct wireless network on the network standby screen Parent topic: Selecting Wireless Network Settings Manually Selecting Wireless Network Settings in Mac OS X. 1. Setting IP Settings SSID Display IP Address Display Options DHCP (On or Off) IP Address Subnet Mask Gateway...
... wireless network in Windows Before connecting to the projector, select the correct wireless network on the network standby screen Parent topic: Selecting Wireless Network Settings Manually Selecting Wireless Network Settings in Mac OS X. 1. Setting IP Settings SSID Display IP Address Display Options DHCP (On or Off) IP Address Subnet Mask Gateway...

User Manual
Page 111
Note: For best performance, hold the pen perpendicular to use the pen as shown below. Calibrating Automatically Calibrating Manually Parent topic: Using the Interactive Pens 111 If the battery is low, the light flashes. Do not cover the black section near the tip of ...
Note: For best performance, hold the pen perpendicular to use the pen as shown below. Calibrating Automatically Calibrating Manually Parent topic: Using the Interactive Pens 111 If the battery is low, the light flashes. Do not cover the black section near the tip of ...

User Manual
Page 113
Select the Easy Interactive Function setting and press Enter. 3. Adjust the focus if necessary, by opening the cover on the side of the projector and sliding the focus lever. 5. 2. Press Enter to calibrate manually. 113 If you see a message that calibration failed, you need to select Yes. Select Auto Calibration and press Enter. 4. A pattern appears, and the system is calibrated.
Select the Easy Interactive Function setting and press Enter. 3. Adjust the focus if necessary, by opening the cover on the side of the projector and sliding the focus lever. 5. 2. Press Enter to calibrate manually. 113 If you see a message that calibration failed, you need to select Yes. Select Auto Calibration and press Enter. 4. A pattern appears, and the system is calibrated.
User Manual
Page 114
Press the Menu button, select the Extended menu, and press Enter. 114 If not, you can calibrate manually. 1. Parent topic: Using the Pens Related tasks Calibrating Manually Calibrating Manually If the cursor location and pen position do not match after calibration. The cursor location and pen position should match after auto calibration, you may need to calibrate manually.
Press the Menu button, select the Extended menu, and press Enter. 114 If not, you can calibrate manually. 1. Parent topic: Using the Pens Related tasks Calibrating Manually Calibrating Manually If the cursor location and pen position do not match after calibration. The cursor location and pen position should match after auto calibration, you may need to calibrate manually.

User Manual
Page 115
Select the Easy Interactive Function setting and press Enter. 3. Touch the center of the circle with the tip of your projected image. 6. A flashing green circle appears in the upper left corner of the pen. 115 2. Select Manual Calibration and press Enter. 4. Press Enter to select Yes. Adjust the focus if necessary, by opening the cover on the side of the projector and sliding the focus lever. 5.
Select the Easy Interactive Function setting and press Enter. 3. Touch the center of the circle with the tip of your projected image. 6. A flashing green circle appears in the upper left corner of the pen. 115 2. Select Manual Calibration and press Enter. 4. Press Enter to select Yes. Adjust the focus if necessary, by opening the cover on the side of the projector and sliding the focus lever. 5.

User Manual
Page 118
If you notice that the pen position is normally adjusted automatically if you can adjust the pen area manually. 1. Select the Easy Interactive Function setting and press Enter. 118 Adjusting the Pen Operation Area The pen operation area is incorrect, you connect a different computer or adjust the computer's resolution. Press the Menu button, select the Extended menu, and press Enter. 3. Project your computer's desktop. 2.
If you notice that the pen position is normally adjusted automatically if you can adjust the pen area manually. 1. Select the Easy Interactive Function setting and press Enter. 118 Adjusting the Pen Operation Area The pen operation area is incorrect, you connect a different computer or adjust the computer's resolution. Press the Menu button, select the Extended menu, and press Enter. 3. Project your computer's desktop. 2.

User Manual
Page 119
The mouse pointer moves toward the bottom right corner. 8. The mouse pointer moves toward the top left corner of the image, touch the tip of the pointer with the pen. When the mouse pointer stops at the top left corner. 7. Parent topic: Using BrightLink With a Computer 119 Select Advanced and press Enter. 5. Pen Area and press Enter. 6. 4. When the mouse pointer stops at the bottom right corner of the image, touch the tip of the pointer with the pen. Select Manual Adj. Press Enter to select Yes.
The mouse pointer moves toward the bottom right corner. 8. The mouse pointer moves toward the top left corner of the image, touch the tip of the pointer with the pen. When the mouse pointer stops at the top left corner. 7. Parent topic: Using BrightLink With a Computer 119 Select Advanced and press Enter. 5. Pen Area and press Enter. 6. 4. When the mouse pointer stops at the bottom right corner of the image, touch the tip of the pointer with the pen. Select Manual Adj. Press Enter to select Yes.

User Manual
Page 155
... Quick Corner Varying levels available Varying positions available Full Lock Partial Lock Off Description Adjusts image shape to rectangular (horizontally and vertically) H/V Keystone: lets you manually correct horizontal and vertical sides Quick Corner: select to correct image shape and alignment using an on-screen display Adjusts the size of the projected...
... Quick Corner Varying levels available Varying positions available Full Lock Partial Lock Off Description Adjusts image shape to rectangular (horizontally and vertically) H/V Keystone: lets you manually correct horizontal and vertical sides Quick Corner: select to correct image shape and alignment using an on-screen display Adjusts the size of the projected...
User Manual
Page 161
...the Network menu let you assign Right Click or Left Click to interactive pen operation The two Calibration options start auto or manual calibration Use Source lets you select the image source for interactivity (using Easy Interactive Tools) Number of Pen Users lets you... by Reset option) Parent topic: Adjusting the Menu Settings Projector Network Settings - Setting Easy Interactive Function Language Options Auto Calibration Manual Calibration Use Source Number of Pen Users Pen Operation Mode Enable Right Click Advanced Various languages available Description Selects various options related ...
...the Network menu let you assign Right Click or Left Click to interactive pen operation The two Calibration options start auto or manual calibration Use Source lets you select the image source for interactivity (using Easy Interactive Tools) Number of Pen Users lets you... by Reset option) Parent topic: Adjusting the Menu Settings Projector Network Settings - Setting Easy Interactive Function Language Options Auto Calibration Manual Calibration Use Source Number of Pen Users Pen Operation Mode Enable Right Click Advanced Various languages available Description Selects various options related ...
User Manual
Page 167
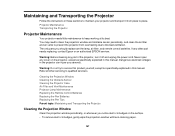
Maintaining and Transporting the Projector Follow the instructions in this manual. Dangerous electrical voltages in this product yourself, except as specifically explained in the projector can injure you should replace are the lamp, air filter, and ... to maintain your projector and transport it off and unplug the power cord. Warning: Do not try to service this manual. Refer all other part needs replacing, contact Epson or an authorized EPSON servicer. You may need to clean the projection window and obstacle sensor periodically, and clean the air filter and air...
Maintaining and Transporting the Projector Follow the instructions in this manual. Dangerous electrical voltages in this product yourself, except as specifically explained in the projector can injure you should replace are the lamp, air filter, and ... to maintain your projector and transport it off and unplug the power cord. Warning: Do not try to service this manual. Refer all other part needs replacing, contact Epson or an authorized EPSON servicer. You may need to clean the projection window and obstacle sensor periodically, and clean the air filter and air...

User Manual
Page 169
... the vents. Dust clogs may leave a residue. Do not use wax, alcohol, benzene, paint thinner, or other chemicals to clean them as described in this manual. Parent topic: Projector Maintenance Air Filter and Vent Maintenance The projector's air filter keeps the intake air clean. Be sure to clean the air filter...
... the vents. Dust clogs may leave a residue. Do not use wax, alcohol, benzene, paint thinner, or other chemicals to clean them as described in this manual. Parent topic: Projector Maintenance Air Filter and Vent Maintenance The projector's air filter keeps the intake air clean. Be sure to clean the air filter...

