
Product Brochure
Page 2
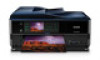
...Weight and Dimensions (W x D x H) Printing: 18.3" x 25.8" x 7.8" Storage: 18.3" x 18.0" x 7.8" Weight: 25.1 lb What's In The Box Artisan 837 inkjet all colors have to be installed for printing. Black and color two-sided print speeds are determined in default, single-side mode, in accordance...based on accelerated testing of the U.S. Epson America, Inc. 3840 Kilroy Airport Way, Long Beach, CA 90806 Epson Canada Limited 185 Renfrew Drive, Markham, Ontario L3R 6G3 www.epson.com www.epson.ca Epson, Artisan, Claria, Epson ESC/P and MicroPiezo are used . Epson disclaims any and all -in-ones...
...Weight and Dimensions (W x D x H) Printing: 18.3" x 25.8" x 7.8" Storage: 18.3" x 18.0" x 7.8" Weight: 25.1 lb What's In The Box Artisan 837 inkjet all colors have to be installed for printing. Black and color two-sided print speeds are determined in default, single-side mode, in accordance...based on accelerated testing of the U.S. Epson America, Inc. 3840 Kilroy Airport Way, Long Beach, CA 90806 Epson Canada Limited 185 Renfrew Drive, Markham, Ontario L3R 6G3 www.epson.com www.epson.ca Epson, Artisan, Claria, Epson ESC/P and MicroPiezo are used . Epson disclaims any and all -in-ones...

Quick Guide
Page 1
Artisan® 837 Quick Guide About Your Product 2 Using Special Papers 5 Placing Originals for Copying, Scanning, or Faxing 7 Printing From a Memory Card 9 Printing From Your Computer 11 Faxing a Document 15 Scanning a Document or Photo 20 Maintaining Your Product 23 Solving Problems 29 Notices 36 1
Artisan® 837 Quick Guide About Your Product 2 Using Special Papers 5 Placing Originals for Copying, Scanning, or Faxing 7 Printing From a Memory Card 9 Printing From Your Computer 11 Faxing a Document 15 Scanning a Document or Photo 20 Maintaining Your Product 23 Solving Problems 29 Notices 36 1

Quick Guide
Page 2
... details. About Your Product After you set up your Artisan® 837 (see the Start Here sheet), turn to find information See this Quick Guide and your online User's Guide for instructions on using your computer with Epson Connect. Print photos from the easy-to-use touch panel. See the Start Here sheet and the...
... details. About Your Product After you set up your Artisan® 837 (see the Start Here sheet), turn to find information See this Quick Guide and your online User's Guide for instructions on using your computer with Epson Connect. Print photos from the easy-to-use touch panel. See the Start Here sheet and the...
Quick Guide
Page 3
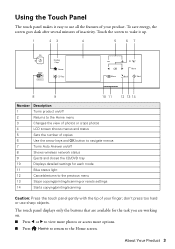
...: Press the touch panel gently with the tip of your product. don't press too hard or use all the features of inactivity. To save energy, the screen goes dark after several minutes of your finger; Using the Touch Panel The touch panel makes it up. 1 23 4 5 67 Display Crop Home CD .../off 2 Returns to the Home menu 3 Changes the view of photos or crops photos 4 LCD screen shows menus and status 5 Sets the number of copies 6 Use the arrow keys and OK button to navigate menus 7 Turns Auto Answer on . ■ Press l or r to view more photos or access more options. ■...
...: Press the touch panel gently with the tip of your product. don't press too hard or use all the features of inactivity. To save energy, the screen goes dark after several minutes of your finger; Using the Touch Panel The touch panel makes it up. 1 23 4 5 67 Display Crop Home CD .../off 2 Returns to the Home menu 3 Changes the view of photos or crops photos 4 LCD screen shows menus and status 5 Sets the number of copies 6 Use the arrow keys and OK button to navigate menus 7 Turns Auto Answer on . ■ Press l or r to view more photos or access more options. ■...

Quick Guide
Page 4
... settings for error messages. If you turn off the "beep" heard when you whether View Auto Correct is connected to a wireless network. If it was used. The product is loaded in the automatic document feeder. ADF A document is connected to a wired network. Reminds you press a button, or to make ...special settings. Tip: To turn off the sound, the dialing sound made when you 're using. ■ The blue status light at the bottom of the settings. You may see the following icons on the screen: Icon Meaning The product is...
... settings for error messages. If you turn off the "beep" heard when you whether View Auto Correct is connected to a wireless network. If it was used. The product is loaded in the automatic document feeder. ADF A document is connected to a wired network. Reminds you press a button, or to make ...special settings. Tip: To turn off the sound, the dialing sound made when you 're using. ■ The blue status light at the bottom of the settings. You may see the following icons on the screen: Icon Meaning The product is...

Quick Guide
Page 5
...[216 × 279 mm]) 4 × 6 inches (102 × 152 mm) Letter (8.5 × 11 inches [216 × 279 mm]) Epson Ultra Premium Presentation Paper Matte Epson Premium Presentation Paper Matte Epson Premium Presentation Paper Matte Double-sided Letter (8.5 × 11 inches [216 × 279 mm]) 8 × 10 inches (203 × 254 mm... 20 20 25 50 50 40 100 20 20 25 50 40 20 50 100 20 50 100 50 50 50 100 50 Using Special Papers 5 Using Special Papers Epson offers a wide array of high quality papers, making it easy to maximize the impact of your documents, photos, presentations, and ...
...[216 × 279 mm]) 4 × 6 inches (102 × 152 mm) Letter (8.5 × 11 inches [216 × 279 mm]) Epson Ultra Premium Presentation Paper Matte Epson Premium Presentation Paper Matte Epson Premium Presentation Paper Matte Double-sided Letter (8.5 × 11 inches [216 × 279 mm]) 8 × 10 inches (203 × 254 mm... 20 20 25 50 50 40 100 20 20 25 50 40 20 50 100 20 50 100 50 50 50 100 50 Using Special Papers 5 Using Special Papers Epson offers a wide array of high quality papers, making it easy to maximize the impact of your documents, photos, presentations, and ...

Quick Guide
Page 6
... photo paper with the glossy or printable side facedown, making sure the paper is under the edge guides. 6 Using Special Papers Paper name Epson Presentation Paper Matte Epson Bright White Paper Epson Photo Quality Self-adhesive Sheets Epson Iron-on Cool Peel Transfer paper Size Letter (8.5 × 11 inches [216 × 279 mm]) Legal (8.5 ×...
... photo paper with the glossy or printable side facedown, making sure the paper is under the edge guides. 6 Using Special Papers Paper name Epson Presentation Paper Matte Epson Bright White Paper Epson Photo Quality Self-adhesive Sheets Epson Iron-on Cool Peel Transfer paper Size Letter (8.5 × 11 inches [216 × 279 mm]) Legal (8.5 ×...

Quick Guide
Page 7
Close the cover gently to letter-size (or A4-size) on the scanner glass. 1. Using the Scanner Glass You can place up to keep your original facedown on the scanner glass or in the Automatic Document Feeder (ADF). Note: If ... support, and then move the document or photo 1/4 inch (5 mm) away from the corner of the scanner glass. Placing Originals for Copying, Scanning, or Faxing 7 Using the Automatic Document Feeder You can place a photo or a document up to even the edges. or A4-size sheets (single- Fan the originals, then tap...
Close the cover gently to letter-size (or A4-size) on the scanner glass. 1. Using the Scanner Glass You can place up to keep your original facedown on the scanner glass or in the Automatic Document Feeder (ADF). Note: If ... support, and then move the document or photo 1/4 inch (5 mm) away from the corner of the scanner glass. Placing Originals for Copying, Scanning, or Faxing 7 Using the Automatic Document Feeder You can place a photo or a document up to even the edges. or A4-size sheets (single- Fan the originals, then tap...

Quick Guide
Page 8
Insert the originals faceup, top edge first. 3. The ADF icon appears on the screen. Slide the edge guide against the originals, but not too tight. 8 Placing Originals for Copying, Scanning, or Faxing Note: If you're using the 2-up Copy layout, make sure the originals are loaded as shown below. 4.
Insert the originals faceup, top edge first. 3. The ADF icon appears on the screen. Slide the edge guide against the originals, but not too tight. 8 Placing Originals for Copying, Scanning, or Faxing Note: If you're using the 2-up Copy layout, make sure the originals are loaded as shown below. 4.

Quick Guide
Page 10
... Guide for instructions on or 5. Press + or - Press x Menu, then select Print Settings. 10. Load several sheets of that you want of Epson photo paper in the cassette. 2. Press the Home button, if necessary, and select Print Photos. 3. To print more photos. 9. to select more ...you want to print. 6. Select View and Print Photos. 4. to turn Auto Correct on printing photo greeting cards, layout sheets, and proof sheets. 1. use the arrows to select the photo for printing. 7. Press l or r to confirm your photos and display one copy, press + or - Select your...
... Guide for instructions on or 5. Press + or - Press x Menu, then select Print Settings. 10. Load several sheets of that you want of Epson photo paper in the cassette. 2. Press the Home button, if necessary, and select Print Photos. 3. To print more photos. 9. to select more ...you want to print. 6. Select View and Print Photos. 4. to turn Auto Correct on printing photo greeting cards, layout sheets, and proof sheets. 1. use the arrows to select the photo for printing. 7. Press l or r to confirm your photos and display one copy, press + or - Select your...
Quick Guide
Page 11
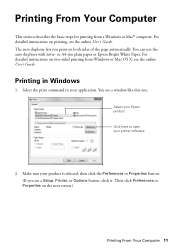
...Options button, click it. Then click Preferences or Properties on both sides of the page automatically. You can use the auto duplexer with letter- or A4-size plain paper or Epson Bright White Paper. Make sure your product is selected, then click the Preferences or Properties button. (If ...you print on the next screen.) Printing From Your Computer 11 The auto duplexer lets you see a window like this one: Select your Epson product Click here to open your application. Select the print command in Windows 1. For detailed instructions on two-sided printing from a Windows or...
...Options button, click it. Then click Preferences or Properties on both sides of the page automatically. You can use the auto duplexer with letter- or A4-size plain paper or Epson Bright White Paper. Make sure your product is selected, then click the Preferences or Properties button. (If ...you print on the next screen.) Printing From Your Computer 11 The auto duplexer lets you see a window like this one: Select your Epson product Click here to open your application. Select the print command in Windows 1. For detailed instructions on two-sided printing from a Windows or...

Quick Guide
Page 12
... tab and select settings as necessary. 7. Select the type of photos, select Fix Photo. 5. To improve the color, contrast, and sharpness of document you are using (see your own presets by clicking the Save Settings button on the Advanced tab. 4. 3. Note: For more printing options, click the Advanced tab.
... tab and select settings as necessary. 7. Select the type of photos, select Fix Photo. 5. To improve the color, contrast, and sharpness of document you are using (see your own presets by clicking the Save Settings button on the Advanced tab. 4. 3. Note: For more printing options, click the Advanced tab.
Quick Guide
Page 14
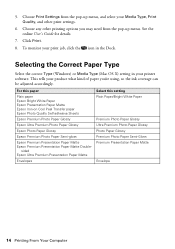
... Epson Photo Quality Self-adhesive Sheets Epson Premium Photo Paper Glossy Epson Ultra Premium Photo Paper Glossy Epson Photo Paper Glossy Epson Premium Photo Paper Semi-gloss Epson Premium Presentation Paper Matte Epson Premium Presentation Paper Matte Double- This tells your printer software. See the online User's Guide for details. 7. Choose any other printing options you 're using...
... Epson Photo Quality Self-adhesive Sheets Epson Premium Photo Paper Glossy Epson Ultra Premium Photo Paper Glossy Epson Photo Paper Glossy Epson Premium Photo Paper Semi-gloss Epson Premium Presentation Paper Matte Epson Premium Presentation Paper Matte Double- This tells your printer software. See the online User's Guide for details. 7. Choose any other printing options you 're using...

Quick Guide
Page 15
... the product. Faxing a Document Your product lets you send faxes by entering fax numbers or selecting entries from your computer using the Epson FAX Utility. Contact your DSL provider for backing up to use a telephone or answering machine on the back of the product: Press Home, if necessary, press l or r to the EXT... your own backup or print out your network settings and fax data. Connecting a Phone or Answering Machine 1. Connect the phone cable from the EXT. To use the fax or telephone equipment. Epson is turned off.
... the product. Faxing a Document Your product lets you send faxes by entering fax numbers or selecting entries from your computer using the Epson FAX Utility. Contact your DSL provider for backing up to use a telephone or answering machine on the back of the product: Press Home, if necessary, press l or r to the EXT... your own backup or print out your network settings and fax data. Connecting a Phone or Answering Machine 1. Connect the phone cable from the EXT. To use the fax or telephone equipment. Epson is turned off.

Quick Guide
Page 16
...connected to select 2. port for your product to detect an incoming fax call is a caller, the phone can be used as FiOS™. Entering Your Sender Name 1. Select Communication. 4. Use the keypad to the Header menu. Note: If you leave your name and phone number in the fax header before ...'s Guide for a long period of the fax. Press l or r and select Fax Settings. 3. You see page 17). If the other settings or use the Epson FAX Utility, see the online User's Guide. Entering Fax Header Information You should create a fax header and select the number of rings before sending faxes...
...connected to select 2. port for your product to detect an incoming fax call is a caller, the phone can be used as FiOS™. Entering Your Sender Name 1. Select Communication. 4. Use the keypad to the Header menu. Note: If you leave your name and phone number in the fax header before ...'s Guide for a long period of the fax. Press l or r and select Fax Settings. 3. You see page 17). If the other settings or use the Epson FAX Utility, see the online User's Guide. Entering Fax Header Information You should create a fax header and select the number of rings before sending faxes...

Quick Guide
Page 17
... return to switch between uppercase, lowercase, or numbers. ■ Press 1 Symb. Faxing a Document 17 Using the Keypad to Enter Numbers and Characters ■ To enter a fax number, use for an international number. 3. Press u or d to select the number of Rings to Answer If you... add a space, press . ■ To delete a character, press (backspace). Select Communication, then Rings to pick up on the fourth ring, you use the numeric keypad. ■ To enter text, press a keypad number repeatedly to the Header menu. Select Your Phone Number from the Header menu. 2. ...
... return to switch between uppercase, lowercase, or numbers. ■ Press 1 Symb. Faxing a Document 17 Using the Keypad to Enter Numbers and Characters ■ To enter a fax number, use for an international number. 3. Press u or d to select the number of Rings to Answer If you... add a space, press . ■ To delete a character, press (backspace). Select Communication, then Rings to pick up on the fourth ring, you use the numeric keypad. ■ To enter text, press a keypad number repeatedly to the Header menu. Select Your Phone Number from the Header menu. 2. ...

Quick Guide
Page 18
... settings. 6. Press OK, if desired, to 64 digits). To redial immediately, press Redial. Press , then use the numeric keypad to enter the fax number (up and use a speed dial list or send a fax from your computer using the Epson FAX Utility, see your original(s) for faxing (see a redialing message and the product redials after...
... settings. 6. Press OK, if desired, to 64 digits). To redial immediately, press Redial. Press , then use the numeric keypad to enter the fax number (up and use a speed dial list or send a fax from your computer using the Epson FAX Utility, see your original(s) for faxing (see a redialing message and the product redials after...
Quick Guide
Page 19
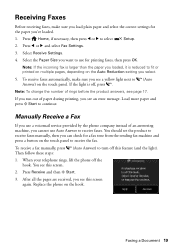
... sure you see this screen. 2. To receive faxes automatically, make sure you load plain paper and select the correct settings for the paper you cannot use Auto Answer to (Auto Answer) on the Auto Reduction setting you loaded, it is larger than the paper you select. 5. If you run out of... product to receive faxes manually, then you want to receive the fax. Press Receive and then x Start. 3. Replace the phone on the touch panel to use a voicemail service provided by the phone company instead of rings before the product answers, see page 17. Manually Receive a Fax If you...
... sure you see this screen. 2. To receive faxes automatically, make sure you load plain paper and select the correct settings for the paper you cannot use Auto Answer to (Auto Answer) on the Auto Reduction setting you loaded, it is larger than the paper you select. 5. If you run out of... product to receive faxes manually, then you want to receive the fax. Press Receive and then x Start. 3. Replace the phone on the touch panel to use a voicemail service provided by the phone company instead of rings before the product answers, see page 17. Manually Receive a Fax If you...

Quick Guide
Page 20
... scans a photo, resizes it to scan original documents or photos and save it automatically included in old photos. For example, you can use the Epson Scan software to access more advanced features. Note: For detailed scanning instructions, see the online User's Guide. Close the cover gently so ... creates a PDF file and saves it , launches your computer. Quick Scanning with the Touch Panel Use the touch panel to your computer. Press Home, if necessary, and select Scan. 4. You can use Epson Scan to PC (WSD) lets you scan wirelessly in JPG or PDF format ■ Scan to...
... scans a photo, resizes it to scan original documents or photos and save it automatically included in old photos. For example, you can use the Epson Scan software to access more advanced features. Note: For detailed scanning instructions, see the online User's Guide. Close the cover gently so ... creates a PDF file and saves it , launches your computer. Quick Scanning with the Touch Panel Use the touch panel to your computer. Press Home, if necessary, and select Scan. 4. You can use Epson Scan to PC (WSD) lets you scan wirelessly in JPG or PDF format ■ Scan to...
Quick Guide
Page 21
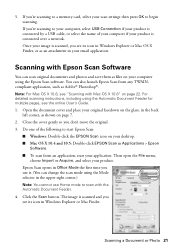
...begin scanning. If you see its icon in your computer using the Automatic Document Feeder for multiple pages, see "Scanning with Epson Scan Software You can also launch Epson Scan from an application, start Epson Scan: ■ Windows: Double-click the EPSON Scan icon on your desktop. ■ Mac OS X.... ■ To scan from any TWAINcompliant application, such as Adobe® Photoshop®. For detailed scanning instructions, including using the Epson Scan software. Open the document cover and place your scan settings then press OK to scan with the Automatic Document Feeder...
...begin scanning. If you see its icon in your computer using the Automatic Document Feeder for multiple pages, see "Scanning with Epson Scan Software You can also launch Epson Scan from an application, start Epson Scan: ■ Windows: Double-click the EPSON Scan icon on your desktop. ■ Mac OS X.... ■ To scan from any TWAINcompliant application, such as Adobe® Photoshop®. For detailed scanning instructions, including using the Epson Scan software. Open the document cover and place your scan settings then press OK to scan with the Automatic Document Feeder...


