Printer Guide
Page 6
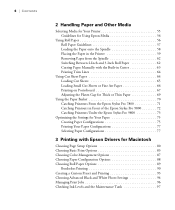
... in Front of the Epson Stylus Pro 9800 72 Catching Printouts Under the Epson Stylus Pro 9800 73 Optimizing the Settings for Your Paper 75 Creating Paper Configurations 75 Printing Your Paper Configurations 77 Selecting Paper Configurations 77 3 Printing with Epson Drivers for Macintosh Choosing Page Setup Options 80 Choosing Basic Print Options 83 Choosing Color Management Options 87 Choosing...
... in Front of the Epson Stylus Pro 9800 72 Catching Printouts Under the Epson Stylus Pro 9800 73 Optimizing the Settings for Your Paper 75 Creating Paper Configurations 75 Printing Your Paper Configurations 77 Selecting Paper Configurations 77 3 Printing with Epson Drivers for Macintosh Choosing Page Setup Options 80 Choosing Basic Print Options 83 Choosing Color Management Options 87 Choosing...
Printer Guide
Page 10
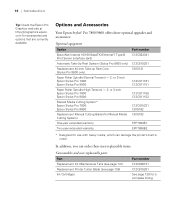
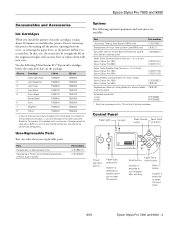
...: Consumables and user-replaceable parts Part Replacement Ink Maintenance Tank (see page 141) Replacement Printer Cutter Blade (see page 138) Ink Cartridges Part number C12C890191 C12C815291 See page 128 for a complete listing. 10 In addition, you can damage the printer's built-in cutter. or 3-inch Epson Stylus Pro 7800: Epson Stylus Pro 9800: Paper Roller Spindle (High Tension) - 2- 10 | Introduction Tip...
...: Consumables and user-replaceable parts Part Replacement Ink Maintenance Tank (see page 141) Replacement Printer Cutter Blade (see page 138) Ink Cartridges Part number C12C890191 C12C815291 See page 128 for a complete listing. 10 In addition, you can damage the printer's built-in cutter. or 3-inch Epson Stylus Pro 7800: Epson Stylus Pro 9800: Paper Roller Spindle (High Tension) - 2- 10 | Introduction Tip...
Printer Guide
Page 119
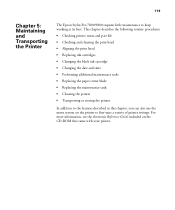
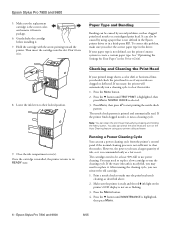
... the date and time • Performing additional maintenance tasks • Replacing the paper cutter blade • Replacing the maintenance tank • Cleaning the printer • Transporting or storing the printer In addition to keep working at its best. 119 Chapter 5: Maintaining and Transporting the Printer The Epson Stylus Pro 7800/9800 requires little maintenance to the features described in this chapter...
... the date and time • Performing additional maintenance tasks • Replacing the paper cutter blade • Replacing the maintenance tank • Cleaning the printer • Transporting or storing the printer In addition to keep working at its best. 119 Chapter 5: Maintaining and Transporting the Printer The Epson Stylus Pro 7800/9800 requires little maintenance to the features described in this chapter...
Printer Guide
Page 142
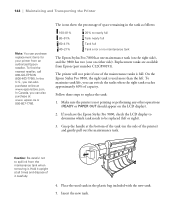
... or 800-807-7766. On the Epson Stylus Pro 9800, the right tank is used tank in the tank as follows: 100-81% 80-61% 60-41% 40-21% 20% to be replaced (left . Grasp the handle at all times and dispose of the printer) and gently pull out the maintenance tank. The printer will not print if one on the...
... or 800-807-7766. On the Epson Stylus Pro 9800, the right tank is used tank in the tank as follows: 100-81% 80-61% 60-41% 40-21% 20% to be replaced (left . Grasp the handle at all times and dispose of the printer) and gently pull out the maintenance tank. The printer will not print if one on the...

Product Brochure
Page 8
...V Approx. 55 W or less (operating) Normal is 42:30 Acoustic Noise Level Approximately 50 dB(A) according to ISO 7779 Printer Language/Drivers Epson ESC/P2 raster photographic drivers standard Optional PANTONE licensed and SWOP certified PostScript Language Level 3 Compatible RIP by ColorBurst (included only ...dpi; 360 x 360 dpi Print Engine SpeedA 16" x 20" prints from 1:18 to 81:42 - Epson Stylus Pro 7800 and 9800 Print Engine Specifications Printing Method 8-channel Print Head Technology 8-color (C, Lc, M, Lm, Y, Lk, LLk + PK or MK) pigment-based Variable-sized Droplet Micro Piezo...
...V Approx. 55 W or less (operating) Normal is 42:30 Acoustic Noise Level Approximately 50 dB(A) according to ISO 7779 Printer Language/Drivers Epson ESC/P2 raster photographic drivers standard Optional PANTONE licensed and SWOP certified PostScript Language Level 3 Compatible RIP by ColorBurst (included only ...dpi; 360 x 360 dpi Print Engine SpeedA 16" x 20" prints from 1:18 to 81:42 - Epson Stylus Pro 7800 and 9800 Print Engine Specifications Printing Method 8-channel Print Head Technology 8-color (C, Lc, M, Lm, Y, Lk, LLk + PK or MK) pigment-based Variable-sized Droplet Micro Piezo...

Product Information Guide
Page 1
... 49 to 61 Hz 1.0 A at 120 V 0.5 A at 220 V Epson Stylus Pro 7800: Approx. 50 W or less (ISO 10561 Letter Pattern) 6 W or less in sleep mode 1 W or less in power off mode Epson Stylus Pro 9800: Approx. 55 W or less (ISO 10561 Letter Pattern) 6 W or less in sleep mode 1 W or less in power off mode Maintenance tank 8/05 Epson Stylus Pro 7800 and 9800 - 1
... 49 to 61 Hz 1.0 A at 120 V 0.5 A at 220 V Epson Stylus Pro 7800: Approx. 50 W or less (ISO 10561 Letter Pattern) 6 W or less in sleep mode 1 W or less in power off mode Epson Stylus Pro 9800: Approx. 55 W or less (ISO 10561 Letter Pattern) 6 W or less in sleep mode 1 W or less in power off mode Maintenance tank 8/05 Epson Stylus Pro 7800 and 9800 - 1
Product Information Guide
Page 3
... performed infrequently. In that case, there may have to initialize the printer. or 3-inch Epson Stylus Pro 7800 Epson Stylus Pro 9800 C12C811155 C12C811152 Manual Media Cutting System (for thick media) Epson Stylus Pro 7800 Epson Stylus Pro 9800 C12C815231 C815182 Replacement Manual Cutting Blade (for 3 seconds to replace them with your ink and maintenance tank, and should be enough ink left in cutter) Part number C12C890191...
... performed infrequently. In that case, there may have to initialize the printer. or 3-inch Epson Stylus Pro 7800 Epson Stylus Pro 9800 C12C811155 C12C811152 Manual Media Cutting System (for thick media) Epson Stylus Pro 7800 Epson Stylus Pro 9800 C12C815231 C815182 Replacement Manual Cutting Blade (for 3 seconds to replace them with your ink and maintenance tank, and should be enough ink left in cutter) Part number C12C890191...
Product Information Guide
Page 4
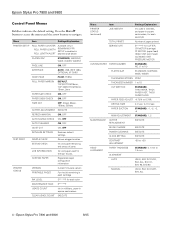
... Epson Stylus Pro 7800 and 9800 Control Panel Menus Boldface indicates the default setting. to navigate. PAPER SUCTION STANDARD, -1, -2, -3, -4 M/W ADJUSTMENT STANDARD, 1, 2 MAINTENANCE CUTTER REPLACEMENT EXECUTE BK INK CHANGE EXECUTE POWER CLEANING EXECUTE CLOCK SETTING EXECUTE CONTRAST ADJUSTMENT -20 to +20 HEAD ALIGNMENT PAPER THICKNESS STANDARD, 0.1 mm to 0.70% DRYING TIME 0. 0 sec. Menu Item Settings/Explanation PRINTER...
... Epson Stylus Pro 7800 and 9800 Control Panel Menus Boldface indicates the default setting. to navigate. PAPER SUCTION STANDARD, -1, -2, -3, -4 M/W ADJUSTMENT STANDARD, 1, 2 MAINTENANCE CUTTER REPLACEMENT EXECUTE BK INK CHANGE EXECUTE POWER CLEANING EXECUTE CLOCK SETTING EXECUTE CONTRAST ADJUSTMENT -20 to +20 HEAD ALIGNMENT PAPER THICKNESS STANDARD, 0.1 mm to 0.70% DRYING TIME 0. 0 sec. Menu Item Settings/Explanation PRINTER...
Product Information Guide
Page 5
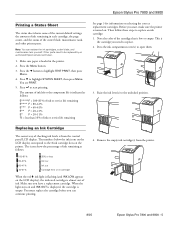
...% or less Ink low Ink out Cartridge error or no cartridge When the red B ink light is from the printer. 8/05 Epson Stylus Pro 7800 and 9800 - 5 Note the color of checking ink levels is flashing (and INK LOW appears on . You must replace the cartridge before you have ... Make sure you can replace the ink cartridges, cutter blade, and maintenance tank yourself. Epson Stylus Pro 7800 and 9800 Printing a Status Sheet The status sheet shows some of the current default settings, the amount of ink remaining in the printer. 2. Press the d button to the unlocked position. Raise the ...
...% or less Ink low Ink out Cartridge error or no cartridge When the red B ink light is from the printer. 8/05 Epson Stylus Pro 7800 and 9800 - 5 Note the color of checking ink levels is flashing (and INK LOW appears on . You must replace the cartridge before you have ... Make sure you can replace the ink cartridges, cutter blade, and maintenance tank yourself. Epson Stylus Pro 7800 and 9800 Printing a Status Sheet The status sheet shows some of the current default settings, the amount of ink remaining in the printer. 2. Press the d button to the unlocked position. Raise the ...
Product Information Guide
Page 6
...print head to see if any nozzles are clogged or deflected. Epson Stylus Pro 7800 and 9800 8/05 Press the Menu button. 2. The cartridges need to ...9. The nozzle check pattern is selected. 3. Press the d button until MAINTENANCE is nearly full, you can check the print head and turn on or...cartridge. 1. If the waste ink tank is highlighted, then press Menu. 6 - Don't force it from the printer's control panel if the normal ...button. Make sure the replacement cartridge is the correct color, and remove it in the Printer Guide. 8. Press the d button until TEST PRINT ...
...print head to see if any nozzles are clogged or deflected. Epson Stylus Pro 7800 and 9800 8/05 Press the Menu button. 2. The cartridges need to ...9. The nozzle check pattern is selected. 3. Press the d button until MAINTENANCE is nearly full, you can check the print head and turn on or...cartridge. 1. If the waste ink tank is highlighted, then press Menu. 6 - Don't force it from the printer's control panel if the normal ...button. Make sure the replacement cartridge is the correct color, and remove it in the Printer Guide. 8. Press the d button until TEST PRINT ...

Product Information Guide
Page 9
...%. Epson Stylus Pro 7800 and 9800 Replacing the Maintenance Tank The maintenance tank stores ink that you have the Epson Stylus Pro 9800, check the LCD display to determine which tank needs to be replaced (left . Related Documentation CPD-20271 CPD-20272 CPD-20270 Epson Stylus Pro 7800 and 9800 Printer Guide Epson Stylus Pro 7800 and 9800 Quick Reference Guide Epson Stylus Pro 7800 and 9800 CD-ROM with the new tank. 5. When the tank is used tank...
...%. Epson Stylus Pro 7800 and 9800 Replacing the Maintenance Tank The maintenance tank stores ink that you have the Epson Stylus Pro 9800, check the LCD display to determine which tank needs to be replaced (left . Related Documentation CPD-20271 CPD-20272 CPD-20270 Epson Stylus Pro 7800 and 9800 Printer Guide Epson Stylus Pro 7800 and 9800 Quick Reference Guide Epson Stylus Pro 7800 and 9800 CD-ROM with the new tank. 5. When the tank is used tank...

Quick Reference Guide
Page 8
... than the left or right). Replacing Printer Parts (continued) 5 Hold down the side pin, as shown. 8 Hold down its side pin and secure it with the new tank. 4 Insert the new tank. 9 Close the front cover. The carriage returns to replace the maintenance tank (part # C12C890191) when you have the Epson Stylus Pro 9800, check the LCD to determine...
... than the left or right). Replacing Printer Parts (continued) 5 Hold down the side pin, as shown. 8 Hold down its side pin and secure it with the new tank. 4 Insert the new tank. 9 Close the front cover. The carriage returns to replace the maintenance tank (part # C12C890191) when you have the Epson Stylus Pro 9800, check the LCD to determine...


