Getting Started - ColorBurst RIP
Page 5
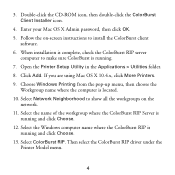
.... Select the Windows computer name where the ColorBurst RIP is running and click Choose. 13. Open the Printer Setup Utility in the Applications > Utilities folder. 8. Click Add. Then select the ColorBurst RIP driver under the Printer Model menu. 4 Select the name of the workgroup where the ColorBurst RIP Server is running and click.... When installation is complete, check the ColorBurst RIP server computer to install the ColorBurst client software. 6. 3. If you are using Mac OS X 10.4.x, click More Printers. 9.
.... Select the Windows computer name where the ColorBurst RIP is running and click Choose. 13. Open the Printer Setup Utility in the Applications > Utilities folder. 8. Click Add. Then select the ColorBurst RIP driver under the Printer Model menu. 4 Select the name of the workgroup where the ColorBurst RIP Server is running and click.... When installation is complete, check the ColorBurst RIP server computer to install the ColorBurst client software. 6. 3. If you are using Mac OS X 10.4.x, click More Printers. 9.

Getting Started - ColorBurst RIP
Page 7
...use the ColorBurst RIP as the ColorBurst RIP server computer. 2. Windows Clients Printing to the client system. 3. Copy the CB Windows Print Driver zip file from the ColorBurst > Utilities folder on the server to a Mac OS X RIP Server ColorBurst supports Windows XP and Windows .... Select Browse for a printer (Windows XP) or Type your default printer, choose Yes. Unzip the CB Windows Print Driver zip file. 4. Browse the network and select the ColorBurst RIP printer, then click Next. Windows XP: Click Start > Control Panel > Printers and Other Hardware > Printers and Faxes. Other Windows ...
...use the ColorBurst RIP as the ColorBurst RIP server computer. 2. Windows Clients Printing to the client system. 3. Copy the CB Windows Print Driver zip file from the ColorBurst > Utilities folder on the server to a Mac OS X RIP Server ColorBurst supports Windows XP and Windows .... Select Browse for a printer (Windows XP) or Type your default printer, choose Yes. Unzip the CB Windows Print Driver zip file. 4. Browse the network and select the ColorBurst RIP printer, then click Next. Windows XP: Click Start > Control Panel > Printers and Other Hardware > Printers and Faxes. Other Windows ...
Printer Guide
Page 6
... Your Printer 55 Guidelines for Using Epson Media 56 Using Roll Paper 56 Roll Paper Guidelines 57 Loading the Paper onto the Spindle 58 Placing the Paper in the Printer 59 ...Epson Stylus Pro 7800 71 Catching Printouts in Front of the Epson Stylus Pro 9800 72 Catching Printouts Under the Epson Stylus Pro 9800 73 Optimizing the Settings for Your Paper 75 Creating Paper Configurations 75 Printing Your Paper Configurations 77 Selecting Paper Configurations 77 3 Printing with Epson Drivers for Macintosh Choosing Page Setup Options 80 Choosing Basic Print Options 83 Choosing Color...
... Your Printer 55 Guidelines for Using Epson Media 56 Using Roll Paper 56 Roll Paper Guidelines 57 Loading the Paper onto the Spindle 58 Placing the Paper in the Printer 59 ...Epson Stylus Pro 7800 71 Catching Printouts in Front of the Epson Stylus Pro 9800 72 Catching Printouts Under the Epson Stylus Pro 9800 73 Optimizing the Settings for Your Paper 75 Creating Paper Configurations 75 Printing Your Paper Configurations 77 Selecting Paper Configurations 77 3 Printing with Epson Drivers for Macintosh Choosing Page Setup Options 80 Choosing Basic Print Options 83 Choosing Color...

Printer Guide
Page 7
Contents | 7 4 Printing with Epson Drivers for Windows Choosing Basic Print Options 100 Choosing Paper ... 114 Setting Monitoring Preferences and Optimizing Print Speed . . . . . 115 5 Maintaining and Transporting the Printer Checking Printer Status and Part Life 120 Printing Status Information 120 Viewing Status Information 121 Checking and Cleaning the Print Head ... Ink Cartridges 132 Draining the Old Ink 132 Installing the New Black Ink Cartridge 134 Updating the Printer Driver Information 135 Changing the Date and Time 136 Using Maintenance Mode 136 Replacing the Paper Cutter Blade...
Contents | 7 4 Printing with Epson Drivers for Windows Choosing Basic Print Options 100 Choosing Paper ... 114 Setting Monitoring Preferences and Optimizing Print Speed . . . . . 115 5 Maintaining and Transporting the Printer Checking Printer Status and Part Life 120 Printing Status Information 120 Viewing Status Information 121 Checking and Cleaning the Print Head ... Ink Cartridges 132 Draining the Old Ink 132 Installing the New Black Ink Cartridge 134 Updating the Printer Driver Information 135 Changing the Date and Time 136 Using Maintenance Mode 136 Replacing the Paper Cutter Blade...

Printer Guide
Page 8
... Shipment 144 Removing the Optional Print Server Card 146 Moving the Printer on the Stand 147 Setting Up the Printer After Transportation 148 6 Solving Problems Diagnosing Problems 149 Checking Error Messages and Lights 150 Improving Print Quality 154 ...Problems 160 Fixing Paper Eject Problems 161 Clearing Paper Jams 162 Uninstalling and Reinstalling the Printer Driver 164 Macintosh 164 Windows 164 A Specifications Environmental 165 Electrical 165 Dimensions and Weight 166 Printer Interfaces 166 Safety Approvals 166 Media 166 Roll Paper 166 Cut Sheets 167 Printable Area...
... Shipment 144 Removing the Optional Print Server Card 146 Moving the Printer on the Stand 147 Setting Up the Printer After Transportation 148 6 Solving Problems Diagnosing Problems 149 Checking Error Messages and Lights 150 Improving Print Quality 154 ...Problems 160 Fixing Paper Eject Problems 161 Clearing Paper Jams 162 Uninstalling and Reinstalling the Printer Driver 164 Macintosh 164 Windows 164 A Specifications Environmental 165 Electrical 165 Dimensions and Weight 166 Printer Interfaces 166 Safety Approvals 166 Media 166 Roll Paper 166 Cut Sheets 167 Printable Area...
Printer Guide
Page 9
..., versions 4.0 or later. Tips contain additional hints on the CD-ROM provides additional information about your printer, loading paper, using a web browser, such as you have a problem. You can read the guide using the Epson® printer drivers, and replacing ink cartridges. Attach it to get the most out of procedures for easy reference...
..., versions 4.0 or later. Tips contain additional hints on the CD-ROM provides additional information about your printer, loading paper, using a web browser, such as you have a problem. You can read the guide using the Epson® printer drivers, and replacing ink cartridges. Attach it to get the most out of procedures for easy reference...
Printer Guide
Page 11
... configuration, and operation of purchase. In the U.S., you can download drivers, firmware, and other files, look at www.epson.ca or 800-807-7766. You can purchase optional equipment and genuine Epson ink and paper from an authorized Epson reseller. Dial (888) 377-6611, 6 AM to change without ...notice. Introduction | 11 Tip: If you experience difficulty with your printer. To find the nearest reseller, call , make sure you call 800-GO-EPSON (800-463-7766) or visit www.prographics.epson.com. Before you have your Unit ID number, which is included with the...
... configuration, and operation of purchase. In the U.S., you can download drivers, firmware, and other files, look at www.epson.ca or 800-807-7766. You can purchase optional equipment and genuine Epson ink and paper from an authorized Epson reseller. Dial (888) 377-6611, 6 AM to change without ...notice. Introduction | 11 Tip: If you experience difficulty with your printer. To find the nearest reseller, call , make sure you call 800-GO-EPSON (800-463-7766) or visit www.prographics.epson.com. Before you have your Unit ID number, which is included with the...
Printer Guide
Page 43
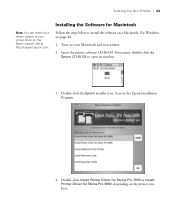
Double-click Install Printer Driver for Stylus Pro 7800 or Install Printer Driver for Macintosh Follow the steps below to open its window. 3. Insert the printer software CD-ROM. Double-click the Epson installer icon. You see page 48. 1. Installing the Software for Stylus Pro 9800, depending on the printer you have. 1-43 Turn on your Macintosh and your printer driver on a Macintosh. Setting Up...
Double-click Install Printer Driver for Stylus Pro 7800 or Install Printer Driver for Macintosh Follow the steps below to open its window. 3. Insert the printer software CD-ROM. Double-click the Epson installer icon. You see page 48. 1. Installing the Software for Stylus Pro 9800, depending on the printer you have. 1-43 Turn on your Macintosh and your printer driver on a Macintosh. Setting Up...

Printer Guide
Page 44
Remove the printer software CD-ROM and follow the on-screen instructions to install the profiles for Mac OS X 10.3. 1-44 Double-click Install Additional Color Profiles to install the EPSON LFP Remote Panel. 7. When you installed the optional EpsonNet print server card, double-click Install EpsonNet Config. ...your password and follow the on page 53. Enter your password and follow the on-screen instructions to configure your printer. 8. Enter your printer driver. 6. Enter your password again and follow the instructions on page 45 for Mac OS X 10.4 or page 46 for your...
Remove the printer software CD-ROM and follow the on-screen instructions to install the profiles for Mac OS X 10.3. 1-44 Double-click Install Additional Color Profiles to install the EPSON LFP Remote Panel. 7. When you installed the optional EpsonNet print server card, double-click Install EpsonNet Config. ...your password and follow the on page 53. Enter your password and follow the on-screen instructions to configure your printer. 8. Enter your printer driver. 6. Enter your password again and follow the instructions on page 45 for Mac OS X 10.4 or page 46 for your...
Printer Guide
Page 45
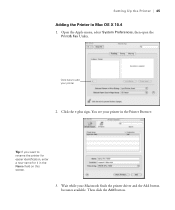
Wait while your printer in the Printer Browser: Tip: If you want to add your printer 2. Then click the Add button. 1-45 Setting Up the Printer | 45 Adding the Printer in the Name field on this screen. 3. You see your Macintosh finds the printer driver and the Add button becomes available. Click the + plus sign. Click here to rename the printer for easier identification, enter a new name for it in Mac OS X 10.4 1. Open the Apple menu, select System Preferences, then open the Print & Fax Utility.
Wait while your printer in the Printer Browser: Tip: If you want to add your printer 2. Then click the Add button. 1-45 Setting Up the Printer | 45 Adding the Printer in the Name field on this screen. 3. You see your Macintosh finds the printer driver and the Add button becomes available. Click the + plus sign. Click here to rename the printer for easier identification, enter a new name for it in Mac OS X 10.4 1. Open the Apple menu, select System Preferences, then open the Print & Fax Utility.
Printer Guide
Page 49
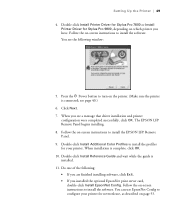
... your printer for Stylus Pro 9800, depending on the printer. (Make sure the printer is connected; Click Next. 7. Setting Up the Printer | 49 4. see a message that driver installation and printer configuration were completed successfully, click OK. Double-click Install Printer Driver for Stylus Pro 7800 or Install Printer Driver for network use EpsonNet Config to install the EPSON LFP Remote Panel. 9. Double-click Install Additional Color Profiles...
... your printer for Stylus Pro 9800, depending on the printer. (Make sure the printer is connected; Click Next. 7. Setting Up the Printer | 49 4. see a message that driver installation and printer configuration were completed successfully, click OK. Double-click Install Printer Driver for Stylus Pro 7800 or Install Printer Driver for network use EpsonNet Config to install the EPSON LFP Remote Panel. 9. Double-click Install Additional Color Profiles...

Printer Guide
Page 50
... site and update your browser. 2. Navigate to update the printer firmware, if necessary. Click Drivers and Downloads to upgrade the firmware. 1-50 50 | Setting Up the Printer 12. Downloading the Firmware 1. Choose your printer. 3. Go to the next section to http://support.epson.com in the next section to find the newest firmware. 4. Close the...
... site and update your browser. 2. Navigate to update the printer firmware, if necessary. Click Drivers and Downloads to upgrade the firmware. 1-50 50 | Setting Up the Printer 12. Downloading the Firmware 1. Choose your printer. 3. Go to the next section to http://support.epson.com in the next section to find the newest firmware. 4. Close the...

Printer Guide
Page 56
...included in your paper package, when printing on the printer's control panel. Avoid storing your printouts where they will be exposed to maintain quality. Manually switching rolls is a simple process. Check the Epson Pro Graphics web site (http://prographics.epson.com) or your bare hands. See page 81 ...Keep unused media in its original packaging and store it in both the printer driver software and on Epson paper and other media: • Avoid touching the printable surface with a 2- or 3-inch core, up to 24 inches wide (7800) or 44 inches wide (9800). See page 84 (Mac OS X)...
...included in your paper package, when printing on the printer's control panel. Avoid storing your printouts where they will be exposed to maintain quality. Manually switching rolls is a simple process. Check the Epson Pro Graphics web site (http://prographics.epson.com) or your bare hands. See page 81 ...Keep unused media in its original packaging and store it in both the printer driver software and on Epson paper and other media: • Avoid touching the printable surface with a 2- or 3-inch core, up to 24 inches wide (7800) or 44 inches wide (9800). See page 84 (Mac OS X)...
Printer Guide
Page 64
...: 1. Press the Pause button to highlight PAGE LINE. 4. The printer accepts sheets ranging from the paper path and rolled up. If you 're using stock thicker than 19 mil (0.5 mm), load it is removed from letter size to 24 inches wide (7800) or 44 inches wide (9800). Press the Menu button. 2. ... 're not using auto cut). An asterisk appears next to save the setting. Using Cut Sheet Paper You can also specify trim lines from your printer driver software. 64 | Handling Paper and Other Media Printing Trim Lines You can print trim lines on the right edge of cut sheet paper and other...
...: 1. Press the Pause button to highlight PAGE LINE. 4. The printer accepts sheets ranging from the paper path and rolled up. If you 're using stock thicker than 19 mil (0.5 mm), load it is removed from letter size to 24 inches wide (7800) or 44 inches wide (9800). Press the Menu button. 2. ... 're not using auto cut). An asterisk appears next to save the setting. Using Cut Sheet Paper You can also specify trim lines from your printer driver software. 64 | Handling Paper and Other Media Printing Trim Lines You can print trim lines on the right edge of cut sheet paper and other...
Printer Guide
Page 70
...the Pause button to exit the menu. Note: When you print on page 71 for the Epson Stylus Pro 7800 or page 72 for more information. Using the Paper Basket The paper basket attaches to your printer and catches your printouts from getting dirty or scratched. If you're printing on thick media.... 6. 70 | Handling Paper and Other Media Caution: To avoid damaging the printer, make sure you do not select the Narrow setting when you print on non-Epson media and not using the Epson driver, you may also need to create a paper configuration to optimize your results.
...the Pause button to exit the menu. Note: When you print on page 71 for the Epson Stylus Pro 7800 or page 72 for more information. Using the Paper Basket The paper basket attaches to your printer and catches your printouts from getting dirty or scratched. If you're printing on thick media.... 6. 70 | Handling Paper and Other Media Caution: To avoid damaging the printer, make sure you do not select the Narrow setting when you print on non-Epson media and not using the Epson driver, you may also need to create a paper configuration to optimize your results.
Printer Guide
Page 75
... most paper types. Press Menu to highlight THICKNESS PATTERN. 6. Then follow these steps: 1. The STANDARD setting is loaded in your Epson printer software, the driver automatically determines the best settings for your paper. Press the l button, then the d button to display PAPER NUMBER. 3. Press ... is highlighted. 2. Handling Paper and Other Media | 75 Optimizing the Settings for Your Paper When you use non-Epson paper or a paper not supported by the driver. Press the l button, then the d button to print the paper thickness pattern. A pattern similar to save ...
... most paper types. Press Menu to highlight THICKNESS PATTERN. 6. Then follow these steps: 1. The STANDARD setting is loaded in your Epson printer software, the driver automatically determines the best settings for your paper. Press the l button, then the d button to display PAPER NUMBER. 3. Press ... is highlighted. 2. Handling Paper and Other Media | 75 Optimizing the Settings for Your Paper When you use non-Epson paper or a paper not supported by the driver. Press the l button, then the d button to print the paper thickness pattern. A pattern similar to save ...
Printer Guide
Page 76
... print with the most even lines. After you create paper configurations, you can make similar settings using the printer driver software. After printing the pattern, THICKNESS NUMBER is highlighted. 8. Choose the number with non-Epson media and avoid smearing the ink. For instructions, see white lines on thin media (under number 4 are the...
... print with the most even lines. After you create paper configurations, you can make similar settings using the printer driver software. After printing the pattern, THICKNESS NUMBER is highlighted. 8. Choose the number with non-Epson media and avoid smearing the ink. For instructions, see white lines on thin media (under number 4 are the...
Printer Guide
Page 77
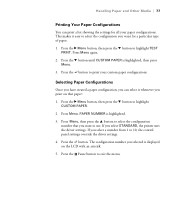
... it whenever you select a number from 1 to print your paper configurations. Press the button to 10, the control panel settings override the driver settings. 4. Selecting Paper Configurations Once you have created a paper configuration, you can print a list showing the settings for a particular type... you want to select the configuration you want for all your custom paper configurations. The configuration number you select STANDARD, the printer uses the driver settings. PAPER NUMBER is highlighted, then press Menu. 3. Press Menu, then press the u button to exit the menu....
... it whenever you select a number from 1 to print your paper configurations. Press the button to 10, the control panel settings override the driver settings. 4. Selecting Paper Configurations Once you have created a paper configuration, you can print a list showing the settings for a particular type... you want to select the configuration you want for all your custom paper configurations. The configuration number you select STANDARD, the printer uses the driver settings. PAPER NUMBER is highlighted, then press Menu. 3. Press Menu, then press the u button to exit the menu....
Printer Guide
Page 79
... your printer for color photos. When you install the Epson printer driver, the ready-made profiles are automatically copied to use color management features in Adobe® Photoshop® or other applications, or in the standard folder for your own profiles if you have them created by a color specialist. 79 Chapter 3: Printing with Epson Drivers for Macintosh Your Epson Stylus Pro 7800 or...
... your printer for color photos. When you install the Epson printer driver, the ready-made profiles are automatically copied to use color management features in Adobe® Photoshop® or other applications, or in the standard folder for your own profiles if you have them created by a color specialist. 79 Chapter 3: Printing with Epson Drivers for Macintosh Your Epson Stylus Pro 7800 or...
Printer Guide
Page 80
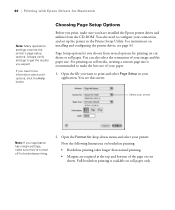
... the CD-ROM. Full borderless printing is recommended to print and select Page Setup in the Printer Setup Utility. You can also select the orientation of your paper. 1. Open the file you have installed the Epson printer driver and utilities from several options for borderless printing. 2. Always verify settings to configure your connection and...
... the CD-ROM. Full borderless printing is recommended to print and select Page Setup in the Printer Setup Utility. You can also select the orientation of your paper. 1. Open the file you have installed the Epson printer driver and utilities from several options for borderless printing. 2. Always verify settings to configure your connection and...


