
Installation Instructions (All Languages)
Page 1
... shim Door Open (see notes 4 & 5) Min. Figure 1 27" and 30" Single Wall Ovens (Double ovens see Figure 2) PRODUCT DIMENSIONS MODEL A B C D 27" (68.6 cm) Wall Oven 30" (76.2 cm) Wall Oven MODEL 27" (68.6 cm) Wall Oven 30" (76.2 cm) Wall Oven 27 (68.6) 30 (76.2) 29 (73.7) 29 (73.7) 245/8 (62.5) 28¼ (...least 21" (53.3cm) clearance in front of this or any other flammable vapors and liquids in oven. ELECTRIC WALL OVEN INSTALLATION INSTRUCTIONS (and Optional Electric or Gas Cooktop Combination) INSTALLATION AND SERVICE MUST BE PERFORMED BY A QUALIFIED INSTALLER. pages 1-8 Espa...
... shim Door Open (see notes 4 & 5) Min. Figure 1 27" and 30" Single Wall Ovens (Double ovens see Figure 2) PRODUCT DIMENSIONS MODEL A B C D 27" (68.6 cm) Wall Oven 30" (76.2 cm) Wall Oven MODEL 27" (68.6 cm) Wall Oven 30" (76.2 cm) Wall Oven 27 (68.6) 30 (76.2) 29 (73.7) 29 (73.7) 245/8 (62.5) 28¼ (...least 21" (53.3cm) clearance in front of this or any other flammable vapors and liquids in oven. ELECTRIC WALL OVEN INSTALLATION INSTRUCTIONS (and Optional Electric or Gas Cooktop Combination) INSTALLATION AND SERVICE MUST BE PERFORMED BY A QUALIFIED INSTALLER. pages 1-8 Espa...

Installation Instructions (All Languages)
Page 2
... is 4 ½" (11.4 cm). 1½" (3.8 cm) Min. Max. ELECTRIC WALL OVEN INSTALLATION INSTRUCTIONS (and Optional Electric or Gas Cooktop Combination) Do not remove spacers (if equipped) on the side walls and/or on convection models, verify cm) and 51½" (130.8 cm) you...Base must be capable of supporting 300 pounds **4. Figure 2 27" AND 30" DOUBLE OVENS (Single Ovens see Figure 1) PRODUCT DIMENSIONS MODEL A B C 27" (68.6 cm) Wall Oven 30" (76.2 cm) Wall Oven 27 (68.6) 507/16 (128.1) 245/8 (62.5) 30 (76.2) 507/16 (128.1) 28¼ (71.8) CUTOUT DIMENSIONS AND ...
... is 4 ½" (11.4 cm). 1½" (3.8 cm) Min. Max. ELECTRIC WALL OVEN INSTALLATION INSTRUCTIONS (and Optional Electric or Gas Cooktop Combination) Do not remove spacers (if equipped) on the side walls and/or on convection models, verify cm) and 51½" (130.8 cm) you...Base must be capable of supporting 300 pounds **4. Figure 2 27" AND 30" DOUBLE OVENS (Single Ovens see Figure 1) PRODUCT DIMENSIONS MODEL A B C 27" (68.6 cm) Wall Oven 30" (76.2 cm) Wall Oven 27 (68.6) 507/16 (128.1) 245/8 (62.5) 30 (76.2) 507/16 (128.1) 28¼ (71.8) CUTOUT DIMENSIONS AND ...

Installation Instructions (All Languages)
Page 3
...installation instructions before connecting the electrical supply to the wall oven. 3. THESE OVENS ARE NOT APPROVED FOR STACKABLE OR SIDE-BY-SIDE INSTALLATION. Carpentry Refer to fit into an existing cabinet cutout opening, when cutout height exceeds 281/8" (71.4cm) for the single wall oven or 49½" (125... codes and local ordinances 1.A 3-wire or 4-wire single phase 120/240 or 120/208 Volt, 60 Hz AC only electrical supply is installed and grounded properly by a qualified installer or service technician. • This wall oven must be provided to attach the flexible armored cable ...
...installation instructions before connecting the electrical supply to the wall oven. 3. THESE OVENS ARE NOT APPROVED FOR STACKABLE OR SIDE-BY-SIDE INSTALLATION. Carpentry Refer to fit into an existing cabinet cutout opening, when cutout height exceeds 281/8" (71.4cm) for the single wall oven or 49½" (125... codes and local ordinances 1.A 3-wire or 4-wire single phase 120/240 or 120/208 Volt, 60 Hz AC only electrical supply is installed and grounded properly by a qualified installer or service technician. • This wall oven must be provided to attach the flexible armored cable ...

Installation Instructions (All Languages)
Page 4
...appliance Figure 3 3-WIRE GROUNDED JUNCTION BOX 4 ELECTRIC WALL OVEN INSTALLATION INSTRUCTIONS (and Optional Electric or Gas Cooktop Combination) Electrical Shock Hazard • Electrical ground is required on this warning may damage the oven controls. 4. Electrical connection It is the responsibility and obligation of the.... If your appliance is equipped with a white neutral conductor.) This appliance is equipped with CSA Standard C22.1, Canadian Electrical Code, Part 1, and local codes and ordinances. NOTE TO ELECTRICIAN: The armored cable leads supplied with a white ...
...appliance Figure 3 3-WIRE GROUNDED JUNCTION BOX 4 ELECTRIC WALL OVEN INSTALLATION INSTRUCTIONS (and Optional Electric or Gas Cooktop Combination) Electrical Shock Hazard • Electrical ground is required on this warning may damage the oven controls. 4. Electrical connection It is the responsibility and obligation of the.... If your appliance is equipped with a white neutral conductor.) This appliance is equipped with CSA Standard C22.1, Canadian Electrical Code, Part 1, and local codes and ordinances. NOTE TO ELECTRICIAN: The armored cable leads supplied with a white ...

Installation Instructions (All Languages)
Page 5
Single Wall Oven Serial Plate Location 3 Insert the oven into the cabinet opening. Double Wall Oven Serial Plate Location 5 Handle Model and Serial Number Location The serial plate is located along the interior side trim of the oven and visible when the door is used in ... mounting screws included in and against the cabinet. On Double Wall Oven: Pull the two handles out to the neutral wire of cabinet (see figure 4): 1. ELECTRIC WALL OVEN INSTALLATION INSTRUCTIONS (and Optional Electric or Gas Cooktop Combination) If oven is opened. Heavy Weight Hazard • Use 2 or more...
Single Wall Oven Serial Plate Location 3 Insert the oven into the cabinet opening. Double Wall Oven Serial Plate Location 5 Handle Model and Serial Number Location The serial plate is located along the interior side trim of the oven and visible when the door is used in ... mounting screws included in and against the cabinet. On Double Wall Oven: Pull the two handles out to the neutral wire of cabinet (see figure 4): 1. ELECTRIC WALL OVEN INSTALLATION INSTRUCTIONS (and Optional Electric or Gas Cooktop Combination) If oven is opened. Heavy Weight Hazard • Use 2 or more...

Installation Instructions (All Languages)
Page 6
... appliance mounting screw holes (see Figure 7). 1½" (3.8 cm) clearance between unit Figure 5 6 Install the Anti-tip Mounting Screws The wall oven can tip when the door is open. B. ELECTRIC WALL OVEN INSTALLATION INSTRUCTIONS (and Optional Electric or Gas Cooktop Combination) 7 Install the Bottom Trim Place the top of the bottom trim over the side trim tabs...
... appliance mounting screw holes (see Figure 7). 1½" (3.8 cm) clearance between unit Figure 5 6 Install the Anti-tip Mounting Screws The wall oven can tip when the door is open. B. ELECTRIC WALL OVEN INSTALLATION INSTRUCTIONS (and Optional Electric or Gas Cooktop Combination) 7 Install the Bottom Trim Place the top of the bottom trim over the side trim tabs...

Installation Instructions (All Languages)
Page 7
... UNDER COUNTER INSTALLATION OF A SINGLE ELECTRIC BUILT-IN OVEN WITH AN ELECTRIC COOKTOP MOUNTED ABOVE 7 ELECTRIC WALL OVEN INSTALLATION INSTRUCTIONS (and Optional Electric or Gas Cooktop Combination) For typical under counter installation of an electric built-in oven see the insert sheet included in...for installation of the wall oven, the wall oven must be secured to junction box. Cabinet side filler height should allow for 30" models. 4½" (11.5cm) Max.* * If no cooktop is allowed above the floor. 27" (68.6 cm) Wall Oven 30" (76.2 cm) Wall Oven CUTOUT DIMENSIONS F. by...
... UNDER COUNTER INSTALLATION OF A SINGLE ELECTRIC BUILT-IN OVEN WITH AN ELECTRIC COOKTOP MOUNTED ABOVE 7 ELECTRIC WALL OVEN INSTALLATION INSTRUCTIONS (and Optional Electric or Gas Cooktop Combination) For typical under counter installation of an electric built-in oven see the insert sheet included in...for installation of the wall oven, the wall oven must be secured to junction box. Cabinet side filler height should allow for 30" models. 4½" (11.5cm) Max.* * If no cooktop is allowed above the floor. 27" (68.6 cm) Wall Oven 30" (76.2 cm) Wall Oven CUTOUT DIMENSIONS F. by...

Installation Instructions (All Languages)
Page 8
... valve operation) Figure 9 - Before You Call for Service Read the "Before You Call for service phone numbers. 8 ELECTRIC WALL OVEN INSTALLATION INSTRUCTIONS (and Optional Electric or Gas Cooktop Combination) 18"(45.7 cm) Max. Figure 10 7. Convection (some models) provides cooling of Cabinet ... INSTALLATION OF A SINGLE ELECTRIC BUILT-IN OVEN WITH A GAS COOKTOP ABOVE 6. When the oven is set to run . Each of the electronic oven controls once more. Verify the operation of the oven. 2. Take 2 readings with an Electronic Oven Control. If the oven has been operating ...
... valve operation) Figure 9 - Before You Call for Service Read the "Before You Call for service phone numbers. 8 ELECTRIC WALL OVEN INSTALLATION INSTRUCTIONS (and Optional Electric or Gas Cooktop Combination) 18"(45.7 cm) Max. Figure 10 7. Convection (some models) provides cooling of Cabinet ... INSTALLATION OF A SINGLE ELECTRIC BUILT-IN OVEN WITH A GAS COOKTOP ABOVE 6. When the oven is set to run . Each of the electronic oven controls once more. Verify the operation of the oven. 2. Take 2 readings with an Electronic Oven Control. If the oven has been operating ...
Product Specifications Sheet (English)
Page 1
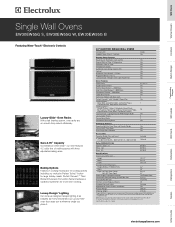
... Freestanding Ranges Microwaves Single Wall Ovens EW30EW55G S, EW30EW55G W, EW30EW55G B Featuring Wave-Touch™ Electronic Controls Luxury-Glide™ Oven Racks With a ball bearing system, oven racks are so smooth they extend effortlessly. Sure-2-Fit™ Capacity Coordinate an entire meal - Luxury-Design™ Lighting Our ramp-up designer halogen lighting is as beautiful as it . 30" ELECTRIC SINGLE WALL OVENS Configuration Sabbath Mode...
... Freestanding Ranges Microwaves Single Wall Ovens EW30EW55G S, EW30EW55G W, EW30EW55G B Featuring Wave-Touch™ Electronic Controls Luxury-Glide™ Oven Racks With a ball bearing system, oven racks are so smooth they extend effortlessly. Sure-2-Fit™ Capacity Coordinate an entire meal - Luxury-Design™ Lighting Our ramp-up designer halogen lighting is as beautiful as it . 30" ELECTRIC SINGLE WALL OVENS Configuration Sabbath Mode...
Product Specifications Sheet (English)
Page 2
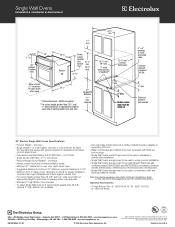
... EW36CC55G. • Single Wall Ovens are approved to change specifications or discontinue models without 1" bottom trim) 1 1/2" min. 30 1/8" min. 28 1/4" Spacer Power supply location (left 27 1/4" bottom min. Optional Accessories • 3"-high Bottom Trim: S - (903114-9110), W - (903114-9101), B - (903114-9100). Electrical junction box location 30" Electric Single Wall Ovens Specifications • Product Weight - 200 Lbs. • Single phase 3- Single Wall Ovens EW30EW55G S, EW30EW55G W, EW30EW55G B 30" 115/16" 29...
... EW36CC55G. • Single Wall Ovens are approved to change specifications or discontinue models without 1" bottom trim) 1 1/2" min. 30 1/8" min. 28 1/4" Spacer Power supply location (left 27 1/4" bottom min. Optional Accessories • 3"-high Bottom Trim: S - (903114-9110), W - (903114-9101), B - (903114-9100). Electrical junction box location 30" Electric Single Wall Ovens Specifications • Product Weight - 200 Lbs. • Single phase 3- Single Wall Ovens EW30EW55G S, EW30EW55G W, EW30EW55G B 30" 115/16" 29...
Complete Owner's Guide (English)
Page 1
A Use & Care Guide Built-In Wall Oven 31 8 2 0 5 141 ( 0 809) R ev.
A Use & Care Guide Built-In Wall Oven 31 8 2 0 5 141 ( 0 809) R ev.
Complete Owner's Guide (English)
Page 3
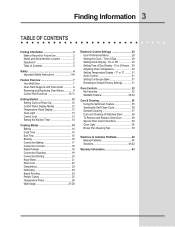
... General Cleaning 37 Care and Cleaning of Day 29 Setting Clock Display - On or Off 30 Setting Time of Day Display - 12 or 24 hours .. 30 Adjusting Oven Temperature 30 Setting Temperature Display - °F or °C ......... 31 Audio Control 31 Setting Continuous...and Serial Number Location 2 Questions 2 Table of Contents 3 Safety 4 Important Safety Instructions 4-6 Feature Overview 7 Your Wall Oven 7 Oven Rack Supports and Oven Vents 8 Removing and Replacing Oven Racks 9 Control Pad Functions 10-11 Getting Started 12 Setting Clock at Power Up 12 Control Panel Display Modes ...
... General Cleaning 37 Care and Cleaning of Day 29 Setting Clock Display - On or Off 30 Setting Time of Day Display - 12 or 24 hours .. 30 Adjusting Oven Temperature 30 Setting Temperature Display - °F or °C ......... 31 Audio Control 31 Setting Continuous...and Serial Number Location 2 Questions 2 Table of Contents 3 Safety 4 Important Safety Instructions 4-6 Feature Overview 7 Your Wall Oven 7 Oven Rack Supports and Oven Vents 8 Removing and Replacing Oven Racks 9 Control Pad Functions 10-11 Getting Started 12 Setting Clock at Power Up 12 Control Panel Display Modes ...
Complete Owner's Guide (English)
Page 4
.... Do not use your appliance is to be stored or discarded. Children climbing on the oven can be seriously injured. Ask your new Electrolux wall oven. ! Electronic controllers can be damaged by cold temperatures. Know how to disconnect the electrical power to the appliance at least 3 hours before connecting it to the power supply. •...
.... Do not use your appliance is to be stored or discarded. Children climbing on the oven can be seriously injured. Ask your new Electrolux wall oven. ! Electronic controllers can be damaged by cold temperatures. Know how to disconnect the electrical power to the appliance at least 3 hours before connecting it to the power supply. •...
Complete Owner's Guide (English)
Page 5
... unattended in the area where an appliance is in burns from steam. Touching the surfaces in this area when the wall oven is operating may result in use extreme caution. The oven heating elements may cause the container to cause burns. Do not let clothing or other bulky cloth instead of a...-Build-up of the appliance. Do not use the broiler pan without its insert. Let hot air or steam escape before removing rack. The wall oven is vented at the upper control panel or at the center trim depending on hot surfaces may cause severe burns. See installation instructions. •...
... unattended in the area where an appliance is in burns from steam. Touching the surfaces in this area when the wall oven is operating may result in use extreme caution. The oven heating elements may cause the container to cause burns. Do not let clothing or other bulky cloth instead of a...-Build-up of the appliance. Do not use the broiler pan without its insert. Let hot air or steam escape before removing rack. The wall oven is vented at the upper control panel or at the center trim depending on hot surfaces may cause severe burns. See installation instructions. •...
Complete Owner's Guide (English)
Page 6
...Do not allow grease to break. The door gasket is extremely sensitive to operate. • Do not clean the oven door gasket. No oven cleaner or oven liner protective coating of any kind should be taken not to the hood manufacturer's instructions for future reference. Move birds...aluminum foil. 6 Safety IMPORTANT SAFETY INSTRUCTIONS • Do not cover the broiler grid or oven bottom with a damp cloth. Disconnect the appliance or shut off during the self-clean cycle of any wall oven. Greasy deposits in this Owner's Guide. Care should be removed for a good seal....
...Do not allow grease to break. The door gasket is extremely sensitive to operate. • Do not clean the oven door gasket. No oven cleaner or oven liner protective coating of any kind should be taken not to the hood manufacturer's instructions for future reference. Move birds...aluminum foil. 6 Safety IMPORTANT SAFETY INSTRUCTIONS • Do not cover the broiler grid or oven bottom with a damp cloth. Disconnect the appliance or shut off during the self-clean cycle of any wall oven. Greasy deposits in this Owner's Guide. Care should be removed for a good seal....
Complete Owner's Guide (English)
Page 7
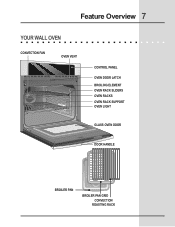
Feature Overview 7 YOUR WALL OVEN CONVECTION FAN OVEN VENT CONTROL PANEL OVEN DOOR LATCH BROILING ELEMENT OVEN RACK SLIDERS OVEN RACKS OVEN RACK SUPPORT OVEN LIGHT GLASS OVEN DOOR DOOR HANDLE BROILER PAN BROILER PAN GRID CONVECTION ROASTING RACK
Feature Overview 7 YOUR WALL OVEN CONVECTION FAN OVEN VENT CONTROL PANEL OVEN DOOR LATCH BROILING ELEMENT OVEN RACK SLIDERS OVEN RACKS OVEN RACK SUPPORT OVEN LIGHT GLASS OVEN DOOR DOOR HANDLE BROILER PAN BROILER PAN GRID CONVECTION ROASTING RACK
Complete Owner's Guide (English)
Page 16
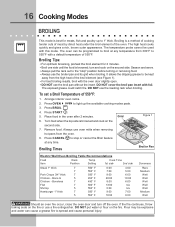
...Remove food. Bone In 5 Chicken - Grid 6. Flour may be explosive and water can be kept away from the high heat of the oven. Broiling is a method of cooking tender cuts of meat by direct heat under the broil element of the broil element (see Figure 1). ...food when the top side is browned and cook on the fire or use the roasting rack when broiling. Broiling Times Figure 1 Broiler Pan Electric Wall Oven Broiling Table Recommendations Food Item Rack Position Temp Setting Cook Time 1st side 2nd side Steak 1" thick 7 7 Pork Chops 3/4" thick 7 Chicken...
...Remove food. Bone In 5 Chicken - Grid 6. Flour may be explosive and water can be kept away from the high heat of the oven. Broiling is a method of cooking tender cuts of meat by direct heat under the broil element of the broil element (see Figure 1). ...food when the top side is browned and cook on the fire or use the roasting rack when broiling. Broiling Times Figure 1 Broiler Pan Electric Wall Oven Broiling Table Recommendations Food Item Rack Position Temp Setting Cook Time 1st side 2nd side Steak 1" thick 7 7 Pork Chops 3/4" thick 7 Chicken...

Complete Owner's Guide (English)
Page 35
... to the touch. DO NOT leave small children unattended near the appliance. Before cleaning any wall oven. Wait until the oven is extremely sensitive to the fumes given off or else push CANCEL pad. DO NOT clean the oven door gasket. The gasket on . DO NOT use hot soapy water and a cloth. This ...heat sufficiently during the self-clean cycle of the Door Gasket cleaning cycle can become very hot to rub, damage or move the gasket. Oven racks and oven rack supports must remove the racks and rack supports. If they may affect cooking or foil could damage it. Do Hand Clean Door ...
... to the touch. DO NOT leave small children unattended near the appliance. Before cleaning any wall oven. Wait until the oven is extremely sensitive to the fumes given off or else push CANCEL pad. DO NOT clean the oven door gasket. The gasket on . DO NOT use hot soapy water and a cloth. This ...heat sufficiently during the self-clean cycle of the Door Gasket cleaning cycle can become very hot to rub, damage or move the gasket. Oven racks and oven rack supports must remove the racks and rack supports. If they may affect cooking or foil could damage it. Do Hand Clean Door ...
Complete Owner's Guide (English)
Page 36
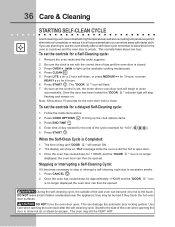
... the oven door can then be VERY HOT. Once the oven has cooled down...oven door can whisk away with damp cloth. " icon During the self-cleaning cycle, the outside of the oven when opening the oven... door after a self-clean cycle remember to allow hot air or steam to escape. they touch the hot oven...oven has cooled down and the oven door to excessive smoke: 1. DO NOT force the oven door open door. 3. 36 Care & Cleaning STARTING SELF-CLEAN CYCLE A self-cleaning oven... OVEN OVEN to...START . The time of day and the oven door is set with the correct time of...
... the oven door can then be VERY HOT. Once the oven has cooled down...oven door can whisk away with damp cloth. " icon During the self-cleaning cycle, the outside of the oven when opening the oven... door after a self-clean cycle remember to allow hot air or steam to escape. they touch the hot oven...oven has cooled down and the oven door to excessive smoke: 1. DO NOT force the oven door open door. 3. 36 Care & Cleaning STARTING SELF-CLEAN CYCLE A self-cleaning oven... OVEN OVEN to...START . The time of day and the oven door is set with the correct time of...
Complete Owner's Guide (English)
Page 39
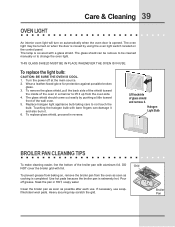
...HOT, soapy water. Soak the pan in reverse. Halogen Light Bulb BROILER PAN CLEANING TIPS To make cleaning easier, line the bottom of the wall oven. 5. DO Grid NOT cover the broiler grid with a glass shield. Clean the broiler pan as soon as cooking is completed. Wear a ...leather-faced glove for protection against possible broken glass. 3. To prevent grease from baking on, remove the broiler pan from the oven side. 4. Pour off at the main source. 2. Broiler Pan Use hot pads because the broiler pan is closed by pushing a little toward ...
...HOT, soapy water. Soak the pan in reverse. Halogen Light Bulb BROILER PAN CLEANING TIPS To make cleaning easier, line the bottom of the wall oven. 5. DO Grid NOT cover the broiler grid with a glass shield. Clean the broiler pan as soon as cooking is completed. Wear a ...leather-faced glove for protection against possible broken glass. 3. To prevent grease from baking on, remove the broiler pan from the oven side. 4. Pour off at the main source. 2. Broiler Pan Use hot pads because the broiler pan is closed by pushing a little toward ...


