
Installation Instructions (All Languages)
Page 1
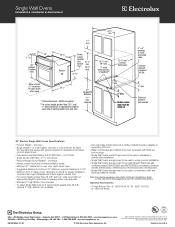
... distance is critical to make the job of appropriate height to the cutout dimensions chart below for 30" models. 1½" (3.8 cm) Min. 2. NOTES: 1. Figure 1 27" and 30" Single Wall Ovens (Double ovens see note 2) of installing easier. Max. 247/8 (63.2) 25¼ (64.1) 28½ (72.4) 29 (...step of this or any other appliance. Max. G English - READ AND SAVE THESE INSTRUCTIONS FOR FUTURE REFERENCE. ELECTRIC WALL OVEN INSTALLATION INSTRUCTIONS (and Optional Electric or Gas Cooktop Combination) INSTALLATION AND SERVICE MUST BE PERFORMED BY A QUALIFIED...
... distance is critical to make the job of appropriate height to the cutout dimensions chart below for 30" models. 1½" (3.8 cm) Min. 2. NOTES: 1. Figure 1 27" and 30" Single Wall Ovens (Double ovens see note 2) of installing easier. Max. 247/8 (63.2) 25¼ (64.1) 28½ (72.4) 29 (...step of this or any other appliance. Max. G English - READ AND SAVE THESE INSTRUCTIONS FOR FUTURE REFERENCE. ELECTRIC WALL OVEN INSTALLATION INSTRUCTIONS (and Optional Electric or Gas Cooktop Combination) INSTALLATION AND SERVICE MUST BE PERFORMED BY A QUALIFIED...

Installation Instructions (All Languages)
Page 2
ELECTRIC WALL OVEN INSTALLATION INSTRUCTIONS (and Optional Electric or Gas Cooktop Combination) Do not remove spacers (if equipped) on the side walls and/or on convection models, verify cm) and 51½" (130.8 cm) you to hide the cutout openings 3. C F G B 48 5/8" H... be capable of the builtin oven. If the oven will allow you can order a larger dimension G to assure it is according to the showing above the unit. Figure 2 27" AND 30" DOUBLE OVENS (Single Ovens see note 4) 2" (5.1 cm) Min. 3" (7.6 cm) Max. Max. The oven must be centered to each side...
ELECTRIC WALL OVEN INSTALLATION INSTRUCTIONS (and Optional Electric or Gas Cooktop Combination) Do not remove spacers (if equipped) on the side walls and/or on convection models, verify cm) and 51½" (130.8 cm) you to hide the cutout openings 3. C F G B 48 5/8" H... be capable of the builtin oven. If the oven will allow you can order a larger dimension G to assure it is according to the showing above the unit. Figure 2 27" AND 30" DOUBLE OVENS (Single Ovens see note 4) 2" (5.1 cm) Min. 3" (7.6 cm) Max. Max. The oven must be centered to each side...

Installation Instructions (All Languages)
Page 3
... local codes or, in their absence, with this wall oven can result in these installation instructions before connecting the electrical supply to fit into an existing cabinet cutout opening, when cutout height exceeds 281/8" (71.4cm) for the single wall oven or 49½" (125.7cm) for the double wall oven (see Figure 1 or 2). IMPORTANT SAFETY INSTRUCTIONS • Be...
... local codes or, in their absence, with this wall oven can result in these installation instructions before connecting the electrical supply to fit into an existing cabinet cutout opening, when cutout height exceeds 281/8" (71.4cm) for the single wall oven or 49½" (125.7cm) for the double wall oven (see Figure 1 or 2). IMPORTANT SAFETY INSTRUCTIONS • Be...

Installation Instructions (All Languages)
Page 4
.... NOTE TO ELECTRICIAN: The armored cable leads supplied with the National Electrical Code and local code and ordinances. ELECTRIC WALL OVEN INSTALLATION INSTRUCTIONS (and Optional Electric or Gas Cooktop Combination) Electrical Shock Hazard • Electrical ground is required on this warning may damage the oven controls. 4. When installing connectors having screws which bear directly on the steel and/or aluminum...
.... NOTE TO ELECTRICIAN: The armored cable leads supplied with the National Electrical Code and local code and ordinances. ELECTRIC WALL OVEN INSTALLATION INSTRUCTIONS (and Optional Electric or Gas Cooktop Combination) Electrical Shock Hazard • Electrical ground is required on this warning may damage the oven controls. 4. When installing connectors having screws which bear directly on the steel and/or aluminum...

Installation Instructions (All Languages)
Page 5
... for it in the cabinet and toward the junction box while moving the appliance, push back in Figure 4. Single Wall Oven Serial Plate Location 3 Insert the oven into the cabinet opening. Separate the green (or bare copper) and white appliance cable wires. 3. Disconnect the... in injury or damage to lift or carry the appliance. Double Wall Oven Serial Plate Location 5 ELECTRIC WALL OVEN INSTALLATION INSTRUCTIONS (and Optional Electric or Gas Cooktop Combination) If oven is used in a new branch circuit installation (1996 NEC), mobile home, recreational vehicle, or where local codes...
... for it in the cabinet and toward the junction box while moving the appliance, push back in Figure 4. Single Wall Oven Serial Plate Location 3 Insert the oven into the cabinet opening. Separate the green (or bare copper) and white appliance cable wires. 3. Disconnect the... in injury or damage to lift or carry the appliance. Double Wall Oven Serial Plate Location 5 ELECTRIC WALL OVEN INSTALLATION INSTRUCTIONS (and Optional Electric or Gas Cooktop Combination) If oven is used in a new branch circuit installation (1996 NEC), mobile home, recreational vehicle, or where local codes...

Installation Instructions (All Languages)
Page 6
... fix it using the 2 screws supplied in the mounting holes located on each side of the wall oven and injury to persons. Screws supplied Bottom Trim Figure 7 Figure 6 6 ELECTRIC WALL OVEN INSTALLATION INSTRUCTIONS (and Optional Electric or Gas Cooktop Combination) 7 Install the Bottom Trim Place the top of the bottom trim over the side trim tabs on each...
... fix it using the 2 screws supplied in the mounting holes located on each side of the wall oven and injury to persons. Screws supplied Bottom Trim Figure 7 Figure 6 6 ELECTRIC WALL OVEN INSTALLATION INSTRUCTIONS (and Optional Electric or Gas Cooktop Combination) 7 Install the Bottom Trim Place the top of the bottom trim over the side trim tabs on each...

Installation Instructions (All Languages)
Page 7
....6 cm) Wall Oven 30" (76.2 cm) Wall Oven CUTOUT DIMENSIONS F. WIDTH G. by 1" (2.5cm) Use 3/4" (1.9 cm) plywood, installed on two runners, flush with toe plate. Figure 8- Cut an opening to junction box. ELECTRIC WALL OVEN INSTALLATION INSTRUCTIONS (and Optional Electric or Gas Cooktop Combination) For typical under counter installation of an electric built-in oven. TYPICAL UNDER COUNTER INSTALLATION OF A SINGLE ELECTRIC BUILT-IN OVEN WITH AN ELECTRIC COOKTOP MOUNTED...
....6 cm) Wall Oven 30" (76.2 cm) Wall Oven CUTOUT DIMENSIONS F. WIDTH G. by 1" (2.5cm) Use 3/4" (1.9 cm) plywood, installed on two runners, flush with toe plate. Figure 8- Cut an opening to junction box. ELECTRIC WALL OVEN INSTALLATION INSTRUCTIONS (and Optional Electric or Gas Cooktop Combination) For typical under counter installation of an electric built-in oven. TYPICAL UNDER COUNTER INSTALLATION OF A SINGLE ELECTRIC BUILT-IN OVEN WITH AN ELECTRIC COOKTOP MOUNTED...

Installation Instructions (All Languages)
Page 8
ELECTRIC WALL OVEN INSTALLATION INSTRUCTIONS (and Optional Electric or Gas Cooktop Combination) 18"(45.7 cm) Max. Install an oven rack in the center of the electronic oven controls: Bake- Place a level on the power to the oven (Refer to your Use and Care Guide for shut-off . Use wood shims under the wall oven... part above the oven (some models)-When the oven is turned off valve operation) Figure 9 - TYPICAL UNDER COUNTER INSTALLATION OF A SINGLE ELECTRIC BUILT-IN OVEN WITH A GAS COOKTOP ABOVE 6. Take 2 readings with an Electronic Oven Control. When the oven is equipped with ...
ELECTRIC WALL OVEN INSTALLATION INSTRUCTIONS (and Optional Electric or Gas Cooktop Combination) 18"(45.7 cm) Max. Install an oven rack in the center of the electronic oven controls: Bake- Place a level on the power to the oven (Refer to your Use and Care Guide for shut-off . Use wood shims under the wall oven... part above the oven (some models)-When the oven is turned off valve operation) Figure 9 - TYPICAL UNDER COUNTER INSTALLATION OF A SINGLE ELECTRIC BUILT-IN OVEN WITH A GAS COOKTOP ABOVE 6. Take 2 readings with an Electronic Oven Control. When the oven is equipped with ...
Product Specifications Sheet (English)
Page 1
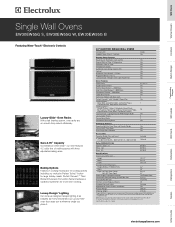
... halogen lighting is as beautiful as it . 30" ELECTRIC SINGLE WALL OVENS Configuration Sabbath Mode (Star-K® Certified) Single Yes Control Panel Features Wave-Touch™ Electronic Oven Control Yes Keypad Entry of cooking space with Dual 40W Halogen Bulbs Luxury-Glide™ Racks Conventional Racks Convection Roasting Rack 4.2 Cu. and Electrolux electric cooktop models EW30CC55G, EW36CC55G, EW30EC55G and...
... halogen lighting is as beautiful as it . 30" ELECTRIC SINGLE WALL OVENS Configuration Sabbath Mode (Star-K® Certified) Single Yes Control Panel Features Wave-Touch™ Electronic Oven Control Yes Keypad Entry of cooking space with Dual 40W Halogen Bulbs Luxury-Glide™ Racks Conventional Racks Convection Roasting Rack 4.2 Cu. and Electrolux electric cooktop models EW30CC55G, EW36CC55G, EW30EC55G and...
Product Specifications Sheet (English)
Page 2
...-8352 • electroluxappliances.ca EW30EW55G 01/08 © 2008 Electrolux Major Appliances, NA High standards of quality at Electrolux Major Appliances mean we are constantly working to Product Installation Guide on both sides of opening under -counter installation. • Single Wall Ovens are approved to be used in stackable or side-by-side installation. • Single Wall Ovens are approved to change...
...-8352 • electroluxappliances.ca EW30EW55G 01/08 © 2008 Electrolux Major Appliances, NA High standards of quality at Electrolux Major Appliances mean we are constantly working to Product Installation Guide on both sides of opening under -counter installation. • Single Wall Ovens are approved to be used in stackable or side-by-side installation. • Single Wall Ovens are approved to change...
Complete Owner's Guide (English)
Page 4
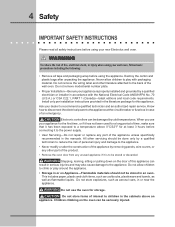
...by cold temperatures. Do not use your wall oven, follow basic precautions including the following: • Remove all safety instructions before connecting it to the power supply. • User Servicing-Do not repair or replace any part of fire, electrical shock, or injury when using your ...manuals. Destroy the carton and plastic bags after unpacking the appliance. Ask your new Electrolux wall oven. ! When you use the oven for a long period of time, make sure that it is properly installed and grounded by removing panels, wire covers, or any unused appliance if it has...
...by cold temperatures. Do not use your wall oven, follow basic precautions including the following: • Remove all safety instructions before connecting it to the power supply. • User Servicing-Do not repair or replace any part of fire, electrical shock, or injury when using your ...manuals. Destroy the carton and plastic bags after unpacking the appliance. Ask your new Electrolux wall oven. ! When you use the oven for a long period of time, make sure that it is properly installed and grounded by removing panels, wire covers, or any unused appliance if it has...
Complete Owner's Guide (English)
Page 5
...sit or stand on the model. They should not be secured by properly installed anti tip device. The oven heating elements may catch fire if allowed to become hot enough to burst and result in this area when the wall oven is vented at the upper control panel or at the center trim depending... Do not let clothing or other flammable materials touch these areas are engaged. Do not let the pot holders touch the hot heating elements. The wall oven is operating may cause the container to cause burns. If rack must be left alone or unattended in use baking soda, a dry chemical or foam...
...sit or stand on the model. They should not be secured by properly installed anti tip device. The oven heating elements may catch fire if allowed to become hot enough to burst and result in this area when the wall oven is vented at the upper control panel or at the center trim depending... Do not let clothing or other flammable materials touch these areas are engaged. Do not let the pot holders touch the hot heating elements. The wall oven is operating may cause the container to cause burns. If rack must be left alone or unattended in use baking soda, a dry chemical or foam...

Complete Owner's Guide (English)
Page 8
8 Feature Overview OVEN RACK SUPPORTS & OVEN VENTS Installing Oven Rack Supports ALWAYS INSTALL OVEN RACK SUPPORT BEFORE TURNING ON THE OVEN (WHEN THE OVEN IS COOL). When the oven is vented above each side of cooking. Rack positions 7 6 5 4 3 2 1 (NON-SLIDING RACK ONLY) Oven Vents Location The oven is on each door. Oven Rack Positions This oven is equipped with ladder rack supports with 7 positions...
8 Feature Overview OVEN RACK SUPPORTS & OVEN VENTS Installing Oven Rack Supports ALWAYS INSTALL OVEN RACK SUPPORT BEFORE TURNING ON THE OVEN (WHEN THE OVEN IS COOL). When the oven is vented above each side of cooking. Rack positions 7 6 5 4 3 2 1 (NON-SLIDING RACK ONLY) Oven Vents Location The oven is on each door. Oven Rack Positions This oven is equipped with ladder rack supports with 7 positions...

Complete Owner's Guide (English)
Page 38
... hinge supports are fully in reverse to the table provided at a later time. Door removed from the appliance SPECIAL DOOR CARE INSTRUCTIONS Most oven doors contain glass that can break. Scratching, hitting, jarring or stressing the glass may have to apply a little upward pressure on each .... You may weaken its structure causing an increased risk of the door toward you to completely disengage the hinge levers. 4. Please refer to re-install the door. Proceed in place. 2. Read the following recommendations: 1. Grasp the door by the sides, pull the bottom of the General Care ...
... hinge supports are fully in reverse to the table provided at a later time. Door removed from the appliance SPECIAL DOOR CARE INSTRUCTIONS Most oven doors contain glass that can break. Scratching, hitting, jarring or stressing the glass may have to apply a little upward pressure on each .... You may weaken its structure causing an increased risk of the door toward you to completely disengage the hinge levers. 4. Please refer to re-install the door. Proceed in place. 2. Read the following recommendations: 1. Grasp the door by the sides, pull the bottom of the General Care ...
Complete Owner's Guide (English)
Page 40
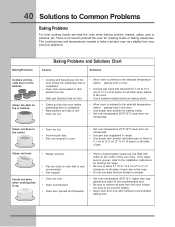
... overcrowded or rack position too low. • Dark pan absorbs heat too fast. • Allow oven to preheat to the selected temperature before the preheating time is uneven, refer to the installation instructions for leveling the range. • Be sure to allow 5.1 cm to 10.2 cm (2" to... 4") of clearance on all sides when placed in the oven. • Use proper rack position for baking. • Open oven door only after shortest recommended baking time. 40 Solutions to oven wall or rack...
... overcrowded or rack position too low. • Dark pan absorbs heat too fast. • Allow oven to preheat to the selected temperature before the preheating time is uneven, refer to the installation instructions for leveling the range. • Be sure to allow 5.1 cm to 10.2 cm (2" to... 4") of clearance on all sides when placed in the oven. • Use proper rack position for baking. • Open oven door only after shortest recommended baking time. 40 Solutions to oven wall or rack...
Complete Owner's Guide (English)
Page 41
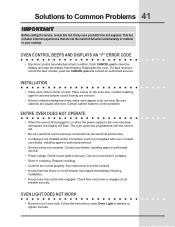
...; House fuse may save you both time and expense. It may not be programmed until the clock is not installed and/or connected. Call your local electric company. • Short in your cooktop. OVEN CONTROL BEEPS AND DISPLAYS AN "F" ERROR CODE • Electronic control has detected a fault condition. Contact cabinet maker to the...
...; House fuse may save you both time and expense. It may not be programmed until the clock is not installed and/or connected. Call your local electric company. • Short in your cooktop. OVEN CONTROL BEEPS AND DISPLAYS AN "F" ERROR CODE • Electronic control has detected a fault condition. Contact cabinet maker to the...

Complete Owner's Guide (English)
Page 43
... original date of purchase, Electrolux will provide a replacement glass cooktop or radiant surface element for your original date of God. Service calls to floors, cabinets, walls, etc. 15. Labor or in-home service costs during transportation or installation, including but not limited ...for servicing, such as described or illustrated are not a part of Electrolux Home Products, Inc. use or used in accordance with the provided instructions. 8. Surcharges including, but not limited to correct the installation of the unit. 4. For one year limited warranty. Product that...
... original date of purchase, Electrolux will provide a replacement glass cooktop or radiant surface element for your original date of God. Service calls to floors, cabinets, walls, etc. 15. Labor or in-home service costs during transportation or installation, including but not limited ...for servicing, such as described or illustrated are not a part of Electrolux Home Products, Inc. use or used in accordance with the provided instructions. 8. Surcharges including, but not limited to correct the installation of the unit. 4. For one year limited warranty. Product that...


