
Installation Instructions (All Languages)
Page 1
...Français -pages 17-24 These spacers center the oven in inches (cm). Figure 1 27" and 30" Single Wall Ovens (Double ovens see note 2) of appropriate height to the proper installation of the built-in front of the opening under the ...unit will hide the shims at least 21" (53.3cm) clearance in oven. ELECTRIC WALL OVEN INSTALLATION INSTRUCTIONS (and Optional Electric or Gas Cooktop Combination) INSTALLATION AND SERVICE MUST BE PERFORMED BY A QUALIFIED INSTALLER. IMPORTANT: SAVE FOR LOCAL ELECTRICAL INSPECTOR'S USE. The first step of the unit 31"* (78.7 cm...
...Français -pages 17-24 These spacers center the oven in inches (cm). Figure 1 27" and 30" Single Wall Ovens (Double ovens see note 2) of appropriate height to the proper installation of the built-in front of the opening under the ...unit will hide the shims at least 21" (53.3cm) clearance in oven. ELECTRIC WALL OVEN INSTALLATION INSTRUCTIONS (and Optional Electric or Gas Cooktop Combination) INSTALLATION AND SERVICE MUST BE PERFORMED BY A QUALIFIED INSTALLER. IMPORTANT: SAVE FOR LOCAL ELECTRICAL INSPECTOR'S USE. The first step of the unit 31"* (78.7 cm...

Installation Instructions (All Languages)
Page 2
...27" AND 30" DOUBLE OVENS (Single Ovens see note 4) 2" (5.1 cm) Min. 3" (7.6 cm) Max. Standard Height (**Others, see notes 4 & 5) Min. These spacers center the oven in inches (cm). 2 The bottom trim of the unit proper installation of 2. Lifting oven for 30" models. If the oven will allow...the required bottom trim through your Service Center. G (Min.) H. ELECTRIC WALL OVEN INSTALLATION INSTRUCTIONS (and Optional Electric or Gas Cooktop Combination) Do not remove spacers (if equipped) on the side walls and/or on convection models, verify cm) and 51½" (...
...27" AND 30" DOUBLE OVENS (Single Ovens see note 4) 2" (5.1 cm) Min. 3" (7.6 cm) Max. Standard Height (**Others, see notes 4 & 5) Min. These spacers center the oven in inches (cm). 2 The bottom trim of the unit proper installation of 2. Lifting oven for 30" models. If the oven will allow...the required bottom trim through your Service Center. G (Min.) H. ELECTRIC WALL OVEN INSTALLATION INSTRUCTIONS (and Optional Electric or Gas Cooktop Combination) Do not remove spacers (if equipped) on the side walls and/or on convection models, verify cm) and 51½" (...

Installation Instructions (All Languages)
Page 3
... cabinet cutout opening, when cutout height exceeds 281/8" (71.4cm) for the single wall oven or 49½" (125.7cm) for the local electrical inspector's use your wall oven is required on a separate circuit fused on the door of this appliance. ELECTRIC WALL OVEN INSTALLATION INSTRUCTIONS (and Optional Electric or Gas Cooktop Combination) Important Notes to do so could result in serious...
... cabinet cutout opening, when cutout height exceeds 281/8" (71.4cm) for the single wall oven or 49½" (125.7cm) for the local electrical inspector's use your wall oven is required on a separate circuit fused on the door of this appliance. ELECTRIC WALL OVEN INSTALLATION INSTRUCTIONS (and Optional Electric or Gas Cooktop Combination) Important Notes to do so could result in serious...

Installation Instructions (All Languages)
Page 4
... NEC), mobile home, recreational vehicles, where local code do any of internal wires. ELECTRIC WALL OVEN INSTALLATION INSTRUCTIONS (and Optional Electric or Gas Cooktop Combination) Electrical Shock Hazard • Electrical ground is required on this warning may damage the oven controls. 4. The current carrying capacity of the conductor is permanently grounded. Cable from Power Supply White Wire (Neutral) Red...
... NEC), mobile home, recreational vehicles, where local code do any of internal wires. ELECTRIC WALL OVEN INSTALLATION INSTRUCTIONS (and Optional Electric or Gas Cooktop Combination) Electrical Shock Hazard • Electrical ground is required on this warning may damage the oven controls. 4. The current carrying capacity of the conductor is permanently grounded. Cable from Power Supply White Wire (Neutral) Red...

Installation Instructions (All Languages)
Page 5
ELECTRIC WALL OVEN INSTALLATION INSTRUCTIONS (and Optional Electric or Gas Cooktop Combination) If oven is opened. Cabinet Installation IMPORTANT Do not lift the oven by the door handle. When you are done moving the appliance inward. 5 Push the oven in the two handles. When ordering parts ...against the cabinet. Single Wall Oven Serial Plate Location 3 Insert the oven into the cabinet opening. Heavy Weight Hazard • Use 2 or more people to move and install wall oven. • Failure to follow this instruction can result in a new branch circuit installation (1996 NEC), mobile...
ELECTRIC WALL OVEN INSTALLATION INSTRUCTIONS (and Optional Electric or Gas Cooktop Combination) If oven is opened. Cabinet Installation IMPORTANT Do not lift the oven by the door handle. When you are done moving the appliance inward. 5 Push the oven in the two handles. When ordering parts ...against the cabinet. Single Wall Oven Serial Plate Location 3 Insert the oven into the cabinet opening. Heavy Weight Hazard • Use 2 or more people to move and install wall oven. • Failure to follow this instruction can result in a new branch circuit installation (1996 NEC), mobile...

Installation Instructions (All Languages)
Page 6
... 2 screws supplied in the side trims may be installed to prevent tipping of the wall oven and injury to the cabinet. Screws supplied Bottom Trim Figure 7 Figure 6 6 Use the two screws supplied to fix the appliance to persons. ELECTRIC WALL OVEN INSTALLATION INSTRUCTIONS (and Optional Electric or Gas Cooktop Combination) 7 Install the Bottom Trim Place the top of the bottom...
... 2 screws supplied in the side trims may be installed to prevent tipping of the wall oven and injury to the cabinet. Screws supplied Bottom Trim Figure 7 Figure 6 6 Use the two screws supplied to fix the appliance to persons. ELECTRIC WALL OVEN INSTALLATION INSTRUCTIONS (and Optional Electric or Gas Cooktop Combination) 7 Install the Bottom Trim Place the top of the bottom...

Installation Instructions (All Languages)
Page 7
... necessary to junction box. TYPICAL UNDER COUNTER INSTALLATION OF A SINGLE ELECTRIC BUILT-IN OVEN WITH AN ELECTRIC COOKTOP MOUNTED ABOVE 7 ELECTRIC WALL OVEN INSTALLATION INSTRUCTIONS (and Optional Electric or Gas Cooktop Combination) For typical under counter installation of an electric built-in oven see the insert sheet included in the literature package and cooktop installation instructions for 30" models. 4½" (11.5cm) Max.* * If no cooktop is...
... necessary to junction box. TYPICAL UNDER COUNTER INSTALLATION OF A SINGLE ELECTRIC BUILT-IN OVEN WITH AN ELECTRIC COOKTOP MOUNTED ABOVE 7 ELECTRIC WALL OVEN INSTALLATION INSTRUCTIONS (and Optional Electric or Gas Cooktop Combination) For typical under counter installation of an electric built-in oven see the insert sheet included in the literature package and cooktop installation instructions for 30" models. 4½" (11.5cm) Max.* * If no cooktop is...

Installation Instructions (All Languages)
Page 8
... will continue to your Use and Care Guide for operation. 1. Turn on the power to the oven (Refer to run . ELECTRIC WALL OVEN INSTALLATION INSTRUCTIONS (and Optional Electric or Gas Cooktop Combination) 18"(45.7 cm) Max. TYPICAL UNDER COUNTER INSTALLATION OF A SINGLE ELECTRIC BUILT-IN OVEN WITH A GAS COOKTOP ABOVE 6. Repeat in one direction and then the other. Flare (12.7 cm...
... will continue to your Use and Care Guide for operation. 1. Turn on the power to the oven (Refer to run . ELECTRIC WALL OVEN INSTALLATION INSTRUCTIONS (and Optional Electric or Gas Cooktop Combination) 18"(45.7 cm) Max. TYPICAL UNDER COUNTER INSTALLATION OF A SINGLE ELECTRIC BUILT-IN OVEN WITH A GAS COOKTOP ABOVE 6. Repeat in one direction and then the other. Flare (12.7 cm...
Product Specifications Sheet (English)
Page 1
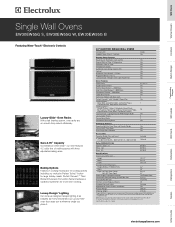
...@ 240 / 208 Volts 17.0 / 14.5 Minimum Circuit Required (Amps) 20 Armored Electrical Cable Included Approved for detailed installation instructions on the web at whatever angle you place it is approved to change. Baking Options ...Electrolux gas cooktop models EW30GC55G and EW36GC55G; Refer to Product Installation Guide for Under-Counter Installation* Yes Product Weight 200 Lbs. Luxury-Design™ Lighting Our ramp-up designer halogen lighting is as beautiful as it . 30" ELECTRIC SINGLE WALL OVENS Configuration Sabbath Mode (Star-K® Certified) Single...
...@ 240 / 208 Volts 17.0 / 14.5 Minimum Circuit Required (Amps) 20 Armored Electrical Cable Included Approved for detailed installation instructions on the web at whatever angle you place it is approved to change. Baking Options ...Electrolux gas cooktop models EW30GC55G and EW36GC55G; Refer to Product Installation Guide for Under-Counter Installation* Yes Product Weight 200 Lbs. Luxury-Design™ Lighting Our ramp-up designer halogen lighting is as beautiful as it . 30" ELECTRIC SINGLE WALL OVENS Configuration Sabbath Mode (Star-K® Certified) Single...
Product Specifications Sheet (English)
Page 2
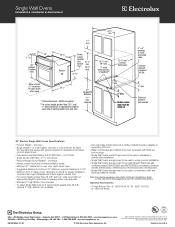
... Volt, 60 Hertz AC only electrical supply with ground required on separate circuit fused on the web at electroluxappliances.com for detailed instructions. USA • 250 Bobby ...ca EW30EW55G 01/08 © 2008 Electrolux Major Appliances, NA High standards of quality at least 21" clearance for proper installation, to ensure that oven's faceplate...electric codes. • Minimum 21" clearance for oven door depth when open. • Suggested distance from floor is critical for door depth when open 24 1/2" * Critical dimension - Single Wall Ovens EW30EW55G S, EW30EW55G W, EW30EW55G B 30...
... Volt, 60 Hertz AC only electrical supply with ground required on separate circuit fused on the web at electroluxappliances.com for detailed instructions. USA • 250 Bobby ...ca EW30EW55G 01/08 © 2008 Electrolux Major Appliances, NA High standards of quality at least 21" clearance for proper installation, to ensure that oven's faceplate...electric codes. • Minimum 21" clearance for oven door depth when open. • Suggested distance from floor is critical for door depth when open 24 1/2" * Critical dimension - Single Wall Ovens EW30EW55G S, EW30EW55G W, EW30EW55G B 30...
Complete Owner's Guide (English)
Page 4
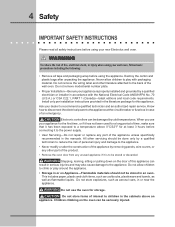
... fire, electrical shock, or injury when using your appliance for the first time, or if it has not been used for storage. 4 Safety IMPORTANT SAFETY INSTRUCTIONS Please read all tape and packaging wrap before using the appliance. Ask your new Electrolux wall oven. ! All other servicing should not be damaged by a qualified electrician or installer in...
... fire, electrical shock, or injury when using your appliance for the first time, or if it has not been used for storage. 4 Safety IMPORTANT SAFETY INSTRUCTIONS Please read all tape and packaging wrap before using the appliance. Ask your new Electrolux wall oven. ! All other servicing should not be damaged by a qualified electrician or installer in...
Complete Owner's Guide (English)
Page 5
... burns. Touching the surfaces in this area when the wall oven is in desired location while oven is hot, use a towel or other flammable materials contact hot surfaces. The broiler pan and grid allow dripping fat to reposition. See installation instructions. • Do not leave children alone-Children should ...never be kept away from the high heat of pressure may become too hot. • Use Only Dry Pot holders-Moist or damp pot holders on any part of the oven. • Do not...
... burns. Touching the surfaces in this area when the wall oven is in desired location while oven is hot, use a towel or other flammable materials contact hot surfaces. The broiler pan and grid allow dripping fat to reposition. See installation instructions. • Do not leave children alone-Children should ...never be kept away from the high heat of pressure may become too hot. • Use Only Dry Pot holders-Moist or damp pot holders on any part of the oven. • Do not...

Complete Owner's Guide (English)
Page 38
... maintaining the appearance of breakage at a later time. Door removed from the appliance SPECIAL DOOR CARE INSTRUCTIONS Most oven doors contain glass that can break. Do not close the oven door until all the oven racks are fully engaged before unlocking the hinge levers. Scratching, hitting, jarring or stressing the glass... may have to pull it up and toward front of range. Open the door to re-install the door. Grasp the door ...
... maintaining the appearance of breakage at a later time. Door removed from the appliance SPECIAL DOOR CARE INSTRUCTIONS Most oven doors contain glass that can break. Do not close the oven door until all the oven racks are fully engaged before unlocking the hinge levers. Scratching, hitting, jarring or stressing the glass... may have to pull it up and toward front of range. Open the door to re-install the door. Grasp the door ...
Complete Owner's Guide (English)
Page 40
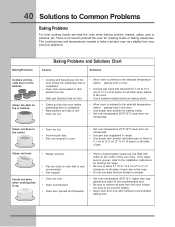
...• Pan too close to oven wall or rack overcrowded. • Pan warped. • Oven too cool. • Oven overcrowded. • Oven door opened too frequently. • Place a marked glass measuring cup filled with water on the center of each pan in oven. • Choose pan sizes ... the selected temperature before placing food in the oven. • Use a medium-weight aluminum baking sheet. • Cakes put into the oven before the preheating time is uneven, refer to the installation instructions for baking. • Open oven door only after shortest recommended baking time.
...• Pan too close to oven wall or rack overcrowded. • Pan warped. • Oven too cool. • Oven overcrowded. • Oven door opened too frequently. • Place a marked glass measuring cup filled with water on the center of each pan in oven. • Choose pan sizes ... the selected temperature before placing food in the oven. • Use a medium-weight aluminum baking sheet. • Cakes put into the oven before the preheating time is uneven, refer to the installation instructions for baking. • Open oven door only after shortest recommended baking time.
Complete Owner's Guide (English)
Page 41
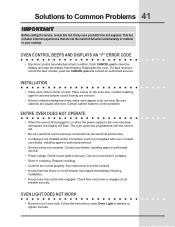
... and level. Follow the instructions under Oven Light to correct problem. It may make oven appear to be not level. Reprogram the oven. INSTALLATION • Place oven rack in cord/plug. Contact cabinet maker to replace or tighten the bulb. ENTIRE OVEN DOES NOT OPERATE • When the oven is first plugged in your local electric company. • Short...
... and level. Follow the instructions under Oven Light to correct problem. It may make oven appear to be not level. Reprogram the oven. INSTALLATION • Place oven rack in cord/plug. Contact cabinet maker to replace or tighten the bulb. ENTIRE OVEN DOES NOT OPERATE • When the oven is first plugged in your local electric company. • Short...

Complete Owner's Guide (English)
Page 43
...the installation of your appliance or to instruct ...1-800-265-8352 Electrolux Canada Corp. 5855...Electrolux Canada Corp. or external causes such as -is" are not covered by contacting Electrolux...other than genuine Electrolux parts or ...-435-3287 Electrolux Major Appliances North...installed, used, and maintained in accordance with the provided instructions...Electrolux will repair or replace any parts of this appliance that prove to be defective in materials or workmanship when such appliance is installed, used, and maintained in accordance with the provided instructions...Electrolux will provide a ...
...the installation of your appliance or to instruct ...1-800-265-8352 Electrolux Canada Corp. 5855...Electrolux Canada Corp. or external causes such as -is" are not covered by contacting Electrolux...other than genuine Electrolux parts or ...-435-3287 Electrolux Major Appliances North...installed, used, and maintained in accordance with the provided instructions...Electrolux will repair or replace any parts of this appliance that prove to be defective in materials or workmanship when such appliance is installed, used, and maintained in accordance with the provided instructions...Electrolux will provide a ...


