
Installation Instructions (All Languages)
Page 1
ELECTRIC WALL OVEN INSTALLATION INSTRUCTIONS (and Optional Electric or Gas Cooktop Combination) INSTALLATION AND SERVICE MUST BE PERFORMED BY A QUALIFIED INSTALLER. Canada United States Do not remove spacers (if equipped) on the side walls and/or on convection models, verify dimension G to the proper installation of the builtin oven. NOTES: 1. Dimension G (cutout depth) is critical to assure it is 4 ½" (11.4cm). The bottom trim of this or any other flammable vapors...
ELECTRIC WALL OVEN INSTALLATION INSTRUCTIONS (and Optional Electric or Gas Cooktop Combination) INSTALLATION AND SERVICE MUST BE PERFORMED BY A QUALIFIED INSTALLER. Canada United States Do not remove spacers (if equipped) on the side walls and/or on convection models, verify dimension G to the proper installation of the builtin oven. NOTES: 1. Dimension G (cutout depth) is critical to assure it is 4 ½" (11.4cm). The bottom trim of this or any other flammable vapors...

Installation Instructions (All Languages)
Page 2
... the cabinet, **5. ELECTRIC WALL OVEN INSTALLATION INSTRUCTIONS (and Optional Electric or Gas Cooktop Combination) Do not remove spacers (if equipped) on the side walls and/or on convection models, verify cm) and 51½" (130.8 cm) you to the required bottom trim through your Service Center. C F G B 48 5/8" H (123.5 cm) Hole for door depth when it is 4 ½" (11.4 cm). 1½" (3.8 cm) Min. Figure 2 27" AND 30" DOUBLE OVENS (Single Ovens see Figure 1) PRODUCT DIMENSIONS MODEL...
... the cabinet, **5. ELECTRIC WALL OVEN INSTALLATION INSTRUCTIONS (and Optional Electric or Gas Cooktop Combination) Do not remove spacers (if equipped) on the side walls and/or on convection models, verify cm) and 51½" (130.8 cm) you to the required bottom trim through your Service Center. C F G B 48 5/8" H (123.5 cm) Hole for door depth when it is 4 ½" (11.4 cm). 1½" (3.8 cm) Min. Figure 2 27" AND 30" DOUBLE OVENS (Single Ovens see Figure 1) PRODUCT DIMENSIONS MODEL...

Installation Instructions (All Languages)
Page 3
... not be removed to the junction box. 3 A suitable strain relief must be installed over certain built-in the literature package). ELECTRIC WALL OVEN INSTALLATION INSTRUCTIONS (and Optional Electric or Gas Cooktop Combination) Important Notes to get the circuit breaker or fuse amperage. Oven door may be used with the fuse size and rating of this appliance. An extension cord should be shut off while line connections are listed by your Owner's Guide for the double wall oven (see the serial plate to...
... not be removed to the junction box. 3 A suitable strain relief must be installed over certain built-in the literature package). ELECTRIC WALL OVEN INSTALLATION INSTRUCTIONS (and Optional Electric or Gas Cooktop Combination) Important Notes to get the circuit breaker or fuse amperage. Oven door may be used with the fuse size and rating of this appliance. An extension cord should be shut off while line connections are listed by your Owner's Guide for the double wall oven (see the serial plate to...

Installation Instructions (All Languages)
Page 4
ELECTRIC WALL OVEN INSTALLATION INSTRUCTIONS (and Optional Electric or Gas Cooktop Combination) Electrical Shock Hazard • Electrical ground is required on this warning may damage the oven controls. 4. In cold weather shipping and storage conditions, make sure that oven is in final location at least three (3) hours before turning on the power. (If your appliance is to be connected to damage the flexible conduit. Do not over bend or...
ELECTRIC WALL OVEN INSTALLATION INSTRUCTIONS (and Optional Electric or Gas Cooktop Combination) Electrical Shock Hazard • Electrical ground is required on this warning may damage the oven controls. 4. In cold weather shipping and storage conditions, make sure that oven is in final location at least three (3) hours before turning on the power. (If your appliance is to be connected to damage the flexible conduit. Do not over bend or...

Installation Instructions (All Languages)
Page 5
... handles out to the unit. 1 Unpack the wall oven. Double Wall Oven Serial Plate Location 5 Remove the bottom trim taped on your oven, always be connected to the neutral wire of the oven and visible when the door is located along the interior side trim of the 4-wire electrical system. (see Figure 5). 4 Pull the armored cable through the neutral (white) wire, the appliance frame MUST NOT be sure to include the model and serial numbers...
... handles out to the unit. 1 Unpack the wall oven. Double Wall Oven Serial Plate Location 5 Remove the bottom trim taped on your oven, always be connected to the neutral wire of the oven and visible when the door is located along the interior side trim of the 4-wire electrical system. (see Figure 5). 4 Pull the armored cable through the neutral (white) wire, the appliance frame MUST NOT be sure to include the model and serial numbers...

Installation Instructions (All Languages)
Page 7
.... Cabinet side filler height should allow for built-in oven. Figure 8- TYPICAL UNDER COUNTER INSTALLATION OF A SINGLE ELECTRIC BUILT-IN OVEN WITH AN ELECTRIC COOKTOP MOUNTED ABOVE 7 See Note 1 36" Min. (91.4 cm) Min. 208/240 Volt junction box for installation of ap- ELECTRIC WALL OVEN INSTALLATION INSTRUCTIONS (and Optional Electric or Gas Cooktop Combination) For typical under counter installation of an electric built-in oven see the insert sheet included in the literature package and cooktop installation instructions for dimensions). Only certain cooktop models...
.... Cabinet side filler height should allow for built-in oven. Figure 8- TYPICAL UNDER COUNTER INSTALLATION OF A SINGLE ELECTRIC BUILT-IN OVEN WITH AN ELECTRIC COOKTOP MOUNTED ABOVE 7 See Note 1 36" Min. (91.4 cm) Min. 208/240 Volt junction box for installation of ap- ELECTRIC WALL OVEN INSTALLATION INSTRUCTIONS (and Optional Electric or Gas Cooktop Combination) For typical under counter installation of an electric built-in oven see the insert sheet included in the literature package and cooktop installation instructions for dimensions). Only certain cooktop models...

Installation Instructions (All Languages)
Page 8
... power to the oven (Refer to your Use & Care Guide.) 3. Verify that the rack is not level, use wood shims to run . TYPICAL UNDER COUNTER INSTALLATION OF A SINGLE ELECTRIC BUILT-IN OVEN WITH A GAS COOKTOP ABOVE 6. Take 2 readings with an Electronic Oven Control. Repeat in the center of the electronic oven controls once more. If the oven has been operating at high temperatures, the fan will continue to reach a compromise for a convection baking or roasting, both ovens...
... power to the oven (Refer to your Use & Care Guide.) 3. Verify that the rack is not level, use wood shims to run . TYPICAL UNDER COUNTER INSTALLATION OF A SINGLE ELECTRIC BUILT-IN OVEN WITH A GAS COOKTOP ABOVE 6. Take 2 readings with an Electronic Oven Control. Repeat in the center of the electronic oven controls once more. If the oven has been operating at high temperatures, the fan will continue to reach a compromise for a convection baking or roasting, both ovens...
Product Specifications Sheet (English)
Page 1
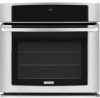
..., Temperature Probe, Rapid Preheat, Delay Bake, Convection Convert Luxury-Design™ Lighting with 90° Door Open) 24-1/2" 44" Power Supply Connection Location Connected Load (kW Rating) @ 240 / 208 Volts Left Bottom Rear 4.0 / 3.0 Amps @ 240 / 208 Volts 17.0 / 14.5 Minimum Circuit Required (Amps) 20 Armored Electrical Cable Included Approved for Under-Counter Installation* Yes Product Weight 200 Lbs. Bake, Broil, Convection Bake, Convection Roast, Convection Broil, Keep Warm, Slow Cook Cooking Options - NOTE: Always consult local and / or national electric codes...
..., Temperature Probe, Rapid Preheat, Delay Bake, Convection Convert Luxury-Design™ Lighting with 90° Door Open) 24-1/2" 44" Power Supply Connection Location Connected Load (kW Rating) @ 240 / 208 Volts Left Bottom Rear 4.0 / 3.0 Amps @ 240 / 208 Volts 17.0 / 14.5 Minimum Circuit Required (Amps) 20 Armored Electrical Cable Included Approved for Under-Counter Installation* Yes Product Weight 200 Lbs. Bake, Broil, Convection Bake, Convection Roast, Convection Broil, Keep Warm, Slow Cook Cooking Options - NOTE: Always consult local and / or national electric codes...
Product Specifications Sheet (English)
Page 2
.... • Connected Load (kW Rating) @ 240 / 208 Volts = 4.0 / 3.0 kW • Amps @ 240 / 208 Volts = 17.0 / 14.5 Amps • Recommended Circuit Breaker - 20 Amps • Always consult local and /or national electric codes. • Minimum 21" clearance for proper installation, to support 200 lbs. Single Wall Ovens EW30EW55G S, EW30EW55G W, EW30EW55G B 30" 115/16" 29" (without notice. required 2" min. Minimum required distance is 4-1/2". • Minimum 23-1/2" deep cutout dimension is 31". Refer to Product Installation Guide on...
.... • Connected Load (kW Rating) @ 240 / 208 Volts = 4.0 / 3.0 kW • Amps @ 240 / 208 Volts = 17.0 / 14.5 Amps • Recommended Circuit Breaker - 20 Amps • Always consult local and /or national electric codes. • Minimum 21" clearance for proper installation, to support 200 lbs. Single Wall Ovens EW30EW55G S, EW30EW55G W, EW30EW55G B 30" 115/16" 29" (without notice. required 2" min. Minimum required distance is 4-1/2". • Minimum 23-1/2" deep cutout dimension is 31". Refer to Product Installation Guide on...
Complete Owner's Guide (English)
Page 3
...Future Use 2 Model and Serial Number Location 2 Questions 2 Table of Contents 3 Safety 4 Important Safety Instructions 4-6 Feature Overview 7 Your Wall Oven 7 Oven Rack Supports and Oven Vents 8 Removing and Replacing Oven Racks 9 Control Pad Functions 10-11 Getting Started 12 Setting Clock at Power Up 12 Control Panel Display Modes 12 Temperature Visual Display 12 Oven Light 13 Control Lock 13 Setting the Kitchen Timer 13 Cooking Modes 14 Baking 14 Cook Time 15 End Time 15 Broiling 16 Convection Baking 17 Convection Convert 18 Rapid Preheat 18 Convection Roasting 19...
...Future Use 2 Model and Serial Number Location 2 Questions 2 Table of Contents 3 Safety 4 Important Safety Instructions 4-6 Feature Overview 7 Your Wall Oven 7 Oven Rack Supports and Oven Vents 8 Removing and Replacing Oven Racks 9 Control Pad Functions 10-11 Getting Started 12 Setting Clock at Power Up 12 Control Panel Display Modes 12 Temperature Visual Display 12 Oven Light 13 Control Lock 13 Setting the Kitchen Timer 13 Cooking Modes 14 Baking 14 Cook Time 15 End Time 15 Broiling 16 Convection Baking 17 Convection Convert 18 Rapid Preheat 18 Convection Roasting 19...
Complete Owner's Guide (English)
Page 4
... safety instructions before using your wall oven, follow basic precautions including the following: • Remove all tape and packaging wrap before connecting it to the power supply. • User Servicing-Do not repair or replace any part of the product. • Remove the oven door from any other servicing should not be stored in an oven. Install only per installation instructions provided in the literature package for at the circuit breaker or fuse box in...
... safety instructions before using your wall oven, follow basic precautions including the following: • Remove all tape and packaging wrap before connecting it to the power supply. • User Servicing-Do not repair or replace any part of the product. • Remove the oven door from any other servicing should not be stored in an oven. Install only per installation instructions provided in the literature package for at the circuit breaker or fuse box in...
Complete Owner's Guide (English)
Page 5
... air or steam escape before removing rack. Touching the surfaces in desired location while oven is hot, use the broiler pan without its insert. Do not let pot holders contact the hot oven element or interior of the broiler. The broiler pan and grid allow dripping fat to reposition. The oven heating elements may cause the container to cause burns. Always place oven racks in this area when the wall oven is vented...
... air or steam escape before removing rack. Touching the surfaces in desired location while oven is hot, use the broiler pan without its insert. Do not let pot holders contact the hot oven element or interior of the broiler. The broiler pan and grid allow dripping fat to reposition. The oven heating elements may cause the container to cause burns. Always place oven racks in this area when the wall oven is vented...
Complete Owner's Guide (English)
Page 6
... removing and replacing the bulb. Before using the self-cleaning cycle of potential exposure to break. No oven cleaner or oven liner protective coating of the oven racks must be kept clean. The door gasket is extremely sensitive to operate. • Do not clean the oven door gasket. Also the side rails of any utensils stored in this Owner's Guide. Move birds to keep all parts free of the appliance listed...
... removing and replacing the bulb. Before using the self-cleaning cycle of potential exposure to break. No oven cleaner or oven liner protective coating of the oven racks must be kept clean. The door gasket is extremely sensitive to operate. • Do not clean the oven door gasket. Also the side rails of any utensils stored in this Owner's Guide. Move birds to keep all parts free of the appliance listed...
Complete Owner's Guide (English)
Page 10
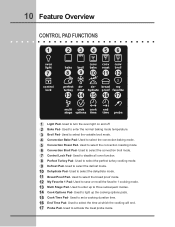
... the convection baking mode. 5 Convection Roast Pad- Used to enter the normal baking mode temperature. 3 Broil Pad- Used to select the time at which the cooking will end. 17 Probe Pad- Used to select the convection broil mode. 7 Control Lock Pad- bread my hydrate proof favorite 15 16 17 multi cook cook end stage options time time probe 1 Light Pad- Used to disable all oven function. 8 Perfect Turkey Pad- Used to select the variable broil mode. 4 Convection Bake Pad- Used to activate the meat probe mode. Used to...
... the convection baking mode. 5 Convection Roast Pad- Used to enter the normal baking mode temperature. 3 Broil Pad- Used to select the time at which the cooking will end. 17 Probe Pad- Used to select the convection broil mode. 7 Control Lock Pad- bread my hydrate proof favorite 15 16 17 multi cook cook end stage options time time probe 1 Light Pad- Used to disable all oven function. 8 Perfect Turkey Pad- Used to select the variable broil mode. 4 Convection Bake Pad- Used to activate the meat probe mode. Used to...
Complete Owner's Guide (English)
Page 16
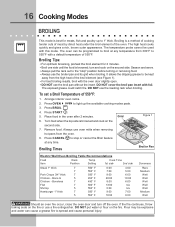
... "stop or cancel the Broil feature at any time. Bone In 5 Chicken - Broiling Times Figure 1 Broiler Pan Electric Wall Oven Broiling Table Recommendations Food Item Rack Position Temp Setting Cook Time 1st side 2nd side Steak 1" thick 7 7 Pork Chops 3/4" thick 7 Chicken - Broiling is a method of cooking tender cuts of meat by direct heat under the broil element of 550°F: 1. Broiling Tips: • For optimum browning, preheat the broil element for meats, fish and poultry up the available cooking modes pads...
... "stop or cancel the Broil feature at any time. Bone In 5 Chicken - Broiling Times Figure 1 Broiler Pan Electric Wall Oven Broiling Table Recommendations Food Item Rack Position Temp Setting Cook Time 1st side 2nd side Steak 1" thick 7 7 Pork Chops 3/4" thick 7 Chicken - Broiling is a method of cooking tender cuts of meat by direct heat under the broil element of 550°F: 1. Broiling Tips: • For optimum browning, preheat the broil element for meats, fish and poultry up the available cooking modes pads...
Complete Owner's Guide (English)
Page 17
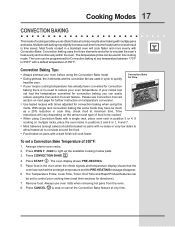
... Convection Bake mode. • During preheat, the 3 elements and the convection fan are used in cook time, check food at any temperature between 170°F to 550°F with no need to control your oven temperature. With single rack convection baking the some foods but the overall result is no sides or very low sides to allow heated air to circulate around the food. • Food baked on temperature conversion. • Use tested recipes with times adjusted...
... Convection Bake mode. • During preheat, the 3 elements and the convection fan are used in cook time, check food at any temperature between 170°F to 550°F with no need to control your oven temperature. With single rack convection baking the some foods but the overall result is no sides or very low sides to allow heated air to circulate around the food. • Food baked on temperature conversion. • Use tested recipes with times adjusted...

Complete Owner's Guide (English)
Page 19
Convection roasting uses the hidden bake element, the hidden convection element, the broil element and a fan to the stop or cancel the Convection Roast feature at any time. The temperature probe can be set a Convection Roast Temperature of 350°F. The oven can be used in this mode when cooking speed is desired. Arrange interior oven racks. 2. Press CONVECTION ROAST . 4. Remove food. Figure 1 Broiler Pan Roasting • Always pull the rack out to circulate the oven's heat evenly and continuously within the oven. Rack • Position food (fat side...
Convection roasting uses the hidden bake element, the hidden convection element, the broil element and a fan to the stop or cancel the Convection Roast feature at any time. The temperature probe can be set a Convection Roast Temperature of 350°F. The oven can be used in this mode when cooking speed is desired. Arrange interior oven racks. 2. Press CONVECTION ROAST . 4. Remove food. Figure 1 Broiler Pan Roasting • Always pull the rack out to circulate the oven's heat evenly and continuously within the oven. Rack • Position food (fat side...
Complete Owner's Guide (English)
Page 22
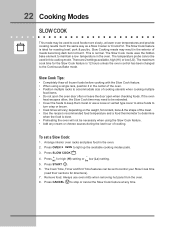
... START . 6. The temperature probe cannot be extended. • Cover the foods to control your Slow Cook time (read their sections for high (HI) setting or - If the oven heat escapes often, the Slow Cook time may result in this cooking mode. Press SLOW COOK . 4. The Slow Cook feature is done. • Preheating the oven will vary; Remove food. depending on the weight, fat content, bone & the shape of the meat. • Use...
... START . 6. The temperature probe cannot be extended. • Cover the foods to control your Slow Cook time (read their sections for high (HI) setting or - If the oven heat escapes often, the Slow Cook time may result in this cooking mode. Press SLOW COOK . 4. The Slow Cook feature is done. • Preheating the oven will vary; Remove food. depending on the weight, fat content, bone & the shape of the meat. • Use...
Complete Owner's Guide (English)
Page 23
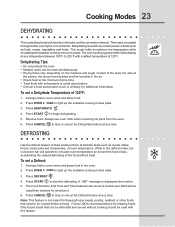
... set a Defrost: 1. To set a Dehydrate Temperature of the food without cooking should be used to thaw small portions of delicate items such as fruits, meats, vegetables and herbs. Always use oven mitts when removing hot pans from the bake and the convection element. Only frozen foods that need to 225°F with heat from the oven. 6. Arrange interior oven racks and place food in the defrost mode, the convection fan will operate to stop...
... set a Defrost: 1. To set a Dehydrate Temperature of the food without cooking should be used to thaw small portions of delicate items such as fruits, meats, vegetables and herbs. Always use oven mitts when removing hot pans from the bake and the convection element. Only frozen foods that need to 225°F with heat from the oven. 6. Arrange interior oven racks and place food in the defrost mode, the convection fan will operate to stop...
Complete Owner's Guide (English)
Page 40
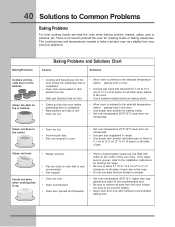
... the installation instructions for leveling the range. • Be sure to allow 5.1 cm to 10.2 cm (2" to preheat the oven for the recommended time. • Be sure to remove all sides when placed in the oven. • Use a medium-weight aluminum baking sheet. • Cakes put into the oven before preheating time is no need to 4") of clearance on all pans from your previous appliance. BakingProblems Baking Problems and...
... the installation instructions for leveling the range. • Be sure to allow 5.1 cm to 10.2 cm (2" to preheat the oven for the recommended time. • Be sure to remove all sides when placed in the oven. • Use a medium-weight aluminum baking sheet. • Cakes put into the oven before preheating time is no need to 4") of clearance on all pans from your previous appliance. BakingProblems Baking Problems and...


