Quick Install Guide
Page 4
... light up. Please do not proceed to flash rapidly and irregularly (2). The amount of time the button should be held down will vary between different routers, some will begin to step 2 until the WPS LED ( ) starts flashing. 3. Approximately 30 seconds afterwards, the Wi‐Fi LED ( ) will work with a quick press...
... light up. Please do not proceed to flash rapidly and irregularly (2). The amount of time the button should be held down will vary between different routers, some will begin to step 2 until the WPS LED ( ) starts flashing. 3. Approximately 30 seconds afterwards, the Wi‐Fi LED ( ) will work with a quick press...

Quick Install Guide
Page 5
... WPS LED ( ) will remain active. 5. The WPS connection between the extender and the wireless access point will go through a series of your router user manual for the WPS LED to step 3. If an error occurred, the WPS LED ( ) will light up in regular two‐second ...flash rapidly. Please wait for detailed instructions regarding WPS operation. 4. Troubleshooting: If the WPS LED ( ) continues to blink in orange. Note: Some wireless routers may test the connectivity of the Wi‐Fi extender by connecting to it (select its SSID from your list of wireless networks, not the...
... WPS LED ( ) will remain active. 5. The WPS connection between the extender and the wireless access point will go through a series of your router user manual for the WPS LED to step 3. If an error occurred, the WPS LED ( ) will light up in regular two‐second ...flash rapidly. Please wait for detailed instructions regarding WPS operation. 4. Troubleshooting: If the WPS LED ( ) continues to blink in orange. Note: Some wireless routers may test the connectivity of the Wi‐Fi extender by connecting to it (select its SSID from your list of wireless networks, not the...
Quick Install Guide
Page 11
... its settings. Click "APPLY" to continue, or click "BACK" to the Wi‐Fi network if you may find it via your Wi‐Fi router's configuration, or consult the network administrator who set up the Wi‐Fi network. 8. Your computer will be unable to connect to restart the setup...
... its settings. Click "APPLY" to continue, or click "BACK" to the Wi‐Fi network if you may find it via your Wi‐Fi router's configuration, or consult the network administrator who set up the Wi‐Fi network. 8. Your computer will be unable to connect to restart the setup...
Manual
Page 10
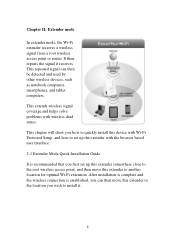
... extender to install it receives. Chapter II: Extender mode In extender mode, the Wi-Fi extender receives a wireless signal from a root wireless access point or router. This extends wireless signal coverage and helps solve problems with the browser based user interface. 2-1 Extender Mode Quick Installation Guide It is established, you can...
... extender to install it receives. Chapter II: Extender mode In extender mode, the Wi-Fi extender receives a wireless signal from a root wireless access point or router. This extends wireless signal coverage and helps solve problems with the browser based user interface. 2-1 Extender Mode Quick Installation Guide It is established, you can...

Manual
Page 11
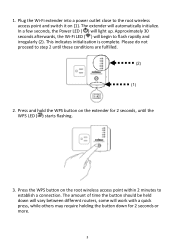
... WPS button Using web UI - You can establish a wireless connection via the hardware WPS button or using the WPS button to section 2-1-1 - If your broadband router or access point also has a WPS button, we recommend using the web UI interface. In a few seconds, the Power LED ( ) will light up. (2) (1) Plug the...
... WPS button Using web UI - You can establish a wireless connection via the hardware WPS button or using the WPS button to section 2-1-1 - If your broadband router or access point also has a WPS button, we recommend using the web UI interface. In a few seconds, the Power LED ( ) will light up. (2) (1) Plug the...
Manual
Page 12
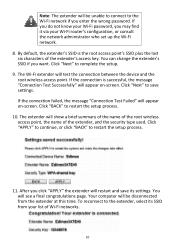
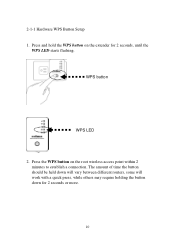
Press and hold the WPS button on the root wireless access point within 2 minutes to establish a connection. WPS button WPS LED 2. Press the WPS button on the extender for 2 seconds or more. 10 The amount of time the button should be held down will vary between different routers, some will work with a quick press, while others may require holding the button down for 2 seconds, until the WPS LED starts flashing. 2-1-1 Hardware WPS Button Setup 1.
Press and hold the WPS button on the root wireless access point within 2 minutes to establish a connection. WPS button WPS LED 2. Press the WPS button on the extender for 2 seconds or more. 10 The amount of time the button should be held down will vary between different routers, some will work with a quick press, while others may require holding the button down for 2 seconds, until the WPS LED starts flashing. 2-1-1 Hardware WPS Button Setup 1.
Manual
Page 14
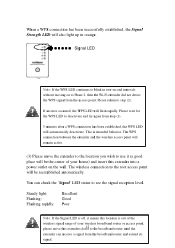
...Poor Note: If the Signal LED is off, it (a good place will be reestablished automatically. You can receive a signal from the broadband router and extend its signal. Please return to blink in orange. If an error occurred, the WPS LED will automatically deactivate. Please wait for the...point. The wireless connection to the root access point will be the center of your house) and insert this extender clos1e2r to the broadband router until the extender can check the 'Signal' LED status to see the signal reception level. When a WPS connection has been successfully established...
...Poor Note: If the Signal LED is off, it (a good place will be reestablished automatically. You can receive a signal from the broadband router and extend its signal. Please return to blink in orange. If an error occurred, the WPS LED will automatically deactivate. Please wait for the...point. The wireless connection to the root access point will be the center of your house) and insert this extender clos1e2r to the broadband router until the extender can check the 'Signal' LED status to see the signal reception level. When a WPS connection has been successfully established...

Manual
Page 22
If you want to log in to the web UI of the extender, please refer to '2-2 Extender Mode Advanced Settings' for more information. 20 Note: After the wireless connection between the extender and the wireless broadband router is established, the extender becomes a DHCP client and will receive its IP address from the broadband router automatically.
If you want to log in to the web UI of the extender, please refer to '2-2 Extender Mode Advanced Settings' for more information. 20 Note: After the wireless connection between the extender and the wireless broadband router is established, the extender becomes a DHCP client and will receive its IP address from the broadband router automatically.
Manual
Page 28
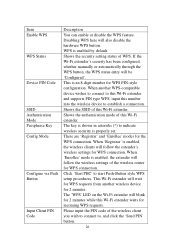
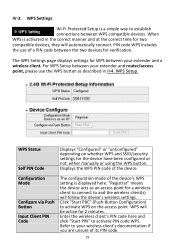
... to connect to start Push-Button style WPS setup procedures. When another wireless device for WPS connection. Shows the security setting status of the wireless router for incoming WPS requests. WPS is properly set. This is enabled, the wireless clients will blink for 2 minutes while this number into the wireless device...
... to connect to start Push-Button style WPS setup procedures. When another wireless device for WPS connection. Shows the security setting status of the wireless router for incoming WPS requests. WPS is properly set. This is enabled, the wireless clients will blink for 2 minutes while this number into the wireless device...
Manual
Page 3
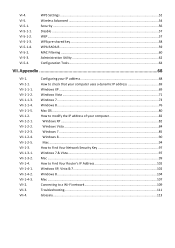
... Vista ...84 Windows 7 ...85 Windows 8 ...90 Mac ...94 How to Find Your Network Security Key 97 Windows 7 & Vista...97 Mac ...99 How to Find Your Router's IP Address 102 Windows XP, Vista & 7 102 Windows 8 ...104 Mac ...107 Connecting to a Wi-Fi network 109 Troubleshooting ...111 Glossary...113
... Vista ...84 Windows 7 ...85 Windows 8 ...90 Mac ...94 How to Find Your Network Security Key 97 Windows 7 & Vista...97 Mac ...99 How to Find Your Router's IP Address 102 Windows XP, Vista & 7 102 Windows 8 ...104 Mac ...107 Connecting to a Wi-Fi network 109 Troubleshooting ...111 Glossary...113
Manual
Page 8
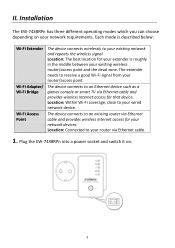
...access for your existing wireless router/access point and the dead zone. Location: The best location for that device. Location: Within Wi-Fi coverage, close to an Ethernet device such as a games console or smart TV via Ethernet cable. 1. Plug the EW-7438RPn into a power socket ...Fi signal from your router via Ethernet cable and provides wireless Internet access for your extender is described below: Wi-Fi Extender Wi-Fi Adapter/ Wi-Fi Bridge Wi-Fi Access Point The device connects wirelessly to your router/access point. Installation The EW-7438RPn has three different ...
...access for your existing wireless router/access point and the dead zone. Location: The best location for that device. Location: Within Wi-Fi coverage, close to an Ethernet device such as a games console or smart TV via Ethernet cable. 1. Plug the EW-7438RPn into a power socket ...Fi signal from your router via Ethernet cable and provides wireless Internet access for your extender is described below: Wi-Fi Extender Wi-Fi Adapter/ Wi-Fi Bridge Wi-Fi Access Point The device connects wirelessly to your router/access point. Installation The EW-7438RPn has three different ...
Manual
Page 11
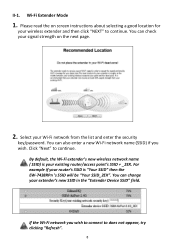
...new SSID in the "Extender Device SSID" field. By default, the Wi-Fi extender's new wireless network name ( SSID) is "Your SSID" then the EW-7438RPn 's SSID will be "Your SSID_2EX". If the Wi-Fi network you wish. Wi-Fi Extender Mode 1. You can also enter a new Wi-Fi network...to continue. Select your wireless extender and then click "NEXT" to does not appear, try clicking "Refresh". 8 For example if your router's SSID is your existing router/access point's SSID + _2EX. You can change your signal strength on screen instructions about selecting a good location for your Wi-Fi network...
...new SSID in the "Extender Device SSID" field. By default, the Wi-Fi extender's new wireless network name ( SSID) is "Your SSID" then the EW-7438RPn 's SSID will be "Your SSID_2EX". If the Wi-Fi network you wish. Wi-Fi Extender Mode 1. You can also enter a new Wi-Fi network...to continue. Select your wireless extender and then click "NEXT" to does not appear, try clicking "Refresh". 8 For example if your router's SSID is your existing router/access point's SSID + _2EX. You can change your signal strength on screen instructions about selecting a good location for your Wi-Fi network...
Manual
Page 12
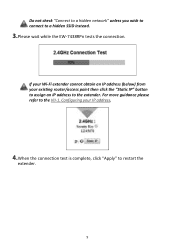
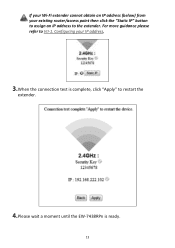
Configuring your existing router/access point then click the "Static IP" button to assign an IP address to restart the extender. 9 Do not check "Connect to a hidden network" unless you wish to connect to the VII-1. If your Wi-Fi extender cannot obtain an IP address (below) from your IP address. 4.When the connection test is complete, click "Apply" to the extender. For more guidance please refer to a hidden SSID instead. 3.Please wait while the EW-7438RPn tests the connection.
Configuring your existing router/access point then click the "Static IP" button to assign an IP address to restart the extender. 9 Do not check "Connect to a hidden network" unless you wish to connect to the VII-1. If your Wi-Fi extender cannot obtain an IP address (below) from your IP address. 4.When the connection test is complete, click "Apply" to the extender. For more guidance please refer to a hidden SSID instead. 3.Please wait while the EW-7438RPn tests the connection.
Manual
Page 14
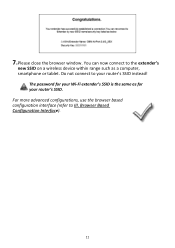
Browser Based Configuration Interface). 11 Do not connect to your router's SSID. For more advanced configurations, use the browser based configuration interface (refer to the extender's new SSID on a wireless device within range such as for your Wi-Fi extender's SSID is the same as a computer, smartphone or tablet. 7.Please close the browser window. The password for your router's SSID instead! You can now connect to III.
Browser Based Configuration Interface). 11 Do not connect to your router's SSID. For more advanced configurations, use the browser based configuration interface (refer to the extender's new SSID on a wireless device within range such as for your Wi-Fi extender's SSID is the same as a computer, smartphone or tablet. 7.Please close the browser window. The password for your router's SSID instead! You can now connect to III.
Manual
Page 16
Configuring your existing router/access point then click the "Static IP" button to assign an IP address to the extender. If your Wi-Fi extender cannot obtain an IP address (below) from your IP address. 3.When the connection test is complete, click "Apply" to restart the extender. 4.Please wait a moment until the EW-7438RPn is ready. 13 For more guidance please refer to VII-1.
Configuring your existing router/access point then click the "Static IP" button to assign an IP address to the extender. If your Wi-Fi extender cannot obtain an IP address (below) from your IP address. 3.When the connection test is complete, click "Apply" to restart the extender. 4.Please wait a moment until the EW-7438RPn is ready. 13 For more guidance please refer to VII-1.
Manual
Page 18
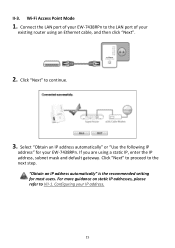
...the LAN port of your EW-7438RPn to VII-1. Click "Next" to proceed to continue. 3. "Obtain an IP address automatically" is the recommended setting for your IP address. 15 For more guidance on static IP addresses, please refer to the LAN port of your existing router using a static IP, enter... the IP address, subnet mask and default gateway. If you are using an Ethernet cable, and then click "Next". 2. Select "Obtain an IP address automatically" or "Use the following IP address" for most users. Configuring your EW-7438RPn. Wi-Fi Access...
...the LAN port of your EW-7438RPn to VII-1. Click "Next" to proceed to continue. 3. "Obtain an IP address automatically" is the recommended setting for your IP address. 15 For more guidance on static IP addresses, please refer to the LAN port of your existing router using a static IP, enter... the IP address, subnet mask and default gateway. If you are using an Ethernet cable, and then click "Next". 2. Select "Obtain an IP address automatically" or "Use the following IP address" for most users. Configuring your EW-7438RPn. Wi-Fi Access...
Manual
Page 22
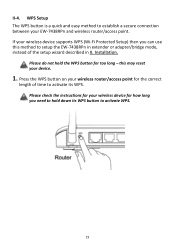
Please check the instructions for your wireless device for how long you can use this may reset your device. 1. If your EW-7438RPn and wireless router/access point. Installation. this method to hold the WPS button for the correct length of time to activate its WPS button to establish a secure ...(Wi-Fi Protected Setup) then you need to setup the EW-7438RPn in extender or adapter/bridge mode, instead of the setup wizard described in II. II-4. Please do not hold down its WPS. Press the WPS button on your wireless router/access point for too long - WPS Setup The WPS button...
Please check the instructions for your wireless device for how long you can use this may reset your device. 1. If your EW-7438RPn and wireless router/access point. Installation. this method to hold the WPS button for the correct length of time to activate its WPS button to establish a secure ...(Wi-Fi Protected Setup) then you need to setup the EW-7438RPn in extender or adapter/bridge mode, instead of the setup wizard described in II. II-4. Please do not hold down its WPS. Press the WPS button on your wireless router/access point for too long - WPS Setup The WPS button...
Manual
Page 32
The WPS Settings page displays settings for 2 minutes. For WPS Setup between your extender and router/access point, please use of its PIN code. 29 Configuration Mode Configure via Push Button Input Client PIN Code The configuration mode of the device. ...
The WPS Settings page displays settings for 2 minutes. For WPS Setup between your extender and router/access point, please use of its PIN code. 29 Configuration Mode Configure via Push Button Input Client PIN Code The configuration mode of the device. ...
Manual
Page 34
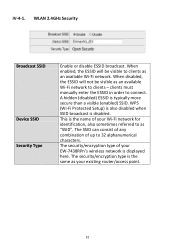
... is typically more secure than a visible (enabled) SSID. The SSID can consist of any combination of up to connect. The security/encryption type of your EW-7438RPn's wireless network is the same as an available Wi-Fi network. IV-4-1. The security/encryption type is displayed here. A hidden (disabled) ESSID is disabled. clients... of your Wi-Fi network for identification, also sometimes referred to clients - When enabled, the ESSID will not be visible to clients as your existing router/access point. 31
... is typically more secure than a visible (enabled) SSID. The SSID can consist of any combination of up to connect. The security/encryption type of your EW-7438RPn's wireless network is the same as an available Wi-Fi network. IV-4-1. The security/encryption type is displayed here. A hidden (disabled) ESSID is disabled. clients... of your Wi-Fi network for identification, also sometimes referred to clients - When enabled, the ESSID will not be visible to clients as your existing router/access point. 31
Manual
Page 38
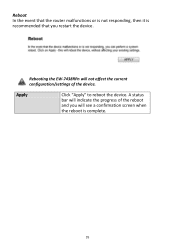
Reboot In the event that you will indicate the progress of the device. Apply Click "Apply" to reboot the device. Rebooting the EW-7438RPn will not affect the current configuration/settings of the reboot and you restart the device. A status bar will see a confirmation screen when the reboot is recommended that the router malfunctions or is not responding, then it is complete. 35
Reboot In the event that you will indicate the progress of the device. Apply Click "Apply" to reboot the device. Rebooting the EW-7438RPn will not affect the current configuration/settings of the reboot and you restart the device. A status bar will see a confirmation screen when the reboot is recommended that the router malfunctions or is not responding, then it is complete. 35


