Datasheet
Page 1
... wired and the wireless network nodes. This standardized function is provided in smart transmission power control. Support Green WLAN The EW‐7228APn has adapted a clever protocol in the bundled CD. Robust Wireless LAN Security (WPA, WPA2 support) Except for the...PC's IP address before starting the configuration. Web Configuration The EW‐7228APn allows you building up a large wireless network in different networking environment Multi‐languages Setup Wizard An unique Multi‐languages Setup Wizard is compatible with a browser. When the wireless is ...
... wired and the wireless network nodes. This standardized function is provided in smart transmission power control. Support Green WLAN The EW‐7228APn has adapted a clever protocol in the bundled CD. Robust Wireless LAN Security (WPA, WPA2 support) Except for the...PC's IP address before starting the configuration. Web Configuration The EW‐7228APn allows you building up a large wireless network in different networking environment Multi‐languages Setup Wizard An unique Multi‐languages Setup Wizard is compatible with a browser. When the wireless is ...
Datasheet
Page 2
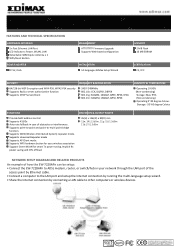
... x 90(D) mm 11n: 14±1.5dBm, 11g: 15±1.5dBm 11b:17±1.5dBm NETWORK SETUP DIAGRAM AND RELATED PRODUCTS An example of how the EW‐7228APn can be setup: • Connect the EW‐7228APn to ADSL modem, router, or switch/hub in case of the access point by Ethernet cable. &#...8226; Connect a computer to the LAN port and setup the Internet connection by running the multi‐language setup wizard. •...
... x 90(D) mm 11n: 14±1.5dBm, 11g: 15±1.5dBm 11b:17±1.5dBm NETWORK SETUP DIAGRAM AND RELATED PRODUCTS An example of how the EW‐7228APn can be setup: • Connect the EW‐7228APn to ADSL modem, router, or switch/hub in case of the access point by Ethernet cable. &#...8226; Connect a computer to the LAN port and setup the Internet connection by running the multi‐language setup wizard. •...
Manual
Page 2
...optical, chemical, manual or otherwise, without the prior written permission from time to change without any particular purpose. Edimax Technology Co., Ltd. Edimax Technology Co., Ltd. Should the programs prove defective following their respective holders. For more than the costs of ...physically performing source distribution, a complete machine-readable copy of all rights reserved. The program is subject to give you have purchased and the setup...
...optical, chemical, manual or otherwise, without the prior written permission from time to change without any particular purpose. Edimax Technology Co., Ltd. Edimax Technology Co., Ltd. Should the programs prove defective following their respective holders. For more than the costs of ...physically performing source distribution, a complete machine-readable copy of all rights reserved. The program is subject to give you have purchased and the setup...

Manual
Page 5
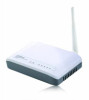
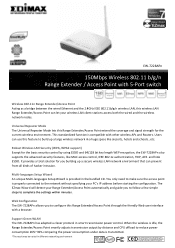
... start using this router, please check if there is connected to 150Mbps for purchasing the Edimax EW-7228APn wireless access point. This product provides wireless access to claim the missing item(s): Wireless Access Point CD containing setup wizard, multi language quick installation guide and user manual Power Adapter 3dBi Antenna...
... start using this router, please check if there is connected to 150Mbps for purchasing the Edimax EW-7228APn wireless access point. This product provides wireless access to claim the missing item(s): Wireless Access Point CD containing setup wizard, multi language quick installation guide and user manual Power Adapter 3dBi Antenna...
Manual
Page 10
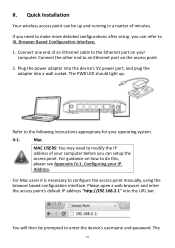
...one end of an Ethernet cable to modify the IP address of minutes. Mac MAC USERS: You may need to make more detailed configurations after setup, you can be prompted to III. The 10 Browser Based Configuration Interface. 1. Plug the power adapter into the device's 5V power port, ...and plug the adapter into the URL bar. Quick Installation Your wireless access point can setup the access point. Connect the other end to configure the access point manually, using the browser based configuration interface. II-1. For Mac users it...
...one end of an Ethernet cable to modify the IP address of minutes. Mac MAC USERS: You may need to make more detailed configurations after setup, you can be prompted to III. The 10 Browser Based Configuration Interface. 1. Plug the power adapter into the device's 5V power port, ...and plug the adapter into the URL bar. Quick Installation Your wireless access point can setup the access point. Connect the other end to configure the access point manually, using the browser based configuration interface. II-1. For Mac users it...
Manual
Page 14
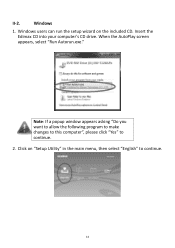
Insert the Edimax CD into your computer's CD drive. II-2. Windows users can run the setup wizard on "Setup Utility" in the main menu, then select "English" to continue. 2. When the AutoPlay screen appears, select "Run Autorun.exe." Click on the included CD. Windows 1. Note: If a popup window appears asking "Do you want to allow the following program to make changes to this computer", please click "Yes" to continue. 14
Insert the Edimax CD into your computer's CD drive. II-2. Windows users can run the setup wizard on "Setup Utility" in the main menu, then select "English" to continue. 2. When the AutoPlay screen appears, select "Run Autorun.exe." Click on the included CD. Windows 1. Note: If a popup window appears asking "Do you want to allow the following program to make changes to this computer", please click "Yes" to continue. 14
Manual
Page 15
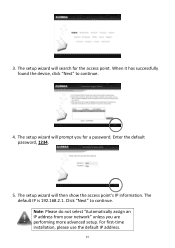
3. The setup wizard will then show the access point's IP information. The setup wizard will prompt you are performing more advanced setup. Enter the default password, 1234. 5. The default IP is 192.168.2.1. Note: Please do not select "Automatically assign an IP address from your network" unless you for the access point. When it has successfully found the device, click "Next" to continue. Click "Next" to continue. 4. The setup wizard will search for a password. For first-time installation, please use the default IP address. 15
3. The setup wizard will then show the access point's IP information. The setup wizard will prompt you are performing more advanced setup. Enter the default password, 1234. 5. The default IP is 192.168.2.1. Note: Please do not select "Automatically assign an IP address from your network" unless you for the access point. When it has successfully found the device, click "Next" to continue. Click "Next" to continue. 4. The setup wizard will search for a password. For first-time installation, please use the default IP address. 15
Manual
Page 17
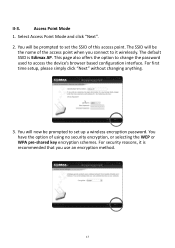
... WEP or WPA pre-shared key encryption schemes. Select Access Point Mode and click "Next". 2. You will now be prompted to it is Edimax AP. II-3. For first time setup, please simply click "Next" without changing anything. 3. You will be prompted to access the device's browser based configuration interface. Access Point Mode...
... WEP or WPA pre-shared key encryption schemes. Select Access Point Mode and click "Next". 2. You will now be prompted to it is Edimax AP. II-3. For first time setup, please simply click "Next" without changing anything. 3. You will be prompted to access the device's browser based configuration interface. Access Point Mode...

Manual
Page 19
6. Click "Finish" to complete the setup. 19 After the device reboots, you will see a final congratulation screen.
6. Click "Finish" to complete the setup. 19 After the device reboots, you will see a final congratulation screen.

Manual
Page 20
Select AP Client Mode and click "Next". 2. For first time setup, please simply click "Next" without changing anything. 3. Select the wireless network you wish to connect to, click "Scan" to refresh the list of wireless networks. ...
Select AP Client Mode and click "Next". 2. For first time setup, please simply click "Next" without changing anything. 3. Select the wireless network you wish to connect to, click "Scan" to refresh the list of wireless networks. ...
Manual
Page 21
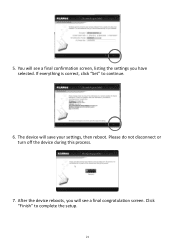
If everything is correct, click "Set" to complete the setup. 21 After the device reboots, you will see a final confirmation screen, listing the settings you have selected. The device will see a final congratulation screen. Click "Finish" to continue. 6. Please do not disconnect or turn off the device during this process. 7. 5. You will save your settings, then reboot.
If everything is correct, click "Set" to complete the setup. 21 After the device reboots, you will see a final confirmation screen, listing the settings you have selected. The device will see a final congratulation screen. Click "Finish" to continue. 6. Please do not disconnect or turn off the device during this process. 7. 5. You will save your settings, then reboot.
Manual
Page 24
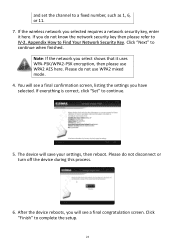
... wireless network you will save your settings, then reboot. If you have selected. Please do not use WPA2 AES here. Click "Next" to complete the setup. 24 After the device reboots, you selected requires a network security key, enter it uses WPA-PSK/WPA2-PSK encryption, then please use WPA2 mixed mode...
... wireless network you will save your settings, then reboot. If you have selected. Please do not use WPA2 AES here. Click "Next" to complete the setup. 24 After the device reboots, you selected requires a network security key, enter it uses WPA-PSK/WPA2-PSK encryption, then please use WPA2 mixed mode...
Manual
Page 28
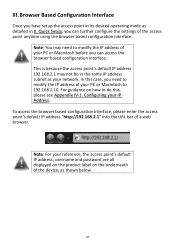
... on how to do this case, you can access the browser based configuration interface. Configuring your PC or Macintosh before you have setup the access point in II. III. Quick Setup, you need to 192.168.2.10. For guidance on the underneath of your IP Address. In this , please see Appendix IV...
... on how to do this case, you can access the browser based configuration interface. Configuring your PC or Macintosh before you have setup the access point in II. III. Quick Setup, you need to 192.168.2.10. For guidance on the underneath of your IP Address. In this , please see Appendix IV...
Manual
Page 46
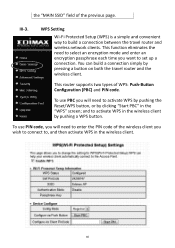
... "WPS" screen; This router supports two types of the previous page. You can build a connection simply by pushing a WPS button. WPS Setting Wi-Fi Protected Setup (WPS) is a simple and convenient way to set up a connection.
... "WPS" screen; This router supports two types of the previous page. You can build a connection simply by pushing a WPS button. WPS Setting Wi-Fi Protected Setup (WPS) is a simple and convenient way to set up a connection.

Manual
Page 47
... point, this box to WPA (AES) and generate a passphrase key for 2 minutes while this access point will be shown here. Enable WPS Wi-Fi Protected Setup Information WPS Status Self PIN Code SSID Authentication Mode Passphrase Key Device Configuration Config Mode Configure via Push Button Input Client PIN Check this field... point's wireless settings for 2 minutes. Displays the SSID (ESSID) of the wireless 47 Displays WPS status. If you need to start Push-Button style WPS setup. Please input the PIN code of this access point.
... point, this box to WPA (AES) and generate a passphrase key for 2 minutes while this access point will be shown here. Enable WPS Wi-Fi Protected Setup Information WPS Status Self PIN Code SSID Authentication Mode Passphrase Key Device Configuration Config Mode Configure via Push Button Input Client PIN Check this field... point's wireless settings for 2 minutes. Displays the SSID (ESSID) of the wireless 47 Displays WPS status. If you need to start Push-Button style WPS setup. Please input the PIN code of this access point.
Manual
Page 48
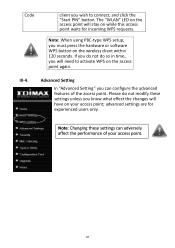
... these settings can configure the advanced features of your access point; advanced settings are for incoming WPS requests. III-4. Note: When using PBC-type WPS setup, you wish to activate WPS on while this access point waits for experienced users only. If you know what effect the changes will need to...
... these settings can configure the advanced features of your access point; advanced settings are for incoming WPS requests. III-4. Note: When using PBC-type WPS setup, you wish to activate WPS on while this access point waits for experienced users only. If you know what effect the changes will need to...
