Quick Install Guide
Page 6
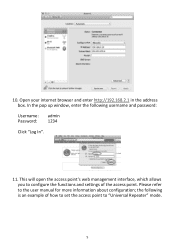
Please refer to "Universal Repeater" mode. 5 In the pop up window, enter the following is an example of the access point. the following username and password: Username: admin Password: 1234 Click "Log In". 11. 10. This will open the access point's web management interface, which allows you to configure the functions and settings of how to set the access point to the user manual for more information about configuration; Open your internet browser and enter http://192.168.2.1 in the address box.
Please refer to "Universal Repeater" mode. 5 In the pop up window, enter the following is an example of the access point. the following username and password: Username: admin Password: 1234 Click "Log In". 11. 10. This will open the access point's web management interface, which allows you to configure the functions and settings of how to set the access point to the user manual for more information about configuration; Open your internet browser and enter http://192.168.2.1 in the address box.
Quick Install Guide
Page 10
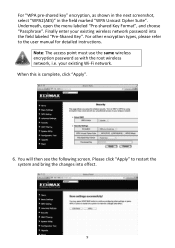
Note: The access point must use the same wireless encryption password as shown in the next screenshot, select "WPA2(AES)" in the field marked "WPA Unicast Cipher Suite". Finally enter your existing Wi-Fi network. For ... menu labeled "Pre-shared Key Format", and choose "Passphrase". For "WPA pre-shared key" encryption, as with the root wireless network, i.e. your existing wireless network password into effect. 9
Note: The access point must use the same wireless encryption password as shown in the next screenshot, select "WPA2(AES)" in the field marked "WPA Unicast Cipher Suite". Finally enter your existing Wi-Fi network. For ... menu labeled "Pre-shared Key Format", and choose "Passphrase". For "WPA pre-shared key" encryption, as with the root wireless network, i.e. your existing wireless network password into effect. 9
Manual
Page 3
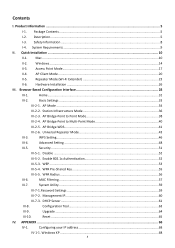
... Settings ...33 III-2-1. AP Bridge-Point to Multi-Point Mode 40 III-2-5. Security ...51 III-5-1. Enable 802.1x Authentication 52 III-5-3. System Utility ...59 III-7-1.Password Settings ...59 III-7-2. Reset ...65 IV. Contents I -4. Safety Information ...8 I . Windows ...14 II-3. Station Infrastructure Mode 36 III-2-3. Universal Repeater Mode 43 III-3. Disable ...52 III...
... Settings ...33 III-2-1. AP Bridge-Point to Multi-Point Mode 40 III-2-5. Security ...51 III-5-1. Enable 802.1x Authentication 52 III-5-3. System Utility ...59 III-7-1.Password Settings ...59 III-7-2. Reset ...65 IV. Contents I -4. Safety Information ...8 I . Windows ...14 II-3. Station Infrastructure Mode 36 III-2-3. Universal Repeater Mode 43 III-3. Disable ...52 III...
Manual
Page 6
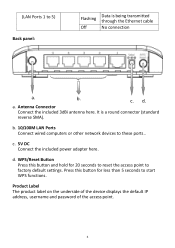
... reset the access point to these ports.. Product Label The product label on the underside of the device displays the default IP address, username and password of the access point. 6 c. b. Antenna Connector Connect the included 3dBi antenna here. b. 10/100M LAN Ports Connect wired computers or other network devices to factory...
... reset the access point to these ports.. Product Label The product label on the underside of the device displays the default IP address, username and password of the access point. 6 c. b. Antenna Connector Connect the included 3dBi antenna here. b. 10/100M LAN Ports Connect wired computers or other network devices to factory...
Manual
Page 10
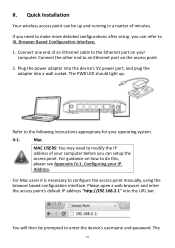
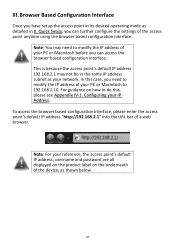
For guidance on how to enter the device's username and password. Please open a web browser and enter the access point's default IP address "http://192.168.2.1" into a wall socket. Quick Installation Your wireless access point can ...
For guidance on how to enter the device's username and password. Please open a web browser and enter the access point's default IP address "http://192.168.2.1" into a wall socket. Quick Installation Your wireless access point can ...

Manual
Page 11
From here, you will see the browser based configuration interface home screen. 11 default username is admin and the default password is 1234.
From here, you will see the browser based configuration interface home screen. 11 default username is admin and the default password is 1234.
Manual
Page 15
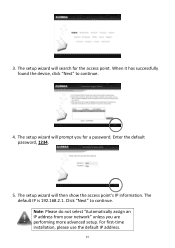
3. Enter the default password, 1234. 5. For first-time installation, please use the default IP address. 15 The setup wizard will then show the access point's IP information. When it has successfully found the device, click "Next" to continue. The setup wizard will search for a password. Click "Next" to continue. 4. The default IP is 192.168.2.1. The setup wizard will prompt you are performing more advanced setup. Note: Please do not select "Automatically assign an IP address from your network" unless you for the access point.
3. Enter the default password, 1234. 5. For first-time installation, please use the default IP address. 15 The setup wizard will then show the access point's IP information. When it has successfully found the device, click "Next" to continue. The setup wizard will search for a password. Click "Next" to continue. 4. The default IP is 192.168.2.1. The setup wizard will prompt you are performing more advanced setup. Note: Please do not select "Automatically assign an IP address from your network" unless you for the access point.
Manual
Page 17
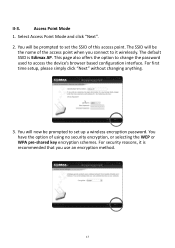
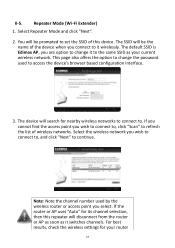
Select Access Point Mode and click "Next". 2. For security reasons, it is Edimax AP. Access Point Mode 1. This page also offers the option to change the password used to it wirelessly. You will now be prompted to set the SSID of using no security encryption, or selecting the WEP ... the name of the access point when you use an encryption method. 17 The SSID will be prompted to set up a wireless encryption password. You have the option of this access point. The default SSID is recommended that you connect to access the device's browser based configuration interface...
Select Access Point Mode and click "Next". 2. For security reasons, it is Edimax AP. Access Point Mode 1. This page also offers the option to change the password used to it wirelessly. You will now be prompted to set the SSID of using no security encryption, or selecting the WEP ... the name of the access point when you use an encryption method. 17 The SSID will be prompted to set up a wireless encryption password. You have the option of this access point. The default SSID is recommended that you connect to access the device's browser based configuration interface...

Manual
Page 20
... the wireless network you wish to connect to and click "Next" to refresh the list of wireless networks. You have the option to change the password used to Find Your Network Security Key. Select the wireless network you selected requires a network security key, enter it here. Appendix How to access the...
... the wireless network you wish to connect to and click "Next" to refresh the list of wireless networks. You have the option to change the password used to Find Your Network Security Key. Select the wireless network you selected requires a network security key, enter it here. Appendix How to access the...
Manual
Page 23
... the same SSID as it wirelessly. The SSID will disconnect from the router or AP as soon as your router 23 The default SSID is Edimax AP, you wish to connect to, click "Scan" to set the SSID of this repeater will be prompted to refresh the list of the device... when you wish to connect to, and click "Next" to change the password used by the wireless router or access point you select. You will search for nearby wireless networks to connect to it switches channels. If the...
... the same SSID as it wirelessly. The SSID will disconnect from the router or AP as soon as your router 23 The default SSID is Edimax AP, you wish to connect to, click "Scan" to set the SSID of this repeater will be prompted to refresh the list of the device... when you wish to connect to, and click "Next" to change the password used by the wireless router or access point you select. You will search for nearby wireless networks to connect to it switches channels. If the...
Manual
Page 28
... can access the browser based configuration interface. In this , please see Appendix IV-1. Note: For your reference, the access point's default IP address, username and password are all displayed on the product label on how to do this case, you can further configure the settings of your PC or Macintosh before...
... can access the browser based configuration interface. In this , please see Appendix IV-1. Note: For your reference, the access point's default IP address, username and password are all displayed on the product label on how to do this case, you can further configure the settings of your PC or Macintosh before...
Manual
Page 29
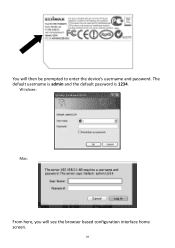
Windows: Mac: From here, you will then be prompted to enter the device's username and password. The default username is admin and the default password is 1234. You will see the browser based configuration interface home screen. 29
Windows: Mac: From here, you will then be prompted to enter the device's username and password. The default username is admin and the default password is 1234. You will see the browser based configuration interface home screen. 29
Manual
Page 51
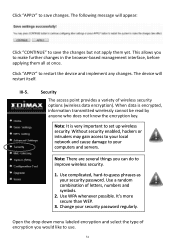
... a variety of encryption you would like to save changes. Use WPA whenever possible. III-5. When data is very important to your security password. Without security enabled, hackers or intruders may gain access to your local network and cause damage to set up wireless security. Change your security... password regularly. This allows you can do to restart the device and implement any changes. Open the drop down menu labeled encryption and select...
... a variety of encryption you would like to save changes. Use WPA whenever possible. III-5. When data is very important to your security password. Without security enabled, hackers or intruders may gain access to your local network and cause damage to set up wireless security. Change your security... password regularly. This allows you can do to restart the device and implement any changes. Open the drop down menu labeled encryption and select...

Manual
Page 53
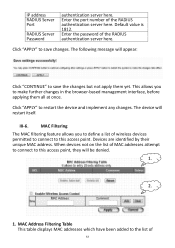
...WPA encryption if possible. The following message will restart itself. For a higher level of the RADIUS authentication server here. Enter the password of the RADIUS authentication server here. Enter the IP address of the RADIUS authentication server here. III-5-3. WEP only supports up to ... some legacy wireless devices only support WEP encryption. Enable 802.1x Authentication RADIUS Server IP Address RADIUS Server Port RADIUS Server Password Enable or disable the use of 802.1x user authentication. Click "APPLY" to 54Mbps transmission data rate. 53 This allows you...
...WPA encryption if possible. The following message will restart itself. For a higher level of the RADIUS authentication server here. Enter the password of the RADIUS authentication server here. Enter the IP address of the RADIUS authentication server here. III-5-3. WEP only supports up to ... some legacy wireless devices only support WEP encryption. Enable 802.1x Authentication RADIUS Server IP Address RADIUS Server Port RADIUS Server Password Enable or disable the use of 802.1x user authentication. Click "APPLY" to 54Mbps transmission data rate. 53 This allows you...
Manual
Page 57
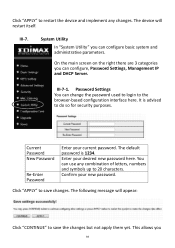
... server here. MAC Address Filtering Table This table displays MAC addresses which have been added to this access point, they will be denied. 1. 2. 1. Enter the password of 57 Click "APPLY" to save changes. Devices are identified by their unique MAC address. Enter the port number of MAC addresses attempt to connect.... When devices not on the list of the RADIUS authentication server here. The following message will restart itself. IP address RADIUS Server Port RADIUS Server Password authentication server here.
... server here. MAC Address Filtering Table This table displays MAC addresses which have been added to this access point, they will be denied. 1. 2. 1. Enter the password of 57 Click "APPLY" to save changes. Devices are identified by their unique MAC address. Enter the port number of MAC addresses attempt to connect.... When devices not on the list of the RADIUS authentication server here. The following message will restart itself. IP address RADIUS Server Port RADIUS Server Password authentication server here.
Manual
Page 59
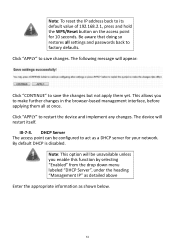
... System Utility In "System Utility" you 59 It is 1234. You can configure basic system and administrative parameters. The default password is advised to save the changes but not apply them yet. III-7. The following message will restart itself. The device will... appear: Click "CONTINUE" to 20 characters. Current Password New Password Re-Enter Password Enter your new password. This allows you can use any changes. Password Settings You can configure, Password Settings, Management IP and DHCP Server. III-7-1. On the main screen on ...
... System Utility In "System Utility" you 59 It is 1234. You can configure basic system and administrative parameters. The default password is advised to save the changes but not apply them yet. III-7. The following message will restart itself. The device will... appear: Click "CONTINUE" to 20 characters. Current Password New Password Re-Enter Password Enter your new password. This allows you can use any changes. Password Settings You can configure, Password Settings, Management IP and DHCP Server. III-7-1. On the main screen on ...
Manual
Page 61
... save changes. III-7-3. Be aware that doing so restores all at once. Click "APPLY" to save the changes but not apply them all settings and passwords back to restart the device and implement any changes. This allows you enable this function by selecting "Enabled" from the drop down menu labeled "DHCP...
... save changes. III-7-3. Be aware that doing so restores all at once. Click "APPLY" to save the changes but not apply them all settings and passwords back to restart the device and implement any changes. This allows you enable this function by selecting "Enabled" from the drop down menu labeled "DHCP...
Manual
Page 63
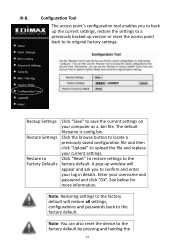
Click the browse button to locate a previously saved configuration file and then click "Upload" to upload the file and replace your username and password and click "Ok". See below for more information. III-8. The default filename is config.bin. Enter your current settings. Backup Settings Restore Settings Restore to ... will appear and ask you to back up the current settings, restore the settings to a previously backed up window will restore all settings, configurations and passwords back to confirm and enter your computer as a .bin file.
Click the browse button to locate a previously saved configuration file and then click "Upload" to upload the file and replace your username and password and click "Ok". See below for more information. III-8. The default filename is config.bin. Enter your current settings. Backup Settings Restore Settings Restore to ... will appear and ask you to back up the current settings, restore the settings to a previously backed up window will restore all settings, configurations and passwords back to confirm and enter your computer as a .bin file.
Manual
Page 80
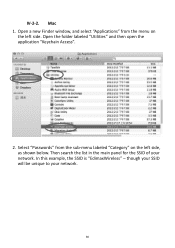
IV-2-2. though your SSID will be unique to your network. Mac 1. Select "Passwords" from the menu on the left side. In this example, the SSID is "EdimaxWireless" - Then search the list in the main panel for the SSID of your network. 80 Open a new Finder window, and select "Applications" from the sub-menu labeled "Category" on the left side, as shown below. Open the folder labeled "Utilities" and then open the application "Keychain Access". 2.
IV-2-2. though your SSID will be unique to your network. Mac 1. Select "Passwords" from the menu on the left side. In this example, the SSID is "EdimaxWireless" - Then search the list in the main panel for the SSID of your network. 80 Open a new Finder window, and select "Applications" from the sub-menu labeled "Category" on the left side, as shown below. Open the folder labeled "Utilities" and then open the application "Keychain Access". 2.
Manual
Page 81
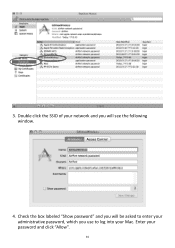
Double click the SSID of your network and you use to log into your Mac. Enter your administrative password, which you will be asked to enter your password and click "Allow". 81 3. Check the box labeled "Show password" and you will see the following window. 4.
Double click the SSID of your network and you use to log into your Mac. Enter your administrative password, which you will be asked to enter your password and click "Allow". 81 3. Check the box labeled "Show password" and you will see the following window. 4.

