
Quick Install Guide
Page 4
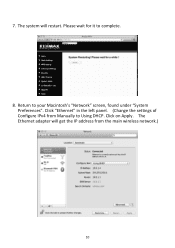
7. Click on "Ethernet" in the left panel and then click the drop down menu, select "Manually". 3 From the drop down arrow for the menu labeled "Configure IPv4" in the right panel.
7. Click on "Ethernet" in the left panel and then click the drop down menu, select "Manually". 3 From the drop down arrow for the menu labeled "Configure IPv4" in the right panel.
Quick Install Guide
Page 5
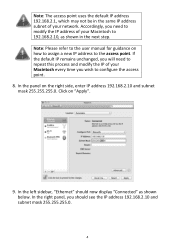
... to repeat this process and modify the IP of your Macintosh to modify the IP address of your network. Note: Please refer to the user manual for guidance on how to assign a new IP address to configure the access point. 8. In the right panel, you wish to the access point...
... to repeat this process and modify the IP of your Macintosh to modify the IP address of your network. Note: Please refer to the user manual for guidance on how to assign a new IP address to configure the access point. 8. In the right panel, you wish to the access point...
Quick Install Guide
Page 6
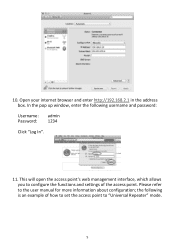
10. the following username and password: Username: admin Password: 1234 Click "Log In". 11. In the pop up window, enter the following is an example of the access point. This will open the access point's web management interface, which allows you to configure the functions and settings of how to set the access point to the user manual for more information about configuration; Please refer to "Universal Repeater" mode. 5 Open your internet browser and enter http://192.168.2.1 in the address box.
10. the following username and password: Username: admin Password: 1234 Click "Log In". 11. In the pop up window, enter the following is an example of the access point. This will open the access point's web management interface, which allows you to configure the functions and settings of how to set the access point to the user manual for more information about configuration; Please refer to "Universal Repeater" mode. 5 Open your internet browser and enter http://192.168.2.1 in the address box.
Quick Install Guide
Page 10
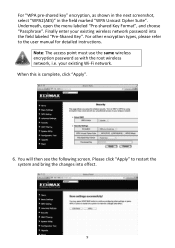
... existing wireless network password into effect. 9 Finally enter your existing Wi-Fi network. When this is complete, click "Apply". 6. Please click "Apply" to the user manual for detailed instructions. Underneath, open the menu labeled "Pre-shared Key Format", and choose "Passphrase". Note: The access point must use the same wireless encryption...
... existing wireless network password into effect. 9 Finally enter your existing Wi-Fi network. When this is complete, click "Apply". 6. Please click "Apply" to the user manual for detailed instructions. Underneath, open the menu labeled "Pre-shared Key Format", and choose "Passphrase". Note: The access point must use the same wireless encryption...
Quick Install Guide
Page 11
Click "Ethernet" in the left panel. (Change the settings of Configure IPv4 from the main wireless network.) 10 Please wait for it to Using DHCP. Click on Apply. The system will get the IP address from Manually to complete. 8. 7. Return to your Macintosh's "Network" screen, found under "System Preferences". The Ethernet adapter will restart.
Click "Ethernet" in the left panel. (Change the settings of Configure IPv4 from the main wireless network.) 10 Please wait for it to Using DHCP. Click on Apply. The system will get the IP address from Manually to complete. 8. 7. Return to your Macintosh's "Network" screen, found under "System Preferences". The Ethernet adapter will restart.
Manual
Page 2
... about this product, please refer to the user manual on the CD-ROM. Any software described in this manual is sold or licensed as is subject to GNU General Public License Version 2 This product includes software that is . Edimax Technology Co., Ltd. All brand and product names... fitness for any warranty of their respective holders. The product you , for updates. Edimax Technology Co., Ltd. Should the programs prove defective following their purchase, the buyer (and not this manual are subject to change without the obligation to time in the contents hereof without notice....
... about this product, please refer to the user manual on the CD-ROM. Any software described in this manual is sold or licensed as is subject to GNU General Public License Version 2 This product includes software that is . Edimax Technology Co., Ltd. All brand and product names... fitness for any warranty of their respective holders. The product you , for updates. Edimax Technology Co., Ltd. Should the programs prove defective following their purchase, the buyer (and not this manual are subject to change without the obligation to time in the contents hereof without notice....

Manual
Page 5
... setup wizard, multi language quick installation guide and user manual Power Adapter 3dBi Antenna Accessory Kit Quick installation guide I-2. Product Information Thank you start using this router, please check if there is connected to 150Mbps for purchasing the Edimax EW-7228APn wireless access point. Its quick and easy installation process...
... setup wizard, multi language quick installation guide and user manual Power Adapter 3dBi Antenna Accessory Kit Quick installation guide I-2. Product Information Thank you start using this router, please check if there is connected to 150Mbps for purchasing the Edimax EW-7228APn wireless access point. Its quick and easy installation process...
Manual
Page 10
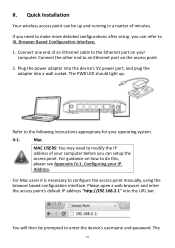
... Your wireless access point can refer to enter the device's username and password. Connect one end of an Ethernet cable to configure the access point manually, using the browser based configuration interface. The PWR LED should light up and running in a matter of your computer. For Mac users it is necessary...
... Your wireless access point can refer to enter the device's username and password. Connect one end of an Ethernet cable to configure the access point manually, using the browser based configuration interface. The PWR LED should light up and running in a matter of your computer. For Mac users it is necessary...
Manual
Page 13
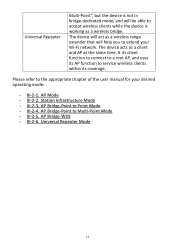
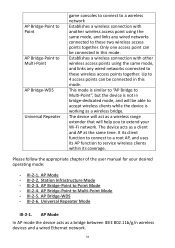
III-2-4. III-2-6. Please refer to the appropriate chapter of the user manual for your Wi-Fi network. AP Mode - III-2-5. The device will act as a client and AP at the same time. Station Infrastructure Mode - AP Bridge-...
III-2-4. III-2-6. Please refer to the appropriate chapter of the user manual for your Wi-Fi network. AP Mode - III-2-5. The device will act as a client and AP at the same time. Station Infrastructure Mode - AP Bridge-...
Manual
Page 34
.... Up to these two wireless access points together. The device will help you to Multi-Point Mode - Please follow the appropriate chapter of the user manual for your Wi-Fi network. Station Infrastructure Mode - III-2-3. AP Bridge-Point to extend your desired operating mode: -
.... Up to these two wireless access points together. The device will help you to Multi-Point Mode - Please follow the appropriate chapter of the user manual for your Wi-Fi network. Station Infrastructure Mode - III-2-3. AP Bridge-Point to extend your desired operating mode: -

Manual
Page 38
... same mode, and all available access points nearby. You will need to Point Mode In this mode, it will be listed. AP Bridge-Point to manually enter the SSID in which case it will pop up. This allows two physically isolated networks to may have hidden its SSID, in the "MAIN...
... same mode, and all available access points nearby. You will need to Point Mode In this mode, it will be listed. AP Bridge-Point to manually enter the SSID in which case it will pop up. This allows two physically isolated networks to may have hidden its SSID, in the "MAIN...

Manual
Page 45
... hidden its SSID, in 45 It will pop up. It will pop up -to use. You will not be same as a station and connect to manually enter the SSID in which contains information about all available access points nearby. The channel number must be listed. Enter the SSID of the access...
... hidden its SSID, in 45 It will pop up. It will pop up -to use. You will not be same as a station and connect to manually enter the SSID in which contains information about all available access points nearby. The channel number must be listed. Enter the SSID of the access...
Manual
Page 76
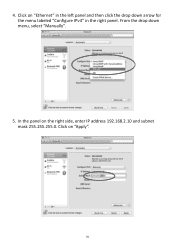
In the panel on "Apply". 76 Click on "Ethernet" in the left panel and then click the drop down menu, select "Manually". 5. Click on the right side, enter IP address 192.168.2.10 and subnet mask 255.255.255.0. 4. From the drop down arrow for the menu labeled "Configure IPv4" in the right panel.
In the panel on "Apply". 76 Click on "Ethernet" in the left panel and then click the drop down menu, select "Manually". 5. Click on the right side, enter IP address 192.168.2.10 and subnet mask 255.255.255.0. 4. From the drop down arrow for the menu labeled "Configure IPv4" in the right panel.
Manual
Page 83
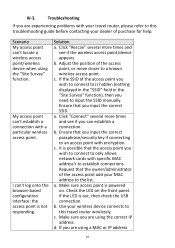
... is not responding. If you need to the list. Solution a. Adjust the position of the access point add your MAC address to input the SSID manually. a. b. Make sure access point is hidden (nothing displayed in the "SSID" field in the "Site Survey" function), then you are using a MAC or IP address...
... is not responding. If you need to the list. Solution a. Adjust the position of the access point add your MAC address to input the SSID manually. a. b. Make sure access point is hidden (nothing displayed in the "SSID" field in the "Site Survey" function), then you are using a MAC or IP address...

Manual
Page 84
... is extremely hot. Call your hand on the access point, the temperature of purchase for the access point to do not know your wireless client manually. Password is safely possible to heat up during frequent use. If you need to input the ESSID into your password, restore the device to obtain...
... is extremely hot. Call your hand on the access point, the temperature of purchase for the access point to do not know your wireless client manually. Password is safely possible to heat up during frequent use. If you need to input the ESSID into your password, restore the device to obtain...