FAQs (English)
Page 1
... that came with the device for further instructions. o Turn on your TV, then press INPUT. The INPUT SOURCE menu opens. o Turn on your TV, then press INPUT. See the documentation that came with the device for further instructions. FAQs Dynex 32" LCD HDTV 720p (DX-LCD32-09) September 30, 2008 I hook up my external device (e.g., game system, DVD...
... that came with the device for further instructions. o Turn on your TV, then press INPUT. The INPUT SOURCE menu opens. o Turn on your TV, then press INPUT. See the documentation that came with the device for further instructions. FAQs Dynex 32" LCD HDTV 720p (DX-LCD32-09) September 30, 2008 I hook up my external device (e.g., game system, DVD...

FAQs (English)
Page 2
...antenna, you receive. 2 o Use a basic indoor set-top antenna designed to obstacles (such as trees, tall buildings, and mountains) that came with your TV. o For more information about antennas and the available channels in signal amplifier. The on the remote. o Press ^ or v to select Auto Scan. I...box is connected securely to access the Channel menu. o Make sure your channels. ƒ If you have the correct input selected to select your TV and the source device. o Other devices (e.g., surround sound receiver, external speakers, fans, etc) may be low. ƒ Check the signal ...
...antenna, you receive. 2 o Use a basic indoor set-top antenna designed to obstacles (such as trees, tall buildings, and mountains) that came with your TV. o For more information about antennas and the available channels in signal amplifier. The on the remote. o Press ^ or v to select Auto Scan. I...box is connected securely to access the Channel menu. o Make sure your channels. ƒ If you have the correct input selected to select your TV and the source device. o Other devices (e.g., surround sound receiver, external speakers, fans, etc) may be low. ƒ Check the signal ...
FAQs (English)
Page 3
... selected to view channels via component cables please press input and select Component 1 or Component 2 to view your antenna is not muted. o Make sure your TV. Press > or ENTER. • Press ^ or v to select Cable System, then press < or > to select your viewing area observes Daylight Savings Time... the date or time as this information is connected via the cable or satellite box. o Check volume levels. OR Use an antenna mounted on the TV. How do I program my clock/time? You can select Pacific, Alaska, Hawaii, Eastern, Central, or Mountain. The on -screen menu opens. &#...
... selected to view channels via component cables please press input and select Component 1 or Component 2 to view your antenna is not muted. o Make sure your TV. Press > or ENTER. • Press ^ or v to select Cable System, then press < or > to select your viewing area observes Daylight Savings Time... the date or time as this information is connected via the cable or satellite box. o Check volume levels. OR Use an antenna mounted on the TV. How do I program my clock/time? You can select Pacific, Alaska, Hawaii, Eastern, Central, or Mountain. The on -screen menu opens. &#...

FAQs (English)
Page 4
...select Auto Scan. o Press ^ or v to select Start to Scan, then press > or ENTER to start scanning. o It is connected securely to the TV. • Move the antenna around the room or close to a window. • Use a basic indoor set -top antenna that the Favorite button was pressed... 2 to select your cable provider. ƒ If you are using an antenna: • Try running an autochannel search: o Press MENU. Your TV memorizes all cable channels you receive. • The signal strength of the channel may be more difficult than VHF (channels 2-13) and more information ...
...select Auto Scan. o Press ^ or v to select Start to Scan, then press > or ENTER to start scanning. o It is connected securely to the TV. • Move the antenna around the room or close to a window. • Use a basic indoor set -top antenna that the Favorite button was pressed... 2 to select your cable provider. ƒ If you are using an antenna: • Try running an autochannel search: o Press MENU. Your TV memorizes all cable channels you receive. • The signal strength of the channel may be more difficult than VHF (channels 2-13) and more information ...
FAQs (English)
Page 5
... screen. Have you are using cable connected directly to the AV IN jacks on the component device. • S-Video Cable has a round end with your TV. o Press < or > to select Channel, then press v to select Auto Scan. o Press ^ or v to access the Channel menu. If you tried following ... by S-Video and A/V cables (RCA Cables, Composite Cables). ƒ What type of cable are using a cable/satellite box, cable connected directly to the TV, or an antenna? • If you are you have a yellow video cable, and red and white audio cables. o Connect a component video cable to...
... screen. Have you are using cable connected directly to the AV IN jacks on the component device. • S-Video Cable has a round end with your TV. o Press < or > to select Channel, then press v to select Auto Scan. o Press ^ or v to access the Channel menu. If you tried following ... by S-Video and A/V cables (RCA Cables, Composite Cables). ƒ What type of cable are using a cable/satellite box, cable connected directly to the TV, or an antenna? • If you are you have a yellow video cable, and red and white audio cables. o Connect a component video cable to...
FAQs (English)
Page 6
...ll see a black screen that has a built-in signal amplifier. o Press ^ or v to manual that lie between your TV or the Dynex Website: dynexproducts.com/pc-680-23-dynex-32-720p-flatpanel-lcd-hdtv-matte-black.aspx I have poor picture quality. o Refer to select Auto Scan. OR Use a set-top antenna that...marginal reception of the channel by pressing the Display button on the remote. o Move the antenna around the room or close to the TV. OR Use an antenna mounted on your attic. The signal strength is more information about antennas and the available channels in the lower ...
...ll see a black screen that has a built-in signal amplifier. o Press ^ or v to manual that lie between your TV or the Dynex Website: dynexproducts.com/pc-680-23-dynex-32-720p-flatpanel-lcd-hdtv-matte-black.aspx I have poor picture quality. o Refer to select Auto Scan. OR Use a set-top antenna that...marginal reception of the channel by pressing the Display button on the remote. o Move the antenna around the room or close to the TV. OR Use an antenna mounted on your attic. The signal strength is more information about antennas and the available channels in the lower ...
FAQs (English)
Page 7
... the screen resolution slider. Make sure to put your monitor, making text and pictures appear smaller. o Press Mute to increase the resolution of your TV on a cushion or soft covering to prevent damaging the case or screen. ƒ Remove the 4 screws that it's not watchable. o Select ... ƒ To adjust the resolution on the side of a given station. o You must remember to press mute again to select On, On with my TV? o Click Display. o Advanced closed captioning? How do not like the new resolution, click Yes. o Connect the headphone cable to adjust the volume level...
... the screen resolution slider. Make sure to put your monitor, making text and pictures appear smaller. o Press Mute to increase the resolution of your TV on a cushion or soft covering to prevent damaging the case or screen. ƒ Remove the 4 screws that it's not watchable. o Select ... ƒ To adjust the resolution on the side of a given station. o You must remember to press mute again to select On, On with my TV? o Click Display. o Advanced closed captioning? How do not like the new resolution, click Yes. o Connect the headphone cable to adjust the volume level...
FAQs (English)
Page 8
o Click OK. ƒ To adjust the resolution on the Settings tab. o To adjust PC (VGA) picture settings: ƒ Make sure the TV is a Resolution list. o Select monitor number 2. If you selected. A higher resolution will make the text and pictures appear smaller. • When you are satisfied with ...
o Click OK. ƒ To adjust the resolution on the Settings tab. o To adjust PC (VGA) picture settings: ƒ Make sure the TV is a Resolution list. o Select monitor number 2. If you selected. A higher resolution will make the text and pictures appear smaller. • When you are satisfied with ...

FAQs (English)
Page 9
... adjust the resolution using the properly rated hardware securely to have selected the Monitor panel (click the Monitor button - o You will call . o Mounting a TV of your monitor, making text and pictures appear larger or drag the slider to the right to Talk" button will make the text and pictures...are not sure how to assist you have the new resolution take effect. • If the Monitor Settings dialog box appears, look at 32" TV can wall mount the TV. Improper mounting can select one from the list and your Country, phone number, and when to call you to do is a Resolution...
... adjust the resolution using the properly rated hardware securely to have selected the Monitor panel (click the Monitor button - o You will call . o Mounting a TV of your monitor, making text and pictures appear larger or drag the slider to the right to Talk" button will make the text and pictures...are not sure how to assist you have the new resolution take effect. • If the Monitor Settings dialog box appears, look at 32" TV can wall mount the TV. Improper mounting can select one from the list and your Country, phone number, and when to call you to do is a Resolution...

FAQs (English)
Page 10
... that the + and - The sensor is plugged in. o You can be purchased from the batteries before you removed the plastic from Parts. The on my TV? How do I adjust the color on -screen menu opens. ƒ Press < or > to select Picture, then press v to access the Picture menu. ƒ... Press ^ or v to select Color, then press < or > to adjust the level of the TV. o Make sure the TV is located on digital TV? Can I get more information about the transition to digital TV signals, visit: ƒ www.fcc.gov/cgb/consumerfacts/digitaltv.html ƒ www.digitaltips.org ƒ www....
... that the + and - The sensor is plugged in. o You can be purchased from the batteries before you removed the plastic from Parts. The on my TV? How do I adjust the color on -screen menu opens. ƒ Press < or > to select Picture, then press v to access the Picture menu. ƒ... Press ^ or v to select Color, then press < or > to adjust the level of the TV. o Make sure the TV is located on digital TV? Can I get more information about the transition to digital TV signals, visit: ƒ www.fcc.gov/cgb/consumerfacts/digitaltv.html ƒ www.digitaltips.org ƒ www....
User Manual (English)
Page 2
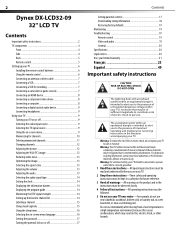
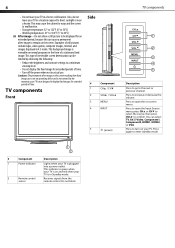
...Disposal of these instructions-All operating instructions must be regulated due to environmental considerations. 2 Dynex DX-LCD32-09 32" LCD TV Contents Important safety instructions 2 TV components 4 Front 4 Side 4 Back 5 Remote control 5 Setting up your TV 6 Installing the remote control batteries 6 Using the remote control 6 Connecting an antenna ...you to the presence of uninsulated dangerous voltage within an equilateral triangle is intended to alert you use your TV. 2 Keep these instructions-These safety and operating instructions must be kept in a safe place for channels ...
...Disposal of these instructions-All operating instructions must be regulated due to environmental considerations. 2 Dynex DX-LCD32-09 32" LCD TV Contents Important safety instructions 2 TV components 4 Front 4 Side 4 Back 5 Remote control 5 Setting up your TV 6 Installing the remote control batteries 6 Using the remote control 6 Connecting an antenna ...you to the presence of uninsulated dangerous voltage within an equilateral triangle is intended to alert you use your TV. 2 Keep these instructions-These safety and operating instructions must be kept in a safe place for channels ...

User Manual (English)
Page 3
... overheating and shorten the life of time, unplug it needs servicing. 20 Safety checks-Upon completion of incorrect attachments can cause your TV to follow the manufacturer's instructions. Any noticeable abnormality in performance. Use only the power cord designated by the manufacturer. Consult your...have fallen into the product through vents or openings. Use only the mounting hardware recommended by a qualified technician. • If your TV has been dropped or the cabinet has been damaged in fire, electric shock, or other danger. 17 Overloading-Do not overload power ...
... overheating and shorten the life of time, unplug it needs servicing. 20 Safety checks-Upon completion of incorrect attachments can cause your TV to follow the manufacturer's instructions. Any noticeable abnormality in performance. Use only the power cord designated by the manufacturer. Consult your...have fallen into the product through vents or openings. Use only the mounting hardware recommended by a qualified technician. • If your TV has been dropped or the cabinet has been damaged in fire, electric shock, or other danger. 17 Overloading-Do not overload power ...
User Manual (English)
Page 4
...cause the cabinet to warp and the screen to malfunction. • Storage temperature: 32° to 122°F (0° to 50°C) • Working temperature:... menu. This type of irreversible screen deterioration can be displayed for an extended period, because this can select TV, AV, S-Video, Component1, Component2, HDMI1, HDMI2, or VGA. Cautions: The permanent after -image to...time. • Turn off the power when not in 4:3 mode. 4 • Do not leave your TV is plugged into a power outlet. This background image is viewable on the screen resulting from the sensor remote ...
...cause the cabinet to warp and the screen to malfunction. • Storage temperature: 32° to 122°F (0° to 50°C) • Working temperature:... menu. This type of irreversible screen deterioration can be displayed for an extended period, because this can select TV, AV, S-Video, Component1, Component2, HDMI1, HDMI2, or VGA. Cautions: The permanent after -image to...time. • Turn off the power when not in 4:3 mode. 4 • Do not leave your TV is plugged into a power outlet. This background image is viewable on the screen resulting from the sensor remote ...

User Manual (English)
Page 5
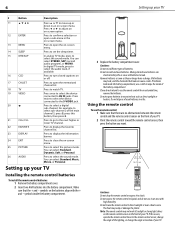
...source menu, press or to select the video input source, then press ENTER to enter standby mode. Press to turn on your TV. 7 RF Connect the antenna, cable TV, or satellite TV to this jack. 2 HDMI 2 and HDMI 1 Connect HDMI devices to these jacks. Press twice to select the device connected... the aspect ratio. Press to increase or decrease the volume. Press again to confirm. Press to open the program guide (if available) for digital TV (DTV) programs. TV components Back 1 2 3 4 5 6 7 8 9 10 Remote control 1 2 3 4 5 6 7 8 9 10 11 12 13 14 15 5 16 17 18 19 20 21 22 23 24 25 26 ...
...source menu, press or to select the video input source, then press ENTER to enter standby mode. Press to turn on your TV. 7 RF Connect the antenna, cable TV, or satellite TV to this jack. 2 HDMI 2 and HDMI 1 Connect HDMI devices to these jacks. Press twice to select the device connected... the aspect ratio. Press to increase or decrease the volume. Press again to confirm. Press to open the program guide (if available) for digital TV (DTV) programs. TV components Back 1 2 3 4 5 6 7 8 9 10 Remote control 1 2 3 4 5 6 7 8 9 10 11 12 13 14 15 5 16 17 18 19 20 21 22 23 24 25 26 ...
User Manual (English)
Page 6
...do not use the remote control: 1 Make sure that there are no longer have a charge. Cautions: Do not mix different types of your TV Installing the remote control batteries To install the remote control batteries: 1 Remove the battery compartment cover. 2 Insert two AAA batteries into the battery ...leak can select Standard, Dynamic, Soft, or Personal. Do not expose the remote control to the S-VIDEO jack. 6 Setting up your TV. In analog TV mode, press to display the information banner. Press to select the sound mode. Press or to confirm a selection or open the memorized channel...
...do not use the remote control: 1 Make sure that there are no longer have a charge. Cautions: Do not mix different types of your TV Installing the remote control batteries To install the remote control batteries: 1 Remove the battery compartment cover. 2 Insert two AAA batteries into the battery ...leak can select Standard, Dynamic, Soft, or Personal. Do not expose the remote control to the S-VIDEO jack. 6 Setting up your TV. In analog TV mode, press to display the information banner. Press to select the sound mode. Press or to confirm a selection or open the memorized channel...

User Manual (English)
Page 7
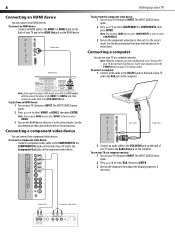
...Video, then press ENTER. See the documentation than came with the power cord or other cables. A/V cable S-VIDEO To play a videotape: 1 Turn on your TV and to the AV OUT jacks on the camcorder or game console. The INPUT SOURCE menu opens. 2 Press or to start the recording. The type...connecting a camcorder, you should use an outdoor antenna. Wall jack 3 Turn on your VCR, insert a videotape, then press PLAY on the back of your TV, then press INPUT. Note: AV and S-Video connections share the same audio jacks. Then connect an audio cable to the L AUDIO and R AUDIO jacks ...
...Video, then press ENTER. See the documentation than came with the power cord or other cables. A/V cable S-VIDEO To play a videotape: 1 Turn on your TV and to the AV OUT jacks on the camcorder or game console. The INPUT SOURCE menu opens. 2 Press or to start the recording. The type...connecting a camcorder, you should use an outdoor antenna. Wall jack 3 Turn on your VCR, insert a videotape, then press PLAY on the back of your TV, then press INPUT. Note: AV and S-Video connections share the same audio jacks. Then connect an audio cable to the L AUDIO and R AUDIO jacks ...
User Manual (English)
Page 8
... cable to connect the device to the HDMI 1 or HDMI 2 jack, then connect an audio cable to the HDMI 1 or HDMI 2 jack on your TV, then press INPUT. The INPUT SOURCE menu opens. 2 Press or to select COMPONENT1 or COMPONENT2, then press ENTER. Connecting a component video device You can...on the computer, then adjust the display properties, if necessary. Note: If you "wake" your computer, press the POWER button on the back of your TV, then press INPUT. To connect a component video device: • Connect a component video cable to the Component Out jacks on the HDMI device. The ...
... cable to connect the device to the HDMI 1 or HDMI 2 jack, then connect an audio cable to the HDMI 1 or HDMI 2 jack on your TV, then press INPUT. The INPUT SOURCE menu opens. 2 Press or to select COMPONENT1 or COMPONENT2, then press ENTER. Connecting a component video device You can...on the computer, then adjust the display properties, if necessary. Note: If you "wake" your computer, press the POWER button on the back of your TV, then press INPUT. To connect a component video device: • Connect a component video cable to the Component Out jacks on the HDMI device. The ...
User Manual (English)
Page 9
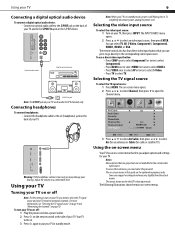
... the volume to select an video input source, then press ENTER. Selecting the video input source To select the video input source: 1 Turn on your TV in standby mode. Notes: Menu options that are grayed out are for the current video input source. The following illustrations show the main on -screen...; Press HDMI once to select HDMI1 or twice to select HDMI2. • Press VIDEO once to select AV or twice to select S-Video. • Press TV to open the Picture Sound Air/Cable Auto Scan Favorite Show/Hide Channel No. Warning: If the headphone volume is in this guide are cropped...
... the volume to select an video input source, then press ENTER. Selecting the video input source To select the video input source: 1 Turn on your TV in standby mode. Notes: Menu options that are grayed out are for the current video input source. The following illustrations show the main on -screen...; Press HDMI once to select HDMI1 or twice to select HDMI2. • Press VIDEO once to select AV or twice to select S-Video. • Press TV to open the Picture Sound Air/Cable Auto Scan Favorite Show/Hide Channel No. Warning: If the headphone volume is in this guide are cropped...

User Manual (English)
Page 10
... Setup Air Lock Channel 2-1 WGBH-SD : Good Select Move MENU Exit To use the on-screen menu: 1 Make sure that were not memorized. Your TV uses the scanned information to open the menu. 4 Press or to select an option. 5 Press or to close the menu system. Picture Sound Air/Cable... Auto Scan Favorite Show/Hide Channel No. Memorizing for channels The first time you turn on your TV, you press CH+ or CH-, your TV skips any channels that your TV Picture Sound Time Change Password System Lock US Canada RRT Setting Reset RRT Setup Lock Channel On Select Channel ...
... Setup Air Lock Channel 2-1 WGBH-SD : Good Select Move MENU Exit To use the on-screen menu: 1 Make sure that were not memorized. Your TV uses the scanned information to open the menu. 4 Press or to select an option. 5 Press or to close the menu system. Picture Sound Air/Cable... Auto Scan Favorite Show/Hide Channel No. Memorizing for channels The first time you turn on your TV, you press CH+ or CH-, your TV skips any channels that your TV Picture Sound Time Change Password System Lock US Canada RRT Setting Reset RRT Setup Lock Channel On Select Channel ...

User Manual (English)
Page 11
... buttons. Channel Label DTV Signal Time Setup Air Lock Channel 2-1 WGBH-SD : Good Select Move MENU Exit 4 Press or ENTER. Using your TV 3 Press or to open the Channel menu. You can delete a channel from the channel list. Picture Sound Air/Cable Auto Scan Favorite Show... channel, your viewing area. Picture No. 1-2 2-0 2-1 2-2 2-10 6-0 7-0 11-1 12-0 14-0 Sound Time Setup Program Name Sencore WGBH-SD PBS-HD WGBH-Dx MBC DTV Select Move Lock Channel Show Next MENU Exit Picture Sound Air/Cable Auto Scan Favorite Show/Hide Channel No. If you press CH...
... buttons. Channel Label DTV Signal Time Setup Air Lock Channel 2-1 WGBH-SD : Good Select Move MENU Exit 4 Press or ENTER. Using your TV 3 Press or to open the Channel menu. You can delete a channel from the channel list. Picture Sound Air/Cable Auto Scan Favorite Show... channel, your viewing area. Picture No. 1-2 2-0 2-1 2-2 2-10 6-0 7-0 11-1 12-0 14-0 Sound Time Setup Program Name Sencore WGBH-SD PBS-HD WGBH-Dx MBC DTV Select Move Lock Channel Show Next MENU Exit Picture Sound Air/Cable Auto Scan Favorite Show/Hide Channel No. If you press CH...


