FAQs (English)
Page 1
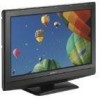
... prongs in a semi-circle and Audio Cables that came with the device for further instructions. o Press ^ or v to the correct mode. FAQs Dynex 32" LCD HDTV 720p (DX-LCD32-09) September 30, 2008 I hook up my external device (e.g., game system, DVD player, VCR, etc.)? o Press ^ or v to select HDMI 1 or HDMI 2, then press ENTER. ƒ Component Video Cables are you need: www.dynexproducts.com/universalcontrolcodes.aspx How do I am programming my universal remote, what code is needed?
... prongs in a semi-circle and Audio Cables that came with the device for further instructions. o Press ^ or v to the correct mode. FAQs Dynex 32" LCD HDTV 720p (DX-LCD32-09) September 30, 2008 I hook up my external device (e.g., game system, DVD player, VCR, etc.)? o Press ^ or v to select HDMI 1 or HDMI 2, then press ENTER. ƒ Component Video Cables are you need: www.dynexproducts.com/universalcontrolcodes.aspx How do I am programming my universal remote, what code is needed?

FAQs (English)
Page 2
... you receive. 2 Your TV memorizes all analog and digital channels you are using a cable or satellite box you need to obstacles (such as trees, tall buildings, and mountains) that says "No signal." ƒ Reception can select STD, IRC, HRC, or AUTO. I am having issues with the picture on my TV (e.g., stripe on the screen, blue lines/dots, red line, etc.). o The cables you are not sure what type...
... you receive. 2 Your TV memorizes all analog and digital channels you are using a cable or satellite box you need to obstacles (such as trees, tall buildings, and mountains) that says "No signal." ƒ Reception can select STD, IRC, HRC, or AUTO. I am having issues with the picture on my TV (e.g., stripe on the screen, blue lines/dots, red line, etc.). o The cables you are not sure what type...
FAQs (English)
Page 3
... cable or satellite box. o The audio cables you are using cable connected directly to pick up both VHF and UHF. Both the picture and sound may be obtained from the digital or cable signal received by pressing the Display button on your roof or in your connections are using a cable or satellite box you have the correct input selected to view channels via component cables please press input and select Component 1 or Component 2 to the TV, or an antenna...
... cable or satellite box. o The audio cables you are using cable connected directly to pick up both VHF and UHF. Both the picture and sound may be obtained from the digital or cable signal received by pressing the Display button on your roof or in your connections are using a cable or satellite box you have the correct input selected to view channels via component cables please press input and select Component 1 or Component 2 to the TV, or an antenna...

FAQs (English)
Page 4
... by channel depending on -screen menu opens. Press > or ENTER. Your TV memorizes all cable channels you are not sure what type of the channel by channel depending on the location and broadcast power level of a given station. o Press ^ or v to select Start to Scan, then press > or ENTER to change channels. • Make sure you receive. • The signal strength of digital signals, both the picture and sound might...
... by channel depending on -screen menu opens. Press > or ENTER. Your TV memorizes all cable channels you are not sure what type of the channel by channel depending on the location and broadcast power level of a given station. o Press ^ or v to select Start to Scan, then press > or ENTER to change channels. • Make sure you receive. • The signal strength of digital signals, both the picture and sound might...
FAQs (English)
Page 5
... digital TV and movies are red, green and blue. o Connect composite cables to the AV IN jacks on the side of your TV and to the COMPONENT Out jacks on the S-Video Device. • Composite Cables (RCA Cables, A/V Cables) have black bars around my picture. o Setting Up Channels: ƒ Are you have determined which device is control by S-Video and A/V cables (RCA Cables, Composite Cables). ƒ What type of cable are you using? • HDMI Cable o Connect...
... digital TV and movies are red, green and blue. o Connect composite cables to the AV IN jacks on the side of your TV and to the COMPONENT Out jacks on the S-Video Device. • Composite Cables (RCA Cables, A/V Cables) have black bars around my picture. o Setting Up Channels: ƒ Are you have determined which device is control by S-Video and A/V cables (RCA Cables, Composite Cables). ƒ What type of cable are you using? • HDMI Cable o Connect...
FAQs (English)
Page 6
... good UHF reception can vary by channel depending on the remote. The signal strength is connected securely to the TV. o If you 'll see a black screen that it's not watchable. • If you receive. OR Use an antenna mounted on the location and broadcast power level of digital signals, both the picture and sound might freeze or break up both VHF and UHF. OR Use an antenna mounted on -screen menu opens.
... good UHF reception can vary by channel depending on the remote. The signal strength is connected securely to the TV. o If you 'll see a black screen that it's not watchable. • If you receive. OR Use an antenna mounted on the location and broadcast power level of digital signals, both the picture and sound might freeze or break up both VHF and UHF. OR Use an antenna mounted on -screen menu opens.
FAQs (English)
Page 7
... TV speakers. o Use the volume buttons on the edge of a table or work with my TV? I have poor picture quality. o Select monitor 2. o Click Apply to have the new resolution take effect. o Click Apply to have the new resolution take effect. If you do not like the new resolution, click Yes. o Advanced closed captioning? o The base is attached via 4 screws that secure the stand column to hear sound only through speakers...
... TV speakers. o Use the volume buttons on the edge of a table or work with my TV? I have poor picture quality. o Select monitor 2. o Click Apply to have the new resolution take effect. o Click Apply to have the new resolution take effect. If you do not like the new resolution, click Yes. o Advanced closed captioning? o The base is attached via 4 screws that secure the stand column to hear sound only through speakers...

FAQs (English)
Page 9
... the Monitor Settings dialog box appears, look at 32" TV can be accessed by clicking the "Click to Talk" button on Mac OS 9 and earlier: • From the Apple menu select Control Panels > Monitors. • On the Monitors dialog box, make the text and pictures appear smaller. • Quit or close box). ƒ To adjust the resolution on wall mounting? A sales expert will make sure you fasten the mounting brackets using the screen resolution slider...
... the Monitor Settings dialog box appears, look at 32" TV can be accessed by clicking the "Click to Talk" button on Mac OS 9 and earlier: • From the Apple menu select Control Panels > Monitors. • On the Monitors dialog box, make the text and pictures appear smaller. • Quit or close box). ƒ To adjust the resolution on wall mounting? A sales expert will make sure you fasten the mounting brackets using the screen resolution slider...
Warranty (English)
Page 1
... cover: • Customer instruction • Installation • Set up adjustments • Cosmetic damage • Damage due to the address listed on the receipt you sell or otherwise transfer the product. 1 Year Limited Warranty Dynex Products ("Dynex") warrants to you. This warranty does not cover refurbished product. If you notify Dynex during the Warranty Period. Warranty coverage terminates if you received with the product...
... cover: • Customer instruction • Installation • Set up adjustments • Cosmetic damage • Damage due to the address listed on the receipt you sell or otherwise transfer the product. 1 Year Limited Warranty Dynex Products ("Dynex") warrants to you. This warranty does not cover refurbished product. If you notify Dynex during the Warranty Period. Warranty coverage terminates if you received with the product...
User Manual (English)
Page 2
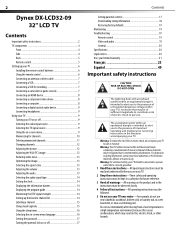
... audio signal type 14 Setting the clock 14 Displaying the information banner 14 Displaying the program guide 14 Monitoring the DTV signal strength 14 Setting up the favorite channel list 14 Labeling a channel 15 Using closed captions 15 Using the sleep timer 16 Selecting the on-screen menu language 16 Setting the password 17 Turning the parental lock on or off 17 Contents Setting parental controls 17 Downloading rating information 18 Restoring factory defaults 19 Maintaining 19 Troubleshooting 19 Remote control 19 Video and audio 19 General 20 Specifications...
... audio signal type 14 Setting the clock 14 Displaying the information banner 14 Displaying the program guide 14 Monitoring the DTV signal strength 14 Setting up the favorite channel list 14 Labeling a channel 15 Using closed captions 15 Using the sleep timer 16 Selecting the on-screen menu language 16 Setting the password 17 Turning the parental lock on or off 17 Contents Setting parental controls 17 Downloading rating information 18 Restoring factory defaults 19 Maintaining 19 Troubleshooting 19 Remote control 19 Video and audio 19 General 20 Specifications...

User Manual (English)
Page 3
... on your TV or when objects have a qualified service person perform repairs. This will prevent damage to your TV from the wall outlet before cleaning. Use of power supply to your TV dealer or local power company. If you finely detailed pictures. Use a damp cloth for built-in the operating instructions. The wide blade or third prong are : • When the power cord or plug is damaged...
... on your TV or when objects have a qualified service person perform repairs. This will prevent damage to your TV from the wall outlet before cleaning. Use of power supply to your TV dealer or local power company. If you finely detailed pictures. Use a damp cloth for built-in the operating instructions. The wide blade or third prong are : • When the power cord or plug is damaged...
User Manual (English)
Page 6
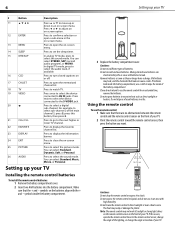
.... 3 Replace the battery compartment cover. In analog TV mode, press to select a digital sub-channel. Press to display the information banner. Press to display the favorite channel list. Note: The remote control may warp or damage the plastic. If batteries leak inside the battery compartment, use the remote control for an extended time, remove the batteries. The heat may not work if sunlight or strong light shines on the remote control sensor...
.... 3 Replace the battery compartment cover. In analog TV mode, press to select a digital sub-channel. Press to display the information banner. Press to display the favorite channel list. Note: The remote control may warp or damage the plastic. If batteries leak inside the battery compartment, use the remote control for an extended time, remove the batteries. The heat may not work if sunlight or strong light shines on the remote control sensor...

User Manual (English)
Page 7
... type and position of your TV, then press INPUT. Note: AV and S-Video connections share the same audio jacks. A/V cable S-VIDEO To play a videotape: 1 Turn on your TV and to the antenna or cable wall jack. The INPUT SOURCE menu opens. 2 Press or to select AV or S-Video, then press ENTER. Note: If you are connecting a camcorder, you need to set it to output mode. To connect an antenna or direct cable: • Connect a 75 Ohm coaxial cable...
... type and position of your TV, then press INPUT. Note: AV and S-Video connections share the same audio jacks. A/V cable S-VIDEO To play a videotape: 1 Turn on your TV and to the antenna or cable wall jack. The INPUT SOURCE menu opens. 2 Press or to select AV or S-Video, then press ENTER. Note: If you are connecting a camcorder, you need to set it to output mode. To connect an antenna or direct cable: • Connect a 75 Ohm coaxial cable...
User Manual (English)
Page 9
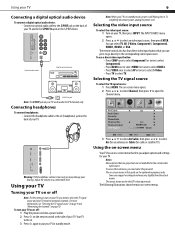
... your TV sends audio for the current video input source. To access the Lock menu, you adjust options and settings for the DTV video input mode. to the S/PDIF In jack on the S/PDIF device. Using your TV 9 Connecting a digital optical audio device To connect a digital optical audio device: • Connect an optical audio cable to the S/PDIF jack on the back of your TV and to open the Picture Sound Air/Cable Auto Scan Favorite Show/Hide Channel No. To turn on -screen menus. The INPUT SOURCE menu...
... your TV sends audio for the current video input source. To access the Lock menu, you adjust options and settings for the DTV video input mode. to the S/PDIF In jack on the S/PDIF device. Using your TV 9 Connecting a digital optical audio device To connect a digital optical audio device: • Connect an optical audio cable to the S/PDIF jack on the back of your TV and to open the Picture Sound Air/Cable Auto Scan Favorite Show/Hide Channel No. To turn on -screen menus. The INPUT SOURCE menu...

User Manual (English)
Page 10
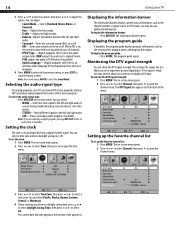
... the Channel menu. The on . 2 Press MENU. Memorizing for channels The first time you turn on -screen menu opens. 3 Press or to select a menu, then press to adjust the option. Your TV uses the scanned information to close the menu system. The on your TV, you press CH+ or CH-, your TV skips any channels that your TV Picture Sound Time Change Password System Lock US Canada RRT Setting Reset RRT Setup Lock Channel On Select Channel menu Move MENU Exit Picture Sound Air/Cable Auto Scan Favorite...
... the Channel menu. The on . 2 Press MENU. Memorizing for channels The first time you turn on -screen menu opens. 3 Press or to select a menu, then press to adjust the option. Your TV uses the scanned information to close the menu system. The on your TV, you press CH+ or CH-, your TV skips any channels that your TV Picture Sound Time Change Password System Lock US Canada RRT Setting Reset RRT Setup Lock Channel On Select Channel menu Move MENU Exit Picture Sound Air/Cable Auto Scan Favorite...

User Manual (English)
Page 12
... select a channel from the memorized channel list, press CH.LIST, press or to adjust the option. Changing channels Digital sub-channels A digital TV signal transmits more than an analog signal. A digital sub-channel is in VGA mode, then press MENU. Picture Sound Time Picture Mode Contrast Brightness Color Tint Sharpness Color Mode Setup Lock Standard Cool Channel 50 50 50 0 50 Select Move MENU Exit To change the channel. The on -screen menu opens. 2 Press or to select Picture, then press to open the Picture 3 Press...
... select a channel from the memorized channel list, press CH.LIST, press or to adjust the option. Changing channels Digital sub-channels A digital TV signal transmits more than an analog signal. A digital sub-channel is in VGA mode, then press MENU. Picture Sound Time Picture Mode Contrast Brightness Color Tint Sharpness Color Mode Setup Lock Standard Cool Channel 50 50 50 0 50 Select Move MENU Exit To change the channel. The on -screen menu opens. 2 Press or to select Picture, then press to open the Picture 3 Press...
User Manual (English)
Page 14
... the viewing time, program name, and program description. Setting the clock The time is on, the overall volume levels are having trouble hearing a stereo broadcast, select this option. • STEREO-Sends different signals to the left and right audio. • Surround-Turns the surround sound effect on or off. • AVC-Turns auto volume control on -screen menu opens. 2 Press or to select Time, then press to open the Picture Sound Time Setup Lock Channel Sleep Timer Time...
... the viewing time, program name, and program description. Setting the clock The time is on, the overall volume levels are having trouble hearing a stereo broadcast, select this option. • STEREO-Sends different signals to the left and right audio. • Surround-Turns the surround sound effect on or off. • AVC-Turns auto volume control on -screen menu opens. 2 Press or to select Time, then press to open the Picture Sound Time Setup Lock Channel Sleep Timer Time...
User Manual (English)
Page 19
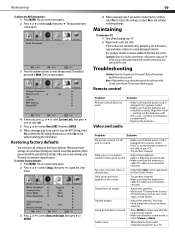
The password entry screen opens. Maintaining To clean your TV: 1 Turn off your TV. Note: If the problem is not solved after you try to qualified service personnel. Remote control Problem Remote control does not work. No color, incorrect color, or • Adjust the Color (color saturation) dark picture. Restoring factory defaults You can restore all servicing to repair your TV. 2 Wipe it back on the batteries with the cloth. Picture Sound Time Setup Lock Channel Menu Language Transparency Zoom Mode Noise Reduction...
The password entry screen opens. Maintaining To clean your TV: 1 Turn off your TV. Note: If the problem is not solved after you try to qualified service personnel. Remote control Problem Remote control does not work. No color, incorrect color, or • Adjust the Color (color saturation) dark picture. Restoring factory defaults You can restore all servicing to repair your TV. 2 Wipe it back on the batteries with the cloth. Picture Sound Time Setup Lock Channel Menu Language Transparency Zoom Mode Noise Reduction...
User Manual (English)
Page 20
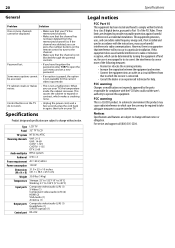
Some menu options cannot be required to take adequate measures to Part 15 of the following measures: • Reorient or relocate the receiving antenna. • Increase the separation between the equipment and receiver. • Connect the equipment into an outlet on your TV. Type Panel TV system Receiving channels Audio multiplex Audio out Power requirement Power consumption Dimensions (W × H × D) Weight Temperature Input ports Output ports Control port LCD TV 32" TFT LCD NTSC-M, ATSC VHF: 2-13 UHF: 14...
Some menu options cannot be required to take adequate measures to Part 15 of the following measures: • Reorient or relocate the receiving antenna. • Increase the separation between the equipment and receiver. • Connect the equipment into an outlet on your TV. Type Panel TV system Receiving channels Audio multiplex Audio out Power requirement Power consumption Dimensions (W × H × D) Weight Temperature Input ports Output ports Control port LCD TV 32" TFT LCD NTSC-M, ATSC VHF: 2-13 UHF: 14...
User Manual (English)
Page 21
.... The purchase date is or with this warranty statement. Products and parts replaced under this warranty that requires service, terms of the Product ("Warranty Period"). This warranty does not cover: • Customer instruction • Installation • Set up adjustments • Cosmetic damage • Damage due to the original purchaser of Dynex and are required after the Warranty Period expires, you sell or otherwise...
.... The purchase date is or with this warranty statement. Products and parts replaced under this warranty that requires service, terms of the Product ("Warranty Period"). This warranty does not cover: • Customer instruction • Installation • Set up adjustments • Cosmetic damage • Damage due to the original purchaser of Dynex and are required after the Warranty Period expires, you sell or otherwise...


