
User Manual (English)
Page 2
... 13, 2009 11:38 AM ii Dynex DX-L321-10A 32" LCD TV Contents CHILD SAFETY 1 Important safety instructions 2 Warnings 2 Cautions 2 Installing and removing the stand 3 Installing the stand 3 Removing the stand 4 Installing a wall-mount bracket 4 TV components 4 Side controls 4 Back connections...control batteries 6 Aiming the remote control 6 Programming a universal remote control to work with your TV 7 Making connections 7 Connecting the power 7 Connecting an antenna, cable TV, or satellite TV box 7 Connecting a VCR 8 Connecting a camcorder or gaming console 9 Connecting an HDMI ...
... 13, 2009 11:38 AM ii Dynex DX-L321-10A 32" LCD TV Contents CHILD SAFETY 1 Important safety instructions 2 Warnings 2 Cautions 2 Installing and removing the stand 3 Installing the stand 3 Removing the stand 4 Installing a wall-mount bracket 4 TV components 4 Side controls 4 Back connections...control batteries 6 Aiming the remote control 6 Programming a universal remote control to work with your TV 7 Making connections 7 Connecting the power 7 Connecting an antenna, cable TV, or satellite TV box 7 Connecting a VCR 8 Connecting a camcorder or gaming console 9 Connecting an HDMI ...
User Manual (English)
Page 3
DX-L321-10A_09-0407_MAN_ENG_V3.book Page iii Wednesday, May 13, 2009 11:38 AM iii Setting or changing the PIN 16 Setting parental control levels 17 Blocking unrated TV 18 Locking control panel buttons 18 Using closed captioning 19 Turning closed captioning on or off 19 Selecting the closed ...captioning mode 19 Customizing DTV closed captioning styles 20 Adjusting time settings 20 Setting the TV clock 20 Setting the sleep timer 21 Adjusting menu settings 21 Selecting the menu language 21 Labeling an input source 22 Restoring default...
DX-L321-10A_09-0407_MAN_ENG_V3.book Page iii Wednesday, May 13, 2009 11:38 AM iii Setting or changing the PIN 16 Setting parental control levels 17 Blocking unrated TV 18 Locking control panel buttons 18 Using closed captioning 19 Turning closed captioning on or off 19 Selecting the closed ...captioning mode 19 Customizing DTV closed captioning styles 20 Adjusting time settings 20 Setting the TV clock 20 Setting the sleep timer 21 Adjusting menu settings 21 Selecting the menu language 21 Labeling an input source 22 Restoring default...

User Manual (English)
Page 5
...an independent laboratory as a chest of drawers. • Remember that are required for safe wall mount installation. Some wall mounts are popular purchases. DX-L321-10A_09-0407_MAN_ENG_V3.book Page 1 Wednesday, May 13, 2009 11:38 AM 1 CHILD SAFETY It makes a difference how and where you use your ... placed on the proper stands or installed according to making home entertainment enjoyable and safe. Make sure that you place or install the TV where it cannot be pushed, pulled over and cause injury. We and the consumer electronics industry are not always supported on dressers, ...
...an independent laboratory as a chest of drawers. • Remember that are required for safe wall mount installation. Some wall mounts are popular purchases. DX-L321-10A_09-0407_MAN_ENG_V3.book Page 1 Wednesday, May 13, 2009 11:38 AM 1 CHILD SAFETY It makes a difference how and where you use your ... placed on the proper stands or installed according to making home entertainment enjoyable and safe. Make sure that you place or install the TV where it cannot be pushed, pulled over and cause injury. We and the consumer electronics industry are not always supported on dressers, ...
User Manual (English)
Page 6
DX-L321-10A_09-0407_MAN_ENG_V3.book Page 2 Wednesday, May 13, 2009 11:38 AM 2 Important safety ...Do not install near water. 6 Clean only with one wider than the other hazards. Handling the LCD panel • Your TV's screen is present within your mouth, immediately gargle, rinse, and consult with them might be taken to rain or moisture. .... A polarized plug has two blades with a dry cloth. 7 Do not block any service or repair to this TV from lightning and power line surges. Cautions Damage requiring service Unplug this device, ask the service technician to perform routine ...
DX-L321-10A_09-0407_MAN_ENG_V3.book Page 2 Wednesday, May 13, 2009 11:38 AM 2 Important safety ...Do not install near water. 6 Clean only with one wider than the other hazards. Handling the LCD panel • Your TV's screen is present within your mouth, immediately gargle, rinse, and consult with them might be taken to rain or moisture. .... A polarized plug has two blades with a dry cloth. 7 Do not block any service or repair to this TV from lightning and power line surges. Cautions Damage requiring service Unplug this device, ask the service technician to perform routine ...
User Manual (English)
Page 7
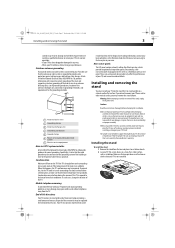
... or bench as a fixed blue, green, or red point. Installing and removing the stand You must remove the stand column. If you must install your TV's finish. DX-L321-10A_09-0407_MAN_ENG_V3.book Page 3 Wednesday, May 13, 2009 11:38 AM Installing and removing the stand 3 controls may result in damage and will form...
... or bench as a fixed blue, green, or red point. Installing and removing the stand You must remove the stand column. If you must install your TV's finish. DX-L321-10A_09-0407_MAN_ENG_V3.book Page 3 Wednesday, May 13, 2009 11:38 AM Installing and removing the stand 3 controls may result in damage and will form...

User Manual (English)
Page 8
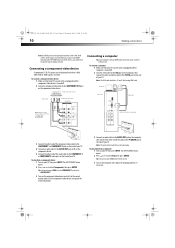
... wall-mount bracket to turn on your TV is pre-attached (see "Connecting an antenna, cable TV, or satellite TV box" on -screen menu. 2 VOL+/VOL- DX-L321-10A_09-0407_MAN_ENG_V3.book Page 4 Wednesday, May 13, 2009 11:38 AM 4 TV components 3 Align the base with the bottom of the TV, then secure the base to -DVI converter...
... wall-mount bracket to turn on your TV is pre-attached (see "Connecting an antenna, cable TV, or satellite TV box" on -screen menu. 2 VOL+/VOL- DX-L321-10A_09-0407_MAN_ENG_V3.book Page 4 Wednesday, May 13, 2009 11:38 AM 4 TV components 3 Align the base with the bottom of the TV, then secure the base to -DVI converter...
User Manual (English)
Page 9
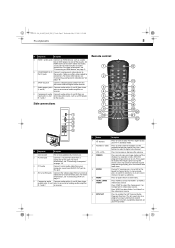
DX-L321-10A_09-0407_MAN_ENG_V3.book Page 5 Wednesday, May 13, 2009 11:38 AM TV components 5 ## Component Description 4 HDMI 1 and 2 jacks Connect an HDMI device, such as a cable box or DVD player, to one of these jacks. An HDMI cable... jacks. Function availability depends on page 9. 5 COMPONENT IN (Y, Connect a component video device to connectors. For more information, see "Connecting an HDMI device" on your TV. Connect a 15-pin VGA cable from a computer to this jack to an external digital audio receiver. 7 Audio output jacks Connect audio cables (L and R) from these...
DX-L321-10A_09-0407_MAN_ENG_V3.book Page 5 Wednesday, May 13, 2009 11:38 AM TV components 5 ## Component Description 4 HDMI 1 and 2 jacks Connect an HDMI device, such as a cable box or DVD player, to one of these jacks. An HDMI cable... jacks. Function availability depends on page 9. 5 COMPONENT IN (Y, Connect a component video device to connectors. For more information, see "Connecting an HDMI device" on your TV. Connect a 15-pin VGA cable from a computer to this jack to an external digital audio receiver. 7 Audio output jacks Connect audio cables (L and R) from these...

User Manual (English)
Page 10
...a cloth. Press to turn on page 19. Press to go to shock or liquids. Remove batteries when they no longer have your TV. If chemicals leak, clean the battery compartment with high humidity. Using the remote control Installing remote control batteries To install remote control batteries:...Insert two AAA batteries into the battery compartment. You can cause a rash. Press to select the video display format. Make sure that the + and - DX-L321-10A_09-0407_MAN_ENG_V3.book Page 6 Wednesday, May 13, 2009 11:38 AM 6 Using the remote control # Button 9 SLEEP 10 PICTURE 11 ZOOM 12 (...
...a cloth. Press to turn on page 19. Press to go to shock or liquids. Remove batteries when they no longer have your TV. If chemicals leak, clean the battery compartment with high humidity. Using the remote control Installing remote control batteries To install remote control batteries:...Insert two AAA batteries into the battery compartment. You can cause a rash. Press to select the video display format. Make sure that the + and - DX-L321-10A_09-0407_MAN_ENG_V3.book Page 6 Wednesday, May 13, 2009 11:38 AM 6 Using the remote control # Button 9 SLEEP 10 PICTURE 11 ZOOM 12 (...
User Manual (English)
Page 11
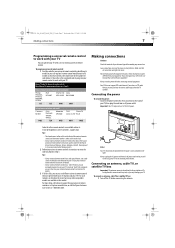
...or set -top box's remote control manufacturer and model) on the charts below, then make note of time. Dynex TV codes for universal remote controls (for all Dynex TVs manufactured after Jan. 1, 2007) Universal remote control manufacturer and model Philips PHDVD5, PH5DSS, PMDVR8, PDVR8 RCA ... source indicated on 120 V, 60 Hz power. DX-L321-10A_09-0407_MAN_ENG_V3.book Page 7 Wednesday, May 13, 2009 11:38 AM Making connections 7 Programming a universal remote control to work with any connections. Always turn the power off the TV before finding a match. 2 Follow your universal remote...
...or set -top box's remote control manufacturer and model) on the charts below, then make note of time. Dynex TV codes for universal remote controls (for all Dynex TVs manufactured after Jan. 1, 2007) Universal remote control manufacturer and model Philips PHDVD5, PH5DSS, PMDVR8, PDVR8 RCA ... source indicated on 120 V, 60 Hz power. DX-L321-10A_09-0407_MAN_ENG_V3.book Page 7 Wednesday, May 13, 2009 11:38 AM Making connections 7 Programming a universal remote control to work with any connections. Always turn the power off the TV before finding a match. 2 Follow your universal remote...
User Manual (English)
Page 12
DX-L321-10A_09-0407_MAN_ENG_V3.book Page 8 Wednesday, May 13, 2009 11:38 AM 8 Making connections 2 Connect one end of TV VHF, UHF, or combination antenna RF coaxial cable (75 ohm) ...ENTER. Side of a coaxial cable (not included) to eliminate interference and noise from the VCR: 1 Turn on your TV. Note: You can also press VIDEO once for Video1 or twice for Video2. 3 Turn on the VCR, insert ... cord or other end of the cable to the ANT/CABLE IN jack on the back of your TV's power cord is unplugged and the VCR is not installed correctly, contact qualified service personnel to white....
DX-L321-10A_09-0407_MAN_ENG_V3.book Page 8 Wednesday, May 13, 2009 11:38 AM 8 Making connections 2 Connect one end of TV VHF, UHF, or combination antenna RF coaxial cable (75 ohm) ...ENTER. Side of a coaxial cable (not included) to eliminate interference and noise from the VCR: 1 Turn on your TV. Note: You can also press VIDEO once for Video1 or twice for Video2. 3 Turn on the VCR, insert ... cord or other end of the cable to the ANT/CABLE IN jack on the back of your TV's power cord is unplugged and the VCR is not installed correctly, contact qualified service personnel to white....
User Manual (English)
Page 13
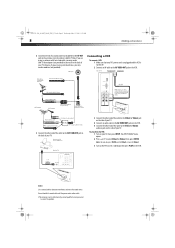
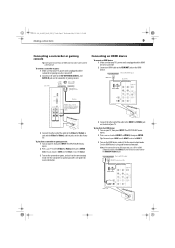
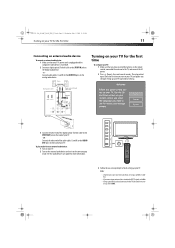
DX-L321-10A_09-0407_MAN_ENG_V3.book Page 9 Wednesday, May 13, 2009 11:38 AM Making connections 9 Connecting a camcorder or gaming .... 3 Connect the other end of the cable to the HDMI 1 or HDMI 2 jack on the back of TV Camcorder or gaming console AV cable Note: Cables are often color-coded to connectors. Device with HDMI output HDMI cable Back of... of the cable to the AV OUT VIDEO, AUDIO-L, and AUDIO-R jacks on the side of TV Device with DVI output HDMI-DVI conversion cable Back of your TV's power cord is unplugged and the HDMI device is turned off . 2 Connect an HDMI cable ...
DX-L321-10A_09-0407_MAN_ENG_V3.book Page 9 Wednesday, May 13, 2009 11:38 AM Making connections 9 Connecting a camcorder or gaming .... 3 Connect the other end of the cable to the HDMI 1 or HDMI 2 jack on the back of TV Camcorder or gaming console AV cable Note: Cables are often color-coded to connectors. Device with HDMI output HDMI cable Back of... of the cable to the AV OUT VIDEO, AUDIO-L, and AUDIO-R jacks on the side of TV Device with DVI output HDMI-DVI conversion cable Back of your TV's power cord is unplugged and the HDMI device is turned off . 2 Connect an HDMI cable ...
User Manual (English)
Page 14
... cable should have an HDMI connector, which can be displayed only when a 480i, 480P, 720P, or 1080i signal is received. Computer Side of your TV, then press INPUT. Note: The audio cable should be displayed only when a 640 x 480, 480P, 720P, or 1080i signal is received. To ... is turned off . 2 Connect a VGA cable to the PC/VGA jack on your TV. To connect a computer: 1 Make sure that your TV's power cord is unplugged and the computer is a possibility that your TV. DX-L321-10A_09-0407_MAN_ENG_V3.book Page 10 Wednesday, May 13, 2009 11:38 AM 10 Making connections ...
... cable should have an HDMI connector, which can be displayed only when a 480i, 480P, 720P, or 1080i signal is received. Computer Side of your TV, then press INPUT. Note: The audio cable should be displayed only when a 640 x 480, 480P, 720P, or 1080i signal is received. To ... is turned off . 2 Connect a VGA cable to the PC/VGA jack on your TV. To connect a computer: 1 Make sure that your TV's power cord is unplugged and the computer is a possibility that your TV. DX-L321-10A_09-0407_MAN_ENG_V3.book Page 10 Wednesday, May 13, 2009 11:38 AM 10 Making connections ...
User Manual (English)
Page 15
...To play audio from an external audio device: 1 Turn on your TV. 2 Turn on the analog audio device. See the audio device's user guide for more information. 3 Follow the on your TV) and guides you through setting up your TV. DX-L321-10A_09-0407_MAN_ENG_V3.book Page 11 Wednesday, May 13, 2009 11:38 ...AM Turning on your TV for the first time 11 Connecting an external audio device To connect an external...
...To play audio from an external audio device: 1 Turn on your TV. 2 Turn on the analog audio device. See the audio device's user guide for more information. 3 Follow the on your TV) and guides you through setting up your TV. DX-L321-10A_09-0407_MAN_ENG_V3.book Page 11 Wednesday, May 13, 2009 11:38 ...AM Turning on your TV for the first time 11 Connecting an external audio device To connect an external...

User Manual (English)
Page 16
... features for on-screen menu display. To completely disconnect power, unplug the power cord. Your TV turns on. 3 Press (Power) again to highlight the video source, then press ENTER. DX-L321-10A_09-0407_MAN_ENG_V3.book Page 12 Wednesday, May 13, 2009 11:38 AM 12 Understanding the basics... Understanding the basics Turning your TV on or off To turn your TV, it automatically goes into standby mode. When you are three...
... features for on-screen menu display. To completely disconnect power, unplug the power cord. Your TV turns on. 3 Press (Power) again to highlight the video source, then press ENTER. DX-L321-10A_09-0407_MAN_ENG_V3.book Page 12 Wednesday, May 13, 2009 11:38 AM 12 Understanding the basics... Understanding the basics Turning your TV on or off To turn your TV, it automatically goes into standby mode. When you are three...
User Manual (English)
Page 17
... visible when there is a digital TV connection. 4 This menu is only visible when there is a digital TV or an HDMI connection. 5 This menu is only visible when the input source is Tuner (TV connection) and the Channel List panel is the default PIN. DX-L321-10A_09-0407_MAN_ENG_V3.book Page 13 Wednesday,... May 13, 2009 11:38 AM Understanding the basics 13 Locks Ratings Locks Set allowable video content for TV programs based on -screen cursor left...
... visible when there is a digital TV connection. 4 This menu is only visible when there is a digital TV or an HDMI connection. 5 This menu is only visible when the input source is Tuner (TV connection) and the Channel List panel is the default PIN. DX-L321-10A_09-0407_MAN_ENG_V3.book Page 13 Wednesday,... May 13, 2009 11:38 AM Understanding the basics 13 Locks Ratings Locks Set allowable video content for TV programs based on -screen cursor left...
User Manual (English)
Page 18
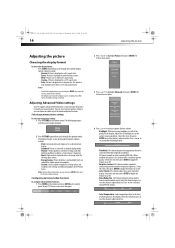
...this item, then press ENTER to toggle the feature on the control panel of the advanced picture functions. Adjusting Advanced Video settings Your TV supports advanced video functions so you enabled in the Settings and Advanced options of white balance in the display. Options include: • ... bar. Select this item then press ENTER to toggle the feature on the picture brightness. Press or to choose your viewing habits. DX-L321-10A_09-0407_MAN_ENG_V3.book Page 14 Wednesday, May 13, 2009 11:38 AM 14 Adjusting the picture Adjusting the picture Choosing the display format...
...this item, then press ENTER to toggle the feature on the control panel of the advanced picture functions. Adjusting Advanced Video settings Your TV supports advanced video functions so you enabled in the Settings and Advanced options of white balance in the display. Options include: • ... bar. Select this item then press ENTER to toggle the feature on the picture brightness. Press or to choose your viewing habits. DX-L321-10A_09-0407_MAN_ENG_V3.book Page 14 Wednesday, May 13, 2009 11:38 AM 14 Adjusting the picture Adjusting the picture Choosing the display format...
User Manual (English)
Page 19
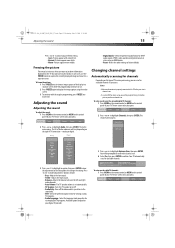
...8226; Audio Only-Turns off the video and lets you listen to the sound only. • MTS-Select the preferred audio stream for viewing analog TV programs. • Audio Language-Select the language track you prefer for available channels in your area. Notes: • Make sure the antenna is only...format for that option or to change the setting. The on the control panel of TV connection-analog or digital. The Channels menu opens. 2 Press or to confirm. The on the type of your TV. DX-L321-10A_09-0407_MAN_ENG_V3.book Page 15 Wednesday, May 13, 2009 11:38 AM Adjusting the sound...
...8226; Audio Only-Turns off the video and lets you listen to the sound only. • MTS-Select the preferred audio stream for viewing analog TV programs. • Audio Language-Select the language track you prefer for available channels in your area. Notes: • Make sure the antenna is only...format for that option or to change the setting. The on the control panel of TV connection-analog or digital. The Channels menu opens. 2 Press or to confirm. The on the type of your TV. DX-L321-10A_09-0407_MAN_ENG_V3.book Page 15 Wednesday, May 13, 2009 11:38 AM Adjusting the sound...

User Manual (English)
Page 20
... to programs that exceed the selected rating, you press CH or . You are prompted to enter the number again to highlight Channels, then press ENTER. DX-L321-10A_09-0407_MAN_ENG_V3.book Page 16 Wednesday, May 13, 2009 11:38 AM 16 Setting parental controls 2 Press or to confirm it . To hide channels: ...1 Press MENU on the remote control, or MENU on the control panel of your TV skips the channels when you must enter a PIN. Setting or changing the PIN To set , parental controls read the rating of the program (with ...
... to programs that exceed the selected rating, you press CH or . You are prompted to enter the number again to highlight Channels, then press ENTER. DX-L321-10A_09-0407_MAN_ENG_V3.book Page 16 Wednesday, May 13, 2009 11:38 AM 16 Setting parental controls 2 Press or to confirm it . To hide channels: ...1 Press MENU on the remote control, or MENU on the control panel of your TV skips the channels when you must enter a PIN. Setting or changing the PIN To set , parental controls read the rating of the program (with ...

User Manual (English)
Page 21
DX-L321-10A_09-0407_MAN_ENG_V3.book Page 17 Wednesday, May 13, 2009 11:38 AM Setting parental controls 17... prompted to enter the number again to confirm it . One of your TV. French or CAN - The Enter PIN box opens. 6 If you selected Canada, press or to highlight your TV. The Locks menu opens. The Ratings Locks menu opens. 5 Press or... prompted.) The Enter New PIN box opens. 4 Using the number keys, enter a new four-digit PIN number. English, then press ENTER. TV or USA-Movie, then press ENTER. - The ratings panel for the sub-menu you selected opens. 7 Press , , , or to select...
DX-L321-10A_09-0407_MAN_ENG_V3.book Page 17 Wednesday, May 13, 2009 11:38 AM Setting parental controls 17... prompted to enter the number again to confirm it . One of your TV. French or CAN - The Enter PIN box opens. 6 If you selected Canada, press or to highlight your TV. The Locks menu opens. The Ratings Locks menu opens. 5 Press or... prompted.) The Enter New PIN box opens. 4 Using the number keys, enter a new four-digit PIN number. English, then press ENTER. TV or USA-Movie, then press ENTER. - The ratings panel for the sub-menu you selected opens. 7 Press , , , or to select...

User Manual (English)
Page 22
DX-L321-10A_09-0407_MAN_ENG_V3.book Page 18 Wednesday, May 13, 2009 11:38 AM 18 Setting parental controls 9 When you set. TV-14 Parental guidance strongly suggested for children under 17. D Suggestive dialog. R Parental guidance suggested . Canadian... Distributors Association (CMPDA). G General audiences. Canadian French ratings These ratings are determined by the Federal Communications Commission (FCC) TV-Y All children. TV-G General audiences. The Locks menu opens. movie (MPAA) ratings These ratings are based on the Canadian Home Video Rating ...
DX-L321-10A_09-0407_MAN_ENG_V3.book Page 18 Wednesday, May 13, 2009 11:38 AM 18 Setting parental controls 9 When you set. TV-14 Parental guidance strongly suggested for children under 17. D Suggestive dialog. R Parental guidance suggested . Canadian... Distributors Association (CMPDA). G General audiences. Canadian French ratings These ratings are determined by the Federal Communications Commission (FCC) TV-Y All children. TV-G General audiences. The Locks menu opens. movie (MPAA) ratings These ratings are based on the Canadian Home Video Rating ...


