
User Manual (English)
Page 2
....book Page ii Wednesday, May 13, 2009 11:38 AM ii Dynex DX-L321-10A 32" LCD TV Contents CHILD SAFETY 1 Important safety instructions 2 Warnings 2 Cautions 2 Installing and removing the stand 3 Installing the stand 3 Removing the stand 4 Installing a wall... an antenna, cable TV, or satellite TV box 7 Connecting a VCR 8 Connecting a camcorder or gaming console 9 Connecting an HDMI device 9 Connecting a component video device 10 Connecting a computer 10 Connecting an external audio device 11 Turning on your TV for the first time 11 Understanding the basics 12 Turning your TV on or...
....book Page ii Wednesday, May 13, 2009 11:38 AM ii Dynex DX-L321-10A 32" LCD TV Contents CHILD SAFETY 1 Important safety instructions 2 Warnings 2 Cautions 2 Installing and removing the stand 3 Installing the stand 3 Removing the stand 4 Installing a wall... an antenna, cable TV, or satellite TV box 7 Connecting a VCR 8 Connecting a camcorder or gaming console 9 Connecting an HDMI device 9 Connecting a component video device 10 Connecting a computer 10 Connecting an external audio device 11 Turning on your TV for the first time 11 Understanding the basics 12 Turning your TV on or...
User Manual (English)
Page 6
... power-supply cord or plug is left unattended and unused for replacement of the obsolete outlet. 10 Protect the power cord from the type of power source indicated on the back of your local power company. DX-L321-10A_09-0407_MAN_ENG_V3.book Page 2 Wednesday, May 13, 2009 11:38 AM 2 Important safety instructions Important...
... power-supply cord or plug is left unattended and unused for replacement of the obsolete outlet. 10 Protect the power cord from the type of power source indicated on the back of your local power company. DX-L321-10A_09-0407_MAN_ENG_V3.book Page 2 Wednesday, May 13, 2009 11:38 AM 2 Important safety instructions Important...
User Manual (English)
Page 9
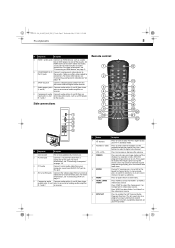
...enter channel numbers or the parental control password. Press COMP to run. For more information, see "Connecting a component video device" on page 10. 6 SPDIF out jack Connect a digital optical cable from this jack to an external digital audio receiver. 7 Audio output jacks Connect audio cables...audio, so you listen to a program using the entire screen. In menu mode, press to confirm selections in channel entry. Do not use. DX-L321-10A_09-0407_MAN_ENG_V3.book Page 5 Wednesday, May 13, 2009 11:38 AM TV components 5 ## Component Description 4 HDMI 1 and 2 jacks Connect ...
...enter channel numbers or the parental control password. Press COMP to run. For more information, see "Connecting a component video device" on page 10. 6 SPDIF out jack Connect a digital optical cable from this jack to an external digital audio receiver. 7 Audio output jacks Connect audio cables...audio, so you listen to a program using the entire screen. In menu mode, press to confirm selections in channel entry. Do not use. DX-L321-10A_09-0407_MAN_ENG_V3.book Page 5 Wednesday, May 13, 2009 11:38 AM TV components 5 ## Component Description 4 HDMI 1 and 2 jacks Connect ...

User Manual (English)
Page 10
... input source. Press to the next or previous channel in the channel list. symbols in a fire. DX-L321-10A_09-0407_MAN_ENG_V3.book Page 6 Wednesday, May 13, 2009 11:38 AM 6 Using the remote control # Button 9 SLEEP 10 PICTURE 11 ZOOM 12 (Mute) 13 RECALL 14 CH / 15 INFO 16 17 EXIT 18 TV 19...
... input source. Press to the next or previous channel in the channel list. symbols in a fire. DX-L321-10A_09-0407_MAN_ENG_V3.book Page 6 Wednesday, May 13, 2009 11:38 AM 6 Using the remote control # Button 9 SLEEP 10 PICTURE 11 ZOOM 12 (Mute) 13 RECALL 14 CH / 15 INFO 16 17 EXIT 18 TV 19...
User Manual (English)
Page 14
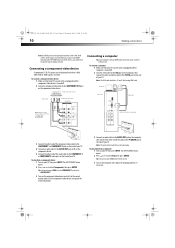
... to the PC/VGA jack on your TV, then press INPUT. When you connect to select VGA, then press ENTER. DX-L321-10A_09-0407_MAN_ENG_V3.book Page 10 Wednesday, May 13, 2009 11:38 AM 10 Making connections Note: An HDMI picture can also press VGA on the remote control. 3 Turn on the back of...
... to the PC/VGA jack on your TV, then press INPUT. When you connect to select VGA, then press ENTER. DX-L321-10A_09-0407_MAN_ENG_V3.book Page 10 Wednesday, May 13, 2009 11:38 AM 10 Making connections Note: An HDMI picture can also press VGA on the remote control. 3 Turn on the back of...
User Manual (English)
Page 25
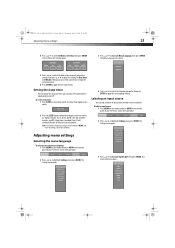
DX-L321-10A_09-0407_MAN_ENG_V3.book Page 21 Wednesday, May 13, 2009 11:38 AM Adjusting menu settings 21 4 Press or to adjust the setting. The Menu Language ... identify. Setting the sleep timer You can add a label to an input source to make it automatically turns off after the interval specified. Options include: 10, 15, 30, 45, 60, 90, 120, 180, and 240 minutes; The Sleep Timer popup screen opens. 2 Press the SLEEP button repeatedly to toggle each timer...
DX-L321-10A_09-0407_MAN_ENG_V3.book Page 21 Wednesday, May 13, 2009 11:38 AM Adjusting menu settings 21 4 Press or to adjust the setting. The Menu Language ... identify. Setting the sleep timer You can add a label to an input source to make it automatically turns off after the interval specified. Options include: 10, 15, 30, 45, 60, 90, 120, 180, and 240 minutes; The Sleep Timer popup screen opens. 2 Press the SLEEP button repeatedly to toggle each timer...
User Manual (English)
Page 28
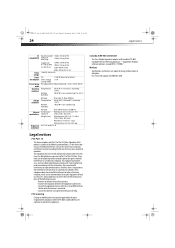
DX-L321-10A_09-0407_MAN_ENG_V3.book Page 24 Wednesday, May 13, 2009 11:38 AM 24 Legal notices PC Recommended 1360 x 768 @ 60 Hz compatibility (reduced blanking) 1366 x 768 @ 60 Hz Power voltage Power consumption Preset timing mode Operating conditions Supported 1280 x 720 @ 60 Hz H = 30-63 KHz 1024 x 768 @ 60 Hz V= 50-75 Hz 720 x 400 @ 70 Hz 640 x 480 @ 60, 75 Hz 120 VAC, 60 Hz, 3A On
DX-L321-10A_09-0407_MAN_ENG_V3.book Page 24 Wednesday, May 13, 2009 11:38 AM 24 Legal notices PC Recommended 1360 x 768 @ 60 Hz compatibility (reduced blanking) 1366 x 768 @ 60 Hz Power voltage Power consumption Preset timing mode Operating conditions Supported 1280 x 720 @ 60 Hz H = 30-63 KHz 1024 x 768 @ 60 Hz V= 50-75 Hz 720 x 400 @ 70 Hz 640 x 480 @ 60, 75 Hz 120 VAC, 60 Hz, 3A On
