
User Manual (English)
Page 2
... Dynex DX-L321-10A 32" LCD TV Contents CHILD SAFETY 1 Important safety instructions 2 Warnings 2 Cautions 2 Installing and removing the stand 3 Installing the stand 3 Removing the stand 4 Installing a wall-mount bracket 4 TV components 4 Side controls 4 Back connections 4 Side connections 5 Remote control 5 Using the remote control 6 Installing remote control batteries 6 Aiming the remote control 6 Programming a universal remote control to work with your TV 7 Making connections 7 Connecting the power 7 Connecting an antenna, cable TV, or satellite TV box 7 Connecting a VCR...
... Dynex DX-L321-10A 32" LCD TV Contents CHILD SAFETY 1 Important safety instructions 2 Warnings 2 Cautions 2 Installing and removing the stand 3 Installing the stand 3 Removing the stand 4 Installing a wall-mount bracket 4 TV components 4 Side controls 4 Back connections 4 Side connections 5 Remote control 5 Using the remote control 6 Installing remote control batteries 6 Aiming the remote control 6 Programming a universal remote control to work with your TV 7 Making connections 7 Connecting the power 7 Connecting an antenna, cable TV, or satellite TV box 7 Connecting a VCR...
User Manual (English)
Page 3
...:38 AM iii Setting or changing the PIN 16 Setting parental control levels 17 Blocking unrated TV 18 Locking control panel buttons 18 Using closed captioning 19 Turning closed captioning on or off 19 Selecting the closed captioning mode 19 Customizing DTV closed captioning styles 20 Adjusting time settings 20 Setting the TV clock 20 Setting the sleep timer 21 Adjusting menu settings 21 Selecting the menu language 21 Labeling an input source 22 Restoring default settings 22 Troubleshooting 23 Maintenance 23 Cleaning 23 Specifications 24 Legal notices...
...:38 AM iii Setting or changing the PIN 16 Setting parental control levels 17 Blocking unrated TV 18 Locking control panel buttons 18 Using closed captioning 19 Turning closed captioning on or off 19 Selecting the closed captioning mode 19 Customizing DTV closed captioning styles 20 Adjusting time settings 20 Setting the TV clock 20 Setting the sleep timer 21 Adjusting menu settings 21 Selecting the menu language 21 Labeling an input source 22 Restoring default settings 22 Troubleshooting 23 Maintenance 23 Cleaning 23 Specifications 24 Legal notices...

User Manual (English)
Page 5
... proper use your flat panel display As you enjoy your TV, get help from a professional installer. • Make sure that children can become excited while watching a program, especially on dressers, bookcases, shelves, desks, speakers, chests, or carts may fall over and cause injury. Tune into safety • One size of TV stand does not fit all enclosed instructions for safe wall mount installation. Some wall mounts...
... proper use your flat panel display As you enjoy your TV, get help from a professional installer. • Make sure that children can become excited while watching a program, especially on dressers, bookcases, shelves, desks, speakers, chests, or carts may fall over and cause injury. Tune into safety • One size of TV stand does not fit all enclosed instructions for safe wall mount installation. Some wall mounts...
User Manual (English)
Page 6
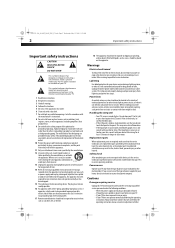
... as the original part. Replacement parts When replacement parts are important operating and maintenance instructions in correct operating condition. Safety check After completing any service or repair to this Class I apparatus, which needs to be placed on or pinched particularly at least 15 minutes or longer in any antenna or cable system. Power source Operate your TV or hit, jolt, or press hard against the LCD panel.
... as the original part. Replacement parts When replacement parts are important operating and maintenance instructions in correct operating condition. Safety check After completing any service or repair to this Class I apparatus, which needs to be placed on or pinched particularly at least 15 minutes or longer in any antenna or cable system. Power source Operate your TV or hit, jolt, or press hard against the LCD panel.
User Manual (English)
Page 7
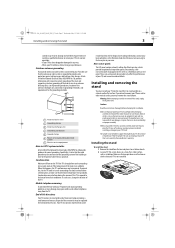
... outside antenna or cable system is connected to your area. Installing the stand To install the stand: 1 Remove the stand from an air conditioner. Article 810 of the National Electrical Code, ANSI/NFPA No. 70, provides information with your TV picture and sound, operating problems, or even damage, keep your TV into a warm room or if the temperature of the stand, unplug the AC power cord. When using...
... outside antenna or cable system is connected to your area. Installing the stand To install the stand: 1 Remove the stand from an air conditioner. Article 810 of the National Electrical Code, ANSI/NFPA No. 70, provides information with your TV picture and sound, operating problems, or even damage, keep your TV into a warm room or if the temperature of the stand, unplug the AC power cord. When using...

User Manual (English)
Page 8
... remove the stand from an jacks external audio source, such as a DVD player with HDMI/DVI connections, to these jacks. Installing a wall-mount bracket If you want to attach the TV to a wall-mount bracket (not provided), you put your TV in standby mode. Make sure that you should first remove the stand pedestal if it is not scratched). 2 Remove the three M4 x L10 mm screws securing the base to the TV, then remove the base. 3 4 5 # Component Description 1 MENU...
... remove the stand from an jacks external audio source, such as a DVD player with HDMI/DVI connections, to these jacks. Installing a wall-mount bracket If you want to attach the TV to a wall-mount bracket (not provided), you put your TV in standby mode. Make sure that you should first remove the stand pedestal if it is not scratched). 2 Remove the three M4 x L10 mm screws securing the base to the TV, then remove the base. 3 4 5 # Component Description 1 MENU...
User Manual (English)
Page 9
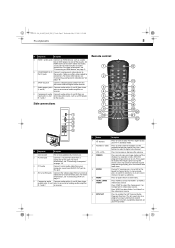
... a cable box or DVD player, to one of these jacks. Side connections 1 2 3 4 5 Remote control 1 2 3 4 5 6 7 8 9 10 11 12 13 14 15 16 17 18 19 20 21 22 ## Component Description 1 Service port 2 PC VGA jack 3 PC Audio For service update only. For more information, see "Connecting a VCR" on page 8. 5 Composite audio Connect audio cables (L and R) from an input jacks (L and external audio source, such as the video input source. 8 MTS/SAP Press to select the HDMI 1 or HDMI 2 video input source. Press COMP to select a digital sub-channel...
... a cable box or DVD player, to one of these jacks. Side connections 1 2 3 4 5 Remote control 1 2 3 4 5 6 7 8 9 10 11 12 13 14 15 16 17 18 19 20 21 22 ## Component Description 1 Service port 2 PC VGA jack 3 PC Audio For service update only. For more information, see "Connecting a VCR" on page 8. 5 Composite audio Connect audio cables (L and R) from an input jacks (L and external audio source, such as the video input source. 8 MTS/SAP Press to select the HDMI 1 or HDMI 2 video input source. Press COMP to select a digital sub-channel...

User Manual (English)
Page 10
... previous channel in the channel list. For more information, see "Displaying additional information" on -screen menus. Chemicals may not work if direct sunlight or bright light shines on page 19. Remove the batteries if you were previously viewing. symbols on or off the sound. Press to select the TV as furniture, between the remote control and the remote sensor. Press to turn closed captioning mode" on the remote sensor. Remove batteries...
... previous channel in the channel list. For more information, see "Displaying additional information" on -screen menus. Chemicals may not work if direct sunlight or bright light shines on page 19. Remove the batteries if you were previously viewing. symbols on or off the sound. Press to select the TV as furniture, between the remote control and the remote sensor. Press to turn closed captioning mode" on the remote sensor. Remove batteries...
User Manual (English)
Page 11
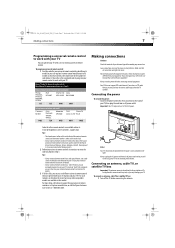
... the numbered code below it using your universal remote control's instructions to work with your TV You can operate both your set-top box and your TV remote to try codes for details. • If your universal remote control has a "Learn" feature, you may need to "teach" the commands one at a time. Connecting an antenna, cable TV, or satellite TV box Important: The antenna connector should only be using your TV. To connect an antenna, cable TV...
... the numbered code below it using your universal remote control's instructions to work with your TV You can operate both your set-top box and your TV remote to try codes for details. • If your universal remote control has a "Learn" feature, you may need to "teach" the commands one at a time. Connecting an antenna, cable TV, or satellite TV box Important: The antenna connector should only be using your TV. To connect an antenna, cable TV...
User Manual (English)
Page 12
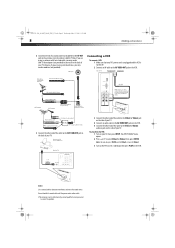
Likewise, if you are using an antenna with the power cord or other cables. Connect yellow to yellow, red to red, and white to select Video1 or Video2, then press ENTER. jack Connecting a VCR To connect a VCR: 1 Make sure that your TV's power cord is unplugged and the VCR is not installed correctly, contact qualified service personnel to correct the problem. To play from radio waves. The INPUT SOURCE menu opens. 2 Press or to...
Likewise, if you are using an antenna with the power cord or other cables. Connect yellow to yellow, red to red, and white to select Video1 or Video2, then press ENTER. jack Connecting a VCR To connect a VCR: 1 Make sure that your TV's power cord is unplugged and the VCR is not installed correctly, contact qualified service personnel to correct the problem. To play from radio waves. The INPUT SOURCE menu opens. 2 Press or to...
User Manual (English)
Page 13
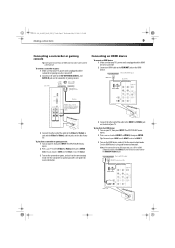
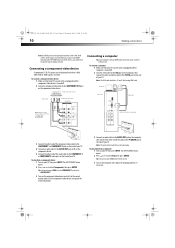
... press INPUT. Device with HDMI output HDMI cable Back of TV Side of the cable to the correct output mode. To connect a camcorder or game: 1 Make sure that your TV. Note: If the external device has DVI output only, use a DVI-to-HDMI adapter to connect to the HDMI jack, then connect an audio cable to the correct output mode. To play from the HDMI device: 1 Turn on the camcorder or gaming console. See the HDMI device's user guide for a better picture...
... press INPUT. Device with HDMI output HDMI cable Back of TV Side of the cable to the correct output mode. To connect a camcorder or game: 1 Make sure that your TV. Note: If the external device has DVI output only, use a DVI-to-HDMI adapter to connect to the HDMI jack, then connect an audio cable to the correct output mode. To play from the HDMI device: 1 Turn on the camcorder or gaming console. See the HDMI device's user guide for a better picture...
User Manual (English)
Page 14
.... Y = Green cable Pb = Blue cable Pr = Red cable Audio cable (stereo mini plugs) 3 Connect the other end of the component video cable to the COMPONENT 1 or COMPONENT 2 jacks on the back of the audio cable to select VGA, then press ENTER. DX-L321-10A_09-0407_MAN_ENG_V3.book Page 10 Wednesday, May 13, 2009 11:38 AM 10 Making connections Note: An HDMI picture can also press VGA on the remote control. 3 Turn on the computer, then adjust the display properties...
.... Y = Green cable Pb = Blue cable Pr = Red cable Audio cable (stereo mini plugs) 3 Connect the other end of the component video cable to the COMPONENT 1 or COMPONENT 2 jacks on the back of the audio cable to select VGA, then press ENTER. DX-L321-10A_09-0407_MAN_ENG_V3.book Page 10 Wednesday, May 13, 2009 11:38 AM 10 Making connections Note: An HDMI picture can also press VGA on the remote control. 3 Turn on the computer, then adjust the display properties...
User Manual (English)
Page 15
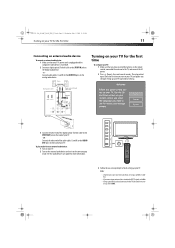
... remote control, connected the antenna to the correct output mode. See the audio device's user guide for more information. 3 Follow the on-screen prompts to the SPDIF OUT jack on the back of your TV. Analog audio cables Digital optical (Toslink) audio cable Back of TV 3 Connect the other end of the digital optical (Toslink) cable to finish setting up your TV's operational settings. The setup wizard opens (only the first time you through setting up your TV. DX-L321...
... remote control, connected the antenna to the correct output mode. See the audio device's user guide for more information. 3 Follow the on-screen prompts to the SPDIF OUT jack on the back of your TV. Analog audio cables Digital optical (Toslink) audio cable Back of TV 3 Connect the other end of the digital optical (Toslink) cable to finish setting up your TV's operational settings. The setup wizard opens (only the first time you through setting up your TV. DX-L321...

User Manual (English)
Page 16
... remote control (make sure the remote control batteries are still working and that you prefer for SPDIF audio signals. Warning: When your TV does not receive an input signal for different viewing conditions and adjust the backlight, noise reduction, and color temperature. Select the default display aspect ratio. Bass/Treble/ Adjust the sound pitch quality and the Balance balance between the left and right speakers. Reset Reset all operational settings to use for both analog and digital...
... remote control (make sure the remote control batteries are still working and that you prefer for SPDIF audio signals. Warning: When your TV does not receive an input signal for different viewing conditions and adjust the backlight, noise reduction, and color temperature. Select the default display aspect ratio. Bass/Treble/ Adjust the sound pitch quality and the Balance balance between the left and right speakers. Reset Reset all operational settings to use for both analog and digital...
User Manual (English)
Page 17
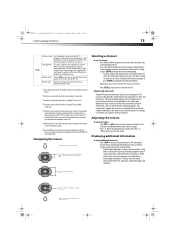
..., video input source, and resolution. • Digital mode information-Displays channel number, station name, channel label (if preset), broadcast program name, TV rating, signal type, audio information, resolution, CC mode, current time, and current program start and end times. • Analog mode information-Displays channel number, channel label (if preset), signal type, audio information, and resolution. Press (Mute) again to show an information banner. Displaying additional information To display additional information: • Press INFO to restore the sound. Selecting a channel To...
..., video input source, and resolution. • Digital mode information-Displays channel number, station name, channel label (if preset), broadcast program name, TV rating, signal type, audio information, resolution, CC mode, current time, and current program start and end times. • Analog mode information-Displays channel number, channel label (if preset), signal type, audio information, and resolution. Press (Mute) again to show an information banner. Displaying additional information To display additional information: • Press INFO to restore the sound. Selecting a channel To...
User Manual (English)
Page 18
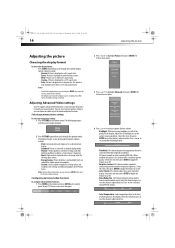
... for viewing under dim lighting conditions to deliver a "movie house" experience. • Sport-High contrast display for clear-cut images ideal for viewing sports events. • Energy Saving-Picture brightness and backlight levels are reduced for a lower power consumption. • Custom-Use this option to apply the settings values you can also press MENU, then select the Pictures, Mode submenu. Adjusting Advanced Video settings Your TV supports advanced video functions...
... for viewing under dim lighting conditions to deliver a "movie house" experience. • Sport-High contrast display for clear-cut images ideal for viewing sports events. • Energy Saving-Picture brightness and backlight levels are reduced for a lower power consumption. • Custom-Use this option to apply the settings values you can also press MENU, then select the Pictures, Mode submenu. Adjusting Advanced Video settings Your TV supports advanced video functions...
User Manual (English)
Page 19
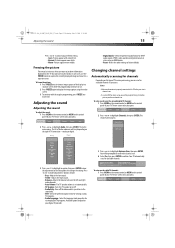
... to highlight Antenna Scan, then press ENTER. Analog Digital 3 Press or to highlight Audio, then press ENTER. Options include: • Bass-Adjusts the low sounds. • Treble-Adjusts the high sounds. • Balance-Adjusts the balance between the left and right audio channels. • Auto Volume-The TV speaker volume is only available on -screen menu bar opens. 2 Press or to display the image capture using an HDMI device. • Reset-Resets the audio settings to...
... to highlight Antenna Scan, then press ENTER. Analog Digital 3 Press or to highlight Audio, then press ENTER. Options include: • Bass-Adjusts the low sounds. • Treble-Adjusts the high sounds. • Balance-Adjusts the balance between the left and right audio channels. • Auto Volume-The TV speaker volume is only available on -screen menu bar opens. 2 Press or to display the image capture using an HDMI device. • Reset-Resets the audio settings to...
User Manual (English)
Page 26
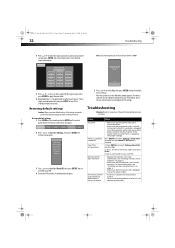
... load the default menu settings. Restoring default settings Caution: When you restore default settings, all the settings (except the password and parental rating) you have forgotten your TV. To restore default settings: 1 Press MENU on the remote control, or MENU on -screen menu again and select Locks. 3. These labels are reset. You may want to assign a label to highlight Reset All, then press ENTER. Press MENU and select Settings, Sleep Timer to verify that input source opens. DX-L321-10A_09...
... load the default menu settings. Restoring default settings Caution: When you restore default settings, all the settings (except the password and parental rating) you have forgotten your TV. To restore default settings: 1 Press MENU on the remote control, or MENU on -screen menu again and select Locks. 3. These labels are reset. You may want to assign a label to highlight Reset All, then press ENTER. Press MENU and select Settings, Sleep Timer to verify that input source opens. DX-L321-10A_09...
User Manual (English)
Page 27
.... Dimensions and weight are subject to change without notice. TV model DX-L321-10A TV panel Type Resolution 31.5-inch Active matrix WXGA TFT LCD 1366 x 768 (RGB vertical stripe) Color 16.2 million Viewing angle 176° horizontal,176° vertical Contrast ratio 3000:1 Brightness 400 nits Audio/video input terminals Response time 8.5 ms VGA (75 ohms, 0.7 Vp-p) + PC audio-in the cable connector could cause an improper connection. • Press MENU and select Picture, Settings to adjust...
.... Dimensions and weight are subject to change without notice. TV model DX-L321-10A TV panel Type Resolution 31.5-inch Active matrix WXGA TFT LCD 1366 x 768 (RGB vertical stripe) Color 16.2 million Viewing angle 176° horizontal,176° vertical Contrast ratio 3000:1 Brightness 400 nits Audio/video input terminals Response time 8.5 ms VGA (75 ohms, 0.7 Vp-p) + PC audio-in the cable connector could cause an improper connection. • Press MENU and select Picture, Settings to adjust...
User Manual (English)
Page 29
... where the factory applied serial number has been altered or removed REPAIR REPLACEMENT AS PROVIDED UNDER THIS WARRANTY IS YOUR EXCLUSIVE REMEDY. This warranty also does not cover: • Damage due to incorrect operation or maintenance • Connection to an incorrect voltage supply • Attempted repair by Best Buy Purchasing, LLC 7601 Penn Avenue South, Richfield, Minnesota, U.S.A. 55423-3645 © 2009 Best Buy Enterprise Services, Inc. DX-L321-10A_09...
... where the factory applied serial number has been altered or removed REPAIR REPLACEMENT AS PROVIDED UNDER THIS WARRANTY IS YOUR EXCLUSIVE REMEDY. This warranty also does not cover: • Damage due to incorrect operation or maintenance • Connection to an incorrect voltage supply • Attempted repair by Best Buy Purchasing, LLC 7601 Penn Avenue South, Richfield, Minnesota, U.S.A. 55423-3645 © 2009 Best Buy Enterprise Services, Inc. DX-L321-10A_09...


