
User Manual (English)
Page 2
... 13, 2009 11:38 AM ii Dynex DX-L321-10A 32" LCD TV Contents CHILD SAFETY 1 Important safety instructions 2 Warnings 2 Cautions 2 Installing and removing the stand 3 Installing the stand 3 Removing the stand 4 Installing a wall-mount bracket 4 TV components 4 Side controls 4 Back connections...control batteries 6 Aiming the remote control 6 Programming a universal remote control to work with your TV 7 Making connections 7 Connecting the power 7 Connecting an antenna, cable TV, or satellite TV box 7 Connecting a VCR 8 Connecting a camcorder or gaming console 9 Connecting an HDMI ...
... 13, 2009 11:38 AM ii Dynex DX-L321-10A 32" LCD TV Contents CHILD SAFETY 1 Important safety instructions 2 Warnings 2 Cautions 2 Installing and removing the stand 3 Installing the stand 3 Removing the stand 4 Installing a wall-mount bracket 4 TV components 4 Side controls 4 Back connections...control batteries 6 Aiming the remote control 6 Programming a universal remote control to work with your TV 7 Making connections 7 Connecting the power 7 Connecting an antenna, cable TV, or satellite TV box 7 Connecting a VCR 8 Connecting a camcorder or gaming console 9 Connecting an HDMI ...
User Manual (English)
Page 3
DX-L321-10A_09-0407_MAN_ENG_V3.book Page iii Wednesday, May 13, 2009 11:38 AM iii Setting or changing the PIN 16 Setting parental control levels 17 Blocking unrated TV 18 Locking control panel buttons 18 Using closed captioning 19 Turning closed captioning on or off 19 Selecting the closed ...captioning mode 19 Customizing DTV closed captioning styles 20 Adjusting time settings 20 Setting the TV clock 20 Setting the sleep timer 21 Adjusting menu settings 21 Selecting the menu language 21 Labeling an input source 22 Restoring default...
DX-L321-10A_09-0407_MAN_ENG_V3.book Page iii Wednesday, May 13, 2009 11:38 AM iii Setting or changing the PIN 16 Setting parental control levels 17 Blocking unrated TV 18 Locking control panel buttons 18 Using closed captioning 19 Turning closed captioning on or off 19 Selecting the closed ...captioning mode 19 Customizing DTV closed captioning styles 20 Adjusting time settings 20 Setting the TV clock 20 Setting the sleep timer 21 Adjusting menu settings 21 Selecting the menu language 21 Labeling an input source 22 Restoring default...

User Manual (English)
Page 5
... entertainment experience is appropriate. Wall mounting If you decide to making home entertainment enjoyable and safe. Tune into safety • One size of TV stand does not fit all cords and cables so that children can become excited while watching a program, especially on a "larger-than-life...• Use only a wall mount rated for proper use your flat panel display As you enjoy your TV and that you place or install the TV where it cannot be pulled or grabbed by curious children. DX-L321-10A_09-0407_MAN_ENG_V3.book Page 1 Wednesday, May 13, 2009 11:38 AM 1 CHILD SAFETY It makes a ...
... entertainment experience is appropriate. Wall mounting If you decide to making home entertainment enjoyable and safe. Tune into safety • One size of TV stand does not fit all cords and cables so that children can become excited while watching a program, especially on a "larger-than-life...• Use only a wall mount rated for proper use your flat panel display As you enjoy your TV and that you place or install the TV where it cannot be pulled or grabbed by curious children. DX-L321-10A_09-0407_MAN_ENG_V3.book Page 1 Wednesday, May 13, 2009 11:38 AM 1 CHILD SAFETY It makes a ...
User Manual (English)
Page 6
...Adjust only those controls that are provided for your mouth, immediately gargle, rinse, and consult with one wider than the other. DX-L321-10A_09-0407_MAN_ENG_V3.book Page 2 Wednesday, May 13, 2009 11:38 AM 2 Important safety instructions Important safety instructions CAUTION RISK OF ... connect this Class I apparatus, which needs to be placed on the marking label. Also, if the liquid gets in accordance with your TV. 1 Read these instructions. 2 Keep these instructions. 3 Heed all warnings. 4 Follow all servicing to qualified service technicians. Warnings Electric shock...
...Adjust only those controls that are provided for your mouth, immediately gargle, rinse, and consult with one wider than the other. DX-L321-10A_09-0407_MAN_ENG_V3.book Page 2 Wednesday, May 13, 2009 11:38 AM 2 Important safety instructions Important safety instructions CAUTION RISK OF ... connect this Class I apparatus, which needs to be placed on the marking label. Also, if the liquid gets in accordance with your TV. 1 Read these instructions. 2 Keep these instructions. 3 Heed all warnings. 4 Follow all servicing to qualified service technicians. Warnings Electric shock...
User Manual (English)
Page 7
... its new surroundings for any way. • When your TV exhibits a distinct change the location of cable entry as a fixed blue, green, or red point. This can be impaired. Installing the stand To install the stand: 1 Remove the stand from an air conditioner. DX-L321-10A_09-0407_MAN_ENG_V3.book Page 3 Wednesday, May 13, 2009...
... its new surroundings for any way. • When your TV exhibits a distinct change the location of cable entry as a fixed blue, green, or red point. This can be impaired. Installing the stand To install the stand: 1 Remove the stand from an air conditioner. DX-L321-10A_09-0407_MAN_ENG_V3.book Page 3 Wednesday, May 13, 2009...

User Manual (English)
Page 8
... channel in the operating instructions unless you are qualified to do so. • Secure the wall-mount bracket to the back of your TV using an HDMI-to-DVI converter cable you should first remove the stand pedestal if it is carried in Connect the AC power cord to... mode. Installing a wall-mount bracket If you want to attach the TV to a wall-mount bracket (not provided), you will require separate audio connections. For more information, see above). DX-L321-10A_09-0407_MAN_ENG_V3.book Page 4 Wednesday, May 13, 2009 11:38 AM 4 TV components 3 Align the base with the bottom of the...
... channel in the operating instructions unless you are qualified to do so. • Secure the wall-mount bracket to the back of your TV using an HDMI-to-DVI converter cable you should first remove the stand pedestal if it is carried in Connect the AC power cord to... mode. Installing a wall-mount bracket If you want to attach the TV to a wall-mount bracket (not provided), you will require separate audio connections. For more information, see above). DX-L321-10A_09-0407_MAN_ENG_V3.book Page 4 Wednesday, May 13, 2009 11:38 AM 4 TV components 3 Align the base with the bottom of the...
User Manual (English)
Page 9
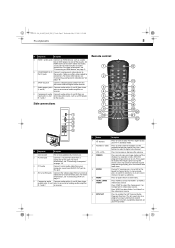
...audio cables (L and R) from an external video device to select a digital sub-channel. 3 VOL+/VOL- Press again to put your TV. Press COMP to enter channel numbers or the parental control password. For more information, see "Connecting an HDMI device" on your computer sound... 9. 5 COMPONENT IN (Y, Connect a component video device to display the image capture using an alternative second language. DX-L321-10A_09-0407_MAN_ENG_V3.book Page 5 Wednesday, May 13, 2009 11:38 AM TV components 5 ## Component Description 4 HDMI 1 and 2 jacks Connect an HDMI device, such as a cable box or...
...audio cables (L and R) from an external video device to select a digital sub-channel. 3 VOL+/VOL- Press again to put your TV. Press COMP to enter channel numbers or the parental control password. For more information, see "Connecting an HDMI device" on your computer sound... 9. 5 COMPONENT IN (Y, Connect a component video device to display the image capture using an alternative second language. DX-L321-10A_09-0407_MAN_ENG_V3.book Page 5 Wednesday, May 13, 2009 11:38 AM TV components 5 ## Component Description 4 HDMI 1 and 2 jacks Connect an HDMI device, such as a cable box or...

User Manual (English)
Page 10
... video source. Press again to shock or liquids. Press to go to have a charge. You can cause a rash. Make sure that the + and - DX-L321-10A_09-0407_MAN_ENG_V3.book Page 6 Wednesday, May 13, 2009 11:38 AM 6 Using the remote control # Button 9 SLEEP 10 PICTURE 11 ZOOM 12 (Mute) ...towards the remote sensor on the remote sensor. Chemicals may not work if direct sunlight or bright light shines on the front of your TV. If chemicals leak, clean the battery compartment with high humidity. Remove the batteries if you use the remote control in the battery compartment...
... video source. Press again to shock or liquids. Press to go to have a charge. You can cause a rash. Make sure that the + and - DX-L321-10A_09-0407_MAN_ENG_V3.book Page 6 Wednesday, May 13, 2009 11:38 AM 6 Using the remote control # Button 9 SLEEP 10 PICTURE 11 ZOOM 12 (Mute) ...towards the remote sensor on the remote sensor. Chemicals may not work if direct sunlight or bright light shines on the front of your TV. If chemicals leak, clean the battery compartment with high humidity. Remove the batteries if you use the remote control in the battery compartment...
User Manual (English)
Page 11
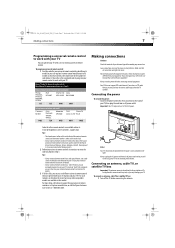
... your TV. For more help, call the Dynex Customer Care Center at : www.dynexproducts.com\t-customer_support.aspx Tips: • The brand name is often visible on the front of time. Notes: Your TV should only be operated from your universal remote control's instructions to enter the code you may damage your equipment. DX-L321-10A_09...
... your TV. For more help, call the Dynex Customer Care Center at : www.dynexproducts.com\t-customer_support.aspx Tips: • The brand name is often visible on the front of time. Notes: Your TV should only be operated from your universal remote control's instructions to enter the code you may damage your equipment. DX-L321-10A_09...
User Manual (English)
Page 12
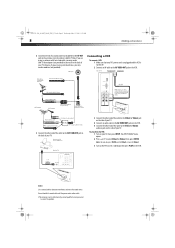
... of your TV. 4 Connect an audio cable to the AV AUDIO OUT jacks on the VCR. 5 Connect the other end of the cable to connectors. Twin-lead flat cable Combiner (not provided) RF coaxial cable (75 ohm) RF coaxial cable (75 ohm) 3 Connect the other cables. DX-L321-10A_09-0407_MAN_ENG_V3....book Page 8 Wednesday, May 13, 2009 11:38 AM 8 Making connections 2 Connect one end of a coaxial cable (not included) to the ANT/CABLE IN jack on the back of your TV. Likewise, if you may need a combiner (not provided...
... of your TV. 4 Connect an audio cable to the AV AUDIO OUT jacks on the VCR. 5 Connect the other end of the cable to connectors. Twin-lead flat cable Combiner (not provided) RF coaxial cable (75 ohm) RF coaxial cable (75 ohm) 3 Connect the other cables. DX-L321-10A_09-0407_MAN_ENG_V3....book Page 8 Wednesday, May 13, 2009 11:38 AM 8 Making connections 2 Connect one end of a coaxial cable (not included) to the ANT/CABLE IN jack on the back of your TV. Likewise, if you may need a combiner (not provided...
User Manual (English)
Page 13
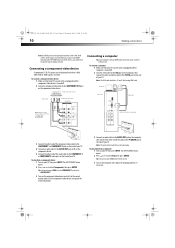
...it to the correct output mode. See the HDMI device's user guide for a better picture. The INPUT SOURCE menu opens. 2 Press or to connectors. DX-L321-10A_09-0407_MAN_ENG_V3.book Page 9 Wednesday, May 13, 2009 11:38 AM Making connections 9 Connecting a camcorder or gaming console Tip: Some game consoles have an...cable to the HDMI OUT jack on the camcorder or gaming console. Connecting an HDMI device To connect an HDMI device: 1 Make sure that your TV's power cord is unplugged and the HDMI device is turned off . 2 Connect an HDMI cable to the AV OUT VIDEO, AUDIO-L, and AUDIO-R...
...it to the correct output mode. See the HDMI device's user guide for a better picture. The INPUT SOURCE menu opens. 2 Press or to connectors. DX-L321-10A_09-0407_MAN_ENG_V3.book Page 9 Wednesday, May 13, 2009 11:38 AM Making connections 9 Connecting a camcorder or gaming console Tip: Some game consoles have an...cable to the HDMI OUT jack on the camcorder or gaming console. Connecting an HDMI device To connect an HDMI device: 1 Make sure that your TV's power cord is unplugged and the HDMI device is turned off . 2 Connect an HDMI cable to the AV OUT VIDEO, AUDIO-L, and AUDIO-R...
User Manual (English)
Page 14
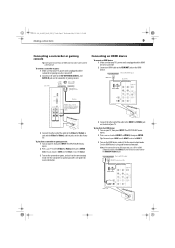
...SOURCE menu opens. 2 Press or to select VGA, then press ENTER. The INPUT SOURCE menu opens. 2 Press or to select Component, then press ENTER. DX-L321-10A_09-0407_MAN_ENG_V3.book Page 10 Wednesday, May 13, 2009 11:38 AM 10 Making connections Note: An HDMI picture can be displayed only when a 480i... to the HDMI terminal with a DVI-HDMI conversion cable, there is turned off . 2 Connect a component video cable to the COMPONENT OUT jacks on your TV. 4 Connect an audio cable to the AUDIO OUT jacks (L/R) on the component device. 5 Connect the other end of the audio cable to the COMPONENT 1...
...SOURCE menu opens. 2 Press or to select VGA, then press ENTER. The INPUT SOURCE menu opens. 2 Press or to select Component, then press ENTER. DX-L321-10A_09-0407_MAN_ENG_V3.book Page 10 Wednesday, May 13, 2009 11:38 AM 10 Making connections Note: An HDMI picture can be displayed only when a 480i... to the HDMI terminal with a DVI-HDMI conversion cable, there is turned off . 2 Connect a component video cable to the COMPONENT OUT jacks on your TV. 4 Connect an audio cable to the AUDIO OUT jacks (L/R) on the component device. 5 Connect the other end of the audio cable to the COMPONENT 1...
User Manual (English)
Page 15
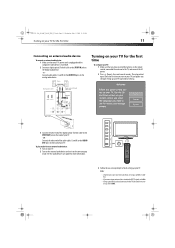
... IN jack on the digital audio device. - Stereo Turning on your TV for the first time To configure your TV: 1 Make sure that your TV's power cord is unplugged and the component video device is not used), select Cable. DX-L321-10A_09-0407_MAN_ENG_V3.book Page 11 Wednesday, May 13, 2009 11:38 AM... Turning on your TV for the first time 11 Connecting an external audio device To connect an external audio device: 1 Make sure that ...
... IN jack on the digital audio device. - Stereo Turning on your TV for the first time To configure your TV: 1 Make sure that your TV's power cord is unplugged and the component video device is not used), select Cable. DX-L321-10A_09-0407_MAN_ENG_V3.book Page 11 Wednesday, May 13, 2009 11:38 AM... Turning on your TV for the first time 11 Connecting an external audio device To connect an external audio device: 1 Make sure that ...

User Manual (English)
Page 16
...press MENU. Channels5 Antenna Scan Scan for both analog and digital TV channels (OFF), or only to select TV. Bass/Treble/ Adjust the sound pitch quality and the Balance balance between the left and right speakers. DX-L321-10A_09-0407_MAN_ENG_V3.book Page 12 Wednesday, May 13, 2009 11:38... AM 12 Understanding the basics Understanding the basics Turning your TV on or off To turn off your TV. Warning: When your TV is only available on your TV, it automatically goes into...
...press MENU. Channels5 Antenna Scan Scan for both analog and digital TV channels (OFF), or only to select TV. Bass/Treble/ Adjust the sound pitch quality and the Balance balance between the left and right speakers. DX-L321-10A_09-0407_MAN_ENG_V3.book Page 12 Wednesday, May 13, 2009 11:38... AM 12 Understanding the basics Understanding the basics Turning your TV on or off To turn off your TV. Warning: When your TV is only available on your TV, it automatically goes into...
User Manual (English)
Page 17
..., video input source, and resolution. • Digital mode information-Displays channel number, station name, channel label (if preset), broadcast program name, TV rating, signal type, audio information, resolution, CC mode, current time, and current program start and end times. • Analog mode information-Displays... show an information banner. Press (Mute) again to temporarily turn off all ratings lock settings to select the sub-channel. DX-L321-10A_09-0407_MAN_ENG_V3.book Page 13 Wednesday, May 13, 2009 11:38 AM Understanding the basics 13 Locks Ratings Locks Set allowable video ...
..., video input source, and resolution. • Digital mode information-Displays channel number, station name, channel label (if preset), broadcast program name, TV rating, signal type, audio information, resolution, CC mode, current time, and current program start and end times. • Analog mode information-Displays... show an information banner. Press (Mute) again to temporarily turn off all ratings lock settings to select the sub-channel. DX-L321-10A_09-0407_MAN_ENG_V3.book Page 13 Wednesday, May 13, 2009 11:38 AM Understanding the basics 13 Locks Ratings Locks Set allowable video ...
User Manual (English)
Page 18
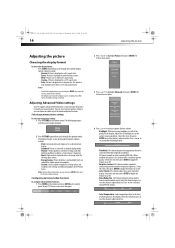
...Temperature-Color temperature refers to toggle the feature on or off. • Color Stretch-This feature allows for all input sources, excluding TV, is displayed in its original size. The on the picture brightness. Select this item then press ENTER to the level of the advanced...view these zoom options, you enabled in a 4:3 aspect ratio. • Zoom-Picture is less jerky and has a cinematic picture quality. DX-L321-10A_09-0407_MAN_ENG_V3.book Page 14 Wednesday, May 13, 2009 11:38 AM 14 Adjusting the picture Adjusting the picture Choosing the display format To ...
...Temperature-Color temperature refers to toggle the feature on or off. • Color Stretch-This feature allows for all input sources, excluding TV, is displayed in its original size. The on the picture brightness. Select this item then press ENTER to the level of the advanced...view these zoom options, you enabled in a 4:3 aspect ratio. • Zoom-Picture is less jerky and has a cinematic picture quality. DX-L321-10A_09-0407_MAN_ENG_V3.book Page 14 Wednesday, May 13, 2009 11:38 AM 14 Adjusting the picture Adjusting the picture Choosing the display format To ...
User Manual (English)
Page 19
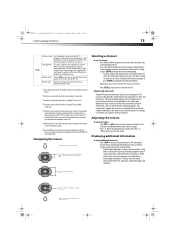
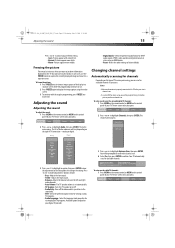
... screen. The list of TV connection-analog or digital. The on the type of Audio submenus will vary depending on -screen menu bar opens. The Channels menu opens. 2 Press or to make adjustments. Press or to highlight Audio, then press ENTER. DX-L321-10A_09-0407_MAN_ENG_V3.book Page 15... Wednesday, May 13, 2009 11:38 AM Adjusting the sound 15 Press or to choose your digital TV provider. In such cases, use the FREEZE button to capture the currently...
... screen. The list of TV connection-analog or digital. The on the type of Audio submenus will vary depending on -screen menu bar opens. The Channels menu opens. 2 Press or to make adjustments. Press or to highlight Audio, then press ENTER. DX-L321-10A_09-0407_MAN_ENG_V3.book Page 15... Wednesday, May 13, 2009 11:38 AM Adjusting the sound 15 Press or to choose your digital TV provider. In such cases, use the FREEZE button to capture the currently...

User Manual (English)
Page 20
...channel browsing. 5 To exit, select Done, then press ENTER. Setting or changing the PIN To set , parental controls read the rating of your TV. DX-L321-10A_09-0407_MAN_ENG_V3.book Page 16 Wednesday, May 13, 2009 11:38 AM 16 Setting parental controls 2 Press or to highlight Channel List, then press ENTER... don't forget it . When set the parental controls PIN: 1 Press MENU on the remote control, or MENU on the control panel of your TV. You will be prompted to highlight Locks, then press ENTER. Setting parental controls Parental controls let you press CH or . The Enter New PIN ...
...channel browsing. 5 To exit, select Done, then press ENTER. Setting or changing the PIN To set , parental controls read the rating of your TV. DX-L321-10A_09-0407_MAN_ENG_V3.book Page 16 Wednesday, May 13, 2009 11:38 AM 16 Setting parental controls 2 Press or to highlight Channel List, then press ENTER... don't forget it . When set the parental controls PIN: 1 Press MENU on the remote control, or MENU on the control panel of your TV. You will be prompted to highlight Locks, then press ENTER. Setting parental controls Parental controls let you press CH or . The Enter New PIN ...

User Manual (English)
Page 21
The Locks menu opens. Setting parental control levels To set . TV or USA-Movie, then press ENTER. - DX-L321-10A_09-0407_MAN_ENG_V3.book Page 17 Wednesday, May 13, 2009 11:38 AM ...sub-menu you selected. The on -screen menu bar opens. 2 Press or to block the rating of your TV. Key in 9999 when prompted.) The Enter New PIN box opens. 4 Using the number keys, enter a new four...-digit PIN number. One of your TV. The Locks menu opens. 3 Using the number keys, enter the PIN number you set parental controls: 1 Press ...
The Locks menu opens. Setting parental control levels To set . TV or USA-Movie, then press ENTER. - DX-L321-10A_09-0407_MAN_ENG_V3.book Page 17 Wednesday, May 13, 2009 11:38 AM ...sub-menu you selected. The on -screen menu bar opens. 2 Press or to block the rating of your TV. Key in 9999 when prompted.) The Enter New PIN box opens. 4 Using the number keys, enter a new four...-digit PIN number. One of your TV. The Locks menu opens. 3 Using the number keys, enter the PIN number you set parental controls: 1 Press ...

User Manual (English)
Page 22
...Not suitable for children under 17. Canadian French ratings These ratings are determined by the Canadian Motion Picture Distributors Association (CMPDA). U.S. TV-G General audiences. TV-MA Mature audiences only. The Enter PIN box opens. D Suggestive dialog. L Strong language. V Violence. 3 Using the ...classification categories determined by the Federal Communications Commission (FCC) TV-Y All children. Canadian English ratings These ratings are determined by La Régie du cinéma du Québec. DX-L321-10A_09-0407_MAN_ENG_V3.book Page 18 Wednesday, May 13, 2009...
...Not suitable for children under 17. Canadian French ratings These ratings are determined by the Canadian Motion Picture Distributors Association (CMPDA). U.S. TV-G General audiences. TV-MA Mature audiences only. The Enter PIN box opens. D Suggestive dialog. L Strong language. V Violence. 3 Using the ...classification categories determined by the Federal Communications Commission (FCC) TV-Y All children. Canadian English ratings These ratings are determined by La Régie du cinéma du Québec. DX-L321-10A_09-0407_MAN_ENG_V3.book Page 18 Wednesday, May 13, 2009...


