User Manual (English)
Page 2
... removing the stand column 4 Installing the stand 4 Removing the stand column 5 Installing a wall-mount bracket 5 TV components 6 Front 6 Side 6 Back 7 Remote control 8 Using the remote control 9 Installing remote control batteries 9 Aiming the remote control 9 Programming a universal remote control to work with your TV 9 Making connections 10 Selecting a location 10 Connecting the power 10 Connecting an antenna, cable...
... removing the stand column 4 Installing the stand 4 Removing the stand column 5 Installing a wall-mount bracket 5 TV components 6 Front 6 Side 6 Back 7 Remote control 8 Using the remote control 9 Installing remote control batteries 9 Aiming the remote control 9 Programming a universal remote control to work with your TV 9 Making connections 10 Selecting a location 10 Connecting the power 10 Connecting an antenna, cable...
User Manual (English)
Page 3
...parental control levels 23 Downloading rating information 25 Using closed captioning 25 Turning closed captioning on or off 25 Selecting the closed captioning mode 26 Customizing DTV closed captioning styles 27 Adjusting time settings 28 Setting the clock 28 Setting the sleep timer 28 Adjusting menu settings 29 ...Selecting the menu language and transparency 29 Labeling an input source 29 Restoring default settings 30 Troubleshooting 30 Video and audio 30 Remote control 31 General 31 Maintenance 31 Cleaning 31 Specifications 31 Legal notices 32 One-year limited warranty 33
...parental control levels 23 Downloading rating information 25 Using closed captioning 25 Turning closed captioning on or off 25 Selecting the closed captioning mode 26 Customizing DTV closed captioning styles 27 Adjusting time settings 28 Setting the clock 28 Setting the sleep timer 28 Adjusting menu settings 29 ...Selecting the menu language and transparency 29 Labeling an input source 29 Restoring default settings 30 Troubleshooting 30 Video and audio 30 Remote control 31 General 31 Maintenance 31 Cleaning 31 Specifications 31 Legal notices 32 One-year limited warranty 33
User Manual (English)
Page 6
... power lines or other apparatus (including amplifiers) that have fallen into your outlet, consult an electrician for your TV or hit, jolt, or press hard against the LCD panel. Power lines An outside antenna system, extreme care should be taken to rain or moisture. 2 Important ... shall be placed on the apparatus. This label is a class I apparatus to a mains socket outlet with a protective earthing connection. 17 Remote control batteries should not be exposed to qualified service technicians. The wide blade or the third prong are inside. Make sure that you connect...
... power lines or other apparatus (including amplifiers) that have fallen into your outlet, consult an electrician for your TV or hit, jolt, or press hard against the LCD panel. Power lines An outside antenna system, extreme care should be taken to rain or moisture. 2 Important ... shall be placed on the apparatus. This label is a class I apparatus to a mains socket outlet with a protective earthing connection. 17 Remote control batteries should not be exposed to qualified service technicians. The wide blade or the third prong are inside. Make sure that you connect...
User Manual (English)
Page 10
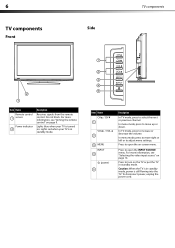
...open the INPUT SOURCE menu. Press to adjust menu settings. Caution: When the TV is turned on -screen menu. To disconnect power, unplug the power cord. For more information, see "Aiming the remote control" on page 14. For more information, see "Selecting the video input... In TV mode, press to open the on . 6 TV components Side Front TV components 2 1 Item Name Remote control 1 sensor Power indicator 2 Description Receives signals from the remote control. Press to increase or decrease the volume. Do not block. In TV mode, press to turn on the TV or put the TV in ...
...open the INPUT SOURCE menu. Press to adjust menu settings. Caution: When the TV is turned on -screen menu. To disconnect power, unplug the power cord. For more information, see "Aiming the remote control" on page 14. For more information, see "Selecting the video input... In TV mode, press to open the on . 6 TV components Side Front TV components 2 1 Item Name Remote control 1 sensor Power indicator 2 Description Receives signals from the remote control. Press to increase or decrease the volume. Do not block. In TV mode, press to turn on the TV or put the TV in ...
User Manual (English)
Page 12
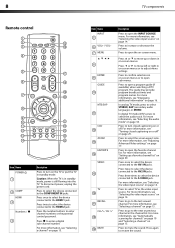
..., see "Selecting a channel" on page 15. Press to open a program guide (if available) when watching a DTV program. Press to go to the last viewed channel. 8 TV components Remote control 1 2 15 3 16 4 5 17 6 18 19 7 20 8 9 10 21 11 22 12 23 13 24 14 25 Item Name POWER 1 2 COMP HDMI... 3 Numbers / 4 Description Press to turn closed captioning on or off . Press to select TV as the video input source. Press three times to ...
..., see "Selecting a channel" on page 15. Press to open a program guide (if available) when watching a DTV program. Press to go to the last viewed channel. 8 TV components Remote control 1 2 15 3 16 4 5 17 6 18 19 7 20 8 9 10 21 11 22 12 23 13 24 14 25 Item Name POWER 1 2 COMP HDMI... 3 Numbers / 4 Description Press to turn closed captioning on or off . Press to select TV as the video input source. Press three times to ...

User Manual (English)
Page 13
....dynexproducts.com\t-customer_support.aspx Battery precautions: • Dispose of new batteries and can operate your TV. Programming a universal remote control to work with your TV You can cause old batteries to work if direct sunlight or bright light shines on the batteries...; Do not use the remote control. Make sure that the + and - To program a universal remote control: 1 Find the code for an extended period of your TV. Dynex TV codes for universal remote controls (for all Dynex TVs manufactured after Jan. 1, 2007) Universal remote control manufacturer and model Philips...
....dynexproducts.com\t-customer_support.aspx Battery precautions: • Dispose of new batteries and can operate your TV. Programming a universal remote control to work with your TV You can cause old batteries to work if direct sunlight or bright light shines on the batteries...; Do not use the remote control. Make sure that the + and - To program a universal remote control: 1 Find the code for an extended period of your TV. Dynex TV codes for universal remote controls (for all Dynex TVs manufactured after Jan. 1, 2007) Universal remote control manufacturer and model Philips...
User Manual (English)
Page 14
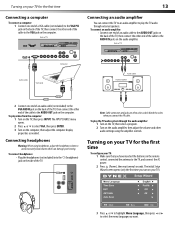
... the device are turned off and that all else fails, you must use a different universal remote control that you can manually program it using the TV for your universal remote control or set -top box and your TV. Power cord Power outlet Notes: • The AC plug on the marking label. • ... securely inserting into the jacks. Loose connections can operate both your set -top box manufacturer, or call the Dynex Customer Care Center at a time. You may need to try codes for the TV: • Where direct light does not reflect on the screen • That has indirect and soft lighting ...
... the device are turned off and that all else fails, you must use a different universal remote control that you can manually program it using the TV for your universal remote control or set -top box and your TV. Power cord Power outlet Notes: • The AC plug on the marking label. • ... securely inserting into the jacks. Loose connections can operate both your set -top box manufacturer, or call the Dynex Customer Care Center at a time. You may need to try codes for the TV: • Where direct light does not reflect on the screen • That has indirect and soft lighting ...
User Manual (English)
Page 17
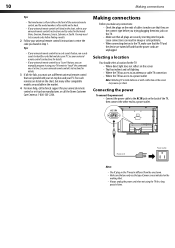
... or to highlight Menu Language, then press or to select the menu language you have inserted the batteries in the remote control, connected the antenna to the TV, and connect the AC power. 2 Press (Power), then wait several seconds. To connect headphones: • Plug the headphones (not included) into the (headphone) jack...
... or to highlight Menu Language, then press or to select the menu language you have inserted the batteries in the remote control, connected the antenna to the TV, and connect the AC power. 2 Press (Power), then wait several seconds. To connect headphones: • Plug the headphones (not included) into the (headphone) jack...
User Manual (English)
Page 18
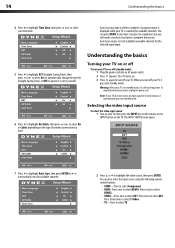
...mode): 1 Plug the power cord into standby mode. Note: If your TV is still receiving power. Press three times to select S-Video. • TV-Press to select AV1. You can also select the input source using the following remote control buttons: • COMP-Press to select Component. • HDMI-Press... Press (power). Press twice to select Air or Cable, depending on the TV. 14 Understanding the basics 4 Press to highlight Time Zone, then press or to select your TV, then press the INPUT key on the remote, or the INPUT button on the type of available/receivable channels for the ...
...mode): 1 Plug the power cord into standby mode. Note: If your TV is still receiving power. Press three times to select S-Video. • TV-Press to select AV1. You can also select the input source using the following remote control buttons: • COMP-Press to select Component. • HDMI-Press... Press (power). Press twice to select Air or Cable, depending on the TV. 14 Understanding the basics 4 Press to highlight Time Zone, then press or to select your TV, then press the INPUT key on the remote, or the INPUT button on the type of available/receivable channels for the ...
User Manual (English)
Page 20
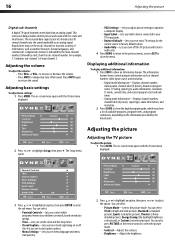
For example, 5.1 indicates sub-channel 1 of available programs, program times, and program summaries, depending on the remote control to select the picture mode. • Contrast-Adjusts the contrast. • Brightness-Adjusts the brightness. The information banner...number, video input source, and resolution. • Digital mode information-Displays channel number, station name, channel label (if preset), broadcast program name, TV rating, signal type, audio information, resolution, CC mode, current time, and current program start and end times. • Analog mode information-Displays ...
For example, 5.1 indicates sub-channel 1 of available programs, program times, and program summaries, depending on the remote control to select the picture mode. • Contrast-Adjusts the contrast. • Brightness-Adjusts the brightness. The information banner...number, video input source, and resolution. • Digital mode information-Displays channel number, station name, channel label (if preset), broadcast program name, TV rating, signal type, audio information, resolution, CC mode, current time, and current program start and end times. • Analog mode information-Displays ...

User Manual (English)
Page 22
... to only the program audio. The on-screen menu opens. • Surround-Turns the surround sound effect on or off the picture on the remote one or more times. To select the audio mode for all channels. • Audio Language-(DTV channels only) Selects an alternate audio language, ...if available. 4 Press MENU to return to the previous menu, or press EXIT to highlight Setup, then press . Playing TV audio only You can turn off . • AVC-(Auto volume control) Equalizes the overall volume levels for analog channels: • Press MTS/SAP on...
... to only the program audio. The on-screen menu opens. • Surround-Turns the surround sound effect on or off the picture on the remote one or more times. To select the audio mode for all channels. • Audio Language-(DTV channels only) Selects an alternate audio language, ...if available. 4 Press MENU to return to the previous menu, or press EXIT to highlight Setup, then press . Playing TV audio only You can turn off . • AVC-(Auto volume control) Equalizes the overall volume levels for analog channels: • Press MTS/SAP on...
User Manual (English)
Page 32
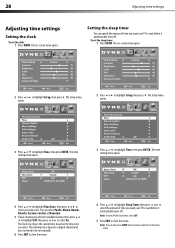
...your TV to wait before it automatically turns off. The time setting menu opens. 4 Press or to highlight Time Zone, then press or to highlight Setup, then press . This information is based on a digital channel and does not need to be set the sleep timer. The on the remote control.... Parental Controls 3 Press or to highlight Setup, then press . You can select Pacific, Alaska, Hawaii, Atlantic, Eastern, Central, or Mountain. 5 If your TV to wait before it automatically turns off the sleep timer, select Off. 5 Press EXIT to set manually. 6 Press EXIT to close the menu. To set...
...your TV to wait before it automatically turns off. The time setting menu opens. 4 Press or to highlight Time Zone, then press or to highlight Setup, then press . This information is based on a digital channel and does not need to be set the sleep timer. The on the remote control.... Parental Controls 3 Press or to highlight Setup, then press . You can select Pacific, Alaska, Hawaii, Atlantic, Eastern, Central, or Mountain. 5 If your TV to wait before it automatically turns off the sleep timer, select Off. 5 Press EXIT to set manually. 6 Press EXIT to close the menu. To set...
User Manual (English)
Page 34
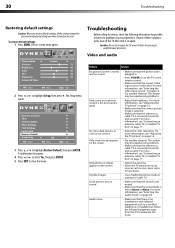
.... • Make sure that the power cord is plugged in. • Press POWER on the TV or the remote control. • Make sure that the antenna or cable TV is connected correctly and securely. The Setup menu opens. For more information, see "Connecting an antenna,... cable TV, or satellite TV box" on page 14. • Try another channel. 30 Troubleshooting Restoring default settings ...
.... • Make sure that the power cord is plugged in. • Press POWER on the TV or the remote control. • Make sure that the antenna or cable TV is connected correctly and securely. The Setup menu opens. For more information, see "Connecting an antenna,... cable TV, or satellite TV box" on page 14. • Try another channel. 30 Troubleshooting Restoring default settings ...
User Manual (English)
Page 35
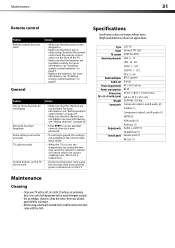
... input mode. • When the TV is in . • Make sure that there are no obstructions between the remote control and the remote control sensor on page 20. Specifications ...Specifications subject to access parental controls, then set a new password. Weight and dimensions shown are installed correctly. Type Panel TV system Receiving channels Audio multiples Audio out Power requirement Power consumption Dimensions (W × H × D with stand) Weight Input ports Output ports Control ports LCD TV 26-inch TFT LCD...
... input mode. • When the TV is in . • Make sure that there are no obstructions between the remote control and the remote control sensor on page 20. Specifications ...Specifications subject to access parental controls, then set a new password. Weight and dimensions shown are installed correctly. Type Panel TV system Receiving channels Audio multiples Audio out Power requirement Power consumption Dimensions (W × H × D with stand) Weight Input ports Output ports Control ports LCD TV 26-inch TFT LCD...


