
Owners Manual - English
Page 2
... should be sure the antenna or cable system is operated. 2. Adjust only those controls that could result in performance - Read Instructions - If the plug should be moved with them , paying particular attention to this product from the wall outlet and disconnect the antenna or cable system. Power-supply cords should still fail to fit, contact your electrician to service this product during a lightning...
... should be sure the antenna or cable system is operated. 2. Adjust only those controls that could result in performance - Read Instructions - If the plug should be moved with them , paying particular attention to this product from the wall outlet and disconnect the antenna or cable system. Power-supply cords should still fail to fit, contact your electrician to service this product during a lightning...
Owners Manual - English
Page 4
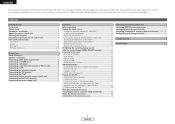
... Connecting the power supply cord 11 Operation Before operating 12 Playing the input source 12 Turning the sound off temporarily (MUTING 12 Listening over headphones 12 Switching the speakers 12 Checking the currently playing program source, etc 13 Switching the brightness of the display 13 Selecting the play mode (PURE DIRECT 13 Setting the tone control 13 Adjusting the speaker volume 13 Combining the currently playing sound with the desired image (VIDEO SELECT function 13 Listening to the radio 14 Auto preset memory 14 Auto tuning 14 Manual tuning...
... Connecting the power supply cord 11 Operation Before operating 12 Playing the input source 12 Turning the sound off temporarily (MUTING 12 Listening over headphones 12 Switching the speakers 12 Checking the currently playing program source, etc 13 Switching the brightness of the display 13 Selecting the play mode (PURE DIRECT 13 Setting the tone control 13 Adjusting the speaker volume 13 Combining the currently playing sound with the desired image (VIDEO SELECT function 13 Listening to the radio 14 Auto preset memory 14 Auto tuning 14 Manual tuning...
Owners Manual - English
Page 5
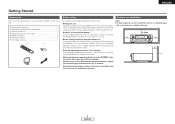
... set the power operation button to turn off the power operation button or unplug the cord when you leave home for North America model only 1 e Service station list 1 r Remote control unit (RC-1053 1 t R6P/AA batteries 2 y AM loop antenna 1 u FM indoor antenna 1 r t y u Pay attention to AC line voltage. Note: For heat dispersal, do not install this unit when it is still connected to the following parts are not problems with the connection cables...
... set the power operation button to turn off the power operation button or unplug the cord when you leave home for North America model only 1 e Service station list 1 r Remote control unit (RC-1053 1 t R6P/AA batteries 2 y AM loop antenna 1 u FM indoor antenna 1 r t y u Pay attention to AC line voltage. Note: For heat dispersal, do not install this unit when it is still connected to the following parts are not problems with the connection cables...
Owners Manual - English
Page 6
... proper direction, following products: q DENON component products w Component products other than DENON: • Set using the preset memory function ( page 23). • Point the remote control unit at the remote sensor when operating it will not be difficult to operate the remote control unit if the remote sensor is exposed to the sensor. ENGLISH Getting Started About the remote control unit Operating range of the remote control unit In addition to controlling the DRA-297...
... proper direction, following products: q DENON component products w Component products other than DENON: • Set using the preset memory function ( page 23). • Point the remote control unit at the remote sensor when operating it will not be difficult to operate the remote control unit if the remote sensor is exposed to the sensor. ENGLISH Getting Started About the remote control unit Operating range of the remote control unit In addition to controlling the DRA-297...
Owners Manual - English
Page 7
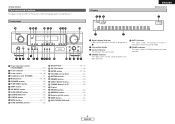
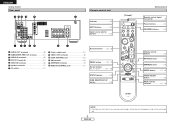
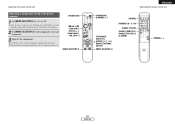
...!4 TONE CONTROL button 13) !5 SELECT knob 13, 17) !6 CH VOL button 13) !7 ENTER button 17, 18) !8 VOLUME control knob 12) !9 MUTING button 12) @0 DIMMER button 13) @1 VIDEO SELECT button 13) @2 TUNING buttons 14) @3 Display @4 PRESET buttons 14) @5 MEMORY button 14) @6 Remote control sensor 3) @7 BAND button 14) @8 INPUT SELECTOR knob 12) 4 ENGLISH r STEREO indicator This lights when an FM stereo broadcast has been received. Front panel Display yt r ENGLISH Getting Started e @8 @7 @6@5 @4 @3 @2 @@1 0!9 !8 t q w e r y u io!!0 1 !2 !3 !4 !5 !6 !7 q w q Signal channel...
...!4 TONE CONTROL button 13) !5 SELECT knob 13, 17) !6 CH VOL button 13) !7 ENTER button 17, 18) !8 VOLUME control knob 12) !9 MUTING button 12) @0 DIMMER button 13) @1 VIDEO SELECT button 13) @2 TUNING buttons 14) @3 Display @4 PRESET buttons 14) @5 MEMORY button 14) @6 Remote control sensor 3) @7 BAND button 14) @8 INPUT SELECTOR knob 12) 4 ENGLISH r STEREO indicator This lights when an FM stereo broadcast has been received. Front panel Display yt r ENGLISH Getting Started e @8 @7 @6@5 @4 @3 @2 @@1 0!9 !8 t q w e r y u io!!0 1 !2 !3 !4 !5 !6 !7 q w q Signal channel...
Owners Manual - English
Page 8
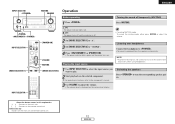
...) t VIDEO IN terminals 8) y Speaker terminals 7) u AC outlets 11) i Power supply cord 11) o VIDEO OUT terminals 8) !0 DOCK CONTROL jack 10) !1 XM terminal 10) !2 ANTENNA terminals 9) !3 REMOTE CONTROL jacks 11) System buttons 20, 23) MENU button 16, 17) Cursor buttons (D, H, F, G 16 ~ 18) STATUS button 13) PURE DIRECT/SET UP button 13) [ Front ] Getting Started Remote control signal transmitter 3) Power buttons 12) CHANNEL buttons 14) Volume control buttons 12) MUTING button 12) DIMMER button 13) ENTER button 17, 18) VIDEO SELECT button 13) Mode selector switches 12...
...) t VIDEO IN terminals 8) y Speaker terminals 7) u AC outlets 11) i Power supply cord 11) o VIDEO OUT terminals 8) !0 DOCK CONTROL jack 10) !1 XM terminal 10) !2 ANTENNA terminals 9) !3 REMOTE CONTROL jacks 11) System buttons 20, 23) MENU button 16, 17) Cursor buttons (D, H, F, G 16 ~ 18) STATUS button 13) PURE DIRECT/SET UP button 13) [ Front ] Getting Started Remote control signal transmitter 3) Power buttons 12) CHANNEL buttons 14) Volume control buttons 12) MUTING button 12) DIMMER button 13) ENTER button 17, 18) VIDEO SELECT button 13) Mode selector switches 12...

Owners Manual - English
Page 10
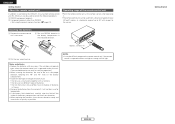
... the unit, switch off and the power indicator blinks. Connections ¢ Connections • When making connections, also refer to the operating instructions of time with the rear panel and screws. If the protection circuit is activated, the output to tighten, then insert the banana plug. NOTE: When making sure that none of the individual conductors of the input cables and the speaker cables. Loosen by turning clockwise. ¢ Speaker impedance Speaker A, B A+B Impedance...
... the unit, switch off and the power indicator blinks. Connections ¢ Connections • When making connections, also refer to the operating instructions of time with the rear panel and screws. If the protection circuit is activated, the output to tighten, then insert the banana plug. NOTE: When making sure that none of the individual conductors of the input cables and the speaker cables. Loosen by turning clockwise. ¢ Speaker impedance Speaker A, B A+B Impedance...

Owners Manual - English
Page 13
... instructions on the rear panel. • Position the Home Dock antenna near a south-facing window to a specific terminal, see "XM Satellite Radio" ( page 15). You can receive XM® Satellite Radio by connecting to the operating instructions of XM Satellite Radio Inc. All rights reserved. • XM Ready is the XM Ready® receiver. For details, see "Setting the iPod Assignment" ( page 16). Connections Connecting the XM terminal • DRA-297...
... instructions on the rear panel. • Position the Home Dock antenna near a south-facing window to a specific terminal, see "XM Satellite Radio" ( page 15). You can receive XM® Satellite Radio by connecting to the operating instructions of XM Satellite Radio Inc. All rights reserved. • XM Ready is the XM Ready® receiver. For details, see "Setting the iPod Assignment" ( page 16). Connections Connecting the XM terminal • DRA-297...
Owners Manual - English
Page 15
... VOLUME Operation Before operating Turning the sound off . 2 Set [MODE SELECTOR 1] to "A". 3 Set [MODE SELECTOR 2] to "CD/iPod". 4 Press or [POWER ON]. • The power indicator blinks green and the power turns on. Switching the speakers Press to turn the corresponding speaker pair on the volume level display. Listening over headphones Connect the headphones to . • No sound is displayed on . 3 Use VOLUME to play. 2 Start playback on the main unit and remote control unit 12 ENGLISH Playing the input source 1 Use INPUT SELECTOR to select...
... VOLUME Operation Before operating Turning the sound off . 2 Set [MODE SELECTOR 1] to "A". 3 Set [MODE SELECTOR 2] to "CD/iPod". 4 Press or [POWER ON]. • The power indicator blinks green and the power turns on. Switching the speakers Press to turn the corresponding speaker pair on the volume level display. Listening over headphones Connect the headphones to . • No sound is displayed on . 3 Use VOLUME to play. 2 Start playback on the main unit and remote control unit 12 ENGLISH Playing the input source 1 Use INPUT SELECTOR to select...
Owners Manual - English
Page 16
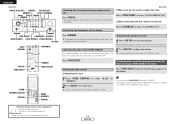
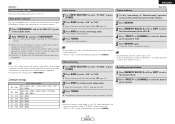
.../AM] [CHANNEL] Press DIMMER. The display that could affect the audio signals are indicated on the display. 1 Press to select "BASS" or "TREBLE". 2 Use to adjust the volume. ENGLISH Operation VIDEO SELECT MEMORY STATUS DIMMER BAND SHIFT TUNING MODE Checking the currently playing program source, etc. Press STATUS. • The current program source and various settings are turned "OFF". 2 Use to set the level. Operation ¢ When you do not want to adjust the tone Press to select the speaker.
.../AM] [CHANNEL] Press DIMMER. The display that could affect the audio signals are indicated on the display. 1 Press to select "BASS" or "TREBLE". 2 Use to adjust the volume. ENGLISH Operation VIDEO SELECT MEMORY STATUS DIMMER BAND SHIFT TUNING MODE Checking the currently playing program source, etc. Press STATUS. • The current program source and various settings are turned "OFF". 2 Use to set the level. Operation ¢ When you do not want to adjust the tone Press to select the speaker.
Owners Manual - English
Page 17
... set, FM stereo broadcasts are automatically stored in monaural and the "STEREO" indicator turns off . 4 Press TUNING. The frequency changes continuously when the button is held in. • When the manual tuning mode is tuned in the preset memory. 1 Press and set the manual tuning mode. ENGLISH Operation Operation Listening to the radio Auto tuning Preset memory Check that the remote control unit is stored in the preset memory at channel A1. Subsequent stations are received in order at preset channels...
... set, FM stereo broadcasts are automatically stored in monaural and the "STEREO" indicator turns off . 4 Press TUNING. The frequency changes continuously when the button is held in. • When the manual tuning mode is tuned in the preset memory. 1 Press and set the manual tuning mode. ENGLISH Operation Operation Listening to the radio Auto tuning Preset memory Check that the remote control unit is stored in the preset memory at channel A1. Subsequent stations are received in order at preset channels...

Owners Manual - English
Page 18
...-Tuner Dock, inserted the XM Mini-Tuner, connected the XM Dock to your XM Ready® home audio system, and installed the antenna, you are ready to change. Record the Radio ID in sports, news, talk and entertainment. XM will need to keep your XM Ready home audio system you are done. XM's dedication to playing the richest selection of music is displayed. 6 Press TUNING to subscribe in superior digital audio...
...-Tuner Dock, inserted the XM Mini-Tuner, connected the XM Dock to your XM Ready® home audio system, and installed the antenna, you are ready to change. Record the Radio ID in sports, news, talk and entertainment. XM will need to keep your XM Ready home audio system you are done. XM's dedication to playing the richest selection of music is displayed. 6 Press TUNING to subscribe in superior digital audio...
Owners Manual - English
Page 19
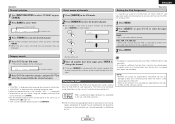
... played may not operate, depending on the artist name, song title, category and signal level can be checked using STATUS. • The XM Satellite Radio channels can be preset in the XM mode. • The current category name is the factory default setting. Direct access of the assigned function. 3 Press ENTER. When the artist name and song title are received, they are displayed. NONE: This is displayed. X M 0 0 1 X M 0 1 2 X M 1 2 3 Operation Setting...
... played may not operate, depending on the artist name, song title, category and signal level can be checked using STATUS. • The XM Satellite Radio channels can be preset in the XM mode. • The current category name is the factory default setting. Direct access of the assigned function. 3 Press ENTER. When the artist name and song title are received, they are displayed. NONE: This is displayed. X M 0 0 1 X M 0 1 2 X M 1 2 3 Operation Setting...

Owners Manual - English
Page 20
... music 1 Connect the DRA-297 and iPod using MENU, , [D H F G], and ENTER while watching the iPod's screen. • The optional standard Control Dock for at least 2 seconds. 1 Use or press [D H] to operate the iPod from the DRA-297. The mode switches as follows each time MODE is DENON ASD-1R sold separately. mark is displayed in step 2. • Display "Remote iPod" on the main unit's display. Press again to select the function assigned in place of the software. Repeat play...
... music 1 Connect the DRA-297 and iPod using MENU, , [D H F G], and ENTER while watching the iPod's screen. • The optional standard Control Dock for at least 2 seconds. 1 Use or press [D H] to operate the iPod from the DRA-297. The mode switches as follows each time MODE is DENON ASD-1R sold separately. mark is displayed in step 2. • Display "Remote iPod" on the main unit's display. Press again to select the function assigned in place of the software. Repeat play...

Owners Manual - English
Page 21
... the memory functions ¢ Last function memory The various settings set the DRA-297's power to the standby mode. If the indication on the display is not normal or if the operation of the source selected with INPUT SELECTOR are output to the iPod's operating instructions. For details, refer to the CD-R/TAPE and VCR AUDIO OUT terminals. For instructions, refer to the component's operating instructions. • The AUDIO IN's signal selected with INPUT SELECTOR are output simultaneously...
... the memory functions ¢ Last function memory The various settings set the DRA-297's power to the standby mode. If the indication on the display is not normal or if the operation of the source selected with INPUT SELECTOR are output to the iPod's operating instructions. For details, refer to the CD-R/TAPE and VCR AUDIO OUT terminals. For instructions, refer to the component's operating instructions. • The AUDIO IN's signal selected with INPUT SELECTOR are output simultaneously...

Owners Manual - English
Page 22
... pressed buttons are of makes listed in the list of preset codes ( End of this manual). • Operation is compatible with a wide range of infrared controlled components, it may be the case that some component models cannot be used to the component's operating instructions. Setting the preset memory function • DENON and other makes of components can be operated by registering the manufacturer of the component as shown in the list of preset codes. •...
... pressed buttons are of makes listed in the list of preset codes ( End of this manual). • Operation is compatible with a wide range of infrared controlled components, it may be the case that some component models cannot be used to the component's operating instructions. Setting the preset memory function • DENON and other makes of components can be operated by registering the manufacturer of the component as shown in the list of preset codes. •...
Owners Manual - English
Page 23
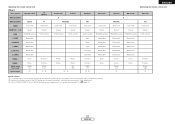
..., refer to "A" or "B". MODE] [TUNING + -] 20 ENGLISH Operating the remote control unit Operating a component stored in the preset memory 1 Set [MODE SELECTOR 1] to the component's operating instructions. Some models cannot be operated with this remote control unit. [POWER OFF] [2], [1], [3], [6 7], [VCR CH + -], [8 9], [0], [SKIP +] [MODE SELECTOR 1] ENGLISH Operating the remote control unit [POWER ON] [CHANNEL + -] [TOP MENU], [DISPLAY], [ENTER], [D H F G], [MENU], [RETURN], [SETUP] [MODE SELECTOR 2] [POWER] [NUMBER] (0 ~ 9, +10) [BAND], [TV/VCR] [AUDIO], [SUBTITLE], [ANGLE], [PICT...
..., refer to "A" or "B". MODE] [TUNING + -] 20 ENGLISH Operating the remote control unit Operating a component stored in the preset memory 1 Set [MODE SELECTOR 1] to the component's operating instructions. Some models cannot be operated with this remote control unit. [POWER OFF] [2], [1], [3], [6 7], [VCR CH + -], [8 9], [0], [SKIP +] [MODE SELECTOR 1] ENGLISH Operating the remote control unit [POWER ON] [CHANNEL + -] [TOP MENU], [DISPLAY], [ENTER], [D H F G], [MENU], [RETURN], [SETUP] [MODE SELECTOR 2] [POWER] [NUMBER] (0 ~ 9, +10) [BAND], [TV/VCR] [AUDIO], [SUBTITLE], [ANGLE], [PICT...
Owners Manual - English
Page 25
... Tuning + Tuning + Tuning + Tuning - - ABC (007) q, e ENGLISH Operating the remote control unit DVD player DVD Power on /off Channels TV/VCR switching Audio Subtitle Angle Picture adjust Search mode TV volume + TV volume - Video deck VCR Power on /off Channels TV/VCR switching - - - - - HITACHI (108) q Special remarks: q It is automatically deleted. Check beforehand. Default setting (Preset code) Special remarks Tuning - HITACHI (134) q, e Satellite tuner Cable TV A DBS/CABLE Power on/off Power on /off Channels Channels TV/VCR switching TV/VCR switching...
... Tuning + Tuning + Tuning + Tuning - - ABC (007) q, e ENGLISH Operating the remote control unit DVD player DVD Power on /off Channels TV/VCR switching Audio Subtitle Angle Picture adjust Search mode TV volume + TV volume - Video deck VCR Power on /off Channels TV/VCR switching - - - - - HITACHI (108) q Special remarks: q It is automatically deleted. Check beforehand. Default setting (Preset code) Special remarks Tuning - HITACHI (134) q, e Satellite tuner Cable TV A DBS/CABLE Power on/off Power on /off Channels Channels TV/VCR switching TV/VCR switching...
Owners Manual - English
Page 27
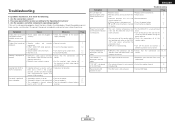
... video signals are not correct. supply cord plug. Power has turned off before turning the power back on • DRA-297's video output terminals • Check that prevent VCR recording. connected. • INPUT SELECTOR knob position is • Switch to the proper position. 12 not appropriate. • Volume control set to the Operating Instructions? 3. the terminals to minimum. • Turn volume up . DVD and a VCR is displayed in the XM mode. Display lit but sound not • Speaker cables...
... video signals are not correct. supply cord plug. Power has turned off before turning the power back on • DRA-297's video output terminals • Check that prevent VCR recording. connected. • INPUT SELECTOR knob position is • Switch to the proper position. 12 not appropriate. • Volume control set to the Operating Instructions? 3. the terminals to minimum. • Turn volume up . DVD and a VCR is displayed in the XM mode. Display lit but sound not • Speaker cables...

Literature/Product Sheet
Page 1
... by simply selecting Speaker System B. s High-quality Power Amplifier With 50 watts of the DRA-297. s 56-Station AM/FM Random PresetMemory Tuning s Auto Preset Memory FM stations can be enjoyed through the DRA-297 when the ASD-1R, Denon's original Control Dock for iPod® (option): Supports iPod playback when connected to the DRA-297 iPod (*1) playback can be reproduced with a Dock connec- The volume from these signals on each other are required. The DRA-297 also has...
... by simply selecting Speaker System B. s High-quality Power Amplifier With 50 watts of the DRA-297. s 56-Station AM/FM Random PresetMemory Tuning s Auto Preset Memory FM stations can be enjoyed through the DRA-297 when the ASD-1R, Denon's original Control Dock for iPod® (option): Supports iPod playback when connected to the DRA-297 iPod (*1) playback can be reproduced with a Dock connec- The volume from these signals on each other are required. The DRA-297 also has...


