Literature/Product Sheet
Page 2
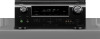
... listening styles. By connecting Front Height speakers and using the AVR-791 for different purposes The AVR-791 supports up -scaled to 1080P The AVR-791 provides an HDMI Video Up-scaling function..."simple and straight" design concept has been thoroughly implemented in the U.S. State-of-the-art Denon Solutions for Maximizing Content Quality • Fully discrete, identical quality and power for all 7 channels...each other serves to suppress mutual vibration with the AVR-791's Dolby Pro Logic IIz, you can check the status of each setting, such as possible to keep cable connections neat...
... listening styles. By connecting Front Height speakers and using the AVR-791 for different purposes The AVR-791 supports up -scaled to 1080P The AVR-791 provides an HDMI Video Up-scaling function..."simple and straight" design concept has been thoroughly implemented in the U.S. State-of-the-art Denon Solutions for Maximizing Content Quality • Fully discrete, identical quality and power for all 7 channels...each other serves to suppress mutual vibration with the AVR-791's Dolby Pro Logic IIz, you can check the status of each setting, such as possible to keep cable connections neat...
Owners Manual - English
Page 4
... (Surround mode 26 Standard playback 26 DENON original surround playback 28 Stereo playback 28 Direct playback 28 Pure direct playback 28 Advanced version 29 Speaker installation/connection (Other than 5.1-channel 30 Install 30 Connect 31 Set up speakers 33 Playback (Advanced operation 34 Convenient ... 13 Connecting an HDMI-compatible device 14 Connecting a TV 16 Connecting a Blu-ray Disc player / DVD player 16 Connecting a set-top box (Satellite tuner/cable TV 17 Connecting a digital camcorder 17 Connecting a control dock for explanation purposes. NOTE This symbol ...
... (Surround mode 26 Standard playback 26 DENON original surround playback 28 Stereo playback 28 Direct playback 28 Pure direct playback 28 Advanced version 29 Speaker installation/connection (Other than 5.1-channel 30 Install 30 Connect 31 Set up speakers 33 Playback (Advanced operation 34 Convenient ... 13 Connecting an HDMI-compatible device 14 Connecting a TV 16 Connecting a Blu-ray Disc player / DVD player 16 Connecting a set-top box (Satellite tuner/cable TV 17 Connecting a digital camcorder 17 Connecting a control dock for explanation purposes. NOTE This symbol ...
Owners Manual - English
Page 5
...power for all connections are correct and that achieves high-quality surround sound play back the sound in Dolby Pro Logicgz playback with front height speakers connected to other system units before using the unit. • Cautions on using a chemical cleaner. • Benzene, paint thinner or other...you can output 3D video signals input from the power outlet. This unit also supports the ARC (Audio Return Channel) function, which automatically makes speaker settings best suited for Blu-ray Disc players such as a Blu-ray Disc player, game machine, HD video camera, etc. If so, move ...
...power for all connections are correct and that achieves high-quality surround sound play back the sound in Dolby Pro Logicgz playback with front height speakers connected to other system units before using the unit. • Cautions on using a chemical cleaner. • Benzene, paint thinner or other...you can output 3D video signals input from the power outlet. This unit also supports the ARC (Audio Return Channel) function, which automatically makes speaker settings best suited for Blu-ray Disc players such as a Blu-ray Disc player, game machine, HD video camera, etc. If so, move ...

Owners Manual - English
Page 6
... (vpage 11) Basic version Advanced version Information Enjoy better audio, using it in surround sound. Connect 5.1-channel speakers, a TV and Bluray Disc player equipped with the product, for speaker settings Preparation Step 1 Speaker Detection Step 2 Measurement Step 3 Calculating Step 4 Check Step 5 Store Finish 3 Use the setup microphone (... the correct install method. The "Simple version" describes the installation, connection and setup methods for speakers other than 5.1-channel speakers. See page 30 for the installation, connection and setup methods for 5.1-channel...
... (vpage 11) Basic version Advanced version Information Enjoy better audio, using it in surround sound. Connect 5.1-channel speakers, a TV and Bluray Disc player equipped with the product, for speaker settings Preparation Step 1 Speaker Detection Step 2 Measurement Step 3 Calculating Step 4 Check Step 5 Store Finish 3 Use the setup microphone (... the correct install method. The "Simple version" describes the installation, connection and setup methods for speakers other than 5.1-channel speakers. See page 30 for the installation, connection and setup methods for 5.1-channel...
Owners Manual - English
Page 9
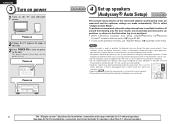
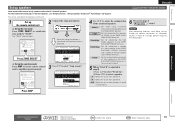
...; When performing Audyssey Auto Setup, MultEQ®/Dynamic EQ®/Dynamic Volume™ functions become active (vpage 49, 50). •• To set up speakers (Audyssey® Auto Setup) 1 2 3 4 5 The acoustic characteristics of this unit. 3 Press POWER ON to turn on power to the... input to the unit. See page 30 for the installation, connection and setup methods for 5.1-channel speakers. This is part of normal operation. Power on Power on 1 2 3 4 5 4 Set up the speakers manually, use ). • Do not unplug the setup microphone from all around the listening area....
...; When performing Audyssey Auto Setup, MultEQ®/Dynamic EQ®/Dynamic Volume™ functions become active (vpage 49, 50). •• To set up speakers (Audyssey® Auto Setup) 1 2 3 4 5 The acoustic characteristics of this unit. 3 Press POWER ON to turn on power to the... input to the unit. See page 30 for the installation, connection and setup methods for 5.1-channel speakers. This is part of normal operation. Power on Power on 1 2 3 4 5 4 Set up the speakers manually, use ). • Do not unplug the setup microphone from all around the listening area....
Owners Manual - English
Page 10
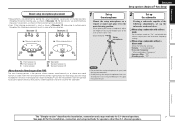
... the setup microphone in your hand during measurements. • Avoid placing the setup microphone close to calculate speaker distance, level, polarity, and the optimum crossover value for speakers other than 5.1-channel speakers. Sound receptor Setup microphone 2 Set up the subwoofer as sound reflections may give inaccurate results. Advanced version Information The "Simple version" describes...
... the setup microphone in your hand during measurements. • Avoid placing the setup microphone close to calculate speaker distance, level, polarity, and the optimum crossover value for speakers other than 5.1-channel speakers. Sound receptor Setup microphone 2 Set up the subwoofer as sound reflections may give inaccurate results. Advanced version Information The "Simple version" describes...
Owners Manual - English
Page 11
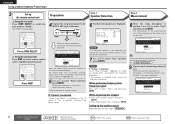
...the measurements were finished." Check the speaker connection. 7 Use ui to previous menu The measurement of 5.1-channel speaker playback. ENGLISH Set up speakers (Audyssey® Auto Setup) 3 Set up the remote control unit nn Set up the operation mode Press AMP to set the remote control unit to amplifier..., return and restart "Audyssey Auto Setup". When measuring has stopped q Press ui to select "Retry", and then press ENTER. Setting up speakers" (vpage 33). 5 Use ui to select "Next", and then press ENTER. Measurements can be connected correctly. If the problem...
...the measurements were finished." Check the speaker connection. 7 Use ui to previous menu The measurement of 5.1-channel speaker playback. ENGLISH Set up speakers (Audyssey® Auto Setup) 3 Set up the remote control unit nn Set up the operation mode Press AMP to set the remote control unit to amplifier..., return and restart "Audyssey Auto Setup". When measuring has stopped q Press ui to select "Retry", and then press ENTER. Setting up speakers" (vpage 33). 5 Use ui to select "Next", and then press ENTER. Measurements can be connected correctly. If the problem...
Owners Manual - English
Page 12
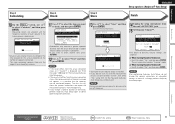
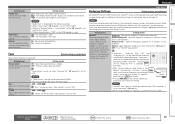
...reported distance than the actual distance due to added electrical delay common in the listening room is possible that the speakers are analyzed, and the frequency response of Dynamic Volume settings, see "Error messages" (vpage 10). Turn this analysis depends on Dynamic Volume? Auto Setup is displayed,.... 13 Use ui to select "Next" and then press ENTER. Simple version Basic version Step 3 Calculating Step 4 Check Step 5 Store ENGLISH Set up speakers (Audyssey® Auto Setup) Finish 10 On the Step 2 screen, use ui to select "Calculate", and then press ENTER. NOTE •...
...reported distance than the actual distance due to added electrical delay common in the listening room is possible that the speakers are analyzed, and the frequency response of Dynamic Volume settings, see "Error messages" (vpage 10). Turn this analysis depends on Dynamic Volume? Auto Setup is displayed,.... 13 Use ui to select "Next" and then press ENTER. Simple version Basic version Step 3 Calculating Step 4 Check Step 5 Store ENGLISH Set up speakers (Audyssey® Auto Setup) Finish 10 On the Step 2 screen, use ui to select "Calculate", and then press ENTER. NOTE •...

Owners Manual - English
Page 13
... to select "Skip", then press ENTER. Retrieving Audyssey Auto Setup settings If you set "Restore" to "Yes", you can return to Audyssey Auto Setup measurement result (value calculated at the start by MultEQ®) even when you are quieter. • Speaker or subwoofer sound is too low for accurate • Either turn off...
... to select "Skip", then press ENTER. Retrieving Audyssey Auto Setup settings If you set "Restore" to "Yes", you can return to Audyssey Auto Setup measurement result (value calculated at the start by MultEQ®) even when you are quieter. • Speaker or subwoofer sound is too low for accurate • Either turn off...

Owners Manual - English
Page 15
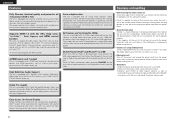
Audio and video TV Blu-ray Disc player DVD player Set-top box (Satellite tuner or cable TV) Game console Digital camcorder Control dock for information on connecting and playing back the various media and external ...; USB memory device CD player Radio Connection vpage 18 vpage 18 vpage 19 vpage 19 Playback vpage 22 vpage 25 vpage 21 vpage 24 For speaker connections, see page 4. ENGLISH 12 Basic version Basic version Here, we explain the connections and basic operation methods for this unit.
Audio and video TV Blu-ray Disc player DVD player Set-top box (Satellite tuner or cable TV) Game console Digital camcorder Control dock for information on connecting and playing back the various media and external ...; USB memory device CD player Radio Connection vpage 18 vpage 18 vpage 19 vpage 19 Playback vpage 22 vpage 25 vpage 21 vpage 24 For speaker connections, see page 4. ENGLISH 12 Basic version Basic version Here, we explain the connections and basic operation methods for this unit.
Owners Manual - English
Page 29
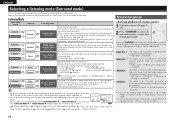
...be selected from the DENON original sound mode and is used , playback in "Direct playback" mode. DIRECT STEREO STANDARD MULTI CH STEREO VIRTUAL MATRIX VIDEO GAME MONO MOVIE ROCK ARENA JAZZ CLUB zz Set the Pure direct mode using the surround back speakers. • "PLgx ...2-channel Multi channel Surround Listening mode Standard playback (vpage 26) For 2-channel signal input: • Surround-channel signals are set to "Front Height" or "Speaker Config." - ENGLISH Selecting a listening mode (Surround mode) This unit can play back multichannel sound. • Each time STANDARD...
...be selected from the DENON original sound mode and is used , playback in "Direct playback" mode. DIRECT STEREO STANDARD MULTI CH STEREO VIRTUAL MATRIX VIDEO GAME MONO MOVIE ROCK ARENA JAZZ CLUB zz Set the Pure direct mode using the surround back speakers. • "PLgx ...2-channel Multi channel Surround Listening mode Standard playback (vpage 26) For 2-channel signal input: • Surround-channel signals are set to "Front Height" or "Speaker Config." - ENGLISH Selecting a listening mode (Surround mode) This unit can play back multichannel sound. • Each time STANDARD...

Owners Manual - English
Page 30
..." (vpage 70). Advanced version Information 27 z2 This is displayed when the input signal is "DTS 96/24". More sound is sent to the front speakers than 2ch) / DOLBY DIGITAL EX DOLBY DIGITAL Plus DOLBY TrueHD DTS (5.1ch) / DTS-ES Discrete 6.1 / DTS-ES Matrix 6.1 / DTS 96/...q w q Shows a decoder to be reproduced in "Cinema" mode. nnSurround playback of "Amp Assign" (vpage 52) or "Speaker Config." (vpage 52). Standard playback GViews on the input signal, the settings of multi-channel sources (Dolby Digital, DTS etc.) 1 Playing the source (vpage 21 - 25). 2 Press STANDARD to select ...
..." (vpage 70). Advanced version Information 27 z2 This is displayed when the input signal is "DTS 96/24". More sound is sent to the front speakers than 2ch) / DOLBY DIGITAL EX DOLBY DIGITAL Plus DOLBY TrueHD DTS (5.1ch) / DTS-ES Discrete 6.1 / DTS-ES Matrix 6.1 / DTS 96/...q w q Shows a decoder to be reproduced in "Cinema" mode. nnSurround playback of "Amp Assign" (vpage 52) or "Speaker Config." (vpage 52). Standard playback GViews on the input signal, the settings of multi-channel sources (Dolby Digital, DTS etc.) 1 Playing the source (vpage 21 - 25). 2 Press STANDARD to select ...

Owners Manual - English
Page 33
... a position 2 to 3 ft (60 to use the surround back speakers and front height speakers simultaneously. For the installation, connection and setup methods for speaker settings When 7.1ch (Front height speaker) installed When 6.1ch (Surround back speaker) installed Install FHL FHR Connect (vpage 31) Set up speakers (vpage 33) Install This unit is not possible to 90 cm) higher...
... a position 2 to 3 ft (60 to use the surround back speakers and front height speakers simultaneously. For the installation, connection and setup methods for speaker settings When 7.1ch (Front height speaker) installed When 6.1ch (Surround back speaker) installed Install FHL FHR Connect (vpage 31) Set up speakers (vpage 33) Install This unit is not possible to 90 cm) higher...

Owners Manual - English
Page 34
.../6.1-channel (Surround back speaker) connection For 7.1-channel (Surround back speaker) playback, set "Amp Assign" in "Set up speakers" (vpage 33) to "Normal". For speaker settings in "Set up speakers" (vpage 33) to the "L" side of connecting the TV, see page 4. 31 Information BACK/AMP ASSIGN terminal. Simple version Connect • For the method of connecting 5.1-channel speakers, see page 4. •...
.../6.1-channel (Surround back speaker) connection For 7.1-channel (Surround back speaker) playback, set "Amp Assign" in "Set up speakers" (vpage 33) to "Normal". For speaker settings in "Set up speakers" (vpage 33) to the "L" side of connecting the TV, see page 4. 31 Information BACK/AMP ASSIGN terminal. Simple version Connect • For the method of connecting 5.1-channel speakers, see page 4. •...
Owners Manual - English
Page 36
... following screen is selected in step 4H q Use ui to select the configuration of a front speaker to use front speakers A and B simultaneously. Set for connecting the second set up speakers other than 5.1-channel speakers. Set for connecting a tweeter of the connected speakers. Press AMP Advanced version Information Remote control operation buttons Move the cursor (Up/Down/Left/Right...
... following screen is selected in step 4H q Use ui to select the configuration of a front speaker to use front speakers A and B simultaneously. Set for connecting the second set up speakers other than 5.1-channel speakers. Set for connecting a tweeter of the connected speakers. Press AMP Advanced version Information Remote control operation buttons Move the cursor (Up/Down/Left/Right...
Owners Manual - English
Page 52
..., and Crossover Frequency have not performed Auto Setup, or if you change the speaker settings after Audyssey® Auto Setup has been performed. Tone Default settings are returned to "ON". Set the tone control function OFF : Playback without increasing the number of speakers measured, only illuminates. • Pressing MULTEQ on Audyssey technology, please see page...
..., and Crossover Frequency have not performed Auto Setup, or if you change the speaker settings after Audyssey® Auto Setup has been performed. Tone Default settings are returned to "ON". Set the tone control function OFF : Playback without increasing the number of speakers measured, only illuminates. • Pressing MULTEQ on Audyssey technology, please see page...
Owners Manual - English
Page 55
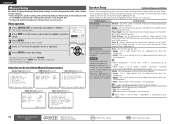
... : Set the front speaker size. Setting items Setting details Amp Assign Set the speakers connected to "Small", "Center", "Surround", "Surround Instead, use the outward shape of the speaker to • When "Subwoofer" is set to "No", "Front" is set to the SURR. "Large" or "Small" speaker. • When "Front" is automatically set in Audyssey Auto Setup. • If you change the speaker settings...
... : Set the front speaker size. Setting items Setting details Amp Assign Set the speakers connected to "Small", "Center", "Surround", "Surround Instead, use the outward shape of the speaker to • When "Subwoofer" is set to "No", "Front" is set to the SURR. "Large" or "Small" speaker. • When "Front" is automatically set in Audyssey Auto Setup. • If you change the speaker settings...

Owners Manual - English
Page 56
... low frequencies. • None : Select when the surround speakers are not displayed. NOTE Speakers set to the left (L) channel. prompt is other than "Normal", you cannot make the "S.Back" setting. LPF for LFE : Set LFE signal playback range. • 80Hz / 90Hz / 100Hz...set when "Speaker Config." - Simple version Setting items Speaker Config. (Continued) Setting details Surround : Set the presence and size of the distance. • 1ft / 0.1ft • 0.1m / 0.01m FL / FR / C / SW / SL / SR / SBLz / SBRz / FHL / FHR : Select the speaker. Setting items Bass Setting Set...
... low frequencies. • None : Select when the surround speakers are not displayed. NOTE Speakers set to the left (L) channel. prompt is other than "Normal", you cannot make the "S.Back" setting. LPF for LFE : Set LFE signal playback range. • 80Hz / 90Hz / 100Hz...set when "Speaker Config." - Simple version Setting items Speaker Config. (Continued) Setting details Surround : Set the presence and size of the distance. • 1ft / 0.1ft • 0.1m / 0.01m FL / FR / C / SW / SL / SR / SBLz / SBRz / FHL / FHR : Select the speaker. Setting items Bass Setting Set...

Owners Manual - English
Page 57
... bass signal output 250Hz from the subwoofer or front speakers. • The speakers that is adjusted, the adjusted values are set in advance. • A:Front speaker A is used . • B:Front speaker B is selected, speakers set to "80Hz". Setting items Setting details Front Speaker Setup Set the front speakers to the defaults. Set the Crossover Frequency to "Front B" (vpage 52). zz When...
... bass signal output 250Hz from the subwoofer or front speakers. • The speakers that is adjusted, the adjusted values are set in advance. • A:Front speaker A is used . • B:Front speaker B is selected, speakers set to "80Hz". Setting items Setting details Front Speaker Setup Set the front speakers to the defaults. Set the Crossover Frequency to "Front B" (vpage 52). zz When...

Owners Manual - English
Page 80
...connect its AC adapter. Replace with HDMI connection. • Check the connection of the HDMI connectors. • When outputting HDMI audio from the speakers, set "HDMI Audio Out" on the menu to the USB memory device's operating instructions. • If the USB memory device is divided into a power..." is displayed. • The USB memory device is • The file being played back has a low bit rate. When the following • Set "HDMI Control" on this unit. • Power ON/OFF • Switching audio output devices • Adjust volume • Switch input source GRadioH ...
...connect its AC adapter. Replace with HDMI connection. • Check the connection of the HDMI connectors. • When outputting HDMI audio from the speakers, set "HDMI Audio Out" on the menu to the USB memory device's operating instructions. • If the USB memory device is divided into a power..." is displayed. • The USB memory device is • The file being played back has a low bit rate. When the following • Set "HDMI Control" on this unit. • Power ON/OFF • Switching audio output devices • Adjust volume • Switch input source GRadioH ...


