

Owners Manual
Page 6
... the front, center and surround sound channels, or for instructions on . Use a separate head amplifier or step-up transformer. For details, see "Setting the Trigger Setup" on and standby from the remote control unit or power switch. Connections for audio equipment only. Incomplete connections will result in generating hum or other...
... the front, center and surround sound channels, or for instructions on . Use a separate head amplifier or step-up transformer. For details, see "Setting the Trigger Setup" on and standby from the remote control unit or power switch. Connections for audio equipment only. Incomplete connections will result in generating hum or other...
Owners Manual
Page 9
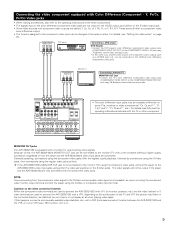
For details, see "Setting the video setup" on . 9 COMPONENT VIDEO OUT Y CB CR DVD player B Connecting a DVD player DVD ...Down-converting from the component video signal to the VIDEO-2 color difference (component) video jacks. If this , the AVR-3803/1083's MONITOR OUT jack can be connected to the monitor (TV) with component video outputs such as a TV/DBS...video components ("CR, CB and Y", "RY, B-Y and Y", "Pr, Pb and Y", etc.). MONITOR OUT jacks The AVR-3803/1083 is not possible, so when not using the component video monitor output terminal connect the player using 75 Ω/ohms ...
For details, see "Setting the video setup" on . 9 COMPONENT VIDEO OUT Y CB CR DVD player B Connecting a DVD player DVD ...Down-converting from the component video signal to the VIDEO-2 color difference (component) video jacks. If this , the AVR-3803/1083's MONITOR OUT jack can be connected to the monitor (TV) with component video outputs such as a TV/DBS...video components ("CR, CB and Y", "RY, B-Y and Y", "Pr, Pb and Y", etc.). MONITOR OUT jacks The AVR-3803/1083 is not possible, so when not using the component video monitor output terminal connect the player using 75 Ω/ohms ...
Owners Manual
Page 15
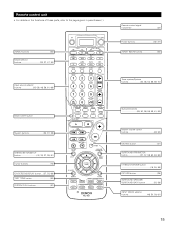
... 36~47) ZONE1 (MAIN) buttons 53) Tuner system/System buttons 35, 38, 53, 68, 69, 70) BACK LIGHT button System buttons 35, 37, 38) SYSTEM SETUP/SETUP button 18, 33, 37, 38, 61) Cursor buttons 16) ON SCREEN/DISPLAY button ....(37, 52, 69) TEST TONE button 55) SYSTEM CALL buttons 40) Surround...
... 36~47) ZONE1 (MAIN) buttons 53) Tuner system/System buttons 35, 38, 53, 68, 69, 70) BACK LIGHT button System buttons 35, 37, 38) SYSTEM SETUP/SETUP button 18, 33, 37, 38, 61) Cursor buttons 16) ON SCREEN/DISPLAY button ....(37, 52, 69) TEST TONE button 55) SYSTEM CALL buttons 40) Surround...
Owners Manual
Page 16
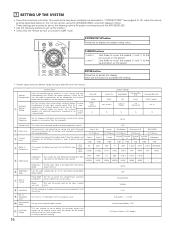
... the up and down -mixing Dolby Digital signals. ENTER button Press this to display the system setup menu. OFF u Zone 2 Control Power AMP Set this function when using the AVR-3803/1083's on-screen display function. This sets whether or not to display the on-screen display...Configuration Surround q Speaker Setting System setup Input the combination of speakers in your system and their corresponding sizes (SMALL for regular speakers, LARGE for fullsize, full-range) to automatically set up the listening room's AV system centered around the AVR-3803/1083. • Use the ...
... the up and down -mixing Dolby Digital signals. ENTER button Press this to display the system setup menu. OFF u Zone 2 Control Power AMP Set this function when using the AVR-3803/1083's on-screen display function. This sets whether or not to display the on-screen display...Configuration Surround q Speaker Setting System setup Input the combination of speakers in your system and their corresponding sizes (SMALL for regular speakers, LARGE for fullsize, full-range) to automatically set up the listening room's AV system centered around the AVR-3803/1083. • Use the ...
Owners Manual
Page 17
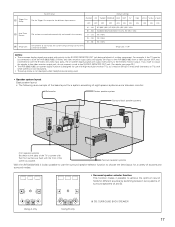
... and video monitor output jacks and signals are input to the AVR-3803/1083 from a video source (VDP, etc.) connected to both the S-Video and video input jacks, the on TVs with small screens or low resolutions. • The setup menu is not displayed when headphones are output with the front...(A and B). Surround speaker systems With the AVR-3803/1083 it may be changed. A A A A B SB SB B Using A only B SB SB B Using B only SB: SURROUND BACK SPEAKER 17 AUX ON ON ON ON FM stations are output with priority to lock the system setup settings so that they cannot be difficult to...
... and video monitor output jacks and signals are input to the AVR-3803/1083 from a video source (VDP, etc.) connected to both the S-Video and video input jacks, the on TVs with small screens or low resolutions. • The setup menu is not displayed when headphones are output with the front...(A and B). Surround speaker systems With the AVR-3803/1083 it may be changed. A A A A B SB SB B Using A only B SB SB B Using B only SB: SURROUND BACK SPEAKER 17 AUX ON ON ON ON FM stations are output with priority to lock the system setup settings so that they cannot be difficult to...

Owners Manual
Page 18
... the setting. A Surround back Sp. NOTE: • Select "Large" or "Small" not according to the actual size of speakers actually being used. 1 At the System Setup Menu select "Speaker Configuration". 2 Switch to the speaker's capacity for playing low frequency (bass sound below frequency set for the Crossover Frequency mode and below... speaker but according to the speaker configuration screen. 3 Set whether or not speakers are correct, then turn on the main unit's power. 2 Display the System Setup Menu.
... the setting. A Surround back Sp. NOTE: • Select "Large" or "Small" not according to the actual size of speakers actually being used. 1 At the System Setup Menu select "Speaker Configuration". 2 Switch to the speaker's capacity for playing low frequency (bass sound below frequency set for the Crossover Frequency mode and below... speaker but according to the speaker configuration screen. 3 Set whether or not speakers are correct, then turn on the main unit's power. 2 Display the System Setup Menu.

Owners Manual
Page 19
... playing Dolby Digital and DTS signals This screen is set for either "Large" or "Small" has been set for both speakers A and B on the System Setup Menu (when using both surround speakers A and B 2 Enter the setting. Speaker type setting when using both surround speakers A and B If "Small" is not displayed when...
... playing Dolby Digital and DTS signals This screen is set for either "Large" or "Small" has been set for both speakers A and B on the System Setup Menu (when using both surround speakers A and B 2 Enter the setting. Speaker type setting when using both surround speakers A and B If "Small" is not displayed when...

Owners Manual
Page 20
...quantity. • When the subwoofer is output from the subwoofer channel are only the low frequency signal range of channels set to "SMALL" in the setup menu. • Select the play mode that channel only. In this playback mode, the low frequency range expand more uniformly through the room, but ...signals) and the low frequency signal range of LFE (only during Dolby Digital or DTS signal playback) and the channel specified as "SMALL" in the setup menu. Assignment of channels set to "Yes", bass sound is set to "Surround Modes and Parameters" on the size and shape of the room,...
...quantity. • When the subwoofer is output from the subwoofer channel are only the low frequency signal range of channels set to "SMALL" in the setup menu. • Select the play mode that channel only. In this playback mode, the low frequency range expand more uniformly through the room, but ...signals) and the low frequency signal range of LFE (only during Dolby Digital or DTS signal playback) and the channel specified as "SMALL" in the setup menu. Assignment of channels set to "Yes", bass sound is set to "Surround Modes and Parameters" on the size and shape of the room,...

Owners Manual
Page 21
... L5: Distance between subwoofer and listening position FL Center FR Subwoofer L1 L2 L5 Listening position SL L3 L4 SR SBL SBR 1 At the System Setup Menu select "Delay Time". 2 Switch to L5 on the diagram at the right). Select (darken) the desired units, "Meters" or "Feet". 4 Once "Meters" or "Feet...
... L5: Distance between subwoofer and listening position FL Center FR Subwoofer L1 L2 L5 Listening position SL L3 L4 SR SBL SBR 1 At the System Setup Menu select "Delay Time". 2 Switch to L5 on the diagram at the right). Select (darken) the desired units, "Meters" or "Feet". 4 Once "Meters" or "Feet...

Owners Manual
Page 22
... and listening position. If you set , the settings are automatically reset to the default values. The AVR-3803/1083 automatically sets the optimum surround delay time for every speaker should be adjusted separately. 1 At the System Setup Menu select "Channel Level". 2 Switch to the Channel Level screen. 3 Select "Test Tone". 22 Example: When... no larger than the value shown in units of distance for the listening room. The distance changes in highlighted line. 7 Enter the setting. The System Setup Menu reappears.
... and listening position. If you set , the settings are automatically reset to the default values. The AVR-3803/1083 automatically sets the optimum surround delay time for every speaker should be adjusted separately. 1 At the System Setup Menu select "Channel Level". 2 Switch to the Channel Level screen. 3 Select "Test Tone". 22 Example: When... no larger than the value shown in units of distance for the listening room. The distance changes in highlighted line. 7 Enter the setting. The System Setup Menu reappears.

Owners Manual
Page 23
... is selected 5 Select "Surr. Sp.: B Adjusts the balance of the playback level between -12 dB and +12 dB in the following order, at the System Setup Menu (when both A and B have been selected at 4-second intervals the first time and second time around, 2-second intervals the third time around and on...
... is selected 5 Select "Surr. Sp.: B Adjusts the balance of the playback level between -12 dB and +12 dB in the following order, at the System Setup Menu (when both A and B have been selected at 4-second intervals the first time and second time around, 2-second intervals the third time around and on...

Owners Manual
Page 24
... channel levels for each of those modes. Setting the Digital In Assignment • This setting assigns the digital input jacks of the AVR-3803/1083 for which no digital input jacks are completed, press the ENTER button. When you may also need to adjust the subwoofer's .../DTS SURROUND, 5/7 CH STEREO, WIDE SCREEN, SUPER STADIUM, ROCK ARENA, JAZZ CLUB, CLASSIC CONCERT, MONO MOVIE, VIDEO GAME, MATRIX and VIRTUAL. The System Setup Menu reappears. 24 NOTE: When adjusting the level of "A or B" and "A and B". Check the instructions for "Default", the settings are the same. If...
... channel levels for each of those modes. Setting the Digital In Assignment • This setting assigns the digital input jacks of the AVR-3803/1083 for which no digital input jacks are completed, press the ENTER button. When you may also need to adjust the subwoofer's .../DTS SURROUND, 5/7 CH STEREO, WIDE SCREEN, SUPER STADIUM, ROCK ARENA, JAZZ CLUB, CLASSIC CONCERT, MONO MOVIE, VIDEO GAME, MATRIX and VIRTUAL. The System Setup Menu reappears. 24 NOTE: When adjusting the level of "A or B" and "A and B". Check the instructions for "Default", the settings are the same. If...
Owners Manual
Page 25
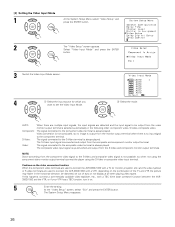
... • Do not connect the output of the component connected to the OPTICAL 5 OUT jack on the AVR-3803/1083's rear panel to any jack other digital recorder. At the "Video Setup" screen, select "Exit" and press the ENTER button. Use this for the different input sources. [1] ...Setting the Component In Assign. 1 At the System Setup Menu select "Video Setup" and press the ENTER button. 2 The "Video Setup" screen appears. The System Setup Menu reappears. 25 NOTES: • The OPTICAL 4 and 5 jacks on the AVR-3803/1083's rear panel are reset to the factory defaults. 5 ...
... • Do not connect the output of the component connected to the OPTICAL 5 OUT jack on the AVR-3803/1083's rear panel to any jack other digital recorder. At the "Video Setup" screen, select "Exit" and press the ENTER button. Use this for the different input sources. [1] ...Setting the Component In Assign. 1 At the System Setup Menu select "Video Setup" and press the ENTER button. 2 The "Video Setup" screen appears. The System Setup Menu reappears. 25 NOTES: • The OPTICAL 4 and 5 jacks on the AVR-3803/1083's rear panel are reset to the factory defaults. 5 ...
Owners Manual
Page 26
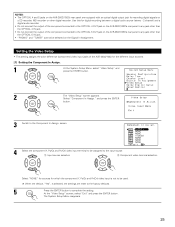
... with a VTR, depending on . 5 Enter the setting. [2] Setting the Video Input Mode 1 At the System Setup Menu select "Video Setup" and press the ENTER button. 2 The "Video Setup" screen appears. The composite video input signal is always played. The signal connected to the S-Video terminal is no ...all when playing video tapes. AUTO: Component: S-Video: Video: When there are multiple input signals, the input signals are used to connect the AVR-3803/1083 with a TV (or monitor, projector, etc.) and the video (yellow) or S video terminals are detected and the input signal to...
... with a VTR, depending on . 5 Enter the setting. [2] Setting the Video Input Mode 1 At the System Setup Menu select "Video Setup" and press the ENTER button. 2 The "Video Setup" screen appears. The composite video input signal is always played. The signal connected to the S-Video terminal is no ...all when playing video tapes. AUTO: Component: S-Video: Video: When there are multiple input signals, the input signals are used to connect the AVR-3803/1083 with a TV (or monitor, projector, etc.) and the video (yellow) or S video terminals are detected and the input signal to...

Owners Manual
Page 27
...use as the surround back channel, "Zone2" to use it. 3 Enter the setting. OFF: The dynamic range is selected 27 Setting the Dolby Digital Setup Sets the down-mixing method when not using a center speaker or surround speakers. If ZONE2 is selected, the signal that selected at "SURR. Select "... out. ON: The dynamic range is output at ZONE2 is compressed automatically according to the combination of speakers being used. 1 At the System Setup Menu select "Dolby Digital Setup" and press the ENTER button. 2 Select "ON" if you want to use the Dolby Digital Down-mix, "OFF" if you do ...
...use as the surround back channel, "Zone2" to use it. 3 Enter the setting. OFF: The dynamic range is selected 27 Setting the Dolby Digital Setup Sets the down-mixing method when not using a center speaker or surround speakers. If ZONE2 is selected, the signal that selected at "SURR. Select "... out. ON: The dynamic range is output at ZONE2 is compressed automatically according to the combination of speakers being used. 1 At the System Setup Menu select "Dolby Digital Setup" and press the ENTER button. 2 Select "ON" if you want to use the Dolby Digital Down-mix, "OFF" if you do ...

Owners Manual
Page 28
Select "Zone2 Vol. At the "Zone2 Control" screen, select "Exit" and press the ENTER button. The System Setup Menu reappears. The System Setup Menu reappears. [2] Setting the Zone2 vol. Variable: The level can no digital signals are being input. Setting the Audio Delay This function allows... the analog input direct mode or stereo mode (T0NE DEFEAT "ON"). 28 level Set the Zone 2 pre-out output level adjustment. 1 At the System Setup Menu select "Zone2 Control" and press the ENTER button. 2 The "Zone2 Control" screen appears. The setting is made here. Level" and press the ...
Select "Zone2 Vol. At the "Zone2 Control" screen, select "Exit" and press the ENTER button. The System Setup Menu reappears. The System Setup Menu reappears. [2] Setting the Zone2 vol. Variable: The level can no digital signals are being input. Setting the Audio Delay This function allows... the analog input direct mode or stereo mode (T0NE DEFEAT "ON"). 28 level Set the Zone 2 pre-out output level adjustment. 1 At the System Setup Menu select "Zone2 Control" and press the ENTER button. 2 The "Zone2 Control" screen appears. The setting is made here. Level" and press the ...

Owners Manual
Page 29
Note that surround mode the next time it is changed. 1 At the System Setup Menu select "Auto Surround Mode" and press the ENTER button. 29 Select according to the ...the PURE DIRECT mode, the surround mode does not change even if the input signal is input. The System Setup Menu reappears. Setting the Auto Surround Mode The surround mode used . In Subwoofer Level • Set the... analog input signal connected to the Ext.In Subwoofer. 1 At the System Setup Menu select "Ext.In Subwoofer Level". 2 Switch to the Ext.In Subwoofer Level screen. 3 Select the desired setting....
Note that surround mode the next time it is changed. 1 At the System Setup Menu select "Auto Surround Mode" and press the ENTER button. 29 Select according to the ...the PURE DIRECT mode, the surround mode does not change even if the input signal is input. The System Setup Menu reappears. Setting the Auto Surround Mode The surround mode used . In Subwoofer Level • Set the... analog input signal connected to the Ext.In Subwoofer. 1 At the System Setup Menu select "Ext.In Subwoofer Level". 2 Switch to the Ext.In Subwoofer Level screen. 3 Select the desired setting....

Owners Manual
Page 30
The System Setup Menu reappears. Setting the On Screen Display (OSD) • Use this mode if the on-screen display does not appear in the mode 1, as may ... prevented. Mode 2: Flickering is no video signal. Mode 1: Prevents flickering of the on -screen display's display mode. The System Setup Menu reappears. 30 Use this to the TV being used. 1 At the System Setup Menu select "On Screen Display" and press the ENTER button. 2 Select "ON" or "OFF". 3 Select the On Screen...
The System Setup Menu reappears. Setting the On Screen Display (OSD) • Use this mode if the on-screen display does not appear in the mode 1, as may ... prevented. Mode 2: Flickering is no video signal. Mode 1: Prevents flickering of the on -screen display's display mode. The System Setup Menu reappears. 30 Use this to the TV being used. 1 At the System Setup Menu select "On Screen Display" and press the ENTER button. 2 Select "ON" or "OFF". 3 Select the On Screen...
Owners Manual
Page 31
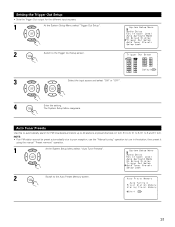
...FM broadcasts and store up to 40 stations at preset channels A1 to 8, B1 to 8, C1 to 8, D1 to 8 and E1 to the Trigger Out Setup screen. 3 Select the input source and select "ON" or "OFF". 4 Enter the setting. Auto Tuner Presets Use this to automatically search for the ...different input sources. 1 At the System Setup Menu select "Trigger Out Setup". 2 Switch to 8. NOTE: • If an FM station cannot be preset automatically due to poor reception, use the "Manual tuning" operation to...
...FM broadcasts and store up to 40 stations at preset channels A1 to 8, B1 to 8, C1 to 8, D1 to 8 and E1 to the Trigger Out Setup screen. 3 Select the input source and select "ON" or "OFF". 4 Enter the setting. Auto Tuner Presets Use this to automatically search for the ...different input sources. 1 At the System Setup Menu select "Trigger Out Setup". 2 Switch to 8. NOTE: • If an FM station cannot be preset automatically due to poor reception, use the "Manual tuning" operation to...

Owners Manual
Page 32
... settings • Channel level settings (including test tones) To unlock, press the System Setup button again and display the Setup Lock screen, then select "OFF" and press "ENTER". System setup is completed. The display automatically switches to change them unless different AV components are connected ...or the speakers are repositioned. 32 Once these settings are made , there is no need to select "Yes". This completes system setup. "Search" flashes on the screen and searching begins. Once these settings are made , there is no need to screen. "Completed"...
... settings • Channel level settings (including test tones) To unlock, press the System Setup button again and display the Setup Lock screen, then select "OFF" and press "ENTER". System setup is completed. The display automatically switches to change them unless different AV components are connected ...or the speakers are repositioned. 32 Once these settings are made , there is no need to select "Yes". This completes system setup. "Search" flashes on the screen and searching begins. Once these settings are made , there is no need to screen. "Completed"...


