

Owners Manual
Page 12
...its distance is no larger than the value shown in units of distance for every speaker should be set , the settings are automatically reset to the Delay Time screen. Enter the setting. ENGLISH Setting the delay time 6 • Input the distance between the listening position... from the speakers to L5 on the diagram at the right). Example: When the distance is pressed. The System Setup Menu reappears. The AVR-2802 automatically sets the optimum surround delay time for surround speakers A and B. Preparations: Measure the distances between the center speaker and listening position....
...its distance is no larger than the value shown in units of distance for every speaker should be set , the settings are automatically reset to the Delay Time screen. Enter the setting. ENGLISH Setting the delay time 6 • Input the distance between the listening position... from the speakers to L5 on the diagram at the right). Example: When the distance is pressed. The System Setup Menu reappears. The AVR-2802 automatically sets the optimum surround delay time for surround speakers A and B. Preparations: Measure the distances between the center speaker and listening position....
Owners Manual
Page 13
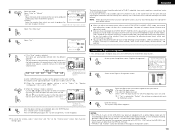
... above settings are automatically reset to the test tones produced automatically from the different speakers. • Manual: Select the speaker from the various speakers is the same. Setting the Digital In Assignment • This setting assigns the digital input jacks of the AVR-2802 for the different input .... 3 4 ENTER Select the digital input jack to be assigned to the same volume. NOTES: • The OPTICAL 3 jacks on the AVR-2802's rear panel are used. The volume can be remembered for just that will affect ALL surround modes. Press the ENTER button again, the "...
... above settings are automatically reset to the test tones produced automatically from the different speakers. • Manual: Select the speaker from the various speakers is the same. Setting the Digital In Assignment • This setting assigns the digital input jacks of the AVR-2802 for the different input .... 3 4 ENTER Select the digital input jack to be assigned to the same volume. NOTES: • The OPTICAL 3 jacks on the AVR-2802's rear panel are used. The volume can be remembered for just that will affect ALL surround modes. Press the ENTER button again, the "...

Owners Manual
Page 18
...If a non-learnable button is pressed or two or more buttons are transmitted in the shaded section. To "learn" that code, first perform the resetting operation. (See page 19.) System call function • The included remote control unit is equipped with a system call function for the CD player,...VDP, VCR or TV position. ENGLISH Learning function • If your AV component is not a DENON product or it cannot be operated with the preset memory codesets, you can "teach" the AVR-2802's remote control to "learn" the codes from the remote control unit TV/DBS approximately once every second...
...If a non-learnable button is pressed or two or more buttons are transmitted in the shaded section. To "learn" that code, first perform the resetting operation. (See page 19.) System call function • The included remote control unit is equipped with a system call function for the CD player,...VDP, VCR or TV position. ENGLISH Learning function • If your AV component is not a DENON product or it cannot be operated with the preset memory codesets, you can "teach" the AVR-2802's remote control to "learn" the codes from the remote control unit TV/DBS approximately once every second...

Owners Manual
Page 19
... system call signals. • The START LED flashes. 3 Press the SET button. • The button is reset to the settings shown on page 18. AUDIO TAPE CDR/MD CD MULTI MUTING AVR/AVC VIDEO TUNING DVD TV VDP VCR SYSTEM SETUP SURROUND PARAMETER BAND RDS MODE PTY MEMORY RT TITLE...selector button with the tip of signals. 19 Light SET 5 Press the USE/LEARN selector button. AUDIO TAPE CDR/MD CD MULTI MUTING AVR/AVC VIDEO TUNING DVD TV VDP VCR SYSTEM SETUP SURROUND PARAMETER BAND MODE MEMORY RDS PTY RT TITLE MENU/GUIDE CH SELECT ENTER SELECT ...
... system call signals. • The START LED flashes. 3 Press the SET button. • The button is reset to the settings shown on page 18. AUDIO TAPE CDR/MD CD MULTI MUTING AVR/AVC VIDEO TUNING DVD TV VDP VCR SYSTEM SETUP SURROUND PARAMETER BAND RDS MODE PTY MEMORY RT TITLE...selector button with the tip of signals. 19 Light SET 5 Press the USE/LEARN selector button. AUDIO TAPE CDR/MD CD MULTI MUTING AVR/AVC VIDEO TUNING DVD TV VDP VCR SYSTEM SETUP SURROUND PARAMETER BAND MODE MEMORY RDS PTY RT TITLE MENU/GUIDE CH SELECT ENTER SELECT ...

Owners Manual
Page 26
... different program sources, such as DVD, DTV and other future formats that can be performed directly using the "6.1/7.1 Surround" button on and off , "LFE" is reset, and the tone is set to "ON", the setting selected at night, or whenever the maximum sound level is on. 4 Display the surround parameter menu...
... different program sources, such as DVD, DTV and other future formats that can be performed directly using the "6.1/7.1 Surround" button on and off , "LFE" is reset, and the tone is set to "ON", the setting selected at night, or whenever the maximum sound level is on. 4 Display the surround parameter menu...

Owners Manual
Page 33
... cord not plugged in the table below. jacks to which stores the input and output setting conditions as possible. • Use cushions to perform complicated resettings when the power is switched on. • The unit is distorted. • Stylus pressure too weak. • Dust or dirt on stylus. ... be initialized. 1, 2 2 NOTES: • If step 3 does not work, start over from step 1. • If the microprocessor has been reset, all the button settings are reset to the default values (the values set upon shipment from one week of memory storage when the main unit's power switch is off...
... cord not plugged in the table below. jacks to which stores the input and output setting conditions as possible. • Use cushions to perform complicated resettings when the power is switched on. • The unit is distorted. • Stylus pressure too weak. • Dust or dirt on stylus. ... be initialized. 1, 2 2 NOTES: • If step 3 does not work, start over from step 1. • If the microprocessor has been reset, all the button settings are reset to the default values (the values set upon shipment from one week of memory storage when the main unit's power switch is off...

