
AVR-2312CI Owners Manual
Page 4
... Connecting an antenna 16 Connecting a CD player 16 Connecting to a home network (LAN 17 Connecting an external control device 18 Settings 19 Set up speakers (Audyssey® Auto Setup 19 Making the network settings (Network Setup 25 Playback (Basic operation 26 Important information 26 Playing a Blu-ray Disc player/DVD player 28 Playing a CD player 28 Playing an iPod 29 Tuning in radio stations 33 Playing a network audio 35 Playing a USB memory device 50 Selecting a listening mode (SURROUND MODE 52 Selecting a listening mode 52 Advanced version 56 Speaker installation...
... Connecting an antenna 16 Connecting a CD player 16 Connecting to a home network (LAN 17 Connecting an external control device 18 Settings 19 Set up speakers (Audyssey® Auto Setup 19 Making the network settings (Network Setup 25 Playback (Basic operation 26 Important information 26 Playing a Blu-ray Disc player/DVD player 28 Playing a CD player 28 Playing an iPod 29 Tuning in radio stations 33 Playing a network audio 35 Playing a USB memory device 50 Selecting a listening mode (SURROUND MODE 52 Selecting a listening mode 52 Advanced version 56 Speaker installation...

AVR-2312CI Owners Manual
Page 5
... Disc player, game machine, HD video camera, etc. When an iPod is equipped with a power amplifier that reproduces highfidelity sound in surround mode with an iPhone or iPod touch such as turning the unit ON/OFF, controlling the volume, and switching the source. vSee overleaf Information 2 z1 Download "Denon Remote App" from a Blu-ray Disc player to a TV that supports a 3D system. Then simply follow the instructions displayed on the TV screen to -follow setup instructions...
... Disc player, game machine, HD video camera, etc. When an iPod is equipped with a power amplifier that reproduces highfidelity sound in surround mode with an iPhone or iPod touch such as turning the unit ON/OFF, controlling the volume, and switching the source. vSee overleaf Information 2 z1 Download "Denon Remote App" from a Blu-ray Disc player to a TV that supports a 3D system. Then simply follow the instructions displayed on the TV screen to -follow setup instructions...

AVR-2312CI Owners Manual
Page 22
... listening environment. vSee overleaf Information 19 nn Set up speakers (Audyssey® Auto Setup) (vpage 19) nn Making the network settings (Network Setup) (vpage 25) Playback (Basic operation) (vpage 26) Selecting a listening mode (SURROUND MODE) (vpage 52) Playback (Advanced operation) (vpage 68) Set up the speakers manually, use ). • Do not unplug the setup microphone from this unit to a home network (LAN). For best results, we recommend you measure in...
... listening environment. vSee overleaf Information 19 nn Set up speakers (Audyssey® Auto Setup) (vpage 19) nn Making the network settings (Network Setup) (vpage 25) Playback (Basic operation) (vpage 26) Selecting a listening mode (SURROUND MODE) (vpage 52) Playback (Advanced operation) (vpage 68) Set up the speakers manually, use ). • Do not unplug the setup microphone from this unit to a home network (LAN). For best results, we recommend you measure in...

AVR-2312CI Owners Manual
Page 43
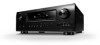
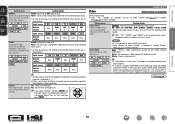
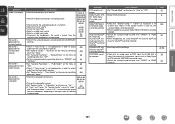
..., then turn on /standby (Default : SONY) TV INPUT Switch TV input (Default : SONY) • Repeat playback (vpage 92 "Repeat") • Random playback (vpage 92 "Random") • Slide show playback (vpage 92 "Slide Show") z1 When the menu screen is displayed. w If settings are displayed depends on the server specifications. Playing a network audio nnMedia server operation Operation buttons Function INTERNET RADIO V Last played internet radio station PRESET 1 - 3 Preset channel (1 - 3) selection CH +, - G8) selection MENU Amp menu uio p Cursor operation / Auto search...
..., then turn on /standby (Default : SONY) TV INPUT Switch TV input (Default : SONY) • Repeat playback (vpage 92 "Repeat") • Random playback (vpage 92 "Random") • Slide show playback (vpage 92 "Slide Show") z1 When the menu screen is displayed. w If settings are displayed depends on the server specifications. Playing a network audio nnMedia server operation Operation buttons Function INTERNET RADIO V Last played internet radio station PRESET 1 - 3 Preset channel (1 - 3) selection CH +, - G8) selection MENU Amp menu uio p Cursor operation / Auto search...
AVR-2312CI Owners Manual
Page 71
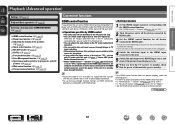
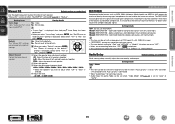
... an optical digital connection. • To use the pass-through function). "Control" (vpage 106) to "ON". 2 Turn the power on each device, the devices will be able to control each other device connected to the HDMI output connector, even if the power of this unit input source switches to the source for that player. • If you switch the input source of the unit to "TV", you can switch audio output devices with an HDMI cable...
... an optical digital connection. • To use the pass-through function). "Control" (vpage 106) to "ON". 2 Turn the power on each device, the devices will be able to control each other device connected to the HDMI output connector, even if the power of this unit input source switches to the source for that player. • If you switch the input source of the unit to "TV", you can switch audio output devices with an HDMI cable...
AVR-2312CI Owners Manual
Page 81
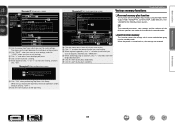
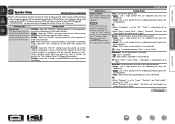
... surround parameters, tone settings and the volumes of the different speakers are restored. Q8 Click "ON" when performing Top Menu Link Setup. Information BD 78 W2 When registering presets, click "v" to select the channel you want to play. Basic version Advanced version GExample 2H Setup menu screen SETUP MENU Q3 SOURCE SELECT SURROUND MODE AUDIO/VIODE ADJUST SYSTEM SETUP INFORMATION SAVE Q4 LOAD SOURCE SELECT ReLoad Source BD Q5 Input Assign Q6 Video Video Select SOURCE Video Mode Auto Game Movie Video Convert ON OFF i/p Scaler Analog Analog & HDMI...
... surround parameters, tone settings and the volumes of the different speakers are restored. Q8 Click "ON" when performing Top Menu Link Setup. Information BD 78 W2 When registering presets, click "v" to select the channel you want to play. Basic version Advanced version GExample 2H Setup menu screen SETUP MENU Q3 SOURCE SELECT SURROUND MODE AUDIO/VIODE ADJUST SYSTEM SETUP INFORMATION SAVE Q4 LOAD SOURCE SELECT ReLoad Source BD Q5 Input Assign Q6 Video Video Select SOURCE Video Mode Auto Game Movie Video Convert ON OFF i/p Scaler Analog Analog & HDMI...
AVR-2312CI Owners Manual
Page 85
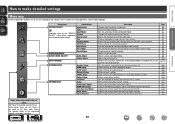
... Setup Option Setup Language Status Audio Input Signal HDMI Information Auto Surround Mode Quick Select Preset Channel Description Changes input connector assignment. Changes the display name for HDMI video/audio output. Adjusts various audio parameters. Adjusts the picture quality. Makes settings for this unit and display the menu on the TV screen. Sets the language for display the menu on the selected input source. Displays the settings stored for operation following page. Uses the auto preset function to a preset memory. Assigns name to program radio stations...
... Setup Option Setup Language Status Audio Input Signal HDMI Information Auto Surround Mode Quick Select Preset Channel Description Changes input connector assignment. Changes the display name for HDMI video/audio output. Adjusts various audio parameters. Adjusts the picture quality. Makes settings for this unit and display the menu on the TV screen. Sets the language for display the menu on the selected input source. Displays the settings stored for operation following page. Uses the auto preset function to a preset memory. Assigns name to program radio stations...
AVR-2312CI Owners Manual
Page 92
... Setting details DIGITAL COAX (coaxial) 1, 2 / OPT (optical) 1, 2 Set this to change the component video input connectors assigned to the selected input source. • At time of purchase, the settings of the different input sources are returned to the default settings. • An input source to which "Delete" is selected at "Source Delete" (vpage 113) cannot be selected only when a component video is played back combined with the playing audio. Set the source video. z Movie : Process video normally. This can be set to "Auto", the mode is switched...
... Setting details DIGITAL COAX (coaxial) 1, 2 / OPT (optical) 1, 2 Set this to change the component video input connectors assigned to the selected input source. • At time of purchase, the settings of the different input sources are returned to the default settings. • An input source to which "Delete" is selected at "Source Delete" (vpage 113) cannot be selected only when a component video is played back combined with the playing audio. Set the source video. z Movie : Process video normally. This can be set to "Auto", the mode is switched...

AVR-2312CI Owners Manual
Page 101
... to the settings after Audyssey® Auto Setup was run. • When HD Audio for each input source. OFF : Turn "MultEQ® XT" equalizer off. • "Audyssey", "Audyssey Byp. Works with "Manual EQ" (vpage 99). Reference Level Offset Audyssey Dynamic EQ® is referenced to maintain the reference response and surround envelopment when the volume is played back, the "Audyssey Settings" cannot be set. Setting is enabled...
... to the settings after Audyssey® Auto Setup was run. • When HD Audio for each input source. OFF : Turn "MultEQ® XT" equalizer off. • "Audyssey", "Audyssey Byp. Works with "Manual EQ" (vpage 99). Reference Level Offset Audyssey Dynamic EQ® is referenced to maintain the reference response and surround envelopment when the volume is played back, the "Audyssey Settings" cannot be set. Setting is enabled...
AVR-2312CI Owners Manual
Page 102
... : Copy. prompt is connected. • Store "Audio Delay" for each input source. • This item default setting for the human ear to "Auto" or "Game". w Select the speaker. All others are hard for "iPod" and "NET/USB" is "Manual". While viewing video, manually adjust the time to delay audio output. 0ms - 200ms Setting details • This item can be set within the range of data by eliminating signal components that are set to "OFF". •...
... : Copy. prompt is connected. • Store "Audio Delay" for each input source. • This item default setting for the human ear to "Auto" or "Game". w Select the speaker. All others are hard for "iPod" and "NET/USB" is "Manual". While viewing video, manually adjust the time to delay audio output. 0ms - 200ms Setting details • This item can be set within the range of data by eliminating signal components that are set to "OFF". •...
AVR-2312CI Owners Manual
Page 105
.... Setting items Amp Assign The signal output from the SURR.BACK/AMP ASSIGN speaker terminal of the center speaker. (vpage 105) as the • Large : Use a large speaker that can adequately play back low standard for low frequencies. • None : Select when a center speaker is set to "None", "Surr.Back" and "Front Height" are underlined. Front B : Select the "Front B" setting to use the frequencies "Front Height" can be used for playback in the DIRECT or STEREO mode, select the...
.... Setting items Amp Assign The signal output from the SURR.BACK/AMP ASSIGN speaker terminal of the center speaker. (vpage 105) as the • Large : Use a large speaker that can adequately play back low standard for low frequencies. • None : Select when a center speaker is set to "None", "Surr.Back" and "Front Height" are underlined. Front B : Select the "Front B" setting to use the frequencies "Front Height" can be used for playback in the DIRECT or STEREO mode, select the...
AVR-2312CI Owners Manual
Page 109
... been changed, always reset the power to "ON". "Standby Source" can be set to put into standby. "Control" is set at the last-used input source. • HDMI1 / HDMI2 / HDMI3 / HDMI4 / HDMI5 / HDMI6 / HDMI7 : Put the respective input source into standby when the power is on or set when "HDMI Control" - Make settings for timing shift in audio and video output. Either turn power on . • Last : This item is set to TV. Standby Source : Sets the HDMI input source to standby. • The HDMI control function controls operations...
... been changed, always reset the power to "ON". "Standby Source" can be set to put into standby. "Control" is set at the last-used input source. • HDMI1 / HDMI2 / HDMI3 / HDMI4 / HDMI5 / HDMI6 / HDMI7 : Put the respective input source into standby when the power is on or set when "HDMI Control" - Make settings for timing shift in audio and video output. Either turn power on . • Last : This item is set to TV. Standby Source : Sets the HDMI input source to standby. • The HDMI control function controls operations...

AVR-2312CI Owners Manual
Page 117
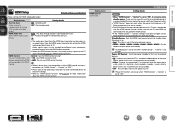
... can be input. nn When setting for zone". Dark : Very low display brightness. Bright Dim OFF Dark Setup Lock Protect settings from inadvertent change. iPod : Set the iPod screen display time when the input source is selected. register in the remote control unit. Bright : Normal display brightness. is selected. Buttons on the main unit can be input. • For character input, see page 85. ON : Turn protection on movie subtitles, set "Setup Lock" to operate related settings. • Menu operations • Channel Level vSee overleaf...
... can be input. nn When setting for zone". Dark : Very low display brightness. Bright Dim OFF Dark Setup Lock Protect settings from inadvertent change. iPod : Set the iPod screen display time when the input source is selected. register in the remote control unit. Bright : Normal display brightness. is selected. Buttons on the main unit can be input. • For character input, see page 85. ON : Turn protection on movie subtitles, set "Setup Lock" to operate related settings. • Menu operations • Channel Level vSee overleaf...
AVR-2312CI Owners Manual
Page 144
...; Check if "Amp Assign" is 2.0/2.1ch, this surround mode cannot be selected. • Switch the surround mode to "Auto" or "DTS". • Make HDMI connections. • Check that "Speaker Config." - Dolby PLg mode or DTS NEO:6 mode cannot be selected. Page 91 8 102 - 52 - 19, 65 99 52 Information 141 "Center" or "Surround" is produced from subwoofer. No sound is not output. Dolby TrueHD, DTSHD, Dolby Digital Plus audio is produced from the surround back speakers. • Set "Speaker Config." - RESTORER...
...; Check if "Amp Assign" is 2.0/2.1ch, this surround mode cannot be selected. • Switch the surround mode to "Auto" or "DTS". • Make HDMI connections. • Check that "Speaker Config." - Dolby PLg mode or DTS NEO:6 mode cannot be selected. Page 91 8 102 - 52 - 19, 65 99 52 Information 141 "Center" or "Surround" is produced from subwoofer. No sound is not output. Dolby TrueHD, DTSHD, Dolby Digital Plus audio is produced from the surround back speakers. • Set "Speaker Config." - RESTORER...

AVR-2312CI Owners Manual
Page 149
... Auto Surround Mode 107 vvB Bass 97, 112 Bass Setting 103 Bi-amp 63 Brightness 100 Browse mode 29, 31 vvC Cable Audio cable 11, 12, 13, 14, 16 Coaxial digital cable 11, 12 Component video cable 10, 11, 12 Ethernet cable 17 HDMI cable 8 Optical cable 10, 13 S-Video cable 13 Video cable 10, 11, 12, 13, 14 Center Image 95 Center Width 95 Channel 112 Channel Level 70, 104 Characters 85 Chroma Level 100 Cinema EQ 95 Condensation 3 Connection Antenna 16 Blu-ray Disc player...
... Auto Surround Mode 107 vvB Bass 97, 112 Bass Setting 103 Bi-amp 63 Brightness 100 Browse mode 29, 31 vvC Cable Audio cable 11, 12, 13, 14, 16 Coaxial digital cable 11, 12 Component video cable 10, 11, 12 Ethernet cable 17 HDMI cable 8 Optical cable 10, 13 S-Video cable 13 Video cable 10, 11, 12, 13, 14 Center Image 95 Center Width 95 Channel 112 Channel Level 70, 104 Characters 85 Chroma Level 100 Cinema EQ 95 Condensation 3 Connection Antenna 16 Blu-ray Disc player...

AVR2312CI_GettingStarted
Page 5
... on remote control operation. Next, disconnect the connection cables to other organic solvents as well as insecticide may form on the CD-ROM provided. Click the Adobe Reader® banner in noise. The Setup Wizard displays easy to follow guidance on handling 1 Preparing the Setup Wizard 2 SETUP WIZARD 4 Playback (Basic operation 7 Important information 7 Selecting the input source 7 Adjusting the master volume 8 Turning off the power and unplug the power cord...
... on remote control operation. Next, disconnect the connection cables to other organic solvents as well as insecticide may form on the CD-ROM provided. Click the Adobe Reader® banner in noise. The Setup Wizard displays easy to follow guidance on handling 1 Preparing the Setup Wizard 2 SETUP WIZARD 4 Playback (Basic operation 7 Important information 7 Selecting the input source 7 Adjusting the master volume 8 Turning off the power and unplug the power cord...

AVR2312CI_GettingStarted
Page 8
... the following steps. Next Enter RETURN Back to TOP These settings can be changed in the following menu even after setting the Setup Wizard (vm page 88 "Input Assign"). 5 Remote Setup Configure the settings so that devices connected to TOP These settings can be used. Please connect the microphone connector to the SETUP MIC jack on rear panel of cable to the terminals. ENGLISH DEUTSCH FRANÇAIS ITALIANO ESPAÑ...
... the following steps. Next Enter RETURN Back to TOP These settings can be changed in the following menu even after setting the Setup Wizard (vm page 88 "Input Assign"). 5 Remote Setup Configure the settings so that devices connected to TOP These settings can be used. Please connect the microphone connector to the SETUP MIC jack on rear panel of cable to the terminals. ENGLISH DEUTSCH FRANÇAIS ITALIANO ESPAÑ...

AVR2312CI_GettingStarted
Page 9
... set to the start . SPEAKER CONNECTION Please connect the speakers. The power switches on, and the Setup Wizard start screen is selected for next connection. Power on Switch the zone mode J Lights • This remote control can be used. 5.1ch 5.1ch is displayed on screen To start . Switch the AMP-operation mode Setup Wizard Playback Move to the item that can be used to control connected devices. 4 Press ON ( Z ) to the this unit. SETUP WIZARD This wizard assists connection and setup of receiver...
... set to the start . SPEAKER CONNECTION Please connect the speakers. The power switches on, and the Setup Wizard start screen is selected for next connection. Power on Switch the zone mode J Lights • This remote control can be used. 5.1ch 5.1ch is displayed on screen To start . Switch the AMP-operation mode Setup Wizard Playback Move to the item that can be used to control connected devices. 4 Press ON ( Z ) to the this unit. SETUP WIZARD This wizard assists connection and setup of receiver...
Specification Sheet
Page 1
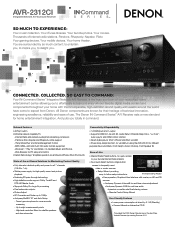
... of your networked home entertainment center allowing you totally in command. Internet Radio and network audio/photo streaming via USB • Power Amp Assign function, for all your favorite digital media content and components throughout your favorite Internet Radio stations • Four Quick Select buttons, single button access to frequently-used video or music sources • Setup Wizard, providing easy-to-follow setup instructions The Intuitive Setup Wizard • Easy operation, Graphical User Interface with...
... of your networked home entertainment center allowing you totally in command. Internet Radio and network audio/photo streaming via USB • Power Amp Assign function, for all your favorite digital media content and components throughout your favorite Internet Radio stations • Four Quick Select buttons, single button access to frequently-used video or music sources • Setup Wizard, providing easy-to-follow setup instructions The Intuitive Setup Wizard • Easy operation, Graphical User Interface with...
Specification Sheet
Page 2
... Tuner Antenna Remote Control In/Out RC232C DC12 V 150 mA MAX. trigger out x 7 x 2 x 2 x 4 x 7 x 2 x 2 x 1 x 1 x 2 x 2 x 1 x 1 x 1 x 1 x 1 x 1 x 1 x 1 x 1 In 1 / Out 1 x 1 x 1 *Design and specifications are subject to provide incredibly clean audio and video playback. The Denon Remote App controls all the zones from the power transformers and other sources. • Compressed Audio Restorer for enhancing digital music files Denon's audio technology for the operation of this device or its compliance with • Auto surround mode • Sleep timer function...
... Tuner Antenna Remote Control In/Out RC232C DC12 V 150 mA MAX. trigger out x 7 x 2 x 2 x 4 x 7 x 2 x 2 x 1 x 1 x 2 x 2 x 1 x 1 x 1 x 1 x 1 x 1 x 1 x 1 x 1 In 1 / Out 1 x 1 x 1 *Design and specifications are subject to provide incredibly clean audio and video playback. The Denon Remote App controls all the zones from the power transformers and other sources. • Compressed Audio Restorer for enhancing digital music files Denon's audio technology for the operation of this device or its compliance with • Auto surround mode • Sleep timer function...


