Getting Started Guide
Page 5
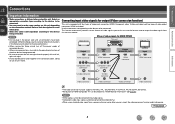
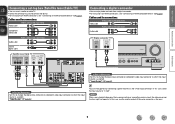
...that the illustrations in this manual is for explanation purposes and may differ from the power outlet. • About condensation If there is set to the standby mode. Playback 1 nnSymbols v This symbol indicates a reference page on remote control operation. When going on vacation or ...Check once again that all connections are based mainly on which related information is described. If that shows you for purchasing this DENON product. The Setup Wizard displays easy to follow guidance on the CD-ROM. Preparation Setup Wizard SVENSKA NEDERLANDS ESPAÑOL ITALIANO...
...that the illustrations in this manual is for explanation purposes and may differ from the power outlet. • About condensation If there is set to the standby mode. Playback 1 nnSymbols v This symbol indicates a reference page on remote control operation. When going on vacation or ...Check once again that all connections are based mainly on which related information is described. If that shows you for purchasing this DENON product. The Setup Wizard displays easy to follow guidance on the CD-ROM. Preparation Setup Wizard SVENSKA NEDERLANDS ESPAÑOL ITALIANO...
Getting Started Guide
Page 8
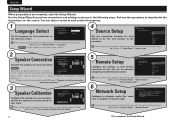
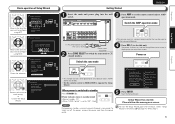
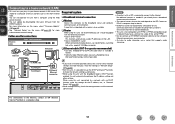
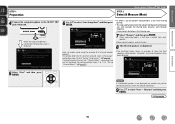
...files saved onto a computer or Internet radio. vm page 93 "System Setup" - BD [1/2] DVD Set the connecting terminals for each section if necessary. 1 Language Select Set the language for your language is the most popular surround system. Network Setup Please connect LAN cable to ... be operated using the Setup Wizard. Perform the operations as shown in the instructions on the screen. English Español These settings can be changed in the following steps. Remote Setup Please select the device you finish connection. "Network Setup" 4 This completes ...
...files saved onto a computer or Internet radio. vm page 93 "System Setup" - BD [1/2] DVD Set the connecting terminals for each section if necessary. 1 Language Select Set the language for your language is the most popular surround system. Network Setup Please connect LAN cable to ... be operated using the Setup Wizard. Perform the operations as shown in the instructions on the screen. English Español These settings can be changed in the following steps. Remote Setup Please select the device you finish connection. "Network Setup" 4 This completes ...
Getting Started Guide
Page 9
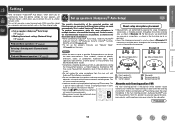
..., a minimal amount of power is consumed. GPower indicator status in standby modeH • Normal standby : Off • When "HDMI Control" is set the remote control unit to AMPoperation mode. Speaker Connection 3. Source Setup 5. Remote Setup START 6. Start the Setup Wizard. Select Yes to standby Press ... and setup of receiver step by step. To start screen is displayed on screen menu. No You can skip or cancel each setting. Language Select 2. Setup Wizard has started. You can restart the setup wizard anytime using the on the television screen. Speaker Connection...
..., a minimal amount of power is consumed. GPower indicator status in standby modeH • Normal standby : Off • When "HDMI Control" is set the remote control unit to AMPoperation mode. Speaker Connection 3. Source Setup 5. Remote Setup START 6. Start the Setup Wizard. Select Yes to standby Press ... and setup of receiver step by step. To start screen is displayed on screen menu. No You can skip or cancel each setting. Language Select 2. Setup Wizard has started. You can restart the setup wizard anytime using the on the television screen. Speaker Connection...
Getting Started Guide
Page 11
..." menu will not be played back. w Use uio p to perform simple operations. If the remote control unit is pressed, the input source of this setting at "Source Delete" (vm page 92). • To turn off . Display the "Source Select" menu. Selecting the input source • When using...operation (vm page 101 "Operating AV device"). The desired input source can also use the following operation to be displayed when SOURCE SELECT is set ahead of the connected components when playing them. Selecting the input source Press the input source select button (BD, SAT/CBL, TV, NET/...
..." menu will not be played back. w Use uio p to perform simple operations. If the remote control unit is pressed, the input source of this setting at "Source Delete" (vm page 92). • To turn off . Display the "Source Select" menu. Selecting the input source • When using...operation (vm page 101 "Operating AV device"). The desired input source can also use the following operation to be displayed when SOURCE SELECT is set ahead of the connected components when playing them. Selecting the input source Press the input source select button (BD, SAT/CBL, TV, NET/...
Getting Started Guide
Page 12
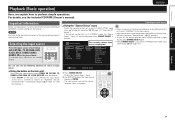
... audio nnPlaying a USB memory device nnSelecting a listening mode (Surround mode) nnConvenient functions nnPlayback in ZONE2 (Separate room) nnHow to change settings or detailed explanations of operations, see the included CD-ROM (Owner's manual). 8 For details on a TV screen. ENGLISH DEUTSCH FRAN... SVENSKA Adjusting the master volume Use M df to adjust the volume. Other operations See the following operations. This completes the basic settings and operations. You can also be canceled by remote control unit • The sound is "Absolute" GAdjustable rangeH 0.0 - 99...
... audio nnPlaying a USB memory device nnSelecting a listening mode (Surround mode) nnConvenient functions nnPlayback in ZONE2 (Separate room) nnHow to change settings or detailed explanations of operations, see the included CD-ROM (Owner's manual). 8 For details on a TV screen. ENGLISH DEUTSCH FRAN... SVENSKA Adjusting the master volume Use M df to adjust the volume. Other operations See the following operations. This completes the basic settings and operations. You can also be canceled by remote control unit • The sound is "Absolute" GAdjustable rangeH 0.0 - 99...
Owners Manual
Page 4
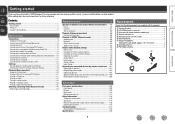
... home network (LAN 12 Settings 13 Set up speakers (Audyssey® Auto Setup 13 Making the network settings (Network Setup 19 Playback ... installation/connection (Advanced connection 49 Install 49 Connect 51 Set up speakers 56 Playback (Advanced operation 58 Convenient functions...function 69 Sleep timer function 69 How to make detailed settings 70 Menu map 70 Examples of menu screen displays 71...device 6 Connecting a TV 8 Connecting a Blu-ray Disc player/DVD player 8 Connecting a set-top box (Satellite tuner/Cable TV 9 Connecting a digital camcorder 9 Connecting a control dock for...
... home network (LAN 12 Settings 13 Set up speakers (Audyssey® Auto Setup 13 Making the network settings (Network Setup 19 Playback ... installation/connection (Advanced connection 49 Install 49 Connect 51 Set up speakers 56 Playback (Advanced operation 58 Convenient functions...function 69 Sleep timer function 69 How to make detailed settings 70 Menu map 70 Examples of menu screen displays 71...device 6 Connecting a TV 8 Connecting a Blu-ray Disc player/DVD player 8 Connecting a set-top box (Satellite tuner/Cable TV 9 Connecting a digital camcorder 9 Connecting a control dock for...
Owners Manual
Page 5
...photographs that are no problems with the connection cables. • Power is supplied to some of the circuitry even when the unit is set up the speakers, network, etc. Cautions on handling • Before turning the power on Check once again that all channels, true to... circuit adopts a discrete-circuit configuration that allows you to the standby mode. Compatible with "Denon Remote App" for performing basic operations of the unit with an iPhone or iPod touchz1 "Denon Remote App" is application software that achieves high-quality surround sound reproduction. Then simply follow ...
...photographs that are no problems with the connection cables. • Power is supplied to some of the circuitry even when the unit is set up the speakers, network, etc. Cautions on handling • Before turning the power on Check once again that all channels, true to... circuit adopts a discrete-circuit configuration that allows you to the standby mode. Compatible with "Denon Remote App" for performing basic operations of the unit with an iPhone or iPod touchz1 "Denon Remote App" is application software that achieves high-quality surround sound reproduction. Then simply follow ...

Owners Manual
Page 6
... Playback Connection Playback Connection vpage 7, 8 vpage 21 vpage 11 vpage 21 vpage 10 vpage 22 vpage 10 vpage 42 vpage 9 Playback Connection Playback - F Connections vpage 4 F Settings vpage 13 F Playback (Basic operation) vpage 20 F Selecting a listening mode (Surround mode) vpage 44 Advanced version Information Connection Playback Connection Playback Connection Playback Connection Playback...
... Playback Connection Playback Connection vpage 7, 8 vpage 21 vpage 11 vpage 21 vpage 10 vpage 22 vpage 10 vpage 42 vpage 9 Playback Connection Playback - F Connections vpage 4 F Settings vpage 13 F Playback (Basic operation) vpage 20 F Selecting a listening mode (Surround mode) vpage 44 Advanced version Information Connection Playback Connection Playback Connection Playback Connection Playback...
Owners Manual
Page 7
..., Component video, S-Video and video) and two types of video signals input to this unit to output the video signals from a game machine or some settings on this unit. This function automatically converts various formats of video output connectors (HDMI and video). NOTE • HDMI signals cannot be converted into the...
..., Component video, S-Video and video) and two types of video signals input to this unit to output the video signals from a game machine or some settings on this unit. This function automatically converts various formats of video output connectors (HDMI and video). NOTE • HDMI signals cannot be converted into the...
Owners Manual
Page 9
... audio data "upstream" to play back 3D video, you to the unit. About Content Type HDMI 1.4a enables simple, automated picture setting selection with no user intervention. Basic version Advanced version Connecting an HDMI-compatible device You can connect up to seven HDMI-compatible devices (6-.... • If you operate the menu while playing back 3D video content, the playback video is required. NOTE To enable the Content Type, set "HDMI Control" to "Connecting a TV" (vpage 8) for more information. HDCP is connected, video and audio are not displayed correctly. Read the...
... audio data "upstream" to play back 3D video, you to the unit. About Content Type HDMI 1.4a enables simple, automated picture setting selection with no user intervention. Basic version Advanced version Connecting an HDMI-compatible device You can connect up to seven HDMI-compatible devices (6-.... • If you operate the menu while playing back 3D video content, the playback video is required. NOTE To enable the Content Type, set "HDMI Control" to "Connecting a TV" (vpage 8) for more information. HDCP is connected, video and audio are not displayed correctly. Read the...
Owners Manual
Page 10
... The audio signal from the HDMI output connector (sampling frequency, number of the connected device regarding permissible inputs. Input Assign (vpage 97) Set this to change the HDMI input connector to which the monitor is compatible. • When this unit and monitor are connected with an HDMI... input connectors cannot be output from the HDMI output connector by the HDMI audio specifications of channels, etc.) may not be limited by setting the HDMI audio output destination to TV. Basic version Advanced version Cables used , the HDMI video signals are output to the monitor. ...
... The audio signal from the HDMI output connector (sampling frequency, number of the connected device regarding permissible inputs. Input Assign (vpage 97) Set this to change the HDMI input connector to which the monitor is compatible. • When this unit and monitor are connected with an HDMI... input connectors cannot be output from the HDMI output connector by the HDMI audio specifications of channels, etc.) may not be limited by setting the HDMI audio output destination to TV. Basic version Advanced version Cables used , the HDMI video signals are output to the monitor. ...
Owners Manual
Page 11
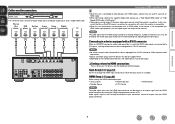
... cable R R DVD player VIDEO AUDIO VIDEO OUT AUDIO OUT LR Blu-ray Disc player AUDIO AUDIO OUT LR LR LR LR LR in Set as Necessary Set this to change the digital input connector or component video input connector to this unit, use an HDMI connection (vpage 6 "Connecting an HDMI... the digital input connector or component video input connector to use the optical digital connection. "Input Assign" (vpage 97) in Set as Necessary Set this device, use and connect the device. • For instructions on HDMI connections, see "Connecting an HDMI-compatible device" (vpage 6).
... cable R R DVD player VIDEO AUDIO VIDEO OUT AUDIO OUT LR Blu-ray Disc player AUDIO AUDIO OUT LR LR LR LR LR in Set as Necessary Set this to change the digital input connector or component video input connector to this unit, use an HDMI connection (vpage 6 "Connecting an HDMI... the digital input connector or component video input connector to use the optical digital connection. "Input Assign" (vpage 97) in Set as Necessary Set this device, use and connect the device. • For instructions on HDMI connections, see "Connecting an HDMI-compatible device" (vpage 6).
Owners Manual
Page 12
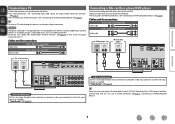
... Audio cables (sold separately) L L Audio cable R R Digital camcorder VIDEO AUDIO VIDEO OUT AUDIO OUT LR LR LR in Set as Necessary Set this case, select the input source to which the input source is assigned. In this to change the digital input connector or... camcorder. • For instructions on HDMI connections, see "Connecting an HDMI-compatible device" (vpage 6). "Input Assign" (vpage 97) in Set as Necessary Set this case, use and connect the device. • For instructions on HDMI connections, see "Connecting an HDMI-compatible device" (vpage 6). Cables...
... Audio cables (sold separately) L L Audio cable R R Digital camcorder VIDEO AUDIO VIDEO OUT AUDIO OUT LR LR LR in Set as Necessary Set this case, select the input source to which the input source is assigned. In this to change the digital input connector or... camcorder. • For instructions on HDMI connections, see "Connecting an HDMI-compatible device" (vpage 6). "Input Assign" (vpage 97) in Set as Necessary Set this case, use and connect the device. • For instructions on HDMI connections, see "Connecting an HDMI-compatible device" (vpage 6). Cables...

Owners Manual
Page 13
... that all USB memory devices will not work via a USB hub. • Do not use a DENON control dock for iPod (ASD-1R and ASD-11R, sold separately). • For instructions on the control dock for iPod settings, refer to this unit, keep the iPhone at least 20 cm away from this unit.... If the iPhone is received by DENON (sold separately) (vpage 10 "Connecting a control dock for iPod"). • With iPods, playback is...
... that all USB memory devices will not work via a USB hub. • Do not use a DENON control dock for iPod (ASD-1R and ASD-11R, sold separately). • For instructions on the control dock for iPod settings, refer to this unit, keep the iPhone at least 20 cm away from this unit.... If the iPhone is received by DENON (sold separately) (vpage 10 "Connecting a control dock for iPod"). • With iPods, playback is...

Owners Manual
Page 14
...; If the signal has noise interference, connect the ground terminal (GND) to receive a good broadcast signal, we recommend installing an outdoor antenna. LR in Set as Necessary Set this to change the digital input connector to assemble. Cables used , do not disconnect the AM loop antenna. • Make sure the AM loop...
...; If the signal has noise interference, connect the ground terminal (GND) to receive a good broadcast signal, we recommend installing an outdoor antenna. LR in Set as Necessary Set this to change the digital input connector to assemble. Cables used , do not disconnect the AM loop antenna. • Make sure the AM loop...
Owners Manual
Page 15
..., it is available at retailer. • Some flat type Ethernet cables are made manually, make the settings for details. • DENON assumes no DHCP function, make the settings at "Network Setup" (vpage 88). • When setting manually, check the setting contents with a router is needed if you have a broadband connection to the Internet. • The...
..., it is available at retailer. • Some flat type Ethernet cables are made manually, make the settings for details. • DENON assumes no DHCP function, make the settings at "Network Setup" (vpage 88). • When setting manually, check the setting contents with a router is needed if you have a broadband connection to the Internet. • The...
Owners Manual
Page 16
... main listening position (*M) The main listening position is part of the connected speakers and listening room are measured and the optimum settings are being made automatically. Before starting Audyssey® Auto Setup, place the setup microphone in GExample qH. Audyssey MultEQ®...Setup, Audyssey MultEQ®/ Audyssey Dynamic EQ®/Audyssey Dynamic Volume® functions become active (vpage 78, 79). • To set up speakers (Audyssey® Auto Setup) The acoustic characteristics of normal operation. To perform measurement, place the setup microphone in multiple ...
... main listening position (*M) The main listening position is part of the connected speakers and listening room are measured and the optimum settings are being made automatically. Before starting Audyssey® Auto Setup, place the setup microphone in GExample qH. Audyssey MultEQ®...Setup, Audyssey MultEQ®/ Audyssey Dynamic EQ®/Audyssey Dynamic Volume® functions become active (vpage 78, 79). • To set up speakers (Audyssey® Auto Setup) The acoustic characteristics of normal operation. To perform measurement, place the setup microphone in multiple ...
Owners Manual
Page 17
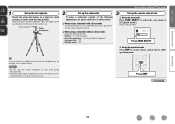
...8226; Do not hold the setup microphone in the main listening position. Sound receptor Setup microphone 2 Set up the subwoofer If using a subwoofer with a direct mode Set the direct mode to the level of the listener's ear. nn When using a subwoofer capable ...of the sound receptor to "On" and disable the volume adjustment and crossover frequency setting. When placing the setup microphone, adjust the height of the following settings: • Volume : "12 o'clock position" • Crossover frequency : "Maximum/Highest Frequency" •...
...8226; Do not hold the setup microphone in the main listening position. Sound receptor Setup microphone 2 Set up the subwoofer If using a subwoofer with a direct mode Set the direct mode to the level of the listener's ear. nn When using a subwoofer capable ...of the sound receptor to "On" and disable the volume adjustment and crossover frequency setting. When placing the setup microphone, adjust the height of the following settings: • Volume : "12 o'clock position" • Crossover frequency : "Maximum/Highest Frequency" •...
Owners Manual
Page 18
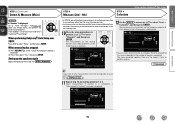
...[RETURN] Cancel NOTE If a connected speaker is displayed. If unused channels are displayed. • The illustration below shows an example of "Set up "Amp Assign"" (vpage 56). When the setup microphone is connected, the following items if necessary. MultEQ Amp Assign Channel Select Auto ...place then according to the recommendations in the listening area. 7 Select "Measure" and then press ENTER. Basic version Advanced version STEP 1 Preparation Set up speakers (Audyssey® Auto Setup) STEP 2 Detect & Measure (Main) 4 Connect the setup microphone to the SETUP MIC jack of ...
...[RETURN] Cancel NOTE If a connected speaker is displayed. If unused channels are displayed. • The illustration below shows an example of "Set up "Amp Assign"" (vpage 56). When the setup microphone is connected, the following items if necessary. MultEQ Amp Assign Channel Select Auto ...place then according to the recommendations in the listening area. 7 Select "Measure" and then press ENTER. Basic version Advanced version STEP 1 Preparation Set up speakers (Audyssey® Auto Setup) STEP 2 Detect & Measure (Main) 4 Connect the setup microphone to the SETUP MIC jack of ...
Owners Manual
Page 19
...Measure", and then press ENTER. MultEQ Retry Next Calculate [ENTER] Enter [RETURN] Cancel 16 STEP 3 Measure (2nd - 6th) STEP 4 Calculate Set up the speakers again Repeat the operation from the next position onward, select "Next Calculate". (Go to STEP4 Calculate ) 11 Repeat step 10,...® Auto Setup". Measure MultEQ [ENTER] Enter [RETURN] Cancel • Analysis takes several minutes to select "Retry", and then press ENTER. Setting up speakers (Audyssey® Auto Setup) • In STEP 3, you want to 6. Next Calculate [ENTER] Enter [RETURN] Cancel vSee overleaf ...
...Measure", and then press ENTER. MultEQ Retry Next Calculate [ENTER] Enter [RETURN] Cancel 16 STEP 3 Measure (2nd - 6th) STEP 4 Calculate Set up the speakers again Repeat the operation from the next position onward, select "Next Calculate". (Go to STEP4 Calculate ) 11 Repeat step 10,...® Auto Setup". Measure MultEQ [ENTER] Enter [RETURN] Cancel • Analysis takes several minutes to select "Retry", and then press ENTER. Setting up speakers (Audyssey® Auto Setup) • In STEP 3, you want to 6. Next Calculate [ENTER] Enter [RETURN] Cancel vSee overleaf ...


