
Literature/Product Sheet
Page 2
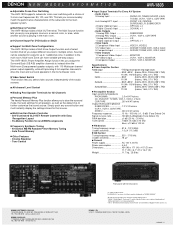
... independently of Digital Theater System, Inc. DENON, LTD. 3-16-11, YUSHIMA, BUNKYO-KU, TOKYO 113-0034, JAPAN 13010802 A Sources can have variable pre-amp output. Input FRONT L/R, CENTER, SURROUND L/R, SUBWOOFER 4 Digital (Optical) Input OPTICAL x 4 1 Digital (Coaxial) Input COAXIAL x 1 • Audio Outputs... stage values. NEW MODEL I N F O R M A T I O N AVR-1803 ■ Adjustable Cross-Over Switching The AVR-1803 supports subwoofer cross-over frequencies: 80, 100, and 120. The AVR-1803's Power Amplifier Assign function lets you to store the surround mode, the level settings for...
... independently of Digital Theater System, Inc. DENON, LTD. 3-16-11, YUSHIMA, BUNKYO-KU, TOKYO 113-0034, JAPAN 13010802 A Sources can have variable pre-amp output. Input FRONT L/R, CENTER, SURROUND L/R, SUBWOOFER 4 Digital (Optical) Input OPTICAL x 4 1 Digital (Coaxial) Input COAXIAL x 1 • Audio Outputs... stage values. NEW MODEL I N F O R M A T I O N AVR-1803 ■ Adjustable Cross-Over Switching The AVR-1803 supports subwoofer cross-over frequencies: 80, 100, and 120. The AVR-1803's Power Amplifier Assign function lets you to store the surround mode, the level settings for...
Owners Manual
Page 9
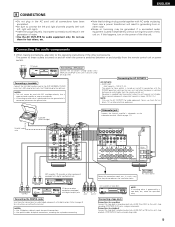
...Connecting a tape deck Connections for playback: Connect the tape deck's playback output jacks (LINE OUT or PB) to page 17.) OUTPUT INPUT OPTICAL COAXIAL OPTICAL OUTPUT MD recorder, CD recorder or other electrical appliances. ENGLISH 8 CONNECTIONS • Do not plug in the AC cord until all connections...these outlets is turned on and off in conjunction with digital output jacks R LRL INPUT OUTPUT tape deck, etc., move the tape deck away. Connecting a turntable Connect the turntable's output cord to the AVR-1803/883's PHONO jacks, the L (left , right with AC cords or placing ...
...Connecting a tape deck Connections for playback: Connect the tape deck's playback output jacks (LINE OUT or PB) to page 17.) OUTPUT INPUT OPTICAL COAXIAL OPTICAL OUTPUT MD recorder, CD recorder or other electrical appliances. ENGLISH 8 CONNECTIONS • Do not plug in the AC cord until all connections...these outlets is turned on and off in conjunction with digital output jacks R LRL INPUT OUTPUT tape deck, etc., move the tape deck away. Connecting a turntable Connect the turntable's output cord to the AVR-1803/883's PHONO jacks, the L (left , right with AC cords or placing ...

Owners Manual
Page 14
... decoder. • When making connections, also refer to this unit's V. Video game OUTPUT R L OPTICAL VIDEO OUT S-VIDEO OUT RL Connecting a Video game component • Connect the Video game component's output jacks to use the terminal. (See page 4 for inputting multi-channel audio signals from an outboard decoder, or a component with 6channel analog...
... decoder. • When making connections, also refer to this unit's V. Video game OUTPUT R L OPTICAL VIDEO OUT S-VIDEO OUT RL Connecting a Video game component • Connect the Video game component's output jacks to use the terminal. (See page 4 for inputting multi-channel audio signals from an outboard decoder, or a component with 6channel analog...

Owners Manual
Page 19
... Subwoofer channel playback level. Large Center Sp. Input source Digital Inputs This assigns the component video input jacks for playing deep bass signals. AUX OFF OFF Auto surround mode function setting. Input source Component Inputs Front & Subwoofer 12 ft (3.6 m) Center 12 ft (3.6 m) CD DVD/VDP TV/DBS COAXIAL OPTICAL 1 OPTICAL 2 DVD/VDP TV/DBS VCR-1 VIDEO 1 VIDEO...
... Subwoofer channel playback level. Large Center Sp. Input source Digital Inputs This assigns the component video input jacks for playing deep bass signals. AUX OFF OFF Auto surround mode function setting. Input source Component Inputs Front & Subwoofer 12 ft (3.6 m) Center 12 ft (3.6 m) CD DVD/VDP TV/DBS COAXIAL OPTICAL 1 OPTICAL 2 DVD/VDP TV/DBS VCR-1 VIDEO 1 VIDEO...

Owners Manual
Page 24
.... (left) button (right) button Press the ENTER or (down) button to switch the optical input 1 (OPT1) setting. 2 Use the (left) and (right) buttons to assign the input function connected to the OPTICAL 1 input (OPTICAL 1) terminal. 13 OPT1 DVD (Initial) CD DVD TV VCR1 VCR2 TAPE OFF • ...the main unit's rear panel. (See page 4) Setting the Digital In assignment Input the type of the buttons is connected. (left ) and (right) buttons to assign the input function connected to the OPTICAL 2 input (OPTICAL 2) terminal. 14 OPT2 TV (Initial) CD DVD TV VCR1 VCR2 TAPE OFF...
.... (left) button (right) button Press the ENTER or (down) button to switch the optical input 1 (OPT1) setting. 2 Use the (left) and (right) buttons to assign the input function connected to the OPTICAL 1 input (OPTICAL 1) terminal. 13 OPT1 DVD (Initial) CD DVD TV VCR1 VCR2 TAPE OFF • ...the main unit's rear panel. (See page 4) Setting the Digital In assignment Input the type of the buttons is connected. (left ) and (right) buttons to assign the input function connected to the OPTICAL 2 input (OPTICAL 2) terminal. 14 OPT2 TV (Initial) CD DVD TV VCR1 VCR2 TAPE OFF...

Owners Manual
Page 25
... the ENTER or setting. (down) button to enter the setting and switch the component input 2 (VIDEO2) 2 Use the (left) and (right) buttons to assign the input function connected to the COMPONENT VIDEO 2 input (VIDEO 2) terminal. 17 VIDEO2 TV DVD (Initial) TV VCR1 VCR2 V.AUX OFF ...setting. (down ) button to enter the setting and switch the Component Video input NOTE: • PHONO, TUNER and V. ENGLISH 4 Use the (left) and (right) buttons to assign the input function connected to the OPTICAL 3 input (OPTICAL 3) terminal. 15 OPT2 TAPE (Initial) CD DVD TV VCR1 VCR2 TAPE OFF...
... the ENTER or setting. (down) button to enter the setting and switch the component input 2 (VIDEO2) 2 Use the (left) and (right) buttons to assign the input function connected to the COMPONENT VIDEO 2 input (VIDEO 2) terminal. 17 VIDEO2 TV DVD (Initial) TV VCR1 VCR2 V.AUX OFF ...setting. (down ) button to enter the setting and switch the Component Video input NOTE: • PHONO, TUNER and V. ENGLISH 4 Use the (left) and (right) buttons to assign the input function connected to the OPTICAL 3 input (OPTICAL 3) terminal. 15 OPT2 TAPE (Initial) CD DVD TV VCR1 VCR2 TAPE OFF...

Owners Manual
Page 34
...connect the source component to the component's manual. 5 Adjust the volume. DIGITAL ANALOG DIGITAL DIGITAL ANALOG Input signal display • DOLBY DIGITAL SIGNAL DIGITAL • DTS SIGNAL DIGITAL • PCM SIGNAL DIGITAL... the selected component. • For operating instructions, refer to the digital input jacks (OPTICAL/COAXIAL) and set at +1 dB or greater, the volume cannot be output if DTS-compatible... CDs or LDs are being input properly. Press the SURROUND MODE button, then ...
...connect the source component to the component's manual. 5 Adjust the volume. DIGITAL ANALOG DIGITAL DIGITAL ANALOG Input signal display • DOLBY DIGITAL SIGNAL DIGITAL • DTS SIGNAL DIGITAL • PCM SIGNAL DIGITAL... the selected component. • For operating instructions, refer to the digital input jacks (OPTICAL/COAXIAL) and set at +1 dB or greater, the volume cannot be output if DTS-compatible... CDs or LDs are being input properly. Press the SURROUND MODE button, then ...

Owners Manual
Page 45
... the "AUDIO" position of the slide switch on . 4 Set the surround parameter according to digital (COAXIAL/OPTICAL) (see page 24). Dolby Digital mode (only with digital input) and DTS Surround (only with a digital input q Select an input source set to the source. First, press the SURROUND PARAMETER button. DIGITAL • The Dolby Digital indicator...
... the "AUDIO" position of the slide switch on . 4 Set the surround parameter according to digital (COAXIAL/OPTICAL) (see page 24). Dolby Digital mode (only with digital input) and DTS Surround (only with a digital input q Select an input source set to the source. First, press the SURROUND PARAMETER button. DIGITAL • The Dolby Digital indicator...
Owners Manual
Page 60
...Optical or coaxial digital output (same as stereo signals. • Various parameters can also be played on ordinary stereo equipment, in which three or more channels of surround have the function of source and the contents, so it possible to achieve multi-channel surround playback. Also refer to the AVR-1803... (front left, front right, center, surround left , surround right, and an additional channel exclusively reserved for PCM) Set the input mode to "AUTO". (Page 33) 1 Please use a commercially available adapter when connecting the Dolby Digital RF output jack of home...
...Optical or coaxial digital output (same as stereo signals. • Various parameters can also be played on ordinary stereo equipment, in which three or more channels of surround have the function of source and the contents, so it possible to achieve multi-channel surround playback. Also refer to the AVR-1803... (front left, front right, center, surround left , surround right, and an additional channel exclusively reserved for PCM) Set the input mode to "AUTO". (Page 33) 1 Please use a commercially available adapter when connecting the Dolby Digital RF output jack of home...
Owners Manual
Page 61
... these signals is input to the AVR-1803/883, the surround mode is played. Also, never switch the input mode to interference between signals, crosstalk, etc. DTS features a relatively higher bit rate as PCM signals. Media CD LD (VDP) DVD Dolby Digital output jacks Optical or coaxial digital output...Set the input mode to "AUTO" or "DTS" (page 33). Manufactured under license from the CD or LD player's analog outputs. The signals for an extra disc; The following are trademarks of Digital Theater Systems, Inc. ©1996, 2000 Digital Theater Systems, Inc. Recent DENON DVD ...
... these signals is input to the AVR-1803/883, the surround mode is played. Also, never switch the input mode to interference between signals, crosstalk, etc. DTS features a relatively higher bit rate as PCM signals. Media CD LD (VDP) DVD Dolby Digital output jacks Optical or coaxial digital output...Set the input mode to "AUTO" or "DTS" (page 33). Manufactured under license from the CD or LD player's analog outputs. The signals for an extra disc; The following are trademarks of Digital Theater Systems, Inc. ©1996, 2000 Digital Theater Systems, Inc. Recent DENON DVD ...


