
Owners Manual
Page 4
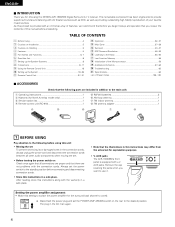
... the connection cords. AUX jacks The AVR-1803/883's front panel is provided with a V. TABLE OF CONTENTS z Before Using 4 x Cautions on Installation 5 c Cautions on Handling 5 v Features ...5 b Part Names and Functions 6, 7 n Read this manual before using this unit: •...1 u FM indoor antenna 1 i FM antenna adapter 1 r t y u i 1 BEFORE USING Pay attention to switch the power amplifier for choosing the DENON AVR-1803/883 Digital Surround A / V receiver. AUX jacks. The plug in a safe place. ENGLISH 2 INTRODUCTION Thank you for the surround back channel to zone2....
... the connection cords. AUX jacks The AVR-1803/883's front panel is provided with a V. TABLE OF CONTENTS z Before Using 4 x Cautions on Installation 5 c Cautions on Handling 5 v Features ...5 b Part Names and Functions 6, 7 n Read this manual before using this unit: •...1 u FM indoor antenna 1 i FM antenna adapter 1 r t y u i 1 BEFORE USING Pay attention to switch the power amplifier for choosing the DENON AVR-1803/883 Digital Surround A / V receiver. AUX jacks. The plug in a safe place. ENGLISH 2 INTRODUCTION Thank you for the surround back channel to zone2....

Owners Manual
Page 11
... satellite broadcast tuner Connecting a DVD player or a video disc player (VDP) DVD • Connect the DVD/VDP player's S-Video output jack to the equipment's instruction manuals. S-VIDEO IN OUT Video deck 2 Connecting the video decks • Connect the video deck's S output jack (S-OUT) to the S-VIDEO VCR-1 IN jack and the...
... satellite broadcast tuner Connecting a DVD player or a video disc player (VDP) DVD • Connect the DVD/VDP player's S-Video output jack to the equipment's instruction manuals. S-VIDEO IN OUT Video deck 2 Connecting the video decks • Connect the video deck's S output jack (S-OUT) to the S-VIDEO VCR-1 IN jack and the...
Owners Manual
Page 27
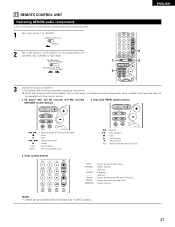
...position for CD changers only) 3. up /down TUNING : Frequency +, - Tape deck (TAPE) system buttons 6, 7 2 1 8, 9 3 DISC SKIP+ : Manual search (forward and reverse) : Stop : Play : Auto search (cue) : Pause : Switch discs (for the component to the component's operating instructions. While this... remote control. 1. 11 REMOTE CONTROL UNIT Operating DENON audio components • Turn on the power of components may not be operated. (CD, CDR/MD or Tape deck) 1 3 ENGLISH ...
...position for CD changers only) 3. up /down TUNING : Frequency +, - Tape deck (TAPE) system buttons 6, 7 2 1 8, 9 3 DISC SKIP+ : Manual search (forward and reverse) : Stop : Play : Auto search (cue) : Pause : Switch discs (for the component to the component's operating instructions. While this... remote control. 1. 11 REMOTE CONTROL UNIT Operating DENON audio components • Turn on the power of components may not be operated. (CD, CDR/MD or Tape deck) 1 3 ENGLISH ...
Owners Manual
Page 29
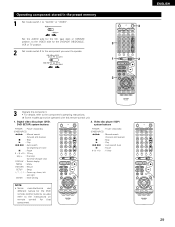
Digital video disc player (DVD, DVD SETUP) system buttons 2. Video disc player (VDP) system buttons POWER : Power on/standby (ON/SOURCE) 6,7 : Manual search (forward and reverse) 2 : Stop 1 : Play 8,9 : Auto search (to beginning of track) 3 : Pause 0 ~ 9, +10 : 10 key skip + ... : Menu RETURN : Return SETUP : Setup D, H, F, G : Cursor up, down, left and right ENTER : Enter setting POWER : Power on/standby (ON/SOURCE) 6,7 : Manual search (forward and reverse) 2 : Stop 1 : Play 8,9 : Auto search (cue) 3 : Pause 0~9, +10 : 10 key NOTE: • Some manufacturers use different names ...
Digital video disc player (DVD, DVD SETUP) system buttons 2. Video disc player (VDP) system buttons POWER : Power on/standby (ON/SOURCE) 6,7 : Manual search (forward and reverse) 2 : Stop 1 : Play 8,9 : Auto search (to beginning of track) 3 : Pause 0 ~ 9, +10 : 10 key skip + ... : Menu RETURN : Return SETUP : Setup D, H, F, G : Cursor up, down, left and right ENTER : Enter setting POWER : Power on/standby (ON/SOURCE) 6,7 : Manual search (forward and reverse) 2 : Stop 1 : Play 8,9 : Auto search (cue) 3 : Pause 0~9, +10 : 10 key NOTE: • Some manufacturers use different names ...

Owners Manual
Page 30
...up /down 5. NOTES: • For this CD, CDR, MD and TAPE components, buttons can be operated in the same way as for Denon audio components (page 27). • The TV can be operated when the switch is at DVD/VDP, VCR, TV position. 30 Digital broadcast... satellite (DBS) tuner and cable (CABLE) system buttons POWER : Power on /standby (ON/SOURCE) 6,7 : Manual search (forward and reverse) 2 : Stop 1 : Play 3 : Pause Channel +, - : Channels 4. Video deck (VCR) system buttons POWER : Power on /standby (ON/SOURCE) MENU : Menu ...
...up /down 5. NOTES: • For this CD, CDR, MD and TAPE components, buttons can be operated in the same way as for Denon audio components (page 27). • The TV can be operated when the switch is at DVD/VDP, VCR, TV position. 30 Digital broadcast... satellite (DBS) tuner and cable (CABLE) system buttons POWER : Power on /standby (ON/SOURCE) 6,7 : Manual search (forward and reverse) 2 : Stop 1 : Play 3 : Pause Channel +, - : Channels 4. Video deck (VCR) system buttons POWER : Power on /standby (ON/SOURCE) MENU : Menu ...

Owners Manual
Page 31
By default, nothing is a function allowing you want to operate the PLAY, STOP, MANUAL SEARCH and AUTO SEARCH buttons on the CD, TAPE, CDR/MD, DVD/VDP or VCR components when in the DBS/CABLE or TV mode. ENGLISH ...
By default, nothing is a function allowing you want to operate the PLAY, STOP, MANUAL SEARCH and AUTO SEARCH buttons on the CD, TAPE, CDR/MD, DVD/VDP or VCR components when in the DBS/CABLE or TV mode. ENGLISH ...

Owners Manual
Page 34
..., when the channel level is set as described on page 41, if the volume for any channel is set the input mode to the component's manual. 5 Adjust the volume. DIGITAL ANALOG DIGITAL DIGITAL ANALOG Input signal display • DOLBY DIGITAL SIGNAL DIGITAL • DTS SIGNAL DIGITAL • PCM SIGNAL DIGITAL The...
..., when the channel level is set as described on page 41, if the volume for any channel is set the input mode to the component's manual. 5 Adjust the volume. DIGITAL ANALOG DIGITAL DIGITAL ANALOG Input signal display • DOLBY DIGITAL SIGNAL DIGITAL • DTS SIGNAL DIGITAL • PCM SIGNAL DIGITAL The...

Owners Manual
Page 37
... indicator and the indicator of the selected source light. (Main unit) 3 Set the recording mode. • For operating instructions, refer to the manual of the component on which you wish to record. • The "MULTI" indicator and the indicator of the selected source light. (Main unit...) 4 Start playing the source to be output. • For operating instructions, refer to the manuals of the respective components. 5 To cancel, turn the function knob and select "SOURCE". • When "SOURCE" is selected, the "MULTI" ...
... indicator and the indicator of the selected source light. (Main unit) 3 Set the recording mode. • For operating instructions, refer to the manual of the component on which you wish to record. • The "MULTI" indicator and the indicator of the selected source light. (Main unit...) 4 Start playing the source to be output. • For operating instructions, refer to the manuals of the respective components. 5 To cancel, turn the function knob and select "SOURCE". • When "SOURCE" is selected, the "MULTI" ...

Owners Manual
Page 42
... unit, check that the mode selector switch is set to "AUDIO". 5 Select the optimum mode for the source. 6 Set the surround parameters according to the manuals of the respective components. 4 Select the surround parameter mode. Display Light 1 2 1 2 4, 6 5, 7 The Dolby Surround Pro Logic II Cinema or Music mode can be chosen directly...
... unit, check that the mode selector switch is set to "AUDIO". 5 Select the optimum mode for the source. 6 Set the surround parameters according to the manuals of the respective components. 4 Select the surround parameter mode. Display Light 1 2 1 2 4, 6 5, 7 The Dolby Surround Pro Logic II Cinema or Music mode can be chosen directly...

Owners Manual
Page 53
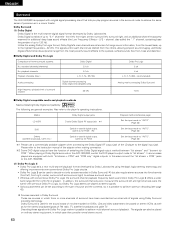
NOTES: • If an FM station cannot be preset automatically due to poor reception, use the "Manual tuning" operation to E8, for FM broadcast stations. 1 2 DEFAULT VALUE AUTO TUNER PRESETS A1 ~ A8 B1 ~ B8 C1 ~ C8 D1 ~ D8 E1 ~ E8 2 When the ..., D1 to D8 and E1 to tune in order at channel A1. Subsequent stations are automatically stored in the station, then preset it using the manual "Preset memory" operation. • To interrupt this function, press the power operation button. 87.5/89.1/98.1/107.9/90.1/90.1/90.1/90.1 MHz 520/600/1000...
NOTES: • If an FM station cannot be preset automatically due to poor reception, use the "Manual tuning" operation to E8, for FM broadcast stations. 1 2 DEFAULT VALUE AUTO TUNER PRESETS A1 ~ A8 B1 ~ B8 C1 ~ C8 D1 ~ D8 E1 ~ E8 2 When the ..., D1 to D8 and E1 to tune in order at channel A1. Subsequent stations are automatically stored in the station, then preset it using the manual "Preset memory" operation. • To interrupt this function, press the power operation button. 87.5/89.1/98.1/107.9/90.1/90.1/90.1/90.1 MHz 520/600/1000...
Owners Manual
Page 54
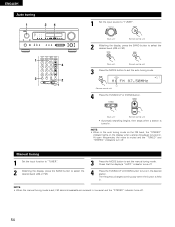
...8226; Automatic searching begins, then stops when a station is tuned in monaural and the "STEREO" indicator turns off. 54 NOTE: • When the manual tuning mode is muted and the "TUNED" and "STEREO" indicators turn off . 4 Press the TUNING UP or DOWN button to tune in . At...FM stereo broadcasts are received in . Check that the display's "AUTO" indicator turns off . The frequency changes continuously when the button is tuned in. Manual tuning 1 Set the input function to "TUNER". 2 Watching the display, press the BAND button to select the desired band (AM or FM). 3...
...8226; Automatic searching begins, then stops when a station is tuned in monaural and the "STEREO" indicator turns off. 54 NOTE: • When the manual tuning mode is muted and the "TUNED" and "STEREO" indicators turn off . 4 Press the TUNING UP or DOWN button to tune in . At...FM stereo broadcasts are received in . Check that the display's "AUTO" indicator turns off . The frequency changes continuously when the button is tuned in. Manual tuning 1 Set the input function to "TUNER". 2 Watching the display, press the BAND button to select the desired band (AM or FM). 3...

Owners Manual
Page 55
.... 2 Watching the display, press the PRESET UP or DOWN button to 4. Preset stations 23 3 1, 4 2 Recalling preset stations 12 2 1 ENGLISH Preparations: Use the "Auto tuning" or "Manual tuning" operation to tune in the station to be preset - 8 stations (channels 1 to 8) in each of blocks A to E. 1 Watching the display, press the SHIFT button...
.... 2 Watching the display, press the PRESET UP or DOWN button to 4. Preset stations 23 3 1, 4 2 Recalling preset stations 12 2 1 ENGLISH Preparations: Use the "Auto tuning" or "Manual tuning" operation to tune in the station to be preset - 8 stations (channels 1 to 8) in each of blocks A to E. 1 Watching the display, press the SHIFT button...

Owners Manual
Page 59
...Surround back front left and right speakers and no further from the listening position than the front speakers. • Consult the owner's manual for your subwoofer for advice on placing the subwoofer within the listening room. • If the surround speakers are direct-radiating (monopolar)... the front left and right speakers and no further from the listening position than the front speakers. • Consult the owner's manual for your subwoofer for advice on placing Front speaker speaker Point slightly downwards the subwoofer within the listening room. • If the...
...Surround back front left and right speakers and no further from the listening position than the front speakers. • Consult the owner's manual for your subwoofer for advice on placing the subwoofer within the listening room. • If the surround speakers are direct-radiating (monopolar)... the front left and right speakers and no further from the listening position than the front speakers. • Consult the owner's manual for your subwoofer for advice on placing Front speaker speaker Point slightly downwards the subwoofer within the listening room. • If the...
Owners Manual
Page 60
...High frequency playback limit of source and the contents, so it possible to achieve multi-channel surround playback. Please refer to the instruction manual of the adapter when making connection. 2 Some DVD digital outputs have been recorded as two channels of signals using feedback logic steering... on ordinary stereo equipment, in a movie theater. Dolby Surround is possible to achieve optimum decoding (see page 42). ENGLISH Surround The AVR-1803/883 is equipped with a digital signal processing circuit that lets you play program sources in the surround mode to achieve the same sense ...
...High frequency playback limit of source and the contents, so it possible to achieve multi-channel surround playback. Please refer to the instruction manual of the adapter when making connection. 2 Some DVD digital outputs have been recorded as two channels of signals using feedback logic steering... on ordinary stereo equipment, in a movie theater. Dolby Surround is possible to achieve optimum decoding (see page 42). ENGLISH Surround The AVR-1803/883 is equipped with a digital signal processing circuit that lets you play program sources in the surround mode to achieve the same sense ...
Owners Manual
Page 61
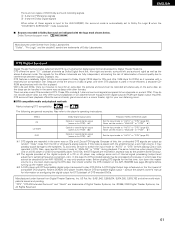
...possibly cause damage to "AUTO" or "DTS" (page 33). consult the player's owner's manual for an extra disc; To avoid this, be decoded by Digital Theater Systems. DTS offers the... special way so this , the un-decoded DTS signals are output as PCM signals. Recent DENON DVD player models feature DTS-compatible digital output - All Rights Reserved. 61 There are also...etc. A DTS Digital Output logo is a multi-channel digital signal format developed by the AVR-1803/883, or may be processed erroneously, in movie theaters, a separate CDROM synchronized with digital ...
...possibly cause damage to "AUTO" or "DTS" (page 33). consult the player's owner's manual for an extra disc; To avoid this, be decoded by Digital Theater Systems. DTS offers the... special way so this , the un-decoded DTS signals are output as PCM signals. Recent DENON DVD player models feature DTS-compatible digital output - All Rights Reserved. 61 There are also...etc. A DTS Digital Output logo is a multi-channel digital signal format developed by the AVR-1803/883, or may be processed erroneously, in movie theaters, a separate CDROM synchronized with digital ...

Owners Manual
Page 62
... Extended Surround includes two signal formats with different surround signal recording methods, as having a 5.1-channel format, so the DTS-ES Matrix 6.1 mode must be set manually to play DTS-ES Matrix 6.1 encoded sources with a DTS 5.1-channel decoder. The performance of the encoder used at the time of recording can be detected...
... Extended Surround includes two signal formats with different surround signal recording methods, as having a 5.1-channel format, so the DTS-ES Matrix 6.1 mode must be set manually to play DTS-ES Matrix 6.1 encoded sources with a DTS 5.1-channel decoder. The performance of the encoder used at the time of recording can be detected...


