
Owners Manual
Page 16
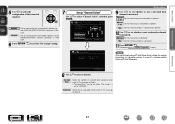
... channels are displayed. • The illustration below shows an example of 5.1-channel speaker playback. For settings other than 5.1-channel surround, select "Pre Assign" and perform step 4 to 11 of "Set up "Channel Select"" (vpage 41). • In STEP 2, you will perform measurements... of this unit. Retry Next Measure [ENTER] Enter [RETURN] Cancel NOTE If a connected speaker is displayed. vSee overleaf Information 13 MultEQ Pre Assign Channel Select Auto Setup Start [ENTER] Enter [RETURN] Cancel Here, we explain setup using the example of when the front speakers, center...
... channels are displayed. • The illustration below shows an example of 5.1-channel speaker playback. For settings other than 5.1-channel surround, select "Pre Assign" and perform step 4 to 11 of "Set up "Channel Select"" (vpage 41). • In STEP 2, you will perform measurements... of this unit. Retry Next Measure [ENTER] Enter [RETURN] Cancel NOTE If a connected speaker is displayed. vSee overleaf Information 13 MultEQ Pre Assign Channel Select Auto Setup Start [ENTER] Enter [RETURN] Cancel Here, we explain setup using the example of when the front speakers, center...

Owners Manual
Page 39
...each other (vpage 90 "Protection Circuit"). • Never touch the speaker terminals while the power supply is required for "Set up "Pre Assign"" (vpage 40). NOTE • A power amplifier (sold separately)". 7.1-channel (Surround back speaker) connection The illustration on the ...making connections.). • Use speakers with the speaker impedances shown below. To perform 7.1-channel playback using the surround back speakers, set "Pre Assign" to "NORMAL" in the Setup wizard screen for performing 7.1-channel playback using an HDMI cable (sold separately) is connected. Connect...
...each other (vpage 90 "Protection Circuit"). • Never touch the speaker terminals while the power supply is required for "Set up "Pre Assign"" (vpage 40). NOTE • A power amplifier (sold separately)". 7.1-channel (Surround back speaker) connection The illustration on the ...making connections.). • Use speakers with the speaker impedances shown below. To perform 7.1-channel playback using the surround back speakers, set "Pre Assign" to "NORMAL" in the Setup wizard screen for performing 7.1-channel playback using an HDMI cable (sold separately) is connected. Connect...

Owners Manual
Page 40
7.1-channel (Front height speaker) connection The illustration on the right shows a connection example for performing 7.1-channel playback using the front height speaker, set "Pre Assign" to "F.HEIGHT" in steps 3 and 4 for this connection. • For speaker cable connections, see C page 6 "Connecting the speakers". ... 7.1-channel playback using the front height speakers. NOTE • A power amplifier (sold separately) is required for "Set up "Pre Assign"" (vpage 40). Power amplifier L R IN RL FHL FL SW FHR FR C SL SR 37 Connect Information Advanced version Basic version
7.1-channel (Front height speaker) connection The illustration on the right shows a connection example for performing 7.1-channel playback using the front height speaker, set "Pre Assign" to "F.HEIGHT" in steps 3 and 4 for this connection. • For speaker cable connections, see C page 6 "Connecting the speakers". ... 7.1-channel playback using the front height speakers. NOTE • A power amplifier (sold separately) is required for "Set up "Pre Assign"" (vpage 40). Power amplifier L R IN RL FHL FL SW FHR FR C SL SR 37 Connect Information Advanced version Basic version

Owners Manual
Page 41
... settings in steps 3 and 4 for this case, see page 36. BACK/FRONT HEIGHT terminal. NOTE • A power amplifier (sold separately) is required for "Set up "Pre Assign"" (vpage 40). setting (vpage 59) to set "Pre Assign" to the "L" side of the SURR.
... settings in steps 3 and 4 for this case, see page 36. BACK/FRONT HEIGHT terminal. NOTE • A power amplifier (sold separately) is required for "Set up "Pre Assign"" (vpage 40). setting (vpage 59) to set "Pre Assign" to the "L" side of the SURR.

Owners Manual
Page 43
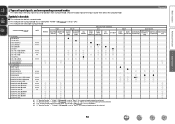
... can be reduced. First install and connect the speakers to be made. • Changing the amplifier assignment (Pre Assign) The signal output from the SURR.BACK/FRONT HEIGHT terminals on PRE OUT of the amplifier can also change the number of setting up speakers around items indicate the settings. Press...measurement, the settings shown below can be used (Channel Select) If channels that are set in advance, measurement for the set up "Pre Assign" Use ui to select "Pre Assign", and then press ENTER. Here we describe how to AMP- You can be used are not to this unit. Basic version...
... can be reduced. First install and connect the speakers to be made. • Changing the amplifier assignment (Pre Assign) The signal output from the SURR.BACK/FRONT HEIGHT terminals on PRE OUT of the amplifier can also change the number of setting up speakers around items indicate the settings. Press...measurement, the settings shown below can be used (Channel Select) If channels that are set in advance, measurement for the set up "Pre Assign" Use ui to select "Pre Assign", and then press ENTER. Here we describe how to AMP- You can be used are not to this unit. Basic version...
Owners Manual
Page 44
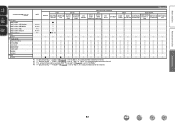
... Use ui to page 13 STEP1 Preparation step 6. Subwoofer Select for connecting the front height speakers to the SURR.BACK/FRONT HEIGHT connector in PRE OUT. In this case, go to be set to select a channel. Measure (2 sp) Set for no subwoofer to set whether or not... a surround back channel is set when "Pre Assign" is measured. Skip Set for measuring two surround back speakers. Audyssey Auto Setup Preparation Set the following items if necessary. Information BD 41...
... Use ui to page 13 STEP1 Preparation step 6. Subwoofer Select for connecting the front height speakers to the SURR.BACK/FRONT HEIGHT connector in PRE OUT. In this case, go to be set to select a channel. Measure (2 sp) Set for no subwoofer to set whether or not... a surround back channel is set when "Pre Assign" is measured. Skip Set for measuring two surround back speakers. Audyssey Auto Setup Preparation Set the following items if necessary. Information BD 41...

Owners Manual
Page 50
...setup item w List of currently selected setup subcategory Press i to switch.) e Selected setup item r Options of menu screen displays Typical examples are described below. u Pre Assign Channel Select Auto Setup Start i [ENTER] Enter [RETURN] Cancel t History icon y Operation guidance text u Illustration i Operation button guidance nnList Selected item &#... "System Setup" and then press p. (Or press ENTER.) System Setup Speaker Setup e HDMI Setup Audio Setup Option Setup Language Auto Setup Pre Assign Speaker Config. Bass Setting Distance r Channel Level Crossover Freq.
...setup item w List of currently selected setup subcategory Press i to switch.) e Selected setup item r Options of menu screen displays Typical examples are described below. u Pre Assign Channel Select Auto Setup Start i [ENTER] Enter [RETURN] Cancel t History icon y Operation guidance text u Illustration i Operation button guidance nnList Selected item &#... "System Setup" and then press p. (Or press ENTER.) System Setup Speaker Setup e HDMI Setup Audio Setup Option Setup Language Auto Setup Pre Assign Speaker Config. Bass Setting Distance r Channel Level Crossover Freq.

Owners Manual
Page 62
... Use a small speaker that can be set to "Large". • When "Surround" is other than "None", sound may not be switched in PRE OUT. OUT of surround back speakers. • Large : Use a large speaker that can be emitted from BACK/FRONT HEIGHT connector in accordance with ... back speaker. The signal output from the surround back speaker, depending on PRE BACK/FRONT HEIGHT connector in PRE OUT. the speaker environment. Center : Set the presence and size of a "Large". NOTE When "Pre Assign" setting (vpage 59) is not connected. Perform when setting the ...
... Use a small speaker that can be set to "Large". • When "Surround" is other than "None", sound may not be switched in PRE OUT. OUT of surround back speakers. • Large : Use a large speaker that can be emitted from BACK/FRONT HEIGHT connector in accordance with ... back speaker. The signal output from the surround back speaker, depending on PRE BACK/FRONT HEIGHT connector in PRE OUT. the speaker environment. Center : Set the presence and size of a "Large". NOTE When "Pre Assign" setting (vpage 59) is not connected. Perform when setting the ...

Owners Manual
Page 63
... Distance Set distance from the subwoofer. • "Subwoofer Mode" can make the "F.Height" setting. When you can be output from the subwoofers, depending on the "Pre Assign" (vpage 59) and "Speaker Config." (vpage 59) settings. • Default settings : Front L / Front R / Center / Subwoofer / F.Height L / F.Height R : 12.0 ft ... Mode" is added to the LFE signal output from listening position to less than 20.0 ft (6.00 m). NOTE When "Pre Assign" setting (vpage 59) is displayed. vSee overleaf Information BD 60 Basic version Advanced version Setting items Speaker Config. (...
... Distance Set distance from the subwoofer. • "Subwoofer Mode" can make the "F.Height" setting. When you can be output from the subwoofers, depending on the "Pre Assign" (vpage 59) and "Speaker Config." (vpage 59) settings. • Default settings : Front L / Front R / Center / Subwoofer / F.Height L / F.Height R : 12.0 ft ... Mode" is added to the LFE signal output from listening position to less than 20.0 ft (6.00 m). NOTE When "Pre Assign" setting (vpage 59) is displayed. vSee overleaf Information BD 60 Basic version Advanced version Setting items Speaker Config. (...

Owners Manual
Page 81
... 8) Remove the cap covering the connectors when you want to this jack, audio will no longer be output from the connected speakers or from the PRE OUT connectors. w Power indicator C 5) e Headphones jack (PHONES) When the headphones are plugged into this unit on and off (standby). Q6 Q5 Q4 Q3 Q2 Q1...
... 8) Remove the cap covering the connectors when you want to this jack, audio will no longer be output from the connected speakers or from the PRE OUT connectors. w Power indicator C 5) e Headphones jack (PHONES) When the headphones are plugged into this unit on and off (standby). Q6 Q5 Q4 Q3 Q2 Q1...

Owners Manual
Page 83
Electrostatic discharge may cause permanent damage to the unit. 80 Basic version Rear panel See the page indicated in parentheses ( ). o iu y Advanced version Information q w e r t q FM/AM antenna terminals 10) w Analog audio connectors 7, 8) e Speaker terminals C 6, 36, 37) r S-VIDEO/VIDEO connectors 7, 8, 9) t Power cord C 5) y HDMI connectors C 3, 6) u PRE OUT connectors C 6, 36, 37) i Digital audio connectors 7, 8) o DOCK CONTROL jack 9) NOTE Do not touch the inner pins of the connectors on the rear panel.
Electrostatic discharge may cause permanent damage to the unit. 80 Basic version Rear panel See the page indicated in parentheses ( ). o iu y Advanced version Information q w e r t q FM/AM antenna terminals 10) w Analog audio connectors 7, 8) e Speaker terminals C 6, 36, 37) r S-VIDEO/VIDEO connectors 7, 8, 9) t Power cord C 5) y HDMI connectors C 3, 6) u PRE OUT connectors C 6, 36, 37) i Digital audio connectors 7, 8) o DOCK CONTROL jack 9) NOTE Do not touch the inner pins of the connectors on the rear panel.
Owners Manual
Page 89
... Information nnTypes of the input source then select the surround mode. "S.Back" (vpage 59) is set to "None", this surround mode cannot be selected when "Pre Assign" (vpage 59) is set to "None", this surround mode cannot be selected. Surround Symbols in each surround mode.
... Information nnTypes of the input source then select the surround mode. "S.Back" (vpage 59) is set to "None", this surround mode cannot be selected when "Pre Assign" (vpage 59) is set to "None", this surround mode cannot be selected. Surround Symbols in each surround mode.
Owners Manual
Page 90
"S.Back" (vpage 59) is set to "1spkr" or "None", this surround mode cannot be selected. z3 This surround mode can be selected when "Pre Assign" (vpage 59) is set to "None", this surround mode cannot be selected. z4 If "Speaker Config." - z2 If "Speaker Config." - Information 87 "S.Back" (vpage ...
"S.Back" (vpage 59) is set to "1spkr" or "None", this surround mode cannot be selected. z3 This surround mode can be selected when "Pre Assign" (vpage 59) is set to "None", this surround mode cannot be selected. z4 If "Speaker Config." - z2 If "Speaker Config." - Information 87 "S.Back" (vpage ...
Owners Manual
Page 95
... selected. C 3, 6, 7, 8, 9, 10 • Check the speaker connections and configurations. "S.Back" on the menu to "ON". • Check if "Pre Assign" is produced from surround back speaker. "PLgz Height" on the menu to output audio from the front height speakers. • Set "Speaker Config." - Audyssey...the AM loop antenna from the unit. • Use an FM outdoor antenna. • Separate the antenna from the speakers 78 or the PRE OUT connectors when headphones are connected. • Check if the surround speakers are used . • Switch the surround mode to something other ...
... selected. C 3, 6, 7, 8, 9, 10 • Check the speaker connections and configurations. "S.Back" on the menu to "ON". • Check if "Pre Assign" is produced from surround back speaker. "PLgz Height" on the menu to output audio from the front height speakers. • Set "Speaker Config." - Audyssey...the AM loop antenna from the unit. • Use an FM outdoor antenna. • Separate the antenna from the speakers 78 or the PRE OUT connectors when headphones are connected. • Check if the surround speakers are used . • Switch the surround mode to something other ...
