
Literature/Product Sheet
Page 1
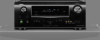
...system. High level resolution filters for satellite speakers and also subwoofer State-of-the-art Denon Solutions for Maximizing Content Quality • Stable power supply for high-quality sound and ...Amp Assign function, for system configuration flexibility, allowing surround back, front height effects, and 2nd zone multi-room configuration • Dock connectivity for iPod® and network streaming Ease-of-Use ... centerpiece of an exciting home theater system, the AVR-1611 is both fast and easy, thanks to Audyssey MultEQ automatic setup and room acoustic correction system. In addition to...
...system. High level resolution filters for satellite speakers and also subwoofer State-of-the-art Denon Solutions for Maximizing Content Quality • Stable power supply for high-quality sound and ...Amp Assign function, for system configuration flexibility, allowing surround back, front height effects, and 2nd zone multi-room configuration • Dock connectivity for iPod® and network streaming Ease-of-Use ... centerpiece of an exciting home theater system, the AVR-1611 is both fast and easy, thanks to Audyssey MultEQ automatic setup and room acoustic correction system. In addition to...

Owners Manual - English
Page 4
... Audio Adjust 43 Manual Setup 48 Information 55 Operating the connected devices by remote control unit 56 Operating AV equipment 56 Registering preset codes 56 Operating components 58 Specifying the zone used with the remote control unit...related information is described. Simple version Basic version ENGLISH Getting started 1 Accessories 1 About this DENON product. q Owner's manual 1 w Warranty (for North America model only 1 e Service network list 1 r Remote control unit (RC-1146 1 t R6/AA batteries 2 y Setup microphone (DM-A409, Cord length: Approx. 19.7 ft / 6.0 m 1 u AM...
... Audio Adjust 43 Manual Setup 48 Information 55 Operating the connected devices by remote control unit 56 Operating AV equipment 56 Registering preset codes 56 Operating components 58 Specifying the zone used with the remote control unit...related information is described. Simple version Basic version ENGLISH Getting started 1 Accessories 1 About this DENON product. q Owner's manual 1 w Warranty (for North America model only 1 e Service network list 1 r Remote control unit (RC-1146 1 t R6/AA batteries 2 y Setup microphone (DM-A409, Cord length: Approx. 19.7 ft / 6.0 m 1 u AM...

Owners Manual - English
Page 10
...: • Volume : "12 o'clock position" • Crossover frequency : "Maximum/Highest Frequency" • Low pass filter : "Off" • Standby mode : "Off" Press ZONE SELECT nn Set up the microphone Mount the setup microphone on a tripod or stand and place it in the main listening position. Press AMP Advanced version Information The "Simple version...
...: • Volume : "12 o'clock position" • Crossover frequency : "Maximum/Highest Frequency" • Low pass filter : "Off" • Standby mode : "Off" Press ZONE SELECT nn Set up the microphone Mount the setup microphone on a tripod or stand and place it in the main listening position. Press AMP Advanced version Information The "Simple version...

Owners Manual - English
Page 34
...ZONE SELECT nn Set up the operation mode Press AMP to set up speakers other than 5.1-channel speakers. Set for connecting the speakers for connecting a tweeter of the connected speakers. Set for ZONE2 to the SURR. In this case, go to step 5. 5 GWhen "Front B" is displayed. 3-1.Audyssey Auto Setup.... BACK/AMP ASSIGN terminals. B Select this unit. 1 Set up the remote control unit nn Set up speakers (Audyssey® Auto Setup)" (vpage 6). Simple version Basic version ENGLISH Set up speakers Here we describe how to set the remote control unit to amplifier operation mode...
...ZONE SELECT nn Set up the operation mode Press AMP to set up speakers other than 5.1-channel speakers. Set for connecting the speakers for connecting a tweeter of the connected speakers. Set for ZONE2 to the SURR. In this case, go to step 5. 5 GWhen "Front B" is displayed. 3-1.Audyssey Auto Setup.... BACK/AMP ASSIGN terminals. B Select this unit. 1 Set up the remote control unit nn Set up speakers (Audyssey® Auto Setup)" (vpage 6). Simple version Basic version ENGLISH Set up speakers Here we describe how to set the remote control unit to amplifier operation mode...

Owners Manual - English
Page 42
...that can be set the remote control unit to amplifier operation mode. 3 Press MENU. q Press uio p to use the unit. Input Setup Perform settings related to input source playback. • You do not have to change the settings to select "[ ]" or "[ ]". Menu operation 1 ...Press ZONE SELECT to switch the zone mode to the normal screen input method • [ENT] ENTER For inputting a selected character • [RTN] RETURN Canceling an input character Inputting...
...that can be set the remote control unit to amplifier operation mode. 3 Press MENU. q Press uio p to use the unit. Input Setup Perform settings related to input source playback. • You do not have to change the settings to select "[ ]" or "[ ]". Menu operation 1 ...Press ZONE SELECT to switch the zone mode to the normal screen input method • [ENT] ENTER For inputting a selected character • [RTN] RETURN Canceling an input character Inputting...
Owners Manual - English
Page 45
...is switched according to the input contents. • If a source is played in both MAIN ZONE (audio and video) and ZONE2 (audio only) modes in the same room, audio in MAIN ZONE and ZONE2 modes may sound out of synchronization, but this to change the component video input connectors ...source. PCM : Decode and play only DTS input signals. • This item can be assigned is displayed as an input source. ENGLISH Input Setup Setting items Component Set this is not malfunction. Yes : Reset to previous menu Setting details Source : Play the picture and sound of digital input...
...is switched according to the input contents. • If a source is played in both MAIN ZONE (audio and video) and ZONE2 (audio only) modes in the same room, audio in MAIN ZONE and ZONE2 modes may sound out of synchronization, but this to change the component video input connectors ...source. PCM : Decode and play only DTS input signals. • This item can be assigned is displayed as an input source. ENGLISH Input Setup Setting items Component Set this is not malfunction. Yes : Reset to previous menu Setting details Source : Play the picture and sound of digital input...

Owners Manual - English
Page 46
...For details on the signal being played is canceled. The menu display disappears. nn When DENON control dock for shuffle mode. Menu operation 1 Press ZONE SELECT to switch the zone mode to the default setting. Shuffle Make settings for iPod ASD-1R or ASD-11R is... "DOCK". OFF : Repeat playback mode is played repeatedly. nn When DENON control dock for which "HDMI" or "Digital" is returned to "MAIN". Default The input source name is assigned at "Input Assign" (vpage 41). Input Setup...
...For details on the signal being played is canceled. The menu display disappears. nn When DENON control dock for shuffle mode. Menu operation 1 Press ZONE SELECT to switch the zone mode to the default setting. Shuffle Make settings for iPod ASD-1R or ASD-11R is... "DOCK". OFF : Repeat playback mode is played repeatedly. nn When DENON control dock for which "HDMI" or "Digital" is returned to "MAIN". Default The input source name is assigned at "Input Assign" (vpage 41). Input Setup...

Owners Manual - English
Page 51
...Last Mute Lev. : Full [RTN]:Back [RTN]:Back [ENT]:Select [RTN]:Back Option Setup (vpage 53) 4-5.Option Setup 1.Volume Control 2.Source Delete 3.On-Screen Display 4.Remote Preset Codes 5.Quick Select Name 6.ZONE Rename 7.Display [ENT]:Select [RTN]:Back 48 Remote control operation buttons Move the cursor (...; If you change the speaker settings after performing Audyssey Auto Setup, it will not be possible to conditions near those of the original sound before compression. Menu operation 1 Press ZONE SELECT to switch the zone mode to obtain richer sound with compressed audio signals. The menu...
...Last Mute Lev. : Full [RTN]:Back [RTN]:Back [ENT]:Select [RTN]:Back Option Setup (vpage 53) 4-5.Option Setup 1.Volume Control 2.Source Delete 3.On-Screen Display 4.Remote Preset Codes 5.Quick Select Name 6.ZONE Rename 7.Display [ENT]:Select [RTN]:Back 48 Remote control operation buttons Move the cursor (...; If you change the speaker settings after performing Audyssey Auto Setup, it will not be possible to conditions near those of the original sound before compression. Menu operation 1 Press ZONE SELECT to switch the zone mode to obtain richer sound with compressed audio signals. The menu...
Owners Manual - English
Page 52
...you cannot make the "S.Back" setting. Setting details Normal : Set when using the surround back speakers with MAIN ZONE, change the speaker settings after performing Audyssey Auto Setup, it will not be possible to "Normal". ZONE2 : Set for connecting the speakers for ZONE2 to the SURR...for low frequencies. • None : Select when the surround back speakers are not connected. Setting items Speaker Config. (Continued) ENGLISH Manual Setup Setting details Surround : Set the presence and size of surround back speakers. • Large : Use a large speaker that can adequately play...
...you cannot make the "S.Back" setting. Setting details Normal : Set when using the surround back speakers with MAIN ZONE, change the speaker settings after performing Audyssey Auto Setup, it will not be possible to "Normal". ZONE2 : Set for connecting the speakers for ZONE2 to the SURR...for low frequencies. • None : Select when the surround back speakers are not connected. Setting items Speaker Config. (Continued) ENGLISH Manual Setup Setting details Surround : Set the presence and size of surround back speakers. • Large : Use a large speaker that can adequately play...

Owners Manual - English
Page 56
... is displayed. • OFF : Screensaver is located) volume setting. This is displayed from the last session 0) : Always use this source. Manual Setup Option Setup Default settings are underlined. Volume Limit : Make a setting for maximum volume. • OFF : Do not set a maximum volume. • -20dB... to "Delete" cannot be selected using SOURCE SELECT. Simple version Basic version ENGLISH ZONE2 Setup Default settings are underlined. Setting items Volume Control Set the MAIN ZONE (room where the unit is not activated. Setting details Volume Display : Set how volume...
... is displayed. • OFF : Screensaver is located) volume setting. This is displayed from the last session 0) : Always use this source. Manual Setup Option Setup Default settings are underlined. Volume Limit : Make a setting for maximum volume. • OFF : Do not set a maximum volume. • -20dB... to "Delete" cannot be selected using SOURCE SELECT. Simple version Basic version ENGLISH ZONE2 Setup Default settings are underlined. Setting items Volume Control Set the MAIN ZONE (room where the unit is not activated. Setting details Volume Display : Set how volume...
Owners Manual - English
Page 57
...Listen to "Top". Display Adjust the display brightness of • For character input, see page 38. Dim : Reduced display brightness. NOTE When "Setup Lock" is "TUNER". • Always : Show display continuously. • 30sec : Show display for 30 seconds after operation. • 10sec ...press ENTER. 2. Change the display title of this to previous menu Also, "SETUP LOCKED!" Setting items Setting details Zone Rename • Up to select "Template", then press ENTER. 3. Bright Dim Setup Lock Protect settings from the previously set to "ON", the settings listed below ...
...Listen to "Top". Display Adjust the display brightness of • For character input, see page 38. Dim : Reduced display brightness. NOTE When "Setup Lock" is "TUNER". • Always : Show display continuously. • 30sec : Show display for 30 seconds after operation. • 10sec ...press ENTER. 2. Change the display title of this to previous menu Also, "SETUP LOCKED!" Setting items Setting details Zone Rename • Up to select "Template", then press ENTER. 3. Bright Dim Setup Lock Protect settings from the previously set to "ON", the settings listed below ...

Owners Manual - English
Page 59
...• For turning power in the included remote control unit, it can be used . e MENU, SETUP, TOP MENU For displaying the menu of the remote control unit is switched. • For details, refer to the operating zone lights. • The mode switches each input source button as shown in MAIN...Not used. • If setting of the remote control unit is set top box Motorola 01376 DVD player DENON z Control dock for iPod DENON 32134 42517 zzIf a control dock for each time ZONE SELECT is not to be preset in the remote control unit enables you have, such as the Play button...
...• For turning power in the included remote control unit, it can be used . e MENU, SETUP, TOP MENU For displaying the menu of the remote control unit is switched. • For details, refer to the operating zone lights. • The mode switches each input source button as shown in MAIN...Not used. • If setting of the remote control unit is set top box Motorola 01376 DVD player DENON z Control dock for iPod DENON 32134 42517 zzIf a control dock for each time ZONE SELECT is not to be preset in the remote control unit enables you have, such as the Play button...

Owners Manual - English
Page 60
...operating, press QUICK SELECT 2. Category :DVD Brand :DENON Code[1/3]:30490 Setup Remote 1.Press [Source]button. 2.Press and Hold 3sec. The zone mode indicator flashes twice. 11 Enter a five-digit code using 0 - 9. Category :DVD Brand :DENON Code[1/3]:30490 Setup Remote 1.Press [Source]button. 2.Press and Hold...unit's CH + or CH -. "Remote Preset Codes" and then press ENTER. 4-5.Option Setup 1.Volume Control 2.Source Delete 3.On-Screen Display 4.Remote Preset Codes 5.Quick Select Name 6.Zone Rename 7.Display [ENT]:Select [RTN]:Back 5 Pressing ui, select the category of the brand...
...operating, press QUICK SELECT 2. Category :DVD Brand :DENON Code[1/3]:30490 Setup Remote 1.Press [Source]button. 2.Press and Hold 3sec. The zone mode indicator flashes twice. 11 Enter a five-digit code using 0 - 9. Category :DVD Brand :DENON Code[1/3]:30490 Setup Remote 1.Press [Source]button. 2.Press and Hold...unit's CH + or CH -. "Remote Preset Codes" and then press ENTER. 4-5.Option Setup 1.Volume Control 2.Source Delete 3.On-Screen Display 4.Remote Preset Codes 5.Quick Select Name 6.Zone Rename 7.Display [ENT]:Select [RTN]:Back 5 Pressing ui, select the category of the brand...

Owners Manual - English
Page 61
...(Default : SONY) Switch TV input (Default : SONY) nnDigital video recorder (PVR) / video cassette recorder (VCR) operation Operation buttons ZONE/DEVICE ON ZONE/DEVICE OFF CH +, - MENU TOP MENU uio p ENTER SETUP RETURN 6 7 1 8 9 3 2 0 - 9, +10 TV POWER TV INPUT Function Power onz Power standbyz Switch channels (up... /down ) (Popup) Menu Top menu Cursor operation Enter setting Setup Return Manual search (fast-reverse/fast-forward) ...
...(Default : SONY) Switch TV input (Default : SONY) nnDigital video recorder (PVR) / video cassette recorder (VCR) operation Operation buttons ZONE/DEVICE ON ZONE/DEVICE OFF CH +, - MENU TOP MENU uio p ENTER SETUP RETURN 6 7 1 8 9 3 2 0 - 9, +10 TV POWER TV INPUT Function Power onz Power standbyz Switch channels (up... /down ) (Popup) Menu Top menu Cursor operation Enter setting Setup Return Manual search (fast-reverse/fast-forward) ...

Owners Manual - English
Page 62
... button is pressed, only the set . "MAIN" indicator flashes four times. Simple version Basic version Operating components nnTV operation Operation buttons ZONE/DEVICE ON ZONE/DEVICE OFF CH +, - MENU uio p ENTER SETUP RETURN 6 7 1 8 9 3 2 0 - 9, +10 TV POWER TV INPUT Function Power onz Power standbyz Switch channels (up /down ) Menu Cursor operation Enter setting Guide...
... button is pressed, only the set . "MAIN" indicator flashes four times. Simple version Basic version Operating components nnTV operation Operation buttons ZONE/DEVICE ON ZONE/DEVICE OFF CH +, - MENU uio p ENTER SETUP RETURN 6 7 1 8 9 3 2 0 - 9, +10 TV POWER TV INPUT Function Power onz Power standbyz Switch channels (up /down ) Menu Cursor operation Enter setting Guide...

Owners Manual - English
Page 77
...22 vvL Level Lch 53 Level Rch 53 LFE 44, 70 Listening mode 24 Listening position 7 vvM MAIN ZONE 34, 70 Manual EQ 47 Manual Setup 48 Master volume display 54 Menu map 36 74 Mode 44 MP3 70 MPEG 70 MultEQ 46 Mute Level... vvO On-Screen Display 53 Optical cable 16 Option Setup 53 Display 54 On-Screen Display 53 Quick Select Name 54 Remote Preset Codes 54 Setup Lock 54 Source Delete 53 Volume Control 53 Zone Rename 54 vvP Panorama 44 Parameter Check 10 Playback ...Control 53 Volume Limit 53 vvW WMA 70 vvX x.v.Color 70 vvZ ZONE2 34, 61, 70 ZONE2 Setup 53 Zone Rename 54
...22 vvL Level Lch 53 Level Rch 53 LFE 44, 70 Listening mode 24 Listening position 7 vvM MAIN ZONE 34, 70 Manual EQ 47 Manual Setup 48 Master volume display 54 Menu map 36 74 Mode 44 MP3 70 MPEG 70 MultEQ 46 Mute Level... vvO On-Screen Display 53 Optical cable 16 Option Setup 53 Display 54 On-Screen Display 53 Quick Select Name 54 Remote Preset Codes 54 Setup Lock 54 Source Delete 53 Volume Control 53 Zone Rename 54 vvP Panorama 44 Parameter Check 10 Playback ...Control 53 Volume Limit 53 vvW WMA 70 vvX x.v.Color 70 vvZ ZONE2 34, 61, 70 ZONE2 Setup 53 Zone Rename 54


