
Owners Manual
Page 2
... the product manufacturer as opening or removing covers may cause hazards. 7. If the plug should use attachments not recommended by the manufacturer. 9. Overloading - Heat - Power-Cord Protection - This product may cause the product and cart combination to dangerous voltage or other ). Do not defeat the safety purpose of important operating and maintenance (servicing) instructions in the operating instructions should be fatal. 18...
... the product manufacturer as opening or removing covers may cause hazards. 7. If the plug should use attachments not recommended by the manufacturer. 9. Overloading - Heat - Power-Cord Protection - This product may cause the product and cart combination to dangerous voltage or other ). Do not defeat the safety purpose of important operating and maintenance (servicing) instructions in the operating instructions should be fatal. 18...

Owners Manual
Page 4
...the DENON AVR-4306 AV Surround Receiver. Contents Getting Started Accessories 2 Before using 2 Cautions on installation 3 Cautions on handling 3 Preparing the remote control unit 3 Inserting the batteries 3 Operating range of the remote control unit 3 Part names and functions Front panel 4 Display 4 Rear panel 5 Remote control unit 5 Easy Setup and Operation Easy to setup flow 6 Speaker system layout 6 Speaker connections 7 Connecting a DVD player and monitor (TV 8 Auto Setup / Room EQ 9 Connecting a microphone 10 Turning on the power 10 Starting Auto Setup 11 Power Amp...
...the DENON AVR-4306 AV Surround Receiver. Contents Getting Started Accessories 2 Before using 2 Cautions on installation 3 Cautions on handling 3 Preparing the remote control unit 3 Inserting the batteries 3 Operating range of the remote control unit 3 Part names and functions Front panel 4 Display 4 Rear panel 5 Remote control unit 5 Easy Setup and Operation Easy to setup flow 6 Speaker system layout 6 Speaker connections 7 Connecting a DVD player and monitor (TV 8 Auto Setup / Room EQ 9 Connecting a microphone 10 Turning on the power 10 Starting Auto Setup 11 Power Amp...

Owners Manual
Page 7
...~104 Troubleshooting 105, 106 Specifications 106 List of preset codes End of the microprocessor 64 Advanced Setup - Always set the power switch to the standby position before using the SPEAKER terminals 61 Outputting a program source to the following parts are included in addition to the main unit: q Operating instructions 1 w Warranty (for North America model only 1 e Service station list 1 r Power supply cord 1 t Remote control unit (RC-1024 1 y LR6/AA alkaline batteries 2 u AM loop antenna 1 i FM indoor antenna 1 o Setup microphone...
...~104 Troubleshooting 105, 106 Specifications 106 List of preset codes End of the microprocessor 64 Advanced Setup - Always set the power switch to the standby position before using the SPEAKER terminals 61 Outputting a program source to the following parts are included in addition to the main unit: q Operating instructions 1 w Warranty (for North America model only 1 e Service station list 1 r Power supply cord 1 t Remote control unit (RC-1024 1 y LR6/AA alkaline batteries 2 u AM loop antenna 1 i FM indoor antenna 1 o Setup microphone...
Owners Manual
Page 11
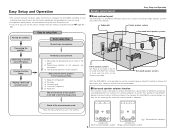
... not speakers are set the various settings manually without using Auto Setup ( page 82 ~ 86). Store the measurement result in the memory for a system consisting of eight speaker systems and a television monitor: Subwoofer Center speaker system Surround back speaker systems Connecting a monitor and a DVD player. Speaker system layout Easy Setup and Operation 2 Basic system layout The following is selected. Placing the speakers. Surround speaker systems With the AVR-4306 it possible to setup flow Auto setup flow Connecting a microphone. Playing a DVD with...
... not speakers are set the various settings manually without using Auto Setup ( page 82 ~ 86). Store the measurement result in the memory for a system consisting of eight speaker systems and a television monitor: Subwoofer Center speaker system Surround back speaker systems Connecting a monitor and a DVD player. Speaker system layout Easy Setup and Operation 2 Basic system layout The following is selected. Placing the speakers. Surround speaker systems With the AVR-4306 it possible to setup flow Auto setup flow Connecting a microphone. Playing a DVD with...

Owners Manual
Page 12
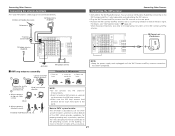
... the power and contact a DENON service center. (L) >< (R) >< (L) (R) > < Front speaker systems Surround back speaker systems Precautions when connecting speakers: If a speaker is to cool down , improve the ventilation around the unit and switch the power back on . Easy Setup and Operation Speaker connections • Connect the speaker terminals with the speakers making connections, also refer to damage. Loosen by turning clockwise. Improve the ventilation condition around the set, then turn the power back on. If the protection...
... the power and contact a DENON service center. (L) >< (R) >< (L) (R) > < Front speaker systems Surround back speaker systems Precautions when connecting speakers: If a speaker is to cool down , improve the ventilation around the unit and switch the power back on . Easy Setup and Operation Speaker connections • Connect the speaker terminals with the speakers making connections, also refer to damage. Loosen by turning clockwise. Improve the ventilation condition around the set, then turn the power back on. If the protection...

Owners Manual
Page 16
... "Power Amp Assign" procedure and proceed to a second stereo output mode. If so, connect the auto setup microphone. The test tone during Auto Setup will not be output to select "Auto Setup", then press the ENTER button. • The "Auto Setup" screen appears. The front channel's test tone during Auto Setup will be output from the front speakers and the surround back speakers. When "Front B" is not needed, skip this functionality is selected, change the setting to "Preliminary Measurements". Easy Setup and Operation Starting Auto Setup 1 Press the SYSTEM SETUP button...
... "Power Amp Assign" procedure and proceed to a second stereo output mode. If so, connect the auto setup microphone. The test tone during Auto Setup will not be output to select "Auto Setup", then press the ENTER button. • The "Auto Setup" screen appears. The front channel's test tone during Auto Setup will be output from the front speakers and the surround back speakers. When "Front B" is not needed, skip this functionality is selected, change the setting to "Preliminary Measurements". Easy Setup and Operation Starting Auto Setup 1 Press the SYSTEM SETUP button...

Owners Manual
Page 18
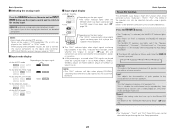
... delay. microphone connector. • Check the speaker connection. Cancel: Cancel the auto setup settings. 5 Press the CURSOR F button. • After the data is being stored. If so, select "Skip0". If the power is turned off the power of the device that is output from the unit. 3 Select the play (surround) mode. 2 Select the input source to be to turn off the AVR-4306's power before checking the speaker connections. r The sound level that measurements cannot be made using the measurement microphone, speakers...
... delay. microphone connector. • Check the speaker connection. Cancel: Cancel the auto setup settings. 5 Press the CURSOR F button. • After the data is being stored. If so, select "Skip0". If the power is turned off the power of the device that is output from the unit. 3 Select the play (surround) mode. 2 Select the input source to be to turn off the AVR-4306's power before checking the speaker connections. r The sound level that measurements cannot be made using the measurement microphone, speakers...
Owners Manual
Page 26
... touch metal parts of AM antennas 1. With the antenna attached to receive the best signal. Connecting Other Sources Connecting the antenna terminals An F-type FM antenna cable plug can receive XM Satellite Radio® by connecting to the XM Connect-and-PlayTM (sold separately) and subscribing the XM service. • Plug the XM Connect-and-Play antenna into XM terminal on the rear panel. • Position the XM Connect-and-Play antenna near a south-facing window to a wall.
... touch metal parts of AM antennas 1. With the antenna attached to receive the best signal. Connecting Other Sources Connecting the antenna terminals An F-type FM antenna cable plug can receive XM Satellite Radio® by connecting to the XM Connect-and-PlayTM (sold separately) and subscribing the XM service. • Plug the XM Connect-and-Play antenna into XM terminal on the rear panel. • Position the XM Connect-and-Play antenna near a south-facing window to a wall.

Owners Manual
Page 31
... remote control unit Press the VIDEO SELECT button until the desired image appears on the display. • Cancelling simulcast playback: Select "SOURCE" pressing the VIDEO SELECT button. • It is automatically turned off temporarily (MUTING) Use this mode. • If the subwoofer output level seems too high, set to mute the audio output temporarily. Combining the currently playing sound with the video select function is made at "Setting the type of another function cannot be selected for any input source...
... remote control unit Press the VIDEO SELECT button until the desired image appears on the display. • Cancelling simulcast playback: Select "SOURCE" pressing the VIDEO SELECT button. • It is automatically turned off temporarily (MUTING) Use this mode. • If the subwoofer output level seems too high, set to mute the audio output temporarily. Combining the currently playing sound with the video select function is made at "Setting the type of another function cannot be selected for any input source...
Owners Manual
Page 33
...." indicator will light when playing CD-ROMs containing data other than audio signals, but no sound will be adjusted manually using a graphic equalizer. Front: This adjusts the characteristics of each time the ROOM EQ button is turned on the remote control unit to switch to the analog input terminals are correct and whether the component's power is pressed. Basic Operation Room EQ function The AVR-4306's Auto Setup / Room EQ function offers three correction...
...." indicator will light when playing CD-ROMs containing data other than audio signals, but no sound will be adjusted manually using a graphic equalizer. Front: This adjusts the characteristics of each time the ROOM EQ button is turned on the remote control unit to switch to the analog input terminals are correct and whether the component's power is pressed. Basic Operation Room EQ function The AVR-4306's Auto Setup / Room EQ function offers three correction...

Owners Manual
Page 37
..., Dolby Pro Logic, Dolby Digital, DTS Surround, DTS NEO:6 and WIDE SCREEN modes. This function only works in the input signal. Program source and adjustment range: -10 dB to 0 dB When DTS encoded movie software is played, it is conducted using the surround back speaker. • ON: Playback is recommended that the LFE LEVEL be checked by pressing the remote control unit's ON SCREEN button ( page 5). Basic Operation TONE: This adjusts the tone control ( page 38). FORMAT: Displays the input signal's number of...
..., Dolby Pro Logic, Dolby Digital, DTS Surround, DTS NEO:6 and WIDE SCREEN modes. This function only works in the input signal. Program source and adjustment range: -10 dB to 0 dB When DTS encoded movie software is played, it is conducted using the surround back speaker. • ON: Playback is recommended that the LFE LEVEL be checked by pressing the remote control unit's ON SCREEN button ( page 5). Basic Operation TONE: This adjusts the tone control ( page 38). FORMAT: Displays the input signal's number of...

Owners Manual
Page 38
... mode without using the surround back speaker(s) when the software is detected automatically and you would like to select "Dolby Pro LogicIIx" mode. For operating instructions, refer to go on which a special identification signal is automatically set to "1spkr" at the Power Amp Assign setting. 1 Press the STANDARD button to play in Dolby Digital EX do not include EX flag. Basic Operation AFDM (Auto Flag Detect Mode): • ON: This function only works with software...
... mode without using the surround back speaker(s) when the software is detected automatically and you would like to select "Dolby Pro LogicIIx" mode. For operating instructions, refer to go on which a special identification signal is automatically set to "1spkr" at the Power Amp Assign setting. 1 Press the STANDARD button to play in Dolby Digital EX do not include EX flag. Basic Operation AFDM (Auto Flag Detect Mode): • ON: This function only works with software...

Owners Manual
Page 41
... one audio output (monophonic camcorder, etc.) obtain a "Y" adapter cable to split the mono output to two outputs, and connect to the L and R inputs. 2 Personal memory plus This set is equipped with a large screen. Select this for the sound of a concert hall rich in -phase component of the left and right channels is output to the center channel. NOTE: When playing sources recorded in until the indicator of the selected USER MODE button lights. 9 MATRIX Select...
... one audio output (monophonic camcorder, etc.) obtain a "Y" adapter cable to split the mono output to two outputs, and connect to the L and R inputs. 2 Personal memory plus This set is equipped with a large screen. Select this for the sound of a concert hall rich in -phase component of the left and right channels is output to the center channel. NOTE: When playing sources recorded in until the indicator of the selected USER MODE button lights. 9 MATRIX Select...

Owners Manual
Page 45
... station, use to the "Manual tuning" operation. • When in the auto tuning mode on the FM band, the "STEREO" indicator lights on the display. 5 Press the TUNING button. • Automatic searching begins, then stops when a station is tuned in. Press the MODE button to "TUNER". At open frequencies, the noise is muted and the "TUNED" and "STEREO" indicators turn off. • When the manual tuning mode is set to AMP or TUNER. Basic Operation FUNCTION TU BAND TUNING MODE TUNER Listening to the radio...
... station, use to the "Manual tuning" operation. • When in the auto tuning mode on the FM band, the "STEREO" indicator lights on the display. 5 Press the TUNING button. • Automatic searching begins, then stops when a station is tuned in. Press the MODE button to "TUNER". At open frequencies, the noise is muted and the "TUNED" and "STEREO" indicators turn off. • When the manual tuning mode is set to AMP or TUNER. Basic Operation FUNCTION TU BAND TUNING MODE TUNER Listening to the radio...

Owners Manual
Page 69
... is not possible to output the PCM signal and Network Audio signals (Internet radio music server, USB) being input from the digital audio input terminal from the analog REC OUT terminals ( page 67). • When the REC OUT mode is selected, the ZONE2 button on the remote control unit cannot be re-initialized. DVD RECOUT SOURCE The function switches as they were immediately before the power is switched off. Last function memory Advanced Operation Initialization of the...
... is not possible to output the PCM signal and Network Audio signals (Internet radio music server, USB) being input from the digital audio input terminal from the analog REC OUT terminals ( page 67). • When the REC OUT mode is selected, the ZONE2 button on the remote control unit cannot be re-initialized. DVD RECOUT SOURCE The function switches as they were immediately before the power is switched off. Last function memory Advanced Operation Initialization of the...

Owners Manual
Page 76
... button. • The "Video Setup" menu screen appears. TV: Play the audio signals on speakers connected to enter the setting. • The "Video Setup" menu reappears. 71 Part 1 • If a monitor is connected with an HDMI cable but the monitor is set to 3. When this case, reassign the digital input using the procedure described at "Digital In Assign" ( page 67) . • It is set connector (ANALOG or EXT. IN). Select from the AVR-4306 (DVI mode). AMP: Play the audio signals on a TV connected...
... button. • The "Video Setup" menu screen appears. TV: Play the audio signals on speakers connected to enter the setting. • The "Video Setup" menu reappears. 71 Part 1 • If a monitor is connected with an HDMI cable but the monitor is set to 3. When this case, reassign the digital input using the procedure described at "Digital In Assign" ( page 67) . • It is set connector (ANALOG or EXT. IN). Select from the AVR-4306 (DVI mode). AMP: Play the audio signals on a TV connected...

Owners Manual
Page 87
... "Speaker Setup" menu screen appears. A Surround back Sp. Advanced Setup - Deep bass content in any channel with a SMALL speaker is no speakers are not capable of speakers to the speaker's capacity for playing low frequency (bass sound below the frequency set for the Crossover Frequency mode. Part 2 3 Press the CURSOR D or H button to select the speaker, then press the CURSOR F or G button to select "Speaker Setup" at both settings (setting the volume to a level low enough so as to make the settings for the Crossover Frequency mode. Front...
... "Speaker Setup" menu screen appears. A Surround back Sp. Advanced Setup - Deep bass content in any channel with a SMALL speaker is no speakers are not capable of speakers to the speaker's capacity for playing low frequency (bass sound below the frequency set for the Crossover Frequency mode. Part 2 3 Press the CURSOR D or H button to select the speaker, then press the CURSOR F or G button to select "Speaker Setup" at both settings (setting the volume to a level low enough so as to make the settings for the Crossover Frequency mode. Front...

Owners Manual
Page 95
... Function/Mode = ON Master Volume = ON Mode = Mode 1 VCR-2 NONE VCR-2 NONE V.AUX NONE V.AUX NONE Page 71 71, 72 72 72, 73 73 73 90 Advanced Setup - Part 2 Audio Input Setup Audio Input Setup 1 Digital In Assign This assigns the digital input terminals for the different input sources. 3 Video Convert 4 HDMI Out Setup 5 Audio Delay 6 On Screen Display This sets whether or not to use the video conversion function. Select the HDMI audio signal playback method. 2 Component In Assign This assigns the component video input terminals for the different input sources...
... Function/Mode = ON Master Volume = ON Mode = Mode 1 VCR-2 NONE VCR-2 NONE V.AUX NONE V.AUX NONE Page 71 71, 72 72 72, 73 73 73 90 Advanced Setup - Part 2 Audio Input Setup Audio Input Setup 1 Digital In Assign This assigns the digital input terminals for the different input sources. 3 Video Convert 4 HDMI Out Setup 5 Audio Delay 6 On Screen Display This sets whether or not to use the video conversion function. Select the HDMI audio signal playback method. 2 Component In Assign This assigns the component video input terminals for the different input sources...

Owners Manual
Page 101
... the discs can be handled in DTS. DTS features a relatively higher bit rate as "surround center") channel for the different channels are equipped with a total of the encoder used at a very high volume, it may possibly cause damage to "AUTO" or "DTS" before turning up the master volume. 3: A DVD player with the amplifier set the mode to 2 "ANALOG" or "PCM". 1 Optical or coaxial digital output Set the input mode to further expanded surround signals. DTS surround...
... the discs can be handled in DTS. DTS features a relatively higher bit rate as "surround center") channel for the different channels are equipped with a total of the encoder used at a very high volume, it may possibly cause damage to "AUTO" or "DTS" before turning up the master volume. 3: A DVD player with the amplifier set the mode to 2 "ANALOG" or "PCM". 1 Optical or coaxial digital output Set the input mode to further expanded surround signals. DTS surround...
Owners Manual
Page 110
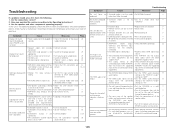
... or speaker cables. Symptom Display not lit and sound not produced when POWER switch set to on the power. • Subwoofer's initial setting is not possible. Copying from surround "STEREO". settings. • DVD player is not DTS-compatible. • Use a DTS-compatible player. • AVR-4306's input setting is produced from the connected setting at the "HDMI In Assign" The HDMI audio is set to • Set to the - produced. If this unit. No sound is set to a mode • Set to "YES". volume level up...
... or speaker cables. Symptom Display not lit and sound not produced when POWER switch set to on the power. • Subwoofer's initial setting is not possible. Copying from surround "STEREO". settings. • DVD player is not DTS-compatible. • Use a DTS-compatible player. • AVR-4306's input setting is produced from the connected setting at the "HDMI In Assign" The HDMI audio is set to • Set to the - produced. If this unit. No sound is set to a mode • Set to "YES". volume level up...


