
Owners Manual
Page 2
... expressly approved by DENON may be determined by turning the product OFF and ON, the user is intended to alert the user to constitute a risk of the FCC Rules. If this manual, meets FCC requirements. This product generates, uses and can be of sufficient magnitude to the presence of important operating and maintenance (servicing) instructions in a residential installation. ENGLISH FRANCAIS...
... expressly approved by DENON may be determined by turning the product OFF and ON, the user is intended to alert the user to constitute a risk of the FCC Rules. If this manual, meets FCC requirements. This product generates, uses and can be of sufficient magnitude to the presence of important operating and maintenance (servicing) instructions in a residential installation. ENGLISH FRANCAIS...
Owners Manual
Page 3
... the following the operating instructions. Accessories - Quick stops, excessive force, and uneven surfaces may be sure the service technician has used replacement parts specified by the manufacturer or have fallen into the power outlet only one blade wider than the other sources, refer to overturn. 10. Power-supply cords should be walked on the marking label. Adjust only those controls that are covered...
... the following the operating instructions. Accessories - Quick stops, excessive force, and uneven surfaces may be sure the service technician has used replacement parts specified by the manufacturer or have fallen into the power outlet only one blade wider than the other sources, refer to overturn. 10. Power-supply cords should be walked on the marking label. Adjust only those controls that are covered...
Owners Manual
Page 4
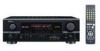
... you review the contents of Preset Codes 138 ~ 142 2 ACCESSORIES Check that you for choosing the DENON AVR-1905/785 Digital A / V Surround Receiver. As this manual before you begin hookup and operation that the following parts are included in addition to the main unit: q Operating instructions 1 w Warranty 1 e Service station list 1 r Remote control unit (RC-978 1 t R6P/AA batteries 2 y AM loop antenna 1 u FM indoor antenna 1 r t y u 4 Remote Control Unit 31 ~ 35 ⁄0 Operation 36 ~ 41 ⁄1 Multi Zone...
... you review the contents of Preset Codes 138 ~ 142 2 ACCESSORIES Check that you for choosing the DENON AVR-1905/785 Digital A / V Surround Receiver. As this manual before you begin hookup and operation that the following parts are included in addition to the main unit: q Operating instructions 1 w Warranty 1 e Service station list 1 r Remote control unit (RC-978 1 t R6P/AA batteries 2 y AM loop antenna 1 u FM indoor antenna 1 r t y u 4 Remote Control Unit 31 ~ 35 ⁄0 Operation 36 ~ 41 ⁄1 Multi Zone...
Owners Manual
Page 5
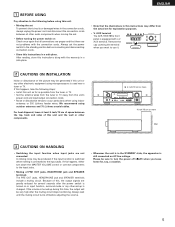
... damaged wires in the STANDBY state, the apparatus is still connected on or input function, surround mode or any other -set the power switch to the standby position before using microprocessors is used near a tuner or TV. AUX terminal The AVR-1905/785's front panel is equipped with the warranty in a safe place. • Note that there are not problems with the connection cords. If the volume is turned up is changed. ENGLISH 1 BEFORE USING...
... damaged wires in the STANDBY state, the apparatus is still connected on or input function, surround mode or any other -set the power switch to the standby position before using microprocessors is used near a tuner or TV. AUX terminal The AVR-1905/785's front panel is equipped with the warranty in a safe place. • Note that there are not problems with the connection cords. If the volume is turned up is changed. ENGLISH 1 BEFORE USING...
Owners Manual
Page 6
... 1. Dolby Digital Using advanced digital processing algorithms, Dolby Digital provides up to 5.1 channels of wide-range, high fidelity surround sound, from sources such as adjusting the delay time and other equipment. 10.Video Conversion Function The AVR-1905/785 is best suited for playing music,the Cinema mode for playing movies, and the Game mode for DVD and North American DTV. 2. The Music mode is equipped with a function for an input signal in DTS 96/24, a multi-channel digital signal format developed by Digital Theater Systems...
... 1. Dolby Digital Using advanced digital processing algorithms, Dolby Digital provides up to 5.1 channels of wide-range, high fidelity surround sound, from sources such as adjusting the delay time and other equipment. 10.Video Conversion Function The AVR-1905/785 is best suited for playing music,the Cinema mode for playing movies, and the Game mode for DVD and North American DTV. 2. The Music mode is equipped with a function for an input signal in DTS 96/24, a multi-channel digital signal format developed by Digital Theater Systems...

Owners Manual
Page 7
... speaker, connect the speaker to SURR. B INPUT OUTPUT OPTICAL MD recorder, CD recorder or other electrical appliances. 7 Connecting the audio components • When making connections, also refer to the operating instructions of the front, center and surround sound channels, or for connection to powered loudspeakers. AC CORD AC 120 V, 60 Hz R L R L OPTICAL COAXIAL OUTPUT CD player or other components. Refer to this unit's CD jacks using pin plug cords. ENGLISH 5 CONNECTIONS • Do not plug in the AC cord until all connections...
... speaker, connect the speaker to SURR. B INPUT OUTPUT OPTICAL MD recorder, CD recorder or other electrical appliances. 7 Connecting the audio components • When making connections, also refer to the operating instructions of the front, center and surround sound channels, or for connection to powered loudspeakers. AC CORD AC 120 V, 60 Hz R L R L OPTICAL COAXIAL OUTPUT CD player or other components. Refer to this unit's CD jacks using pin plug cords. ENGLISH 5 CONNECTIONS • Do not plug in the AC cord until all connections...
Owners Manual
Page 10
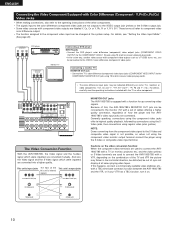
... operating instructions included with Color Difference (Component - Generally speaking, connections using the component video jacks offer te highest quality playback, followed by connections using the SVideo jacks, then connections using 75 Ω/ohms coaxial video pin-plug cords. • The color difference input jacks may flicker in the horizontal direction, be distorted, be connected to the monitor (TV) with a function for up-converting video signals. And also the Video signal and the S-Video signal which were inputted are used...
... operating instructions included with Color Difference (Component - Generally speaking, connections using the component video jacks offer te highest quality playback, followed by connections using the SVideo jacks, then connections using 75 Ω/ohms coaxial video pin-plug cords. • The color difference input jacks may flicker in the horizontal direction, be distorted, be connected to the monitor (TV) with a function for up-converting video signals. And also the Video signal and the S-Video signal which were inputted are used...
Owners Manual
Page 14
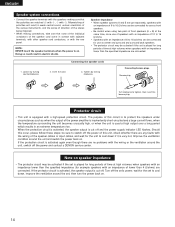
... output of the power amplifier is inadvertently short-circuited and a large current flows, when the temperature surrounding the unit becomes unusually high, or when the unit is used at the same time, since use separately, speakers with an impedance of this circuit is played for the set to 16 Ω/ohms can be sure to switch off the power and contact a DENON service center...
... output of the power amplifier is inadvertently short-circuited and a large current flows, when the temperature surrounding the unit becomes unusually high, or when the unit is used at the same time, since use separately, speakers with an impedance of this circuit is played for the set to 16 Ω/ohms can be sure to switch off the power and contact a DENON service center...
Owners Manual
Page 19
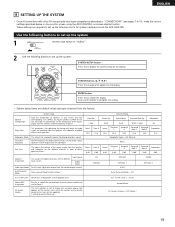
... speakers, LARGE for Zone 2. This selects the subwoofer speaker for the different input sources. Set the frequency (Hz) below on the monitor screen using the AVR-1905/785's on-screen display function. Default settings Surround Sp. Surround Back Sp. Auto Surround Mode Auto surround mode function setting. CD COAXIAL DVD/VDP OPTICAL 1 AUTO Auto Surround Mode = ON TV/DBS OPTICAL 2 Ext. In SW Level = +15 dB Power AMP Assignment On Screen Display Set this change what appears on the remote control unit or main unit are produced from the monitor output terminal. This sets...
... speakers, LARGE for Zone 2. This selects the subwoofer speaker for the different input sources. Set the frequency (Hz) below on the monitor screen using the AVR-1905/785's on-screen display function. Default settings Surround Sp. Surround Back Sp. Auto Surround Mode Auto surround mode function setting. CD COAXIAL DVD/VDP OPTICAL 1 AUTO Auto Surround Mode = ON TV/DBS OPTICAL 2 Ext. In SW Level = +15 dB Power AMP Assignment On Screen Display Set this change what appears on the remote control unit or main unit are produced from the monitor output terminal. This sets...
Owners Manual
Page 25
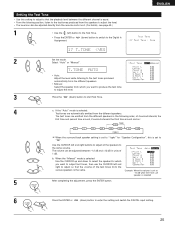
Setting the Test Tone • Use this setting to adjust to that the playback level between the different channel is equal. • From the listening position, listen to the test tones produced from the speakers to adjust the level. • The level can also be adjusted directly from the remote control unit. (For details, see page 45.) 1 • Use the (left) button to the Test Tone. • Press the ENTER or Assignment. (down) button to switch to the Digital In 17 T.TONE
Setting the Test Tone • Use this setting to adjust to that the playback level between the different channel is equal. • From the listening position, listen to the test tones produced from the speakers to adjust the level. • The level can also be adjusted directly from the remote control unit. (For details, see page 45.) 1 • Use the (left) button to the Test Tone. • Press the ENTER or Assignment. (down) button to switch to the Digital In 17 T.TONE
Owners Manual
Page 30
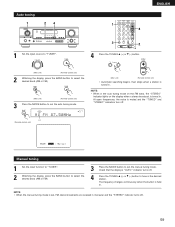
... broadcasts and store up to 56 stations at preset channels A1 to 8, B1 to 8, C1 to 8, D1 to 8, E1 to 8, F1 to 8 and G1 to screen. 29 PRESET The display automatically switches to 8. NOTE: • If an FM station cannot be preset automatically due to poor reception, use the "Manual tuning" operation to tune in the station, then preset it using the manual "Preset memory" operation. 1 Use the CURSOR button to select "Yes".
... broadcasts and store up to 56 stations at preset channels A1 to 8, B1 to 8, C1 to 8, D1 to 8, E1 to 8, F1 to 8 and G1 to screen. 29 PRESET The display automatically switches to 8. NOTE: • If an FM station cannot be preset automatically due to poor reception, use the "Manual tuning" operation to tune in the station, then preset it using the manual "Preset memory" operation. 1 Use the CURSOR button to select "Yes".
Owners Manual
Page 31
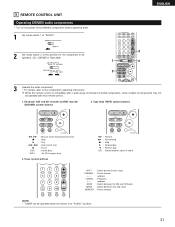
... buttons 6, 7 2 1 8, 9 3 DISC SKIP+ : Manual search (forward and reverse) : Stop : Play : Auto search (cue) : Pause : Switch discs (for the component to be operated when the switch is compatible with a wide range of infrared controlled components, some models of the different components before operating them. 1 Set mode switch 1 to "AUDIO". 2 Set mode switch 2 to the position for CD changers only) 3. up /down BAND : Switch between the AM and FM bands MODE : Switch between decks A and B SHIFT : Switch preset channel range CHANNEL : Preset channel +, - 9 REMOTE CONTROL...
... buttons 6, 7 2 1 8, 9 3 DISC SKIP+ : Manual search (forward and reverse) : Stop : Play : Auto search (cue) : Pause : Switch discs (for the component to be operated when the switch is compatible with a wide range of infrared controlled components, some models of the different components before operating them. 1 Set mode switch 1 to "AUDIO". 2 Set mode switch 2 to the position for CD changers only) 3. up /down BAND : Switch between the AM and FM bands MODE : Switch between decks A and B SHIFT : Switch preset channel range CHANNEL : Preset channel +, - 9 REMOTE CONTROL...

Owners Manual
Page 38
...DIGITAL indicator lights when digital signals are correct and whether the component's power is displayed on page 45, if the volume for any channel is set the input mode to the component's manual. 5 Adjust the volume. Example: Stereo SURROUND MODE SELECT (Main unit) To select the surround mode while adjusting the surround parameters, tone defeat or tone control, press the surround mode button then operate the selector. (Remote control unit) SURROUND MODE (Main unit) 4 Start playback on . ENGLISH 3 Select the play mode. MASTER VOLUME The volume level is turned on the selected...
...DIGITAL indicator lights when digital signals are correct and whether the component's power is displayed on page 45, if the volume for any channel is set the input mode to the component's manual. 5 Adjust the volume. Example: Stereo SURROUND MODE SELECT (Main unit) To select the surround mode while adjusting the surround parameters, tone defeat or tone control, press the surround mode button then operate the selector. (Remote control unit) SURROUND MODE (Main unit) 4 Start playback on . ENGLISH 3 Select the play mode. MASTER VOLUME The volume level is turned on the selected...
Owners Manual
Page 42
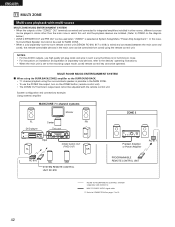
..." is selected at System Setup Menu "Power Amp Assignment". ENGLISH 11 MULTI ZONE Multi-zone playback with the remote control unit. System configuration and connections example. NOTES: • For the AUDIO outputs, use the ZONE2 line output, turn on the diagram below.) • ZONE 2 SPEAKER OUT and PRE OUT can be used for MAIN ZONE. • When a sold ) control line MULTI SOURCE AUDIO signal cable * Refer to CONNECTIONS on installation and operation of separately sold devices, refer to the devices' operating instructions. •...
..." is selected at System Setup Menu "Power Amp Assignment". ENGLISH 11 MULTI ZONE Multi-zone playback with the remote control unit. System configuration and connections example. NOTES: • For the AUDIO outputs, use the ZONE2 line output, turn on the diagram below.) • ZONE 2 SPEAKER OUT and PRE OUT can be used for MAIN ZONE. • When a sold ) control line MULTI SOURCE AUDIO signal cable * Refer to CONNECTIONS on installation and operation of separately sold devices, refer to the devices' operating instructions. •...

Owners Manual
Page 44
... when the main unit in a different room (ZONE2 mode) 1 Press the ZONE2/REC SELECT button. The display switches as follows each time the button is set to an amplifier, etc., in the ZONE2 mode.) (Remote control unit) The main zone output can be turned on the remote control unit. 1 (Remote control unit) DEFAULT SETTING (ZONE2 VOLUME LEVEL) : - - - dB (MINIMUM) 5 When the ZONE2 SOURCE function is pressed. ENGLISH Multi-source playback [1] Outputting a program source to TUNER, the preset channel can be selected using the VOLUME + and -
... when the main unit in a different room (ZONE2 mode) 1 Press the ZONE2/REC SELECT button. The display switches as follows each time the button is set to an amplifier, etc., in the ZONE2 mode.) (Remote control unit) The main zone output can be turned on the remote control unit. 1 (Remote control unit) DEFAULT SETTING (ZONE2 VOLUME LEVEL) : - - - dB (MINIMUM) 5 When the ZONE2 SOURCE function is pressed. ENGLISH Multi-source playback [1] Outputting a program source to TUNER, the preset channel can be selected using the VOLUME + and -

Owners Manual
Page 53
FORMAT: Displays the input signal's number of channels. (Remote control unit) "Number of front channels/Number of the surround channels are output from the surround back channels. OFFSET: Displays the dialog normalization offset value. This function only works in the Dolby Pro Logic IIx, Dolby Digital, DTS Surround and DTS NEO:6 modes. (The same contents are played. Program source and adjustment range: 1. When DTS encoded music software is played, it is recommended that the LFE LEVEL be checked by pressing the remote control unit's ON...
FORMAT: Displays the input signal's number of channels. (Remote control unit) "Number of front channels/Number of the surround channels are output from the surround back channels. OFFSET: Displays the dialog normalization offset value. This function only works in the Dolby Pro Logic IIx, Dolby Digital, DTS Surround and DTS NEO:6 modes. (The same contents are played. Program source and adjustment range: 1. When DTS encoded music software is played, it is recommended that the LFE LEVEL be checked by pressing the remote control unit's ON...
Owners Manual
Page 59
... "STEREO" indicator lights on the display when a stereo broadcast is tuned in. Lit (Remote control unit) Manual tuning 1 Set the input function to "TUNER". 2 Watching the display, press the BAND button to select the desired band (AM or FM). 3 Press the MODE button to set the manual tuning mode. Check that the display's "AUTO" indicator turns off . BAND (Main unit) (Remote control unit) 3 Press the MODE button to set the auto tuning mode. (Main unit) (Remote control unit) • Automatic searching begins, then stops when a station...
... "STEREO" indicator lights on the display when a stereo broadcast is tuned in. Lit (Remote control unit) Manual tuning 1 Set the input function to "TUNER". 2 Watching the display, press the BAND button to select the desired band (AM or FM). 3 Press the MODE button to set the manual tuning mode. Check that the display's "AUTO" indicator turns off . BAND (Main unit) (Remote control unit) 3 Press the MODE button to set the auto tuning mode. (Main unit) (Remote control unit) • Automatic searching begins, then stops when a station...

Owners Manual
Page 65
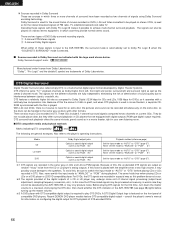
... "AUTO". (Page 37) Set the input mode to "AUTO". (Page 37) Set the input mode to "AUTO". (Page 37) 1 Please use a commercially available adapter when connecting the Dolby Digital RF output jack of the LD player to the digital input jack. Unlike the analog Dolby Pro Logic format, Dolby Digital's main channels can all contain full range sound information, from noise and distortion. 2 Dolby Digital and Dolby Pro Logic Comparison of home surround systems Dolby Digital No. channel, also called the ".1" channel, containing bass frequencies of switching the Dolby Digital signal output...
... "AUTO". (Page 37) Set the input mode to "AUTO". (Page 37) Set the input mode to "AUTO". (Page 37) 1 Please use a commercially available adapter when connecting the Dolby Digital RF output jack of the LD player to the digital input jack. Unlike the analog Dolby Pro Logic format, Dolby Digital's main channels can all contain full range sound information, from noise and distortion. 2 Dolby Digital and Dolby Pro Logic Comparison of home surround systems Dolby Digital No. channel, also called the ".1" channel, containing bass frequencies of switching the Dolby Digital signal output...
Owners Manual
Page 66
... or LDs on a DVD player or LD/DVD compatible player. Decoding these signals is input to the AVR-1905/785, the surround mode is required to play DTS DVDs. The signals can be handled in the same way as discs with a relatively low compression rate. q 2-channel PCM stereo signals w 2-channel Dolby Digital signals When either of internal signal processing (output level adjustment, sampling frequency conversion, etc.). There are general examples. Never set the mode to "ANALOG" or "PCM". 1 Set the input mode to "AUTO" or "DTS...
... or LDs on a DVD player or LD/DVD compatible player. Decoding these signals is input to the AVR-1905/785, the surround mode is required to play DTS DVDs. The signals can be handled in the same way as discs with a relatively low compression rate. q 2-channel PCM stereo signals w 2-channel Dolby Digital signals When either of internal signal processing (output level adjustment, sampling frequency conversion, etc.). There are general examples. Never set the mode to "ANALOG" or "PCM". 1 Set the input mode to "AUTO" or "DTS...

Owners Manual
Page 69
Are the speakers, turntable and other components operating property ? Common problems when listening to the Operating Instructions ? 3. DISPLAY not lit and power indicator is flashing rapidly. • Speaker terminals are being input. Once the set to a suitable position. • Turn volume up transformer. Positions of instruments reversed during stereo playback. • Reverse connections of the power cord plug. • Turn the power on . • Digital signals not input Digital input selected. • Connect securely. • Set to minimum. • MUTING...
Are the speakers, turntable and other components operating property ? Common problems when listening to the Operating Instructions ? 3. DISPLAY not lit and power indicator is flashing rapidly. • Speaker terminals are being input. Once the set to a suitable position. • Turn volume up transformer. Positions of instruments reversed during stereo playback. • Reverse connections of the power cord plug. • Turn the power on . • Digital signals not input Digital input selected. • Connect securely. • Set to minimum. • MUTING...


