

Specifications
Page 1
XPS 13 Views Specifications Copyright © 2014 Dell Inc. and international copyright and intellectual property laws. DellTM and the Dell logo are trademarks of their respective companies. 2014 ‑ 12 Rev. A00 Regulatory model: P54G | Type: P54G001 Computer model: XPS 9343 NOTE: The images in the United States and/or other marks and names mentioned herein may differ from your computer depending on the configuration you ordered. in this document may be trademarks of Dell Inc. This product is protected by U.S. All other jurisdictions. All rights reserved.
XPS 13 Views Specifications Copyright © 2014 Dell Inc. and international copyright and intellectual property laws. DellTM and the Dell logo are trademarks of their respective companies. 2014 ‑ 12 Rev. A00 Regulatory model: P54G | Type: P54G001 Computer model: XPS 9343 NOTE: The images in the United States and/or other marks and names mentioned herein may differ from your computer depending on the configuration you ordered. in this document may be trademarks of Dell Inc. This product is protected by U.S. All other jurisdictions. All rights reserved.

Specifications
Page 3
Specifications Views Front Left Left 1 2 3 45 6 Right Base Display 1 Power-adapter port Connect a power adapter to provide power to check the charge remaining in the battery. 6 Battery-charge status lights (5) Turn on . Each light indicates approximately 20% charge. Provides data transfer speeds up to 5 Gbps. 4 Headset port Connect a headphone, a microphone, or a headphone and microphone combo (headset). 5 Battery-charge status button Press to your computer and charge the battery. 2 Mini DisplayPort Connect an external display or a projector. 3 USB 3.0 port Connect peripherals ...
Specifications Views Front Left Left 1 2 3 45 6 Right Base Display 1 Power-adapter port Connect a power adapter to provide power to check the charge remaining in the battery. 6 Battery-charge status lights (5) Turn on . Each light indicates approximately 20% charge. Provides data transfer speeds up to 5 Gbps. 4 Headset port Connect a headphone, a microphone, or a headphone and microphone combo (headset). 5 Battery-charge status button Press to your computer and charge the battery. 2 Mini DisplayPort Connect an external display or a projector. 3 USB 3.0 port Connect peripherals ...

Specifications
Page 4
...-cable slot Connect a security cable to 5 Gbps. Provides data transfer speeds up to prevent unauthorized movement of your computer. You must connect the power adapter to charge your devices using the PowerShare port. NOTE: Certain USB devices may not charge when the computer is turned off or in the BIOS setup program. PowerShare allows you must enable this feature in the Sleep state. Specifications Front Right Left Views 1 2 3 Right Base Display 1 Media-card reader...
...-cable slot Connect a security cable to 5 Gbps. Provides data transfer speeds up to prevent unauthorized movement of your computer. You must connect the power adapter to charge your devices using the PowerShare port. NOTE: Certain USB devices may not charge when the computer is turned off or in the BIOS setup program. PowerShare allows you must enable this feature in the Sleep state. Specifications Front Right Left Views 1 2 3 Right Base Display 1 Media-card reader...

Specifications
Page 7
Dimensions and weight System information Memory Ports and connectors Communications Video Audio Storage Media-card reader Display Keyboard Camera Touch pad Battery Power adapter Computer environment Views Dimensions and weight Height Width Depth Weight (maximum): Touch screen Non-touch screen Specifications 9 mm to 15 mm (0.35 in to 0.60 in) 304 mm (11.98 in) 200 mm (7.88 in) 1.27 kg (2.8 lb) 1.18 kg (2.6 lb) NOTE: The weight of your laptop varies depending on the configuration ordered and the manufacturing variability.
Dimensions and weight System information Memory Ports and connectors Communications Video Audio Storage Media-card reader Display Keyboard Camera Touch pad Battery Power adapter Computer environment Views Dimensions and weight Height Width Depth Weight (maximum): Touch screen Non-touch screen Specifications 9 mm to 15 mm (0.35 in to 0.60 in) 304 mm (11.98 in) 200 mm (7.88 in) 1.27 kg (2.8 lb) 1.18 kg (2.6 lb) NOTE: The weight of your laptop varies depending on the configuration ordered and the manufacturing variability.

Specifications
Page 8
Views System information Computer model Processor Chipset Specifications XPS 9343 • 5th Generation Intel Core i3 • 5th Generation Intel Core i5 • 5th Generation Intel Core i7 Integrated in processor Dimensions and weight System information Memory Ports and connectors Communications Video Audio Storage Media-card reader Display Keyboard Camera Touch pad Battery Power adapter Computer environment
Views System information Computer model Processor Chipset Specifications XPS 9343 • 5th Generation Intel Core i3 • 5th Generation Intel Core i5 • 5th Generation Intel Core i7 Integrated in processor Dimensions and weight System information Memory Ports and connectors Communications Video Audio Storage Media-card reader Display Keyboard Camera Touch pad Battery Power adapter Computer environment

Specifications
Page 9
Dimensions and weight System information Memory Ports and connectors Communications Video Audio Storage Media-card reader Display Keyboard Camera Touch pad Battery Power adapter Computer environment Views Specifications Memory Type DDR3L-RS Speed 1600 MHz Configurations supported 4 GB and 8 GB NOTE: The memory is integrated on the system board.
Dimensions and weight System information Memory Ports and connectors Communications Video Audio Storage Media-card reader Display Keyboard Camera Touch pad Battery Power adapter Computer environment Views Specifications Memory Type DDR3L-RS Speed 1600 MHz Configurations supported 4 GB and 8 GB NOTE: The memory is integrated on the system board.

Specifications
Page 10
Views Ports and connectors External: USB Audio/video Internal: M.2 card Specifications • One USB 3.0 port • One USB 3.0 port with PowerShare • One Mini DisplayPort • One headphone and microphone combo (headset) port • One M.2-card slot for solid-state drive (SSD) • One M.2-card slot for Wi-Fi, Bluetooth, and Intel WiDi combo card Dimensions and weight System information Memory Ports and connectors Communications Video Audio Storage Media-card reader Display Keyboard Camera Touch pad Battery Power adapter Computer environment
Views Ports and connectors External: USB Audio/video Internal: M.2 card Specifications • One USB 3.0 port • One USB 3.0 port with PowerShare • One Mini DisplayPort • One headphone and microphone combo (headset) port • One M.2-card slot for solid-state drive (SSD) • One M.2-card slot for Wi-Fi, Bluetooth, and Intel WiDi combo card Dimensions and weight System information Memory Ports and connectors Communications Video Audio Storage Media-card reader Display Keyboard Camera Touch pad Battery Power adapter Computer environment

Specifications
Page 11
Views Communications Wireless Specifications • Wi-Fi 802.11a/g/n (2x2) • Wi-Fi 802.11ac (2x2) • Intel WiDi (optional) • Bluetooth 4.1 • Miracast Dimensions and weight System information Memory Ports and connectors Communications Video Audio Storage Media-card reader Display Keyboard Camera Touch pad Battery Power adapter Computer environment
Views Communications Wireless Specifications • Wi-Fi 802.11a/g/n (2x2) • Wi-Fi 802.11ac (2x2) • Intel WiDi (optional) • Bluetooth 4.1 • Miracast Dimensions and weight System information Memory Ports and connectors Communications Video Audio Storage Media-card reader Display Keyboard Camera Touch pad Battery Power adapter Computer environment

Specifications
Page 16
... display with touch screen • 13.3-inch anti-glare FHD infinity display 3200 x 1800 1920 x 1080 165.24 mm (6.51 in) 293.76 mm (11.56 in) 337.05 mm (13.3 in) 60 Hz 0 degree (closed) to 135 degrees 0.0918 mm 0.153 mm Brightness can be controlled using shortcut keys Dimensions and weight System information Memory Ports and connectors Communications Video Audio Storage Media-card reader Display Keyboard Camera Touch pad Battery Power adapter Computer...
... display with touch screen • 13.3-inch anti-glare FHD infinity display 3200 x 1800 1920 x 1080 165.24 mm (6.51 in) 293.76 mm (11.56 in) 337.05 mm (13.3 in) 60 Hz 0 degree (closed) to 135 degrees 0.0918 mm 0.153 mm Brightness can be controlled using shortcut keys Dimensions and weight System information Memory Ports and connectors Communications Video Audio Storage Media-card reader Display Keyboard Camera Touch pad Battery Power adapter Computer...

Specifications
Page 17
... be used to type alternate characters or to perform secondary functions. List of the shortcut keys by pressing Fn+Esc or by changing Function Key Behavior in BIOS setup program. Dimensions and weight System information Memory Ports and connectors Communications Video Audio Storage Media-card reader Display Keyboard Camera Touch pad Battery Power adapter Computer environment These keys can define the behavior of shortcut keys. To perform secondary functions, press Fn and the desired key. Views Keyboard Type Shortcut keys Specifications Backlit keyboard Some keys...
... be used to type alternate characters or to perform secondary functions. List of the shortcut keys by pressing Fn+Esc or by changing Function Key Behavior in BIOS setup program. Dimensions and weight System information Memory Ports and connectors Communications Video Audio Storage Media-card reader Display Keyboard Camera Touch pad Battery Power adapter Computer environment These keys can define the behavior of shortcut keys. To perform secondary functions, press Fn and the desired key. Views Keyboard Type Shortcut keys Specifications Backlit keyboard Some keys...

Specifications
Page 18
Keyboard Shortcut keys Mute audio Decrease volume Increase volume Play previous track/chapter Play/Pause Play next track/chapter Switch to external display Search Toggle keyboard backlight Decrease brightness Increase brightness Turn off/on wireless Toggle Fn-key lock Pause/Break Sleep Toggle scroll lock
Keyboard Shortcut keys Mute audio Decrease volume Increase volume Play previous track/chapter Play/Pause Play next track/chapter Switch to external display Search Toggle keyboard backlight Decrease brightness Increase brightness Turn off/on wireless Toggle Fn-key lock Pause/Break Sleep Toggle scroll lock

Service Manual
Page 8
... 1 Save and close all open files and exit all attached devices and peripherals, such as keyboard, mouse, monitor, and so on the configuration you are using a different operating system, see the documentation of your operating system for shut-down your computer, if applicable. Windows 8.1: On the Start screen, click or tap the power icon → Shut down . Windows 7: Click or tap Start → Shut down...
... 1 Save and close all open files and exit all attached devices and peripherals, such as keyboard, mouse, monitor, and so on the configuration you are using a different operating system, see the documentation of your operating system for shut-down your computer, if applicable. Windows 8.1: On the Start screen, click or tap the power icon → Shut down . Windows 7: Click or tap Start → Shut down...

Service Manual
Page 9
... page at the back of the computer. CAUTION: To avoid damaging the components and cards, handle them evenly aligned to the power source. WARNING: Before working inside the computer, replace all power sources before connecting to avoid bending any installed card from the media-card reader. See the safety instructions that shipped with your computer and then unplug the cable from your computer.
... page at the back of the computer. CAUTION: To avoid damaging the components and cards, handle them evenly aligned to the power source. WARNING: Before working inside the computer, replace all power sources before connecting to avoid bending any installed card from the media-card reader. See the safety instructions that shipped with your computer and then unplug the cable from your computer.

Service Manual
Page 11
After working inside your computer CAUTION: Leaving stray or loose screws inside your computer may severely damage your computer. 1 Replace all screws and ensure that no stray screws remain inside your computer. 2 Connect any external devices, peripherals, and cables you removed before working on your computer. 3 Replace any media cards, discs, and any other parts that you removed before working on your computer. 4 Connect your computer and all attached devices to their electrical outlets. 5 Turn on your computer. 11
After working inside your computer CAUTION: Leaving stray or loose screws inside your computer may severely damage your computer. 1 Replace all screws and ensure that no stray screws remain inside your computer. 2 Connect any external devices, peripherals, and cables you removed before working on your computer. 3 Replace any media cards, discs, and any other parts that you removed before working on your computer. 4 Connect your computer and all attached devices to their electrical outlets. 5 Turn on your computer. 11

Service Manual
Page 25
... board. For more safety best practices, see the Regulatory Compliance home page at an angle into the wireless-card slot. 3 Connect the antenna cables to the wireless card. After working inside your computer, follow the steps in After working inside your computer. The following table provides the antenna cable color schemes for the wireless card supported by your computer. Post-requisites 1 Replace the battery. 2 Replace the base cover...
... board. For more safety best practices, see the Regulatory Compliance home page at an angle into the wireless-card slot. 3 Connect the antenna cables to the wireless card. After working inside your computer, follow the steps in After working inside your computer. The following table provides the antenna cable color schemes for the wireless card supported by your computer. Post-requisites 1 Replace the battery. 2 Replace the base cover...
Service Manual
Page 32
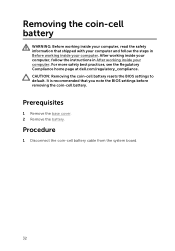
... computer. For more safety best practices, see the Regulatory Compliance home page at dell.com/regulatory_compliance. Prerequisites 1 Remove the base cover. 2 Remove the battery. It is recommended that shipped with your computer and follow the instructions in Before working inside your computer. CAUTION: Removing the coin-cell battery resets the BIOS settings to default. Procedure 1 Disconnect the coin-cell battery cable from the system board. 32
... computer. For more safety best practices, see the Regulatory Compliance home page at dell.com/regulatory_compliance. Prerequisites 1 Remove the base cover. 2 Remove the battery. It is recommended that shipped with your computer and follow the instructions in Before working inside your computer. CAUTION: Removing the coin-cell battery resets the BIOS settings to default. Procedure 1 Disconnect the coin-cell battery cable from the system board. 32
Service Manual
Page 61
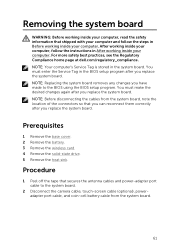
... secures the antenna cables and power-adapter port cable to the BIOS using the BIOS setup program. NOTE: Replacing the system board removes any changes you have made to the system board. 2 Disconnect the camera cable, touch-screen cable (optional), poweradapter port cable, and coin-cell battery cable from the system board, note the location of the connectors so that shipped with your computer and follow the instructions in the BIOS setup program after you replace the system board. For more...
... secures the antenna cables and power-adapter port cable to the BIOS using the BIOS setup program. NOTE: Replacing the system board removes any changes you have made to the system board. 2 Disconnect the camera cable, touch-screen cable (optional), poweradapter port cable, and coin-cell battery cable from the system board, note the location of the connectors so that shipped with your computer and follow the instructions in the BIOS setup program after you replace the system board. For more...

Service Manual
Page 66
...-rest assembly. 3 Slide the I/O-board cable, the touch-pad cable, and the keyboardcontrols board cable into the system board and press down on the connector latches to secure the cables. 4 Connect the camera cable, the touch-screen cable (optional), the power-adapter port cable, the coin-cell battery cable, the speaker cable, the fan cable, and the display cable to the system board. 5 Adhere the tape that secures the antenna cables and power-adapter port to the system board. 6 Align the screw holes...
...-rest assembly. 3 Slide the I/O-board cable, the touch-pad cable, and the keyboardcontrols board cable into the system board and press down on the connector latches to secure the cables. 4 Connect the camera cable, the touch-screen cable (optional), the power-adapter port cable, the coin-cell battery cable, the speaker cable, the fan cable, and the display cable to the system board. 5 Adhere the tape that secures the antenna cables and power-adapter port to the system board. 6 Align the screw holes...

Service Manual
Page 84
... the BIOS update file. 9 Double-click the BIOS update file icon and follow the instructions on the screen. 84 To flash the BIOS: 1 Turn on your computer. 6 Expand BIOS to view the available BIOS files. 7 Click Download File to download the latest version of your computer model. 4 Click Drivers & downloads. 5 Scroll down list. NOTE: If you replace the system board. NOTE: In the Change OS drop-down list, select the operating system installed on...
... the BIOS update file. 9 Double-click the BIOS update file icon and follow the instructions on the screen. 84 To flash the BIOS: 1 Turn on your computer. 6 Expand BIOS to view the available BIOS files. 7 Click Download File to download the latest version of your computer model. 4 Click Drivers & downloads. 5 Scroll down list. NOTE: If you replace the system board. NOTE: In the Change OS drop-down list, select the operating system installed on...

Service Manual
Page 85
... service issues, see dell.com/contactdell. See Me and My Dell at dell.com/ support/manuals. Information about your operating system, setting up and using these online self-help resources: Self-Help Information Accessing Windows Help Self-Help Options Windows 8.1-Open the Search charm, type Help and Support in your computer, data backup, diagnostics, and so on. services Troubleshooting information, user manuals, setup instructions, product specifications, technical help blogs, drivers, software updates, and so on Dell products and services using...
... service issues, see dell.com/contactdell. See Me and My Dell at dell.com/ support/manuals. Information about your operating system, setting up and using these online self-help resources: Self-Help Information Accessing Windows Help Self-Help Options Windows 8.1-Open the Search charm, type Help and Support in your computer, data backup, diagnostics, and so on. services Troubleshooting information, user manuals, setup instructions, product specifications, technical help blogs, drivers, software updates, and so on Dell products and services using...


