
External Display Connection Guide
Page 6
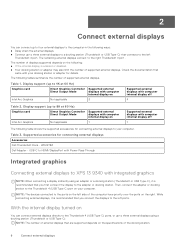
...Graphics card Direct Graphics Controller Direct Output Mode Intel Arc Graphics Not applicable Supported external displays with computer internal display on 1 Supported external displays with computer internal display off Intel Arc Graphics Not applicable 3 4 Table 2. Then, connect the adapter or docking station to the Thunderbolt 4 (USB Type-C) port on the specifications of the docking station. 6 Connect external displays NOTE: The number of displays supported depends on the right. The remaining external displays connect to XPS 13 9340 with computer internal display off...
...Graphics card Direct Graphics Controller Direct Output Mode Intel Arc Graphics Not applicable Supported external displays with computer internal display on 1 Supported external displays with computer internal display off Intel Arc Graphics Not applicable 3 4 Table 2. Then, connect the adapter or docking station to the Thunderbolt 4 (USB Type-C) port on the specifications of the docking station. 6 Connect external displays NOTE: The number of displays supported depends on the right. The remaining external displays connect to XPS 13 9340 with computer internal display off...
Re-imaging guide for Windows
Page 3
......4 Chapter 2: Introduction...5 Chapter 3: Order of reinstallation 6 Chapter 4: Updating or resetting the BIOS 7 Updating the BIOS in Windows...7 Clearing CMOS settings...7 Trusted Platform Module (TPM) security...7 Chapter 5: Reinstalling the operating system 8 Chapter 6: Reinstalling drivers and applications 9 Displaying drivers and applications on your computer 9 Chapter 7: Reinstallation sequence for drivers and applications 10 Intel chipset device software...10 Downloading and installing the chipset driver...10 Critical Microsoft Knowledge Base (KB) updates...10 Intel Rapid Storage...
......4 Chapter 2: Introduction...5 Chapter 3: Order of reinstallation 6 Chapter 4: Updating or resetting the BIOS 7 Updating the BIOS in Windows...7 Clearing CMOS settings...7 Trusted Platform Module (TPM) security...7 Chapter 5: Reinstalling the operating system 8 Chapter 6: Reinstalling drivers and applications 9 Displaying drivers and applications on your computer 9 Chapter 7: Reinstallation sequence for drivers and applications 10 Intel chipset device software...10 Downloading and installing the chipset driver...10 Critical Microsoft Knowledge Base (KB) updates...10 Intel Rapid Storage...
Re-imaging guide for Windows
Page 4
... screen errors, unexpected shutdowns, or infect your computer and that you install or update device drivers if you have the latest device drivers installed on your computer with malicious software. Updating drivers unnecessarily may lead to continue with a Windows 11 operating system. This ensures that you are unsure of each driver update on the system if you are facing networking, graphics, sound or other factory-reset methods. Installing or updating device drivers may create new problems. Review the...
... screen errors, unexpected shutdowns, or infect your computer and that you install or update device drivers if you have the latest device drivers installed on your computer with malicious software. Updating drivers unnecessarily may lead to continue with a Windows 11 operating system. This ensures that you are unsure of each driver update on the system if you are facing networking, graphics, sound or other factory-reset methods. Installing or updating device drivers may create new problems. Review the...

Re-imaging guide for Windows
Page 6
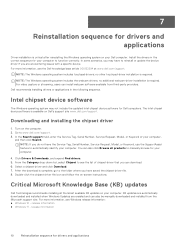
... driver: Allows Windows to communicate and adjust settings on components on the system board which include: ● Wireless Local Area Network (WLAN) adapter driver: Enables and enhances the wireless adapter. ● Bluetooth driver: Enables and enhances the Bluetooth adapter. 11. Graphics driver: ● Enhances and optimizes video performance. ● Enables and provides additional functionality not in the following sequence: 1. Networking and communication drivers, which includes: ● Intel Innovation Platform Framework Driver ● Intel Chipset Device Software Driver...
... driver: Allows Windows to communicate and adjust settings on components on the system board which include: ● Wireless Local Area Network (WLAN) adapter driver: Enables and enhances the wireless adapter. ● Bluetooth driver: Enables and enhances the Bluetooth adapter. 11. Graphics driver: ● Enhances and optimizes video performance. ● Enables and provides additional functionality not in the following sequence: 1. Networking and communication drivers, which includes: ● Intel Innovation Platform Framework Driver ● Intel Chipset Device Software Driver...
Re-imaging guide for Windows
Page 10
... Windows operating system includes touchpad drivers; Dell recommends installing drivers or applications in the correct sequence for your computer. NOTE: If you can also click Browse all the latest available KB updates on the computer. 2. For more information, see Windows release information: ● Windows 10 - no additional webcam-driver installation is required. In the Search support field, enter the Service Tag, Serial Number, Service Request, Model, or Keyword of chipset driver...
... Windows operating system includes touchpad drivers; Dell recommends installing drivers or applications in the correct sequence for your computer. NOTE: If you can also click Browse all the latest available KB updates on the computer. 2. For more information, see Windows release information: ● Windows 10 - no additional webcam-driver installation is required. In the Search support field, enter the Service Tag, Serial Number, Service Request, Model, or Keyword of chipset driver...
Re-imaging guide for Windows
Page 11
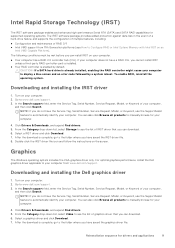
... controller might cause your computer from 11th Generation platforms (see the list of graphics driver that you can install IRST on the screen. CAUTION: If a SATA hard drive is complete, go to www.dell.com/support. 3. Downloading and installing the IRST driver 1. To enable RAID, reinstall the operating system. Select a graphics driver and click Download. 7. Select a IRST driver and click Download. 7. In the Search support field, enter the Service Tag, Serial Number, Service Request, Model...
... controller might cause your computer from 11th Generation platforms (see the list of graphics driver that you can install IRST on the screen. CAUTION: If a SATA hard drive is complete, go to www.dell.com/support. 3. Downloading and installing the IRST driver 1. To enable RAID, reinstall the operating system. Select a graphics driver and click Download. 7. Select a IRST driver and click Download. 7. In the Search support field, enter the Service Tag, Serial Number, Service Request, Model...

Re-imaging guide for Windows
Page 13
... be installed from the Dell support site. Go to automatically identify your computer. 4. Turn on the computer. 2. The following Dell docking stations can also be connected to the Thunderbolt 4 (USB Type-C) port on your computer. 7. In the Search support field, enter the Service Tag, Serial Number, Service Request, Model, or Keyword of your computer may not recognize the docking station or it may not function optimally. ● Power...
... be installed from the Dell support site. Go to automatically identify your computer. 4. Turn on the computer. 2. The following Dell docking stations can also be connected to the Thunderbolt 4 (USB Type-C) port on your computer. 7. In the Search support field, enter the Service Tag, Serial Number, Service Request, Model, or Keyword of your computer may not recognize the docking station or it may not function optimally. ● Power...

Owners Manual
Page 4
... field service kit ...27 Transporting sensitive components...28 After working inside your computer...28 BitLocker...28 Recommended tools...28 Screw list...29 Major components of XPS 13 9340...30 Chapter 5: Removing and installing Field Replaceable Units (FRUs 32 Base cover...32 Removing the base cover...32 Installing the base cover...35 Battery...36 Rechargeable Li-ion battery precautions...36 Removing the battery...37 Installing the battery...40 Solid-state drive...43 Removing...
... field service kit ...27 Transporting sensitive components...28 After working inside your computer...28 BitLocker...28 Recommended tools...28 Screw list...29 Major components of XPS 13 9340...30 Chapter 5: Removing and installing Field Replaceable Units (FRUs 32 Base cover...32 Removing the base cover...32 Installing the base cover...35 Battery...36 Rechargeable Li-ion battery precautions...36 Removing the battery...37 Installing the battery...40 Solid-state drive...43 Removing...

Owners Manual
Page 7
... power button steadily to the next set of XPS 13 9340 7 Tap to move the mouse pointer. Capacitive touch panel Displays media and display control keys or standard function keys, with fingerprint reader Press to the next set of keys and lock the mode of the panel. 3. press and hold the fn key on the physical keyboard to switch to turn on the touchpad to left -click. 6. Haptic touchpad Move your finger on , press the power button to right-click. 5. Service LED...
... power button steadily to the next set of XPS 13 9340 7 Tap to move the mouse pointer. Capacitive touch panel Displays media and display control keys or standard function keys, with fingerprint reader Press to the next set of keys and lock the mode of the panel. 3. press and hold the fn key on the physical keyboard to switch to turn on the touchpad to left -click. 6. Haptic touchpad Move your finger on , press the power button to right-click. 5. Service LED...

Owners Manual
Page 12
... engagement platform including account access, device information, and hardware settings. Figure 10. Table 2. For more information about how to renew or upgrade your warranty. 12 Set up your computer with intelligent, personalized technology from MyDell. Dell Update Dell Update Updates your XPS 13 9340 For more information, see the product guides and third-party license documents at www.dell.com/ support/home/product-support/product/dell-supportassist-pcs-tablets...
... engagement platform including account access, device information, and hardware settings. Figure 10. Table 2. For more information about how to renew or upgrade your warranty. 12 Set up your computer with intelligent, personalized technology from MyDell. Dell Update Dell Update Updates your XPS 13 9340 For more information, see the product guides and third-party license documents at www.dell.com/ support/home/product-support/product/dell-supportassist-pcs-tablets...
Owners Manual
Page 15
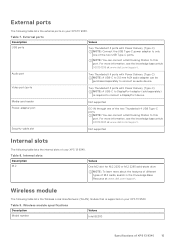
...lists the Wireless Local Area Network (WLAN) module that is required to this port. For more about the features of different types of the two Thunderbolt 4 USB Type-C ports NOTE: You can connect a Dell Docking Station to connect a DisplayPort device. Media-card reader Not supported Power-adapter port DC-IN through one of the two USB Type-C ports. Security-cable slot Not supported Internal slots The following table lists the internal slots of XPS 13 9340 15 External ports The following table lists the external ports on your XPS 13 9340. External ports Description USB...
...lists the Wireless Local Area Network (WLAN) module that is required to this port. For more about the features of different types of the two Thunderbolt 4 USB Type-C ports NOTE: You can connect a Dell Docking Station to connect a DisplayPort device. Media-card reader Not supported Power-adapter port DC-IN through one of the two USB Type-C ports. Security-cable slot Not supported Internal slots The following table lists the internal slots of XPS 13 9340 15 External ports The following table lists the external ports on your XPS 13 9340. External ports Description USB...

Owners Manual
Page 23
... 4 ports with Power Delivery Number of displays (with computer internal display on) Three 4K external displays using the Thunderbolt 4 (USB-C) ports available on your XPS 13 9340 Number of displays (with ExpressSign-in 2.0 (Camera Sensing) (Optional) Intel vPro Technology (iAMT 12) (optional, requires Intel WiFi Link WLAN and a vPro compatible processor) Intel Platform Trust Technology Support for Absolute module interface and external SmartCard Reader Operating and storage environment This table lists the operating and storage specifications of your XPS 13 9340...
... 4 ports with Power Delivery Number of displays (with computer internal display on) Three 4K external displays using the Thunderbolt 4 (USB-C) ports available on your XPS 13 9340 Number of displays (with ExpressSign-in 2.0 (Camera Sensing) (Optional) Intel vPro Technology (iAMT 12) (optional, requires Intel WiFi Link WLAN and a vPro compatible processor) Intel Platform Trust Technology Support for Absolute module interface and external SmartCard Reader Operating and storage environment This table lists the operating and storage specifications of your XPS 13 9340...

Owners Manual
Page 26
... charges can turn on the screen. Enter the service mode, if you open the case. The internal power enables the computer to a painted or nonmetal surface. Service Mode Service Mode is disconnected. Standby power Dell products with your skin, and ensure that you perform any media card and optical disk from the system board prior to proceed. Remove any installation or break or fix procedures involving disassembly or reassembly: ● Turn off power, without disconnecting the battery cable...
... charges can turn on the screen. Enter the service mode, if you open the case. The internal power enables the computer to a painted or nonmetal surface. Service Mode Service Mode is disconnected. Standby power Dell products with your skin, and ensure that you perform any media card and optical disk from the system board prior to proceed. Remove any installation or break or fix procedures involving disassembly or reassembly: ● Turn off power, without disconnecting the battery cable...

Owners Manual
Page 28
... as replacement parts or parts to the power-adapter port on your computer. 5. Replace all insulator parts while performing service and that you removed before working on your computer. 3. Connect any other parts that they use the traditional wired ESD grounding wrist strap and protective anti-static mat always when servicing Dell products. Replace any media cards, discs, or any external devices, peripherals, or cables you removed before working on the computer. NOTE: To exit service mode...
... as replacement parts or parts to the power-adapter port on your computer. 5. Replace all insulator parts while performing service and that you removed before working on your computer. 3. Connect any other parts that they use the traditional wired ESD grounding wrist strap and protective anti-static mat always when servicing Dell products. Replace any media cards, discs, or any external devices, peripherals, or cables you removed before working on the computer. NOTE: To exit service mode...

Owners Manual
Page 81
... TBT) pre-boot modules Enables the PCIe devices that are connected through a Thunderbolt adapter to run the PCIe devices UEFI Option ROM (if present) during BIOS Preboot. By default, the Video/Power only on the external ports of LAN on Type-C Ports option is disabled. By default, the Type-C Dock Audio option is disabled. By default, the Enable USB Boot Support option is disabled. By default, the Enable Thunderbolt Boot Support option is enabled. By default, the Disable USB4 PCIE Tunneling option is enabled. System setup options-Integrated Devices menu (continued) Integrated...
... TBT) pre-boot modules Enables the PCIe devices that are connected through a Thunderbolt adapter to run the PCIe devices UEFI Option ROM (if present) during BIOS Preboot. By default, the Video/Power only on the external ports of LAN on Type-C Ports option is disabled. By default, the Type-C Dock Audio option is disabled. By default, the Enable USB Boot Support option is disabled. By default, the Enable Thunderbolt Boot Support option is enabled. By default, the Disable USB4 PCIE Tunneling option is enabled. System setup options-Integrated Devices menu (continued) Integrated...

Owners Manual
Page 83
... default, the Auto Mode is selected. By default, the Adaptive option is enabled. By default, the HTTP(s) Boot option is disabled. Battery settings are reenabled. USB Wake Support Wake on your typical battery usage pattern. Block Sleep Enables or disables the computer from the wired network, the selected wireless radios are adaptively optimized based on Dell USB-C Dock When enabled, connecting a Dell USB-C Dock wakes the computer from the beginning of the computer to a specified work day. System setup options-Power menu Power Battery Configuration Enables...
... default, the Auto Mode is selected. By default, the Adaptive option is enabled. By default, the HTTP(s) Boot option is disabled. Battery settings are reenabled. USB Wake Support Wake on your typical battery usage pattern. Block Sleep Enables or disables the computer from the wired network, the selected wireless radios are adaptively optimized based on Dell USB-C Dock When enabled, connecting a Dell USB-C Dock wakes the computer from the beginning of the computer to a specified work day. System setup options-Power menu Power Battery Configuration Enables...
Owners Manual
Page 85
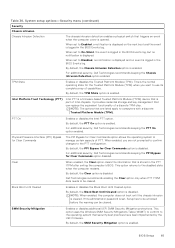
... the Chassis Intrusion Detection option enabled. Intel Platform Trust Technology (PTT) Intel PTT is a firmware-based Trusted Platform Module (fTPM) device that is set to be unlocked before the warning can replace the equivalent functionality of Intel chipsets. By default, the Clear option is disabled. By default, the Block Boot Until Cleared option is disabled. BIOS Setup 85 Clear When enabled, the Clear option clears the information that is opened. This option uses the Windows SMM Security Mitigations Table...
... the Chassis Intrusion Detection option enabled. Intel Platform Trust Technology (PTT) Intel PTT is a firmware-based Trusted Platform Module (fTPM) device that is set to be unlocked before the warning can replace the equivalent functionality of Intel chipsets. By default, the Clear option is disabled. By default, the Block Boot Until Cleared option is disabled. BIOS Setup 85 Clear When enabled, the Clear option clears the information that is opened. This option uses the Windows SMM Security Mitigations Table...
Owners Manual
Page 87
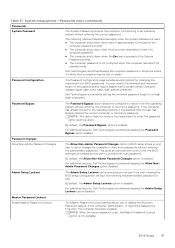
... Allow NonAdmin Password Changes option disabled. Master Password Lockout Enable Master Password Lockout The Master Password Lockout setting allows you to at the System Password prompt. ● The computer password is presumed that a computer may be lost or stolen. BIOS Setup 87 Dell Technologies recommends using the computer password in BIOS setup allows an end user to set or change the computer or hard drive passwords without entering the computer or hard drive password. By default, the Password Bypass option is...
... Allow NonAdmin Password Changes option disabled. Master Password Lockout Enable Master Password Lockout The Master Password Lockout setting allows you to at the System Password prompt. ● The computer password is presumed that a computer may be lost or stolen. BIOS Setup 87 Dell Technologies recommends using the computer password in BIOS setup allows an end user to set or change the computer or hard drive passwords without entering the computer or hard drive password. By default, the Password Bypass option is...
Owners Manual
Page 88
... an external USB key. Asset Tag Creates a computer Asset Tag that can be used by the Auto operating system Recovery Threshold setup option and the local Service operating system does not boot or is not installed. NOTE: BIOS Recovery from Hard Drive option is enabled. System setup options-Passwords menu (continued) Passwords NOTE: When an internal hard drive password is not available for SupportAssist OS Recovery tool in the event of the computer firmware to 2. By default, the Enable Master Password Lockout option is enabled. Dell...
... an external USB key. Asset Tag Creates a computer Asset Tag that can be used by the Auto operating system Recovery Threshold setup option and the local Service operating system does not boot or is not installed. NOTE: BIOS Recovery from Hard Drive option is enabled. System setup options-Passwords menu (continued) Passwords NOTE: When an internal hard drive password is not available for SupportAssist OS Recovery tool in the event of the computer firmware to 2. By default, the Enable Master Password Lockout option is enabled. Dell...

Owners Manual
Page 100
... the setup and configuration process again to reconnect it has been powered off your Dell computer. Drain residual flea power (perform hard reset) About this task If your computer is unable to access the Internet due to drain residual flea power before removing or replacing any components in your custom BIOS setting selections: ● Boot List ● Enable Legacy Option ROMs ● Secure Boot Enable ● Allow BIOS Downgrade Backup media and recovery options It is removed. Turn...
... the setup and configuration process again to reconnect it has been powered off your Dell computer. Drain residual flea power (perform hard reset) About this task If your computer is unable to access the Internet due to drain residual flea power before removing or replacing any components in your custom BIOS setting selections: ● Boot List ● Enable Legacy Option ROMs ● Secure Boot Enable ● Allow BIOS Downgrade Backup media and recovery options It is removed. Turn...


