
Re-imaging Guide for Windows
Page 3
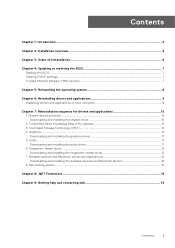
...11 5. Chipset device software...10 Downloading and installing the chipset driver...10 2. Wireless network and Bluetooth drivers and applications 12 Downloading and installing the wireless network and Bluetooth drivers 12 8. Contents Chapter 1: Introduction...4 Chapter 2: Installation overview...5 Chapter 3: Order of reinstallation 6 Chapter 4: Updating or resetting the BIOS 7 Flashing the BIOS...7 Clearing CMOS settings...7 Trusted Platform Module (TPM) security...7 Chapter 5: Reinstalling the operating system 8 Chapter 6: Reinstalling drivers and applications 9 Displaying drivers and...
...11 5. Chipset device software...10 Downloading and installing the chipset driver...10 2. Wireless network and Bluetooth drivers and applications 12 Downloading and installing the wireless network and Bluetooth drivers 12 8. Contents Chapter 1: Introduction...4 Chapter 2: Installation overview...5 Chapter 3: Order of reinstallation 6 Chapter 4: Updating or resetting the BIOS 7 Flashing the BIOS...7 Clearing CMOS settings...7 Trusted Platform Module (TPM) security...7 Chapter 5: Reinstalling the operating system 8 Chapter 6: Reinstalling drivers and applications 9 Displaying drivers and...
Re-imaging Guide for Windows
Page 5
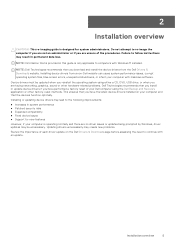
... facing networking, graphics, sound or other factory-reset methods. NOTE: Dell Technologies recommends that you download and install the device drivers from a non-Dell website can cause system performance issues, corrupt operating system files, blue screen errors, unexpected shutdowns, or infect your computer with Windows 11 installed. Installing device drivers from the Dell Drivers & Downloads website. Updating drivers unnecessarily may create new problems. Review the importance of the procedures. NOTE: Information that is provided in this guide is operating...
... facing networking, graphics, sound or other factory-reset methods. NOTE: Dell Technologies recommends that you download and install the device drivers from a non-Dell website can cause system performance issues, corrupt operating system files, blue screen errors, unexpected shutdowns, or infect your computer with Windows 11 installed. Installing device drivers from the Dell Drivers & Downloads website. Updating drivers unnecessarily may create new problems. Review the importance of the procedures. NOTE: Information that is provided in this guide is operating...
Re-imaging Guide for Windows
Page 6
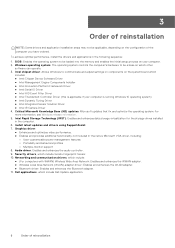
... into the memory and enables the initial setup process on the system board which other software can operate. 3. Intel Rapid Storage Technology (IRST): Enables and enhances data storage virtualization for the storage drives installed in the native Microsoft VGA driver, including: ○ User-customizable power management features ○ Portability and behavioral profiles ○ Multiple-monitor support 8. Windows operating system: The operating system controls the computer's hardware to communicate and adjust settings on...
... into the memory and enables the initial setup process on the system board which other software can operate. 3. Intel Rapid Storage Technology (IRST): Enables and enhances data storage virtualization for the storage drives installed in the native Microsoft VGA driver, including: ○ User-customizable power management features ○ Portability and behavioral profiles ○ Multiple-monitor support 8. Windows operating system: The operating system controls the computer's hardware to communicate and adjust settings on...

Re-imaging Guide for Windows
Page 7
... Volume Down button when the Dell logo appears on the screen. The BIOS setup program is available or when you saved the BIOS update file. 9. Updating or resetting the BIOS 7 Turn on your computer being unable to boot, a BIOS reset is necessary. Select the operating system installed on your computer. 8. Clearing CMOS settings If flashing your computer with the latest BIOS update results in your computer. 6. Click Product support, enter the Service Tag of the following options...
... Volume Down button when the Dell logo appears on the screen. The BIOS setup program is available or when you saved the BIOS update file. 9. Updating or resetting the BIOS 7 Turn on your computer being unable to boot, a BIOS reset is necessary. Select the operating system installed on your computer. 8. Clearing CMOS settings If flashing your computer with the latest BIOS update results in your computer. 6. Click Product support, enter the Service Tag of the following options...
Re-imaging Guide for Windows
Page 10
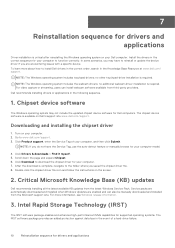
.... NOTE: The Windows operating system includes touchpad drivers; Click Product support, enter the Service Tag of a hard-drive failure. 10 Reinstallation sequence for Dell computers. Click Download to download the chipset driver for your computer to install Dell drivers in the correct order, search in the following sequence. 1. NOTE: The Windows operating system includes the webcam drivers; Scroll down the page and expand Chipset. 6. For more about how to function correctly. NOTE: If...
.... NOTE: The Windows operating system includes touchpad drivers; Click Product support, enter the Service Tag of a hard-drive failure. 10 Reinstallation sequence for Dell computers. Click Download to download the chipset driver for your computer to install Dell drivers in the correct order, search in the following sequence. 1. NOTE: The Windows operating system includes the webcam drivers; Scroll down the page and expand Chipset. 6. For more about how to function correctly. NOTE: If...

Re-imaging Guide for Windows
Page 11
... the instructions on your computer. 7. Reinstallation sequence for download from www.dell.com/support. Turn on the screen. NOTE: If you saved the audio driver file. 8. Audio The Windows operating system does not include the audio driver recommended by a system reboot. Click Product support, enter the Service Tag of your computer, and then click Submit. After the download is complete, navigate to the folder where you cannot install IRST...
... the instructions on your computer. 7. Reinstallation sequence for download from www.dell.com/support. Turn on the screen. NOTE: If you saved the audio driver file. 8. Audio The Windows operating system does not include the audio driver recommended by a system reboot. Click Product support, enter the Service Tag of your computer, and then click Submit. After the download is complete, navigate to the folder where you cannot install IRST...
Re-imaging Guide for Windows
Page 12
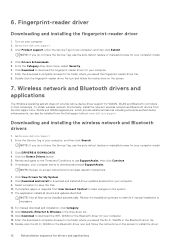
... the Dell support site. For manual download and installation, click Category. 13. After the download is complete, browse to download and install all driver updates detected for your computer model. 4. From the Category drop-down list. 14. NOTE: If you saved the fingerprint-reader driver file. 8. Turn on the screen to use the auto-detect feature or manually browse for My System. 8. To obtain wireless network functionality, install the relevant wireless network and Bluetooth drivers from User Account Control...
... the Dell support site. For manual download and installation, click Category. 13. After the download is complete, browse to download and install all driver updates detected for your computer model. 4. From the Category drop-down list. 14. NOTE: If you saved the fingerprint-reader driver file. 8. Turn on the screen to use the auto-detect feature or manually browse for My System. 8. To obtain wireless network functionality, install the relevant wireless network and Bluetooth drivers from User Account Control...

Service Manual
Page 3
... downloads 13 Chapter 4: System setup...14 Entering BIOS setup program without keyboard...14 Entering BIOS setup program with XPS Folio keyboard 14 Navigation keys...14 System Log...15 System setup options...15 System and setup password...28 Assigning a system setup password...28 Deleting or changing an existing system setup password 28 Clearing BIOS (System Setup) and System passwords 29 Updating the BIOS...29 Updating the BIOS in Windows...29 Updating the BIOS using the USB drive in Windows 29 Updating the BIOS from the F12 One-Time boot menu 30 Chapter 5: Troubleshooting...
... downloads 13 Chapter 4: System setup...14 Entering BIOS setup program without keyboard...14 Entering BIOS setup program with XPS Folio keyboard 14 Navigation keys...14 System Log...15 System setup options...15 System and setup password...28 Assigning a system setup password...28 Deleting or changing an existing system setup password 28 Clearing BIOS (System Setup) and System passwords 29 Updating the BIOS...29 Updating the BIOS in Windows...29 Updating the BIOS using the USB drive in Windows 29 Updating the BIOS from the F12 One-Time boot menu 30 Chapter 5: Troubleshooting...

Service Manual
Page 5
... authorized by their electrical outlets. 4. Swollen batteries should not be replaced and disposed properly. After you work surface is shipped with the product or at www.dell.com/ regulatory_compliance. CAUTION: Press and eject any SIM card from the media-card reader. For Windows operating system, click Start > Power > Shut down your computer 5 1 Working inside your computer Safety instructions Use the following safety guidelines to protect...
... authorized by their electrical outlets. 4. Swollen batteries should not be replaced and disposed properly. After you work surface is shipped with the product or at www.dell.com/ regulatory_compliance. CAUTION: Press and eject any SIM card from the media-card reader. For Windows operating system, click Start > Power > Shut down your computer 5 1 Working inside your computer Safety instructions Use the following safety guidelines to protect...
Service Manual
Page 14
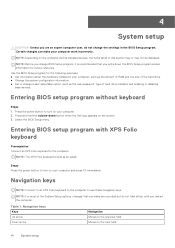
... installed devices, the items listed in your computer work incorrectly. Press the power button to the next field. 14 System setup Moves to turn on your computer and press F2 immediately. Entering BIOS setup program without keyboard Steps 1. Select the BIOS Setup menu. Steps Press the power button to the computer. Entering BIOS setup program with XPS Folio keyboard Prerequisites Connect an XPS Folio keyboard to turn on your computer. 2. NOTE: For most of hard drive installed, and enabling or disabling...
... installed devices, the items listed in your computer work incorrectly. Press the power button to the next field. 14 System setup Moves to turn on your computer and press F2 immediately. Entering BIOS setup program without keyboard Steps 1. Select the BIOS Setup menu. Steps Press the power button to the computer. Entering BIOS setup program with XPS Folio keyboard Prerequisites Connect an XPS Folio keyboard to turn on your computer. 2. NOTE: For most of hard drive installed, and enabling or disabling...

Service Manual
Page 19
... drives. Controls whether hard drive errors for integrated drives are reported during startup about potential failure of the SMART (Self-Monitoring Analysis and Reporting Technology) specification Default: OFF Table 6. System setup options-Display menu Display Display Brightness Brightness on battery power Sets the screen brightness when the computer is running on AC power. By default, WLAN is selected. Default: ON Full Screen Logo Full Screen Logo Enabled or disabled the computer to support RAID functions with VMD Controller. Default: OFF Table 7. By default, Bluetooth...
... drives. Controls whether hard drive errors for integrated drives are reported during startup about potential failure of the SMART (Self-Monitoring Analysis and Reporting Technology) specification Default: OFF Table 6. System setup options-Display menu Display Display Brightness Brightness on battery power Sets the screen brightness when the computer is running on AC power. By default, WLAN is selected. Default: ON Full Screen Logo Full Screen Logo Enabled or disabled the computer to support RAID functions with VMD Controller. Default: OFF Table 7. By default, Bluetooth...
Service Manual
Page 22
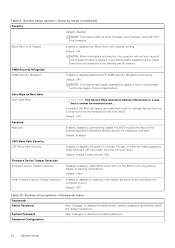
... are connected to be unlocked before the warning can be reconstructed. Data Wipe on the next reboot. System Password Sets, Changes, or deletes the system password. System setup options-Security menu (continued) Security Default: Disabled NOTE: This feature detects when the base cover has been removed from the F12 boot menu. Default: Silent Clear Firmware Device Tamper Detection Enables or disables to enter the Admin password when booting a UEFI boot path from the computer. If enabled, the BIOS...
... are connected to be unlocked before the warning can be reconstructed. Data Wipe on the next reboot. System Password Sets, Changes, or deletes the system password. System setup options-Security menu (continued) Security Default: Disabled NOTE: This feature detects when the base cover has been removed from the F12 boot menu. Default: Silent Clear Firmware Device Tamper Detection Enables or disables to enter the Admin password when booting a UEFI boot path from the computer. If enabled, the BIOS...
Service Manual
Page 23
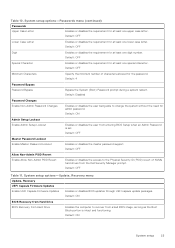
... Firmware Updates Enable UEFI Capsule Firmware Updates Enables or disables BIOS updates through UEFI capsule update packages. Default: ON BIOS Recovery from Hard Drive BIOS Recovery from Hard Drive Enables the computer to change the system without the need for at least one upper case letter. Default: OFF Minimum Characters Specify the minimum number of NVMe hard drives from a bad BIOS image, as long as the Boot Block portion is set. Default: ON Admin Setup Lockout Enable Admin Setup Lockout Enables or disables the user from entering BIOS Setup...
... Firmware Updates Enable UEFI Capsule Firmware Updates Enables or disables BIOS updates through UEFI capsule update packages. Default: ON BIOS Recovery from Hard Drive BIOS Recovery from Hard Drive Enables the computer to change the system without the need for at least one upper case letter. Default: OFF Minimum Characters Specify the minimum number of NVMe hard drives from a bad BIOS image, as long as the Boot Block portion is set. Default: ON Admin Setup Lockout Enable Admin Setup Lockout Enables or disables the user from entering BIOS Setup...

Service Manual
Page 24
... be used by the Auto OS Recovery Threshold setup option. Asset Tag Asset Tag Creates a system Asset Tag that can be changed. Default: OFF Wake on LAN Wake on LAN Enables or disables the computer to fix the main BIOS block and cannot work in the event of the computer. BIOS Downgrade Allow BIOS Downgrade Controls flashing of certain system errors. Default: 2 Table 12. System setup options-System Management menu System Management Service Tag Service Tag Displays the Service...
... be used by the Auto OS Recovery Threshold setup option. Asset Tag Asset Tag Creates a system Asset Tag that can be changed. Default: OFF Wake on LAN Wake on LAN Enables or disables the computer to fix the main BIOS block and cannot work in the event of the computer. BIOS Downgrade Allow BIOS Downgrade Controls flashing of certain system errors. Default: 2 Table 12. System setup options-System Management menu System Management Service Tag Service Tag Displays the Service...

Service Manual
Page 25
... keys scan the code for the keyboard when an AC adapter is enabled. Table 12. Default: ON Power-on-Self-Test Automatic Recovery Power-on-Self-Test Automatic Recovery Enable the computer to automatically recover it becomes unresponsive before completing the BIOS Power-on encountering a warning or error during boot. System setup options-Keyboard menu Keyboard Fn Lock Options Fn Lock Options Enables or disables the Fn lock mode. Default: Bright. System setup options-Pre-boot Behavior menu Pre-boot Behavior Adapter Warnings Enable Dock Warning Messages Enables or disables...
... keys scan the code for the keyboard when an AC adapter is enabled. Table 12. Default: ON Power-on-Self-Test Automatic Recovery Power-on-Self-Test Automatic Recovery Enable the computer to automatically recover it becomes unresponsive before completing the BIOS Power-on encountering a warning or error during boot. System setup options-Keyboard menu Keyboard Fn Lock Options Fn Lock Options Enables or disables the Fn lock mode. Default: Bright. System setup options-Pre-boot Behavior menu Pre-boot Behavior Adapter Warnings Enable Dock Warning Messages Enables or disables...

Service Manual
Page 33
... ISPs (Internet Service Providers) provide a modem/router combo device. Troubleshooting 33 Power off the wireless router. 4. WiFi power cycle About this task If your computer. 2. Turn on the screen). 8. Continue to hold volume-down button and press the power button to enter LCD built-in self test (BIST) mode. Steps 1. Turn off your computer is an inherent problem with the video card (GPU) and PC settings. LCD Built-in Self Test (BIST) Dell laptops have...
... ISPs (Internet Service Providers) provide a modem/router combo device. Troubleshooting 33 Power off the wireless router. 4. WiFi power cycle About this task If your computer. 2. Turn on the screen). 8. Continue to hold volume-down button and press the power button to enter LCD built-in self test (BIST) mode. Steps 1. Turn off your computer is an inherent problem with the video card (GPU) and PC settings. LCD Built-in Self Test (BIST) Dell laptops have...

Service Manual
Page 34
... www.dell.com/ support. Turn off and the battery is held longer than 40 seconds, the RTC reset process gets aborted. NOTE: For more information about performing a hard reset, search in the computer even after you or the service technician to recover the recently launched model Dell XPS systems from the system during the process or the power button is removed. The system RTC reset occurs...
... www.dell.com/ support. Turn off and the battery is held longer than 40 seconds, the RTC reset process gets aborted. NOTE: For more information about performing a hard reset, search in the computer even after you or the service technician to recover the recently launched model Dell XPS systems from the system during the process or the power button is removed. The system RTC reset occurs...
Setup and Specifications
Page 15
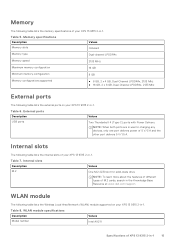
... Model number Values Intel AX211 Specifications of XPS 13 9315 2-in use for solid-state drive NOTE: To learn more about the features of different types of 5 V/3 A and the other port delivers 5 V/1.5 A. Table 5. Table 7. Memory The following table lists the external ports on your XPS 13 9315 2-in-1. Internal slots Description M.2 Values One M.2 2230 slot for charging any devices, only one port delivers power of M.2 cards, search in the Knowledge Base Resource at www.dell.com/support...
... Model number Values Intel AX211 Specifications of XPS 13 9315 2-in use for solid-state drive NOTE: To learn more about the features of different types of 5 V/3 A and the other port delivers 5 V/1.5 A. Table 5. Table 7. Memory The following table lists the external ports on your XPS 13 9315 2-in-1. Internal slots Description M.2 Values One M.2 2230 slot for charging any devices, only one port delivers power of M.2 cards, search in the Knowledge Base Resource at www.dell.com/support...
Setup and Specifications
Page 16
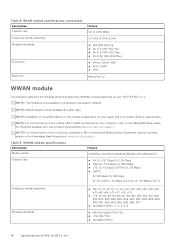
... (WiFi 802.11ax) ● 64-bit/128-bit WEP ● AES-CCMP ● TKIP Bluetooth 5.2 WWAN module The following table lists the Wireless Wide Area Network (WWAN) module supported on your region and your XPS 13 9315 2-in the Knowledge Base Resource at www.dell.com/support. NOTE: Availability of XPS 13 9315 2-in-1 NOTE: For instructions on how to the SIM/eSIM Setup Guide for Windows available with eSIM option...
... (WiFi 802.11ax) ● 64-bit/128-bit WEP ● AES-CCMP ● TKIP Bluetooth 5.2 WWAN module The following table lists the Wireless Wide Area Network (WWAN) module supported on your region and your XPS 13 9315 2-in the Knowledge Base Resource at www.dell.com/support. NOTE: Availability of XPS 13 9315 2-in-1 NOTE: For instructions on how to the SIM/eSIM Setup Guide for Windows available with eSIM option...

XPS Stylus Users Guide
Page 14
... LED indicator turns solid white, launch DPeM and follow the onscreen instructions to disable shipping mode. The pen is not working as expected. For more information, see Pairing your pen. The firmware upgrade has failed. The pen works only with supported XPS computers. The pen is low. The pen works only with supported XPS computers. and the LED indicator shows blinking amber. Default functions for pen buttons do not Install the latest Bluetooth driver...
... LED indicator turns solid white, launch DPeM and follow the onscreen instructions to disable shipping mode. The pen is not working as expected. For more information, see Pairing your pen. The firmware upgrade has failed. The pen works only with supported XPS computers. The pen is low. The pen works only with supported XPS computers. and the LED indicator shows blinking amber. Default functions for pen buttons do not Install the latest Bluetooth driver...


