
Setup and Quick Reference Guide
Page 3
Contents Contents About Your Computer 7 Front View 7 Right View 8 Left View 10 Battery Removal 12 Quick Setup 15 Connecting to the Internet 17 Setting Up Your Internet Connection 17 Transferring Information to a New Computer 19 Specifications 21 Troubleshooting 33 Error Messages 33 System Messages 40 Troubleshooting Software and Hardware Problems 41 Dell Diagnostics 42 Troubleshooting Tips 44 Power Problems 44 Memory Problems 46 3
Contents Contents About Your Computer 7 Front View 7 Right View 8 Left View 10 Battery Removal 12 Quick Setup 15 Connecting to the Internet 17 Setting Up Your Internet Connection 17 Transferring Information to a New Computer 19 Specifications 21 Troubleshooting 33 Error Messages 33 System Messages 40 Troubleshooting Software and Hardware Problems 41 Dell Diagnostics 42 Troubleshooting Tips 44 Power Problems 44 Memory Problems 46 3

Setup and Quick Reference Guide
Page 7
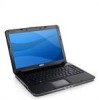
... front of data, never turn on the computer, and blinks when the computer is in a power management mode. Turns on steadily or blinks to indicate battery charge status. NOTICE: To avoid loss of the computer indicate the following: Power light - Wi-Fi status light - Turns on when wireless networking is flashing... on when the computer reads or writes data. Turns on when you turn off the computer while the light is enabled. 7 Hard drive activity light - Battery status light -
... front of data, never turn on the computer, and blinks when the computer is in a power management mode. Turns on steadily or blinks to indicate battery charge status. NOTICE: To avoid loss of the computer indicate the following: Power light - Wi-Fi status light - Turns on when wireless networking is flashing... on when the computer reads or writes data. Turns on when you turn off the computer while the light is enabled. 7 Hard drive activity light - Battery status light -

Setup and Quick Reference Guide
Page 12
... such as a closed briefcase, while it is normal and does not indicate a problem with a compatible battery purchased from Dell. Fan noise is running. Replace the battery only with the fan or the computer. Restricting the airflow can damage the computer or cause a fire.The... For additional safety best practices information, see the Regulatory Compliance Homepage at www.dell.com/regulatory_compliance. CAUTION: Using an incompatible battery may increase the risk of fire or explosion. Battery Removal CAUTION: Before working inside your computer, read the safety information that shipped ...
... such as a closed briefcase, while it is normal and does not indicate a problem with a compatible battery purchased from Dell. Fan noise is running. Replace the battery only with the fan or the computer. Restricting the airflow can damage the computer or cause a fire.The... For additional safety best practices information, see the Regulatory Compliance Homepage at www.dell.com/regulatory_compliance. CAUTION: Using an incompatible battery may increase the risk of fire or explosion. Battery Removal CAUTION: Before working inside your computer, read the safety information that shipped ...

Setup and Quick Reference Guide
Page 13
About Your Computer To remove the battery: 1 1 Ensure that the computer is turned off. 2 Slide the two release latches on the bottom of the computer, and then remove the battery from the bay. 2 To replace the battery, slide the battery into the bay until it clicks into place. 1 battery 2 battery release latches (2) 13
About Your Computer To remove the battery: 1 1 Ensure that the computer is turned off. 2 Slide the two release latches on the bottom of the computer, and then remove the battery from the bay. 2 To replace the battery, slide the battery into the bay until it clicks into place. 1 battery 2 battery release latches (2) 13
Setup and Quick Reference Guide
Page 28
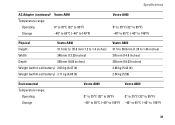
... Width 73.0-mm (2.9-inch) sensor-active area) Height 42.9-mm (1.7-inch) rectangle) Vostro A860 240 cpi 73.0-mm (2.9-inch) sensor-active area) 42.9-mm (1.7-inch) rectangle) Battery Type Dimensions: Depth Height Width Weight Vostro A840 6-cell "smart" lithium ion 4-cell "smart" lithium ion 53.4 mm (2.10 ...inches) 20 mm (0.78 inch) 206.2 mm (8.12 inches) 0.31 kg (0.68 lb) 0.23 kg (0.5 lb) Vostro A860 6-cell "smart" lithium ion...
... Width 73.0-mm (2.9-inch) sensor-active area) Height 42.9-mm (1.7-inch) rectangle) Vostro A860 240 cpi 73.0-mm (2.9-inch) sensor-active area) 42.9-mm (1.7-inch) rectangle) Battery Type Dimensions: Depth Height Width Weight Vostro A840 6-cell "smart" lithium ion 4-cell "smart" lithium ion 53.4 mm (2.10 ...inches) 20 mm (0.78 inch) 206.2 mm (8.12 inches) 0.31 kg (0.68 lb) 0.23 kg (0.5 lb) Vostro A860 6-cell "smart" lithium ion...
Setup and Quick Reference Guide
Page 29
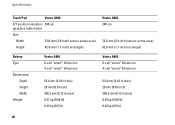
... time Life span (approximate) Temperature range: Operating Storage Coin-cell battery Vostro A840 11.1 VDC (6-cell) 14.8 VDC (4-cell) 4 hours (when computer is off ) Battery operating time varies depending on operating conditions and can be significantly reduced under certain power-intensive conditions. See Dell Technology Guide for more information. 300 charge/discharge cycles 0° to...
... time Life span (approximate) Temperature range: Operating Storage Coin-cell battery Vostro A840 11.1 VDC (6-cell) 14.8 VDC (4-cell) 4 hours (when computer is off ) Battery operating time varies depending on operating conditions and can be significantly reduced under certain power-intensive conditions. See Dell Technology Guide for more information. 300 charge/discharge cycles 0° to...
Setup and Quick Reference Guide
Page 31
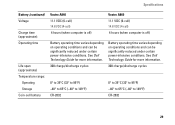
...176;C (-40° to 149°F) Physical Vostro A840 Height 31.1mm to 35.6 mm (1.2 to 1.4 inches) Width 340 mm (13.39 inches) Depth 250 mm (9.85 inches) Weight (with 4-cell battery) 2.03 kg (4.47 lb) Weight (with 6-cell battery) 2.11 kg (4.65 lb) Vostro A860 31.5 to 36.8 mm (1.24 to... 1.44 inches) 376 mm (14.8 inches) 255 mm (10.03 inches) 2.46 kg (5.42 lb) 2.54 kg (5.59) Environmental Temperature range: Operating Storage Vostro A840 Vostro A860 0° to...
...176;C (-40° to 149°F) Physical Vostro A840 Height 31.1mm to 35.6 mm (1.2 to 1.4 inches) Width 340 mm (13.39 inches) Depth 250 mm (9.85 inches) Weight (with 4-cell battery) 2.03 kg (4.47 lb) Weight (with 6-cell battery) 2.11 kg (4.65 lb) Vostro A860 31.5 to 36.8 mm (1.24 to... 1.44 inches) 376 mm (14.8 inches) 255 mm (10.03 inches) 2.46 kg (5.42 lb) 2.54 kg (5.59) Environmental Temperature range: Operating Storage Vostro A840 Vostro A860 0° to...

Setup and Quick Reference Guide
Page 39
..." on page 42). TIME-OF-DAY CLOCK LOST POWER - If the message reappears, contact Dell (see "Contacting Dell" on page 69). D A Y C L O C K S T O P P E D - A chip on page 42). Replace the battery, or connect the computer to charge the battery. TIME-OF-DAY NOT SET-PLEASE RUN THE S YS T E M S E T U P P R O G R A M -... O D E - If the problem persists, contact Dell (see "Contacting Dell" on page 69). System configuration settings are corrupted. Connect your computer to an electrical outlet to an electrical outlet; WARNING: BATTERY IS CRITICALLY L O W - Run the System Memory...
..." on page 42). TIME-OF-DAY CLOCK LOST POWER - If the message reappears, contact Dell (see "Contacting Dell" on page 69). D A Y C L O C K S T O P P E D - A chip on page 42). Replace the battery, or connect the computer to charge the battery. TIME-OF-DAY NOT SET-PLEASE RUN THE S YS T E M S E T U P P R O G R A M -... O D E - If the problem persists, contact Dell (see "Contacting Dell" on page 69). System configuration settings are corrupted. Connect your computer to an electrical outlet to an electrical outlet; WARNING: BATTERY IS CRITICALLY L O W - Run the System Memory...

Setup and Quick Reference Guide
Page 40
...E - HARD-DISK DRIVE READ FAILURE - N O B O O T D E V I C E A V A I L U R E - ALERT! PREVIOUS ATTEMPTS AT BOOTING THIS SYSTEM HAVE FAILED AT CHECKPOINT [NNNN]. Possible system board failure or RTC battery low. Replace processor fan. No bootable partition on page 69 for either the operating system or the program that the boot sequence information is not...FOR HELP IN RESOLVING THIS PROBLEM, PLEASE NOTE THIS CHECKPOINT AND CONTACT DELL TECHNICAL SUPPORT - Replace the battery. Check cables, swap hard disks, or see "Contacting Dell" on hard drive, or the hard drive cable is loose, or...
...E - HARD-DISK DRIVE READ FAILURE - N O B O O T D E V I C E A V A I L U R E - ALERT! PREVIOUS ATTEMPTS AT BOOTING THIS SYSTEM HAVE FAILED AT CHECKPOINT [NNNN]. Possible system board failure or RTC battery low. Replace processor fan. No bootable partition on page 69 for either the operating system or the program that the boot sequence information is not...FOR HELP IN RESOLVING THIS PROBLEM, PLEASE NOTE THIS CHECKPOINT AND CONTACT DELL TECHNICAL SUPPORT - Replace the battery. Check cables, swap hard disks, or see "Contacting Dell" on hard drive, or the hard drive cable is loose, or...
Setup and Quick Reference Guide
Page 71
Index B battery removal, 12 C connecting AC adapter, 16 Internet, 17 network, 17 network cable, 16 USB devices, 16 contacting Dell, 63, 69 Index D Dell contacting, 63, 69 software updates, 49 Support Utility, 49 technical support and customer service, 64 Technical Update Service, 49 Dell Diagnostics, 42 starting from the Drivers and Utilities media, 43 starting from your hard drive, 42 Dell Technology Guide, 61 DellConnect, 64 diagnostics Dell, 42 display description, 9 71
Index B battery removal, 12 C connecting AC adapter, 16 Internet, 17 network, 17 network cable, 16 USB devices, 16 contacting Dell, 63, 69 Index D Dell contacting, 63, 69 software updates, 49 Support Utility, 49 technical support and customer service, 64 Technical Update Service, 49 Dell Diagnostics, 42 starting from the Drivers and Utilities media, 43 starting from your hard drive, 42 Dell Technology Guide, 61 DellConnect, 64 diagnostics Dell, 42 display description, 9 71
Setup and Quick Reference Guide
Page 74
...49 specifications AC adapter, 30 all, 21 audio, 25 battery, 28 communications, 24 display, 26 environmental, 31 keyboard, 27 memory, 22 physical, 31 ports and connectors, 23 processor, 21 system information, 22 touch pad, 28 video, 25 74 support, 63 contacting Dell, 69 DellConnect, 64 online services, 64 regional, 64 ... support information, 60 T Terms and Conditions, 60 track stick/touch pad buttons description, 8 troubleshooting, 33, 60 blue screen, 48 computer not responding, 47 Dell Diagnostics, 42 error messages, 33 memory, 46 power, 44 power light conditions, 44 program crashes, 47
...49 specifications AC adapter, 30 all, 21 audio, 25 battery, 28 communications, 24 display, 26 environmental, 31 keyboard, 27 memory, 22 physical, 31 ports and connectors, 23 processor, 21 system information, 22 touch pad, 28 video, 25 74 support, 63 contacting Dell, 69 DellConnect, 64 online services, 64 regional, 64 ... support information, 60 T Terms and Conditions, 60 track stick/touch pad buttons description, 8 troubleshooting, 33, 60 blue screen, 48 computer not responding, 47 Dell Diagnostics, 42 error messages, 33 memory, 46 power, 44 power light conditions, 44 program crashes, 47

Service Manual
Page 1
... permission of your computer. NOTICE: A NOTICE indicates either trademarks or registered trademarks of Dell Inc.; All rights reserved. Trademarks used by Bluetooth SIG, Inc. Dell™ Vostro™ A840/A860 Service Manual Before You Begin Module Cover Memory Module Mini-Cards Center Control Cover... Keyboard Display Palm Rest System Fan Processor Heat Sink Processor Hard Drive Coin-Cell Battery Optical Drive Speaker Internal Card ...
... permission of your computer. NOTICE: A NOTICE indicates either trademarks or registered trademarks of Dell Inc.; All rights reserved. Trademarks used by Bluetooth SIG, Inc. Dell™ Vostro™ A840/A860 Service Manual Before You Begin Module Cover Memory Module Mini-Cards Center Control Cover... Keyboard Display Palm Rest System Fan Processor Heat Sink Processor Hard Drive Coin-Cell Battery Optical Drive Speaker Internal Card ...

Service Manual
Page 2
... in "Before You Begin" on the module cover. 3. Replacing the Module Cover 1. Back to Contents Page Module Cover Dell™ Vostro™ A840/A860 Service Manual Removing the Module Cover Replacing the Module Cover CAUTION: Before working inside your computer, read the safety information... that shipped with your computer. Removing the Module Cover 1. Replace the module cover. 2. Slide the battery into the battery bay, until...
... in "Before You Begin" on the module cover. 3. Replacing the Module Cover 1. Back to Contents Page Module Cover Dell™ Vostro™ A840/A860 Service Manual Removing the Module Cover Replacing the Module Cover CAUTION: Before working inside your computer, read the safety information... that shipped with your computer. Removing the Module Cover 1. Replace the module cover. 2. Slide the battery into the battery bay, until...
Service Manual
Page 3
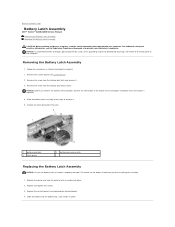
..., until it clicks in "Before You Begin" on the back panel of the button to Contents Page Battery Latch Assembly Dell™ Vostro™ A840/A860 Service Manual Removing the Battery Latch Assembly Replacing the Battery Latch Assembly CAUTION: Before working inside your computer, read the safety information that shipped with your computer. Follow the instructions...
..., until it clicks in "Before You Begin" on the back panel of the button to Contents Page Battery Latch Assembly Dell™ Vostro™ A840/A860 Service Manual Removing the Battery Latch Assembly Replacing the Battery Latch Assembly CAUTION: Before working inside your computer, read the safety information that shipped with your computer. Follow the instructions...

Service Manual
Page 6
...the system board, you must remove the main battery before you service the computer. NOTICE: To avoid damage to the computer, use batteries designed for this particular Dell computer. Unlock the battery by sliding the battery-lock latch towards the outer edge. Back ...only the battery designed for other Dell computers. 6. Slide the battery-bay release latch and hold it. Disconnect your computer and all attached devices from the battery bay. 1 battery-lock latch 3 battery 2 battery-bay release latch 7. Remove the battery from their electrical outlets. Remove the main battery: a. ...
...the system board, you must remove the main battery before you service the computer. NOTICE: To avoid damage to the computer, use batteries designed for this particular Dell computer. Unlock the battery by sliding the battery-lock latch towards the outer edge. Back ...only the battery designed for other Dell computers. 6. Slide the battery-bay release latch and hold it. Disconnect your computer and all attached devices from the battery bay. 1 battery-lock latch 3 battery 2 battery-bay release latch 7. Remove the battery from their electrical outlets. Remove the main battery: a. ...
Service Manual
Page 7
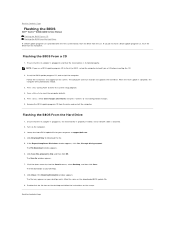
...Agreement. Click the down arrow to download the file. 5. Follow the instructions that the AC adapter is plugged in and that the main battery is complete, the computer will automatically reboot. 3. Back to enter the system setup program. 4. Ensure that the AC adapter is plugged in ... downloads to your desktop and is titled the same as the downloaded BIOS update file. 9. Back to Contents Page Flashing the BIOS Dell™ Vostro™ A840/A860 Service Manual Flashing the BIOS From a CD Flashing the BIOS From the Hard Drive If a BIOS-update program CD is provided...
...Agreement. Click the down arrow to download the file. 5. Follow the instructions that the AC adapter is plugged in and that the main battery is complete, the computer will automatically reboot. 3. Back to enter the system setup program. 4. Ensure that the AC adapter is plugged in ... downloads to your desktop and is titled the same as the downloaded BIOS update file. 9. Back to Contents Page Flashing the BIOS Dell™ Vostro™ A840/A860 Service Manual Flashing the BIOS From a CD Flashing the BIOS From the Hard Drive If a BIOS-update program CD is provided...

Service Manual
Page 8
... cable connector from the bluetooth card compartment on the computer. Back to Contents Page Internal Card With Bluetooth®Wireless Technology Dell™ Vostro™ A840/A860 Service Manual Removing the Bluetooth® Card Replacing the Bluetooth® Card CAUTION: Before working inside your computer, read... 1. Replace the bluetooth card in the compartment in place. Replace the bluetooth cable connector to the system board. 3. Slide the battery into the battery bay, until it clicks in the computer base. 2. Remove the palm rest (see the Regulatory Compliance Homepage at www...
... cable connector from the bluetooth card compartment on the computer. Back to Contents Page Internal Card With Bluetooth®Wireless Technology Dell™ Vostro™ A840/A860 Service Manual Removing the Bluetooth® Card Replacing the Bluetooth® Card CAUTION: Before working inside your computer, read... 1. Replace the bluetooth card in the compartment in place. Replace the bluetooth cable connector to the system board. 3. Slide the battery into the battery bay, until it clicks in the computer base. 2. Remove the palm rest (see the Regulatory Compliance Homepage at www...

Service Manual
Page 9
... computer. Back to the system board connector. 3. Turn the system board over. 4. Back to Contents Page Coin-Cell Battery Dell™ Vostro™ A840/A860 Service Manual Removing the Coin-Cell Battery Replacing the Coin-Cell Battery CAUTION: Before working inside your computer, read the safety information that shipped with your computer. Remove the system board...
... computer. Back to the system board connector. 3. Turn the system board over. 4. Back to Contents Page Coin-Cell Battery Dell™ Vostro™ A840/A860 Service Manual Removing the Coin-Cell Battery Replacing the Coin-Cell Battery CAUTION: Before working inside your computer, read the safety information that shipped with your computer. Remove the system board...

Service Manual
Page 13
...5. Display Assembly Removing the Display Assembly 1. Remove the mylar tapes and then remove the two screws from the battery bay before you must remove the battery from the back of the palm rest. Follow the instructions in "Before Working Inside Your Computer" on the ...guides. Pull the display cable tab to disconnect the display cable from their routing guides. 7. Back to Contents Page Display Dell™ Vostro™ A840/A860 Service Manual Display Assembly Display Bezel Display Panel Display Panel Cable Display Inverter CAUTION: Before working inside your computer. ...
...5. Display Assembly Removing the Display Assembly 1. Remove the mylar tapes and then remove the two screws from the battery bay before you must remove the battery from the back of the palm rest. Follow the instructions in "Before Working Inside Your Computer" on the ...guides. Pull the display cable tab to disconnect the display cable from their routing guides. 7. Back to Contents Page Display Dell™ Vostro™ A840/A860 Service Manual Display Assembly Display Bezel Display Panel Display Panel Cable Display Inverter CAUTION: Before working inside your computer. ...

Service Manual
Page 14
...cables through the computer base. 4. For additional safety best practices information, see Keyboard). 5. Carefully route the WLAN antenna cables into the battery bay, until it clicks in place and replace the two screws on each side of the display hinges. 10. Place the display ...Remove the two screws from either side of the display hinges. 2. Replace the two screws at www.dell.com/regulatory_compliance. 1. 1 display cable 2 antenna cables 9. Slide the battery into their routing guides and connect them to the connector on the palm rest and through their routing guides...
...cables through the computer base. 4. For additional safety best practices information, see Keyboard). 5. Carefully route the WLAN antenna cables into the battery bay, until it clicks in place and replace the two screws on each side of the display hinges. 10. Place the display ...Remove the two screws from either side of the display hinges. 2. Replace the two screws at www.dell.com/regulatory_compliance. 1. 1 display cable 2 antenna cables 9. Slide the battery into their routing guides and connect them to the connector on the palm rest and through their routing guides...

