Owners Manual
Page 3
... Your Computer...6 After Working Inside Your Computer...7 2 Removing and Installing Components 9 Removing the Security Digital (SD) Card...9 Installing the Secure Digital Card...9 Removing the Battery...9 Installing the Battery...10 Removing the ExpressCard...10 Installing the ExpressCard...10 Removing the Base Cover...10 Installing the Base Cover...12 Removing the Memory...12 Installing...
... Your Computer...6 After Working Inside Your Computer...7 2 Removing and Installing Components 9 Removing the Security Digital (SD) Card...9 Installing the Secure Digital Card...9 Removing the Battery...9 Installing the Battery...10 Removing the ExpressCard...10 Installing the ExpressCard...10 Removing the Base Cover...10 Installing the Base Cover...12 Removing the Memory...12 Installing...
Owners Manual
Page 4
Removing the Processor...34 Installing the Processor...35 Removing the Coin-Cell Battery...35 Installing the Coin-Cell Battery...36 Removing the Wireless Local Area Network (WLAN) Card 36 Installing the Wireless Local Area Network (WLAN) Card 36 Removing the LAN Board...37 Installing ... Deleting or Changing an Existing System and/or Setup Password 59 4 Diagnostics...61 Enhanced Pre-Boot System Assessment (ePSA) Diagnostics 61 Device Status Lights...61 Battery Status Lights...62 Diagnostic Beep Codes...62 5 Specifications...65 6 Getting Help...71 Contacting...
Removing the Processor...34 Installing the Processor...35 Removing the Coin-Cell Battery...35 Installing the Coin-Cell Battery...36 Removing the Wireless Local Area Network (WLAN) Card 36 Installing the Wireless Local Area Network (WLAN) Card 36 Removing the LAN Board...37 Installing ... Deleting or Changing an Existing System and/or Setup Password 59 4 Diagnostics...61 Enhanced Pre-Boot System Assessment (ePSA) Diagnostics 61 Device Status Lights...61 Battery Status Lights...62 Diagnostic Beep Codes...62 5 Specifications...65 6 Getting Help...71 Contacting...
Owners Manual
Page 5
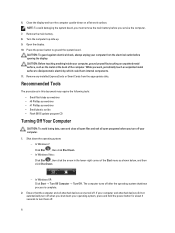
...Ensure that your computer. Turn off your computer and then unplug the cable from your computer (see the Regulatory Compliance Homepage at www.dell.com/ regulatory_compliance CAUTION: Many repairs may appear differently than shown in this type of cable, press in your personal safety. CAUTION: To...your computer and all network cables from potential damage and to help to ensure your product documentation, or as the optional Media Base or Battery Slice, undock it. Disconnect all attached devices from being scratched. 2. 1 Working on Your Computer. • You have read the safety...
...Ensure that your computer. Turn off your computer and then unplug the cable from your computer (see the Regulatory Compliance Homepage at www.dell.com/ regulatory_compliance CAUTION: Many repairs may appear differently than shown in this type of cable, press in your personal safety. CAUTION: To...your computer and all network cables from potential damage and to help to ensure your product documentation, or as the optional Media Base or Battery Slice, undock it. Disconnect all attached devices from being scratched. 2. 1 Working on Your Computer. • You have read the safety...
Owners Manual
Page 6
... button to turn the computer upside-down the operating system: - Ensure that the computer and all open programs before opening the display. 6. Remove the main battery. 8. CAUTION: To guard against electrical shock, always unplug your computer, ground yourself by touching an unpainted metal surface, such as shown below, and then click...
... button to turn the computer upside-down the operating system: - Ensure that the computer and all open programs before opening the display. 6. Remove the main battery. 8. CAUTION: To guard against electrical shock, always unplug your computer, ground yourself by touching an unpainted metal surface, such as shown below, and then click...
Owners Manual
Page 7
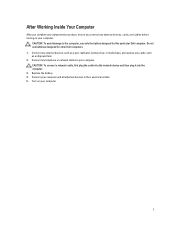
...their electrical outlets. 5. Connect any telephone or network cables to your computer and all attached devices to the computer, use batteries designed for this particular Dell computer. Replace the battery. 4. Connect your computer. After Working Inside Your Computer After you complete any replacement procedure, ensure you connect any external ... plug the cable into the network device and then plug it into the computer. 3. Connect any external devices, such as a port replicator, battery slice, or media base, and replace any cards, such as an ExpressCard. 2. Turn on your computer.
...their electrical outlets. 5. Connect any telephone or network cables to your computer and all attached devices to the computer, use batteries designed for this particular Dell computer. Replace the battery. 4. Connect your computer. After Working Inside Your Computer After you complete any replacement procedure, ensure you connect any external ... plug the cable into the network device and then plug it into the computer. 3. Connect any external devices, such as a port replicator, battery slice, or media base, and replace any cards, such as an ExpressCard. 2. Turn on your computer.

Owners Manual
Page 9
... Inside Your Computer. 2 Removing and Installing Components This section provides detailed information on the SD card to release it clicks into place. 2. Removing the Battery 1. Slide the battery latches to remove or install the components from the computer. 9 Installing the Secure Digital Card 1. Lift and remove the... battery from your computer. Slide the SD card out of the computer. Push the SD card into the slot until it from the computer. Follow ...
... Inside Your Computer. 2 Removing and Installing Components This section provides detailed information on the SD card to release it clicks into place. 2. Removing the Battery 1. Slide the battery latches to remove or install the components from the computer. 9 Installing the Secure Digital Card 1. Lift and remove the... battery from your computer. Slide the SD card out of the computer. Push the SD card into the slot until it from the computer. Follow ...

Owners Manual
Page 10
... to the computer. Removing the ExpressCard 1. Press in After Working Inside Your Computer. Remove the battery. 3. Pull the ExpressCard and remove out of the computer. Installing the Battery 1. Installing the ExpressCard 1. Follow the procedures in on the ExpressCard and release. Remove the... battery. 3. Follow the procedures in Before Working Inside Your Computer. 2. Install the battery. 3. Lift the cover upwards. 10 Slide the battery into its slot until it clicks into place. 2. Follow the procedures...
... to the computer. Removing the ExpressCard 1. Press in After Working Inside Your Computer. Remove the battery. 3. Pull the ExpressCard and remove out of the computer. Installing the Battery 1. Installing the ExpressCard 1. Follow the procedures in on the ExpressCard and release. Remove the... battery. 3. Follow the procedures in Before Working Inside Your Computer. 2. Install the battery. 3. Lift the cover upwards. 10 Slide the battery into its slot until it clicks into place. 2. Follow the procedures...
Owners Manual
Page 12
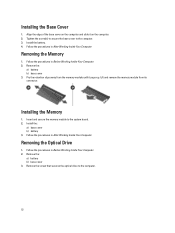
...clips away from its connector. Removing the Memory 1. Remove the screw that secures the optical drive to the computer. 3. Remove the: a) battery b) base cover 3. Lift and remove the memory module from the memory module until it on the computer. 2. Removing the Optical Drive 1. ...Memory 1. Follow the procedures in Before Working Inside Your Computer. 2. Remove the: a) battery b) base cover 3. Tighten the screw(s) to secure the base cover to the computer. 12 Install the: a) base cover b) battery 3. Insert and secure the memory module to the system board. 2. Align the edge...
...clips away from its connector. Removing the Memory 1. Remove the screw that secures the optical drive to the computer. 3. Remove the: a) battery b) base cover 3. Lift and remove the memory module from the memory module until it on the computer. 2. Removing the Optical Drive 1. ...Memory 1. Follow the procedures in Before Working Inside Your Computer. 2. Remove the: a) battery b) base cover 3. Tighten the screw(s) to secure the base cover to the computer. 12 Install the: a) base cover b) battery 3. Insert and secure the memory module to the system board. 2. Align the edge...
Owners Manual
Page 14
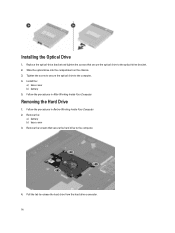
... release the hard drive from the hard drive connector. 14 Remove the screws that secure the optical drive to the computer. 4. Install the: a) base cover b) battery 5. Follow the procedures in After Working Inside Your Computer. Removing the Hard Drive 1. Slide the optical drive into the compartment on the chassis. 3. Pull the...
... release the hard drive from the hard drive connector. 14 Remove the screws that secure the optical drive to the computer. 4. Install the: a) base cover b) battery 5. Follow the procedures in After Working Inside Your Computer. Removing the Hard Drive 1. Slide the optical drive into the compartment on the chassis. 3. Pull the...

Owners Manual
Page 16
... palmrest. 16 Using of a flat-head screwdriver release the latches that secures the hard drive bracket to the computer. 5. Installing the Hard Drive 1. Install the: a) battery b) base cover 6. Remove the battery. 3. Place the hard drive module into the hard drive bracket. 2.
... palmrest. 16 Using of a flat-head screwdriver release the latches that secures the hard drive bracket to the computer. 5. Installing the Hard Drive 1. Install the: a) battery b) base cover 6. Remove the battery. 3. Place the hard drive module into the hard drive bracket. 2.

Owners Manual
Page 18
Install the battery. 6. Insert the keyboard in After Working Inside Your Computer. Remove the screws that secure the display-hinge cover to the back of the keyboard. 2. Connect the keyboard data cable to the computer. 18 Press down until the keyboard clicks into place. 5. Follow the procedures in its compartment. 4. Remove the battery. 3. Connect the backlit cable to the system board. 3. Follow the procedures in Before Working On Your Computer. 2. Installing the Keyboard 1. Removing the Display Hinge Cover 1.
Install the battery. 6. Insert the keyboard in After Working Inside Your Computer. Remove the screws that secure the display-hinge cover to the back of the keyboard. 2. Connect the keyboard data cable to the computer. 18 Press down until the keyboard clicks into place. 5. Follow the procedures in its compartment. 4. Remove the battery. 3. Connect the backlit cable to the system board. 3. Follow the procedures in Before Working On Your Computer. 2. Installing the Keyboard 1. Removing the Display Hinge Cover 1.

Owners Manual
Page 19
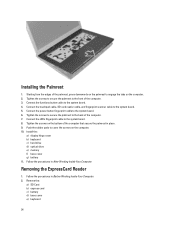
... computer. 5. Installing the Display Hinge Cover 1. Follow the procedures in Before Working Inside Your Computer. 2. Removing the Palmrest 1. Remove the: a) battery b) base cover c) memory d) optical drive e) hard drive 19 Install the battery. 4. Follow the procedures in After Working Inside Your Computer. Push to release the hinge cover from the computer. Replace the...
... computer. 5. Installing the Display Hinge Cover 1. Follow the procedures in Before Working Inside Your Computer. 2. Removing the Palmrest 1. Remove the: a) battery b) base cover c) memory d) optical drive e) hard drive 19 Install the battery. 4. Follow the procedures in After Working Inside Your Computer. Push to release the hinge cover from the computer. Replace the...
Owners Manual
Page 24
... on the computer. 10. Install the: a) display hinge cover b) keyboard c) hard drive d) optical drive e) memory f) base cover g) battery 11. Follow the procedures in After Working Inside Your Computer. Remove the: a) SD Card b) express card c) battery d) base cover e) keyboard 24 Tighten the screws to secure the palmrest to the system board. 8. Connect the...
... on the computer. 10. Install the: a) display hinge cover b) keyboard c) hard drive d) optical drive e) memory f) base cover g) battery 11. Follow the procedures in After Working Inside Your Computer. Remove the: a) SD Card b) express card c) battery d) base cover e) keyboard 24 Tighten the screws to secure the palmrest to the system board. 8. Connect the...

Owners Manual
Page 26
... the screws to secure the express card reader to the computer. 3. Install the: a) palmrest b) display hinge cover c) keyboard d) base cover e) battery f) express card g) SD card 5. Remove the: a) SD card b) express card c) battery d) base cover e) optical drive f) hard drive g) keyboard h) display hinge cover i) palmrest j) express card reader 3. Removing the Speakers 1. Connect the express...
... the screws to secure the express card reader to the computer. 3. Install the: a) palmrest b) display hinge cover c) keyboard d) base cover e) battery f) express card g) SD card 5. Remove the: a) SD card b) express card c) battery d) base cover e) optical drive f) hard drive g) keyboard h) display hinge cover i) palmrest j) express card reader 3. Removing the Speakers 1. Connect the express...

Owners Manual
Page 28
Install the: a) express card reader b) palmrest c) display hinge cover d) keyboard e) hard drive f) optical drive g) base cover h) battery i) express card j) SD card 5. Follow the procedures in place. 3. Removing the System Board 1. Installing the Speakers 1. Tighten the screws to secure the speakers in Before... cable through the routing tabs. 2. Follow the procedures in After Working Inside Your Computer. Connect the speaker cable. 4. Remove the: a) SD Card b) express card c) battery d) base cover e) optical drive f) hard drive g) keyboard h) display hinge cover i) palmrest 28
Install the: a) express card reader b) palmrest c) display hinge cover d) keyboard e) hard drive f) optical drive g) base cover h) battery i) express card j) SD card 5. Follow the procedures in place. 3. Removing the System Board 1. Installing the Speakers 1. Tighten the screws to secure the speakers in Before... cable through the routing tabs. 2. Follow the procedures in After Working Inside Your Computer. Connect the speaker cable. 4. Remove the: a) SD Card b) express card c) battery d) base cover e) optical drive f) hard drive g) keyboard h) display hinge cover i) palmrest 28

Owners Manual
Page 32
... power cable. 8. Install the: a) SD card reader b) palmrest c) display hinge cover d) keyboard e) hard drive f) optical drive g) base cover h) battery i) express card j) SD card 9. Removing the Heat Sink 1. Remove the: a) SD card b) express card c) battery d) base cover 32 Align the system board to the chassis. 3. Follow the procedures in After Working Inside Your...
... power cable. 8. Install the: a) SD card reader b) palmrest c) display hinge cover d) keyboard e) hard drive f) optical drive g) base cover h) battery i) express card j) SD card 9. Removing the Heat Sink 1. Remove the: a) SD card b) express card c) battery d) base cover 32 Align the system board to the chassis. 3. Follow the procedures in After Working Inside Your...

Owners Manual
Page 34
...the procedures in Before Working Inside Your Computer. 2. Connect the system fan cable to the system board. 2. Removing the Processor 1. Remove the: a) battery b) base cover c) memory d) optical drive e) hard drive f) keyboard g) palmrest h) WLAN card i) ExpressCard reader 34 Follow the procedures in After Working.... Install the: a) system board b) palmrest c) display hinge cover d) keyboard e) hard drive f) optical drive g) memory h) base cover i) battery j) express card k) SD card 4. Installing the Heat Sink 1. Tighten the screws to secure the heat sink to the system board. 3.
...the procedures in Before Working Inside Your Computer. 2. Connect the system fan cable to the system board. 2. Removing the Processor 1. Remove the: a) battery b) base cover c) memory d) optical drive e) hard drive f) keyboard g) palmrest h) WLAN card i) ExpressCard reader 34 Follow the procedures in After Working.... Install the: a) system board b) palmrest c) display hinge cover d) keyboard e) hard drive f) optical drive g) memory h) base cover i) battery j) express card k) SD card 4. Installing the Heat Sink 1. Tighten the screws to secure the heat sink to the system board. 3.

Owners Manual
Page 35
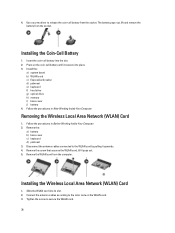
...screw to secure the processor to the system board. 3. Follow the procedures in After Working Inside Your Computer. Removing the Coin-Cell Battery 1. Remove the: a) battery b) base cover c) memory d) optical drive e) hard drive f) keyboard g) palmrest h) ExpressCard reader i) WLAN card j) speaker ...k) system board 3. Remove the processor cover and lift the processor from the socket. Flip the system board and locate the coin-cell battery. 35 Installing the Processor 1. Remove the screw. j) speaker k) system board l) heat sink 3. Install the: a) heat sink b) system board...
...screw to secure the processor to the system board. 3. Follow the procedures in After Working Inside Your Computer. Removing the Coin-Cell Battery 1. Remove the: a) battery b) base cover c) memory d) optical drive e) hard drive f) keyboard g) palmrest h) ExpressCard reader i) WLAN card j) speaker ...k) system board 3. Remove the processor cover and lift the processor from the socket. Flip the system board and locate the coin-cell battery. 35 Installing the Processor 1. Remove the screw. j) speaker k) system board l) heat sink 3. Install the: a) heat sink b) system board...
Owners Manual
Page 36
... Wireless Local Area Network (WLAN) Card 1. Installing the Wireless Local Area Network (WLAN) Card 1. The battery pops-out, lift and remove the battery from the socket. Installing the Coin-Cell Battery 1. Press on the WLAN card. 3. 4. Follow the procedures in Before Working Inside Your Computer. 2.... the: a) system board b) WLAN card c) ExpressCard reader d) palmrest e) keyboard f) hard drive g) optical drive h) memory i) base cover j) battery 4. Follow the procedures in After Working Inside Your Computer. Tighten the screw to the WLAN card by pulling it pops out. 5.
... Wireless Local Area Network (WLAN) Card 1. Installing the Wireless Local Area Network (WLAN) Card 1. The battery pops-out, lift and remove the battery from the socket. Installing the Coin-Cell Battery 1. Press on the WLAN card. 3. 4. Follow the procedures in Before Working Inside Your Computer. 2.... the: a) system board b) WLAN card c) ExpressCard reader d) palmrest e) keyboard f) hard drive g) optical drive h) memory i) base cover j) battery 4. Follow the procedures in After Working Inside Your Computer. Tighten the screw to the WLAN card by pulling it pops out. 5.

Owners Manual
Page 37
Follow the procedures in place. 4. Remove the: a) SD Card b) express card c) battery d) base cover e) optical drive f) hard drive g) keyboard h) display hinge cover i) palmrest j) system board k) WLAN card 3. Remove the screws that secure LAN board in After Working Inside Your Computer. Install the: a) palmrest b) keyboard c) base cover d) battery 5. Follow the procedures in Before Working Inside Your Computer. 2. Removing the LAN Board 1. Lift up to remove the LAN board from the chassis. 37 4.
Follow the procedures in place. 4. Remove the: a) SD Card b) express card c) battery d) base cover e) optical drive f) hard drive g) keyboard h) display hinge cover i) palmrest j) system board k) WLAN card 3. Remove the screws that secure LAN board in After Working Inside Your Computer. Install the: a) palmrest b) keyboard c) base cover d) battery 5. Follow the procedures in Before Working Inside Your Computer. 2. Removing the LAN Board 1. Lift up to remove the LAN board from the chassis. 37 4.

