Setup and Features Information Tech Sheet
Page 2
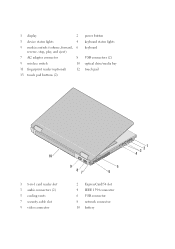
1 display 2 3 device status lights 4 5 media controls (volume, forward, 6 reverse, stop, play, and eject) 7 AC adapter connector 8 9 wireless switch 10 11 fingerprint reader (optional) 12 13 touch pad buttons (2) power button keyboard status lights keyboard USB connectors (2) optical drive/media bay touch pad 10 1 8-in-1 card reader slot 3 audio connectors (2) 5 cooling vents 7 security cable slot 9 video connector 9 87 5 6 2 ExpressCard/54 slot 4 IEEE 1394 connector 6 USB connector 8 network connector 10 battery 3 21 4
1 display 2 3 device status lights 4 5 media controls (volume, forward, 6 reverse, stop, play, and eject) 7 AC adapter connector 8 9 wireless switch 10 11 fingerprint reader (optional) 12 13 touch pad buttons (2) power button keyboard status lights keyboard USB connectors (2) optical drive/media bay touch pad 10 1 8-in-1 card reader slot 3 audio connectors (2) 5 cooling vents 7 security cable slot 9 video connector 9 87 5 6 2 ExpressCard/54 slot 4 IEEE 1394 connector 6 USB connector 8 network connector 10 battery 3 21 4
Setup and Features Information Tech Sheet
Page 4
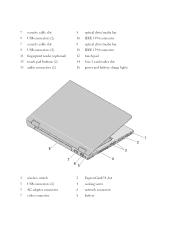
7 security cable slot 9 USB connectors (2) 7 security cable slot 9 USB connectors (2) 11 fingerprint reader (optional) 13 touch pad buttons (2) 15 audio connectors (2) 8 optical drive/media bay 10 IEEE 1394 connector 8 optical drive/media bay 10 IEEE 1394 connector 12 touch pad 14 8-in-1 card reader slot 16 power and battery charge lights 8 7 4 65 1 wireless switch 3 USB connectors (2) 5 AC adapter connector 7 video connector 2 ExpressCard/54 slot 4 cooling vents 6 network connector 8 battery 1 2 3
7 security cable slot 9 USB connectors (2) 7 security cable slot 9 USB connectors (2) 11 fingerprint reader (optional) 13 touch pad buttons (2) 15 audio connectors (2) 8 optical drive/media bay 10 IEEE 1394 connector 8 optical drive/media bay 10 IEEE 1394 connector 12 touch pad 14 8-in-1 card reader slot 16 power and battery charge lights 8 7 4 65 1 wireless switch 3 USB connectors (2) 5 AC adapter connector 7 video connector 2 ExpressCard/54 slot 4 cooling vents 6 network connector 8 battery 1 2 3
Setup and Features Information Tech Sheet
Page 5
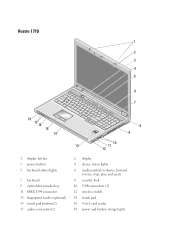
Vostro 1710 1 2 3 4 5 6 9 7 A 18 17 16 15 14 8 9 10 13 11 12 1 display latches 3 power button 5 keyboard status lights 7 keyboard 9 optical drive/media bay 11 IEEE 1394 connector 13 fingerprint reader (optional) 15 touch pad buttons(2) 17 audio connectors(2) 2 display 4 device status lights 6 media controls (volume, forward, reverse, stop, play, and eject) 8 security lock 10 USB connectors (2) 12 wireless switch 14 touch pad 16 8-in-1 card reader 18 power and battery charge lights
Vostro 1710 1 2 3 4 5 6 9 7 A 18 17 16 15 14 8 9 10 13 11 12 1 display latches 3 power button 5 keyboard status lights 7 keyboard 9 optical drive/media bay 11 IEEE 1394 connector 13 fingerprint reader (optional) 15 touch pad buttons(2) 17 audio connectors(2) 2 display 4 device status lights 6 media controls (volume, forward, reverse, stop, play, and eject) 8 security lock 10 USB connectors (2) 12 wireless switch 14 touch pad 16 8-in-1 card reader 18 power and battery charge lights

Setup and Features Information Tech Sheet
Page 6
... Quick Setup WARNING: Before you begin any of the procedures in this section, read the safety information that shipped with your Dell™ computer in the air vents. Using an incompatible cable or improperly connecting the cable to accumulate in a low-airflow...and does not indicate a problem with electrical outlets worldwide. 9 8 7 4 5 6 1 2 3 1 USB connector 3 USB connectors (2) 5 USB connector 7 network connector 9 battery 2 ExpressCard/54 slot 4 cooling vents 6 AC adapter connector 8 video connector WARNING: Do not block, push objects into, or allow dust to the power strip or...
... Quick Setup WARNING: Before you begin any of the procedures in this section, read the safety information that shipped with your Dell™ computer in the air vents. Using an incompatible cable or improperly connecting the cable to accumulate in a low-airflow...and does not indicate a problem with electrical outlets worldwide. 9 8 7 4 5 6 1 2 3 1 USB connector 3 USB connectors (2) 5 USB connector 7 network connector 9 battery 2 ExpressCard/54 slot 4 cooling vents 6 AC adapter connector 8 video connector WARNING: Do not block, push objects into, or allow dust to the power strip or...
Setup and Features Information Tech Sheet
Page 9
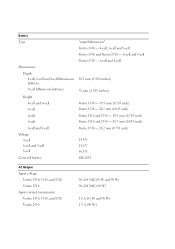
... 9-cell 8-cell Coin-cell battery "smart lithium ion" Vostro 1310 - 4-cell, 6-cell and 9-cell Vostro 1510 and Vostro 2510 - 6-cell and 9-cell Vostro 1710 - 6-cell and 8-cell 50.3 mm (1.980 inches) 72 mm (2.835 inches) Vostro 1310 - 19.9 mm (0.783 inch) Vostro 1310 - 20.7 mm (0.815 inch) Vostro 1510 and 2510 - 19.9 mm (0.783 inch) Vostro 1510 and 2510 - 20.7 mm (0.815...
... 9-cell 8-cell Coin-cell battery "smart lithium ion" Vostro 1310 - 4-cell, 6-cell and 9-cell Vostro 1510 and Vostro 2510 - 6-cell and 9-cell Vostro 1710 - 6-cell and 8-cell 50.3 mm (1.980 inches) 72 mm (2.835 inches) Vostro 1310 - 19.9 mm (0.783 inch) Vostro 1310 - 20.7 mm (0.815 inch) Vostro 1510 and 2510 - 19.9 mm (0.783 inch) Vostro 1510 and 2510 - 20.7 mm (0.815...
Setup and Features Information Tech Sheet
Page 11
... mm (15.472 inches) Vostro 1310 - 243.2 mm (9.575 inches) Vostro 1510 and 2510 - 258 mm (10.157 inches) Vostro 1710 - 286 mm (11.26 inches) Vostro 1310 - minimum 3.41kg (7.51 lbs) with 6-cell battery Vostro 1710 - minimum 2.8 kg (6.173 lbs) with 4-cell battery Vostro 1710 - minimum 2.1 kg (4.630 lbs) with 6-cell battery Vostro 1510 and 2510 - Physical Height Width Depth Weight...
... mm (15.472 inches) Vostro 1310 - 243.2 mm (9.575 inches) Vostro 1510 and 2510 - 258 mm (10.157 inches) Vostro 1710 - 286 mm (11.26 inches) Vostro 1310 - minimum 3.41kg (7.51 lbs) with 6-cell battery Vostro 1710 - minimum 2.8 kg (6.173 lbs) with 4-cell battery Vostro 1710 - minimum 2.1 kg (4.630 lbs) with 6-cell battery Vostro 1510 and 2510 - Physical Height Width Depth Weight...
Setup and Quick Reference Guide
Page 3
Contents 1 About Your Computer 7 Front View 7 Back View 8 Battery Removal 9 Wireless Switch 10 2 Setting Up Your Computer 11 Quick Setup 11 Connecting to the Internet 13 Setting Up Your Internet Connection 14 Transferring Information to a New Computer 15 Microsoft Windows Vista 15 Microsoft® Windows® XP Operating System 15 3 Specifications 19 4 Troubleshooting 31 Tools 31 Power Lights 31 Beep Codes 31 Contents 3
Contents 1 About Your Computer 7 Front View 7 Back View 8 Battery Removal 9 Wireless Switch 10 2 Setting Up Your Computer 11 Quick Setup 11 Connecting to the Internet 13 Setting Up Your Internet Connection 14 Transferring Information to a New Computer 15 Microsoft Windows Vista 15 Microsoft® Windows® XP Operating System 15 3 Specifications 19 4 Troubleshooting 31 Tools 31 Power Lights 31 Beep Codes 31 Contents 3
Setup and Quick Reference Guide
Page 8
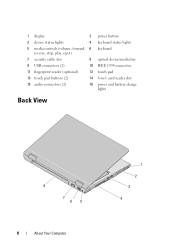
1 display 2 3 device status lights 4 5 media controls (volume, forward, 6 reverse, stop, play, eject) 7 security cable slot 8 9 USB connectors (2) 10 11 fingerprint reader (optional) 12 13 touch pad buttons (2) 14 15 audio connectors (2) 16 power button keyboard status lights keyboard optical device/media bay IEEE 1394 connector touch pad 8-in-1 card reader slot power and battery charge lights Back View 8 7 65 8 About Your Computer 1 2 3 4
1 display 2 3 device status lights 4 5 media controls (volume, forward, 6 reverse, stop, play, eject) 7 security cable slot 8 9 USB connectors (2) 10 11 fingerprint reader (optional) 12 13 touch pad buttons (2) 14 15 audio connectors (2) 16 power button keyboard status lights keyboard optical device/media bay IEEE 1394 connector touch pad 8-in-1 card reader slot power and battery charge lights Back View 8 7 65 8 About Your Computer 1 2 3 4
Setup and Quick Reference Guide
Page 9
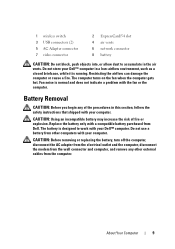
...instructions that shipped with a compatible battery purchased from Dell. CAUTION: Before removing or replacing the battery, turn off the computer, disconnect the AC adapter from the electrical outlet and the computer, disconnect the modem from the computer. Battery Removal CAUTION: Before you begin...(2) 5 AC Adapter connector 7 video connector 2 ExpressCard/54 slot 4 air vents 6 network connector 8 battery CAUTION: Do not block, push objects into, or allow dust to work with your Dell™ computer in a low-airflow environment, such as a closed briefcase, while it is running. Do...
...instructions that shipped with a compatible battery purchased from Dell. CAUTION: Before removing or replacing the battery, turn off the computer, disconnect the AC adapter from the electrical outlet and the computer, disconnect the modem from the computer. Battery Removal CAUTION: Before you begin...(2) 5 AC Adapter connector 7 video connector 2 ExpressCard/54 slot 4 air vents 6 network connector 8 battery CAUTION: Do not block, push objects into, or allow dust to work with your Dell™ computer in a low-airflow environment, such as a closed briefcase, while it is running. Do...
Setup and Quick Reference Guide
Page 10
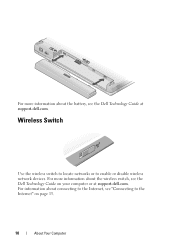
For more information about the wireless switch, see the Dell Technology Guide on page 13. 10 About Your Computer For more information about connecting to the Internet, see the Dell Technology Guide at support.dell.com. Wireless Switch Use the wireless switch to locate networks or to the Internet" on your computer or at support.dell.com. For information about the battery, see "Connecting to enable or disable wireless network devices.
For more information about the wireless switch, see the Dell Technology Guide on page 13. 10 About Your Computer For more information about connecting to the Internet, see the Dell Technology Guide at support.dell.com. Wireless Switch Use the wireless switch to locate networks or to the Internet" on your computer or at support.dell.com. For information about the battery, see "Connecting to enable or disable wireless network devices.
Setup and Quick Reference Guide
Page 26
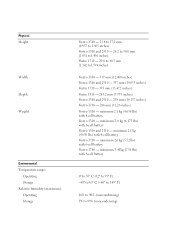
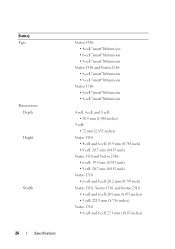
Battery Type Dimensions: Depth Height Width 26 Specifications Vostro 1310: • 4-cell "smart" lithium ion • 6-cell "smart" lithium ion • 9-cell "smart" lithium ion Vostro 1510 and Vostro 2510: • 6-cell "smart" lithium ion • 9-cell "smart" lithium ion Vostro 1710: • 6-cell "smart" lithium ion • 8-cell "smart" lithium ion 4 cell, 6 cell, and 8 cell: •...
Battery Type Dimensions: Depth Height Width 26 Specifications Vostro 1310: • 4-cell "smart" lithium ion • 6-cell "smart" lithium ion • 9-cell "smart" lithium ion Vostro 1510 and Vostro 2510: • 6-cell "smart" lithium ion • 9-cell "smart" lithium ion Vostro 1710: • 6-cell "smart" lithium ion • 8-cell "smart" lithium ion 4 cell, 6 cell, and 8 cell: •...
Setup and Quick Reference Guide
Page 27
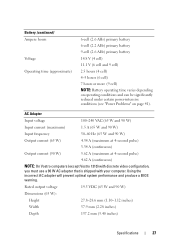
... 27 Using the incorrect AC adapter will prevent optimal system performance and produce a BIOS warning. Battery (continued) Ampere hours Voltage Operating time (approximate) 6-cell (2.6 AHr) primary battery 6-cell (2.2 AHr) primary battery 9-cell (2.6 AHr) primary battery 14.8 V (4 cell) 11.1 V (6 cell and 9 cell) 2.5 hours (4 cell... 3.34 A (continuous) Output current (90 W) 5.62 A (maximum at 4-second pulse) 4.62 A (continuous) NOTE: On Vostro computers (except Vostro 1310) with discrete video configuration, you must use a 90 W AC adapter that is shipped with your computer.
... 27 Using the incorrect AC adapter will prevent optimal system performance and produce a BIOS warning. Battery (continued) Ampere hours Voltage Operating time (approximate) 6-cell (2.6 AHr) primary battery 6-cell (2.2 AHr) primary battery 9-cell (2.6 AHr) primary battery 14.8 V (4 cell) 11.1 V (6 cell and 9 cell) 2.5 hours (4 cell... 3.34 A (continuous) Output current (90 W) 5.62 A (maximum at 4-second pulse) 4.62 A (continuous) NOTE: On Vostro computers (except Vostro 1310) with discrete video configuration, you must use a 90 W AC adapter that is shipped with your computer.
Setup and Quick Reference Guide
Page 29
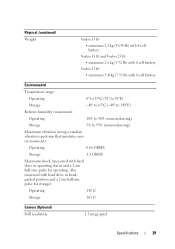
... drive in headparked position and a 2-ms halfsine pulse for operating. Physical (continued) Weight Vostro 1310: • minimum 2.1 kg (4.630 lb) with 4-cell battery Vostro 1510 and Vostro 2510: • minimum 2.6 kg (5.72 lb) with 6-cell battery Vostro 1710: • minimum 3.41kg (7.51 lb) with 8-cell battery Environmental Temperature range: Operating 0° to 35°C (32° to 95...
... drive in headparked position and a 2-ms halfsine pulse for operating. Physical (continued) Weight Vostro 1310: • minimum 2.1 kg (4.630 lb) with 4-cell battery Vostro 1510 and Vostro 2510: • minimum 2.6 kg (5.72 lb) with 6-cell battery Vostro 1710: • minimum 3.41kg (7.51 lb) with 8-cell battery Environmental Temperature range: Operating 0° to 35°C (32° to 95...
Setup and Quick Reference Guide
Page 33
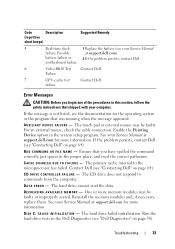
... or more information. See your computer. Code Description (repetitive short beeps) Suggested Remedy 5 Real-time clock 1 Replace the battery (see "Contacting Dell" on page 64). DATA ERROR - For an external mouse, check the cable connection. The CD drive does not respond to the microprocessor has failed. DI S K C : F ...drive tests in the system setup program. Possible at support.dell.com for more memory modules may be faulty or improperly seated. battery failure or 2 If the problem persists, contact Dell. See your Service Manual failure. The hard drive cannot ...
... or more information. See your computer. Code Description (repetitive short beeps) Suggested Remedy 5 Real-time clock 1 Replace the battery (see "Contacting Dell" on page 64). DATA ERROR - For an external mouse, check the cable connection. The CD drive does not respond to the microprocessor has failed. DI S K C : F ...drive tests in the system setup program. Possible at support.dell.com for more memory modules may be faulty or improperly seated. battery failure or 2 If the problem persists, contact Dell. See your Service Manual failure. The hard drive cannot ...
Setup and Quick Reference Guide
Page 38
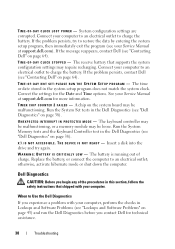
... does not match the system clock. TIME- Connect your computer to an electrical outlet to charge the battery. P L E A S E R U N T H E S YS T E M S E T U P P R O G R A M - Correct the settings for more information. Run the System Set tests in the Dell Diagnostics (see "Dell Diagnostics" on page 64). WA R N I N G : B A T T E R Y I S C R I T I N P R O T E C T E D M O D E - If the problem persists, try again. D A Y N O T S E T - The time or date stored in...
... does not match the system clock. TIME- Connect your computer to an electrical outlet to charge the battery. P L E A S E R U N T H E S YS T E M S E T U P P R O G R A M - Correct the settings for more information. Run the System Set tests in the Dell Diagnostics (see "Dell Diagnostics" on page 64). WA R N I N G : B A T T E R Y I S C R I T I N P R O T E C T E D M O D E - If the problem persists, try again. D A Y N O T S E T - The time or date stored in...
Service Manual
Page 1
...or death. Other trademarks and trade names may be used in this document to avoid the problem. All rights reserved. Dell™ Vostro™ 2510 Service Manual Troubleshooting Before Working on Your Computer Hard Drive Wireless Local Area Network (WLAN) Card Fan Processor Heat Sink ...Rest Fingerprint Reader Internal Card With Bluetooth® Wireless Technology Optical Drive System Board Assembly Speaker Assembly USB Daughter Card Battery Latch Assembly Coin-Cell Battery Flashing the BIOS Notes, Notices, and Cautions NOTE: A NOTE indicates important information that helps you make better ...
...or death. Other trademarks and trade names may be used in this document to avoid the problem. All rights reserved. Dell™ Vostro™ 2510 Service Manual Troubleshooting Before Working on Your Computer Hard Drive Wireless Local Area Network (WLAN) Card Fan Processor Heat Sink ...Rest Fingerprint Reader Internal Card With Bluetooth® Wireless Technology Optical Drive System Board Assembly Speaker Assembly USB Daughter Card Battery Latch Assembly Coin-Cell Battery Flashing the BIOS Notes, Notices, and Cautions NOTE: A NOTE indicates important information that helps you make better ...
Service Manual
Page 8
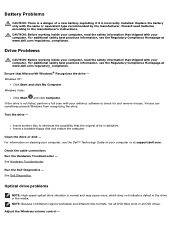
...restart the computer. See Hardware Troubleshooter. Adjust the Windows volume control - Battery Problems CAUTION: There is a danger of different regions worldwide and different disc formats, not all DVD drives. Run the Dell Diagnostics - CAUTION: Before working inside your computer, read the safety ...manufacturer's instructions. Optical drive problems NOTE: High-speed optical drive vibration is defective. Replace the battery only with your computer or at support.dell.com. For information on cleaning your computer, see the Regulatory Compliance Homepage at www...
...restart the computer. See Hardware Troubleshooter. Adjust the Windows volume control - Battery Problems CAUTION: There is a danger of different regions worldwide and different disc formats, not all DVD drives. Run the Dell Diagnostics - CAUTION: Before working inside your computer, read the safety ...manufacturer's instructions. Optical drive problems NOTE: High-speed optical drive vibration is defective. Replace the battery only with your computer or at support.dell.com. For information on cleaning your computer, see the Regulatory Compliance Homepage at www...
Service Manual
Page 17
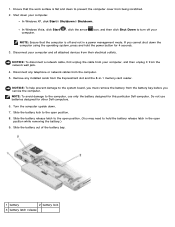
...4. NOTE: To avoid damage to hold the power button for this particular Dell computer. Turn the computer upside down the computer using the operating system, press and hold the battery release latch in a power management mode. Disconnect your computer. Slide the battery release latch to the open position. 8. NOTICE: To disconnect a network ...computer, and then unplug it from being scratched. 2. 1. NOTICE: To help prevent damage to the open position. (You may need to the computer, use batteries designed for other Dell computers. 6. Do not use only the...
...4. NOTE: To avoid damage to hold the power button for this particular Dell computer. Turn the computer upside down the computer using the operating system, press and hold the battery release latch in a power management mode. Disconnect your computer. Slide the battery release latch to the open position. 8. NOTICE: To disconnect a network ...computer, and then unplug it from being scratched. 2. 1. NOTICE: To help prevent damage to the open position. (You may need to the computer, use batteries designed for other Dell computers. 6. Do not use only the...
Service Manual
Page 32
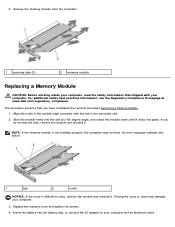
... 1 tab 2 notch NOTICE: If the cover is not installed properly, the computer may damage your computer and an electrical outlet. Insert the battery into place. Align the notch in the module edge connector with your computer, read the safety information that you do not feel the click, ...remove the module and reinstall it clicks into the battery bay, or connect the AC adapter to close may not boot. Slide the module firmly into the slot at www.dell.com/regulatory_compliance. If you have completed the removal procedure Removing a Memory Module. 1. ...
... 1 tab 2 notch NOTICE: If the cover is not installed properly, the computer may damage your computer and an electrical outlet. Insert the battery into place. Align the notch in the module edge connector with your computer, read the safety information that you do not feel the click, ...remove the module and reinstall it clicks into the battery bay, or connect the AC adapter to close may not boot. Slide the module firmly into the slot at www.dell.com/regulatory_compliance. If you have completed the removal procedure Removing a Memory Module. 1. ...
Service Manual
Page 66
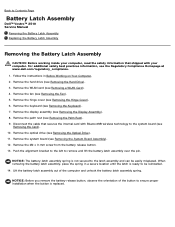
... assembly, place the spring in Before Working on Your Computer. 2. Back to Contents Page Battery Latch Assembly Dell™ Vostro™ 2510 Service Manual Removing the Battery Latch Assembly Replacing the Battery Latch Assembly Removing the Battery Latch Assembly CAUTION: Before working inside your computer, read the safety information that secures the internal card with your computer...
... assembly, place the spring in Before Working on Your Computer. 2. Back to Contents Page Battery Latch Assembly Dell™ Vostro™ 2510 Service Manual Removing the Battery Latch Assembly Replacing the Battery Latch Assembly Removing the Battery Latch Assembly CAUTION: Before working inside your computer, read the safety information that secures the internal card with your computer...


