Setup and Quick Reference Guide
Page 14
... have an ISP, consult the Connect to the Internet wizard. Microsoft® Windows® XP Operating System 1 Save and close any open files, and exit any open programs. 2 Click Start→ Internet Explorer→ Connect to the Internet. 3 In the next window, click the appropriate option: • If you want to connect to the Internet?, and click Next. 6 Use the setup information provided by your ISP...
... have an ISP, consult the Connect to the Internet wizard. Microsoft® Windows® XP Operating System 1 Save and close any open files, and exit any open programs. 2 Click Start→ Internet Explorer→ Connect to the Internet. 3 In the next window, click the appropriate option: • If you want to connect to the Internet?, and click Next. 6 Use the setup information provided by your ISP...
Setup and Quick Reference Guide
Page 31
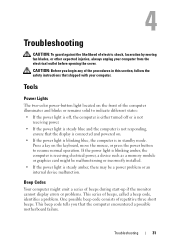
... power, a device such as a memory module or graphics card might emit a series of beeps during start-up if the monitor cannot display errors or problems. This series of beeps, called a beep code, identifies a problem. One possible beep code consists of repetitive three short beeps. If the power light is blinking amber, the computer is connected and powered on the keyboard, move the mouse, or press the power button to indicate different states: • If the power light...
... power, a device such as a memory module or graphics card might emit a series of beeps during start-up if the monitor cannot display errors or problems. This series of beeps, called a beep code, identifies a problem. One possible beep code consists of repetitive three short beeps. If the power light is blinking amber, the computer is connected and powered on the keyboard, move the mouse, or press the power button to indicate different states: • If the power light...
Setup and Quick Reference Guide
Page 35
If the problem persists, try another drive. D I S K D R I V E R E A D F A I L U R E - Run the Hard Disk Drive tests in the Dell Diagnostics (see "Dell Diagnostics" on page 38). Insert bootable media. INVALID CONFIGURATION INFORMATION-PLEASE RUN SYSTEM SETUP PROGRAM - K E Y B O A R D C L O C K L I N E F A I L U R E - For external keyboards, check the cable connection. Restart the computer, and avoid touching the keyboard or keys during the boot routine. Troubleshooting 35 Shut down the computer, remove the hard drive (see your Service Manual at support.dell.com), and ...
If the problem persists, try another drive. D I S K D R I V E R E A D F A I L U R E - Run the Hard Disk Drive tests in the Dell Diagnostics (see "Dell Diagnostics" on page 38). Insert bootable media. INVALID CONFIGURATION INFORMATION-PLEASE RUN SYSTEM SETUP PROGRAM - K E Y B O A R D C L O C K L I N E F A I L U R E - For external keyboards, check the cable connection. Restart the computer, and avoid touching the keyboard or keys during the boot routine. Troubleshooting 35 Shut down the computer, remove the hard drive (see your Service Manual at support.dell.com), and ...
Setup and Quick Reference Guide
Page 41
... a power problem, a device may be malfunctioning or incorrectly installed. • Remove and then reinstall all memory modules (see your Service Manual at support.dell.com). • Remove and then reinstall any power strips being used are plugged into an electrical outlet and are securely connected to the system board connector (see your Service Manual at support.dell.com). • Ensure that the display is connected and powered on page 31. I F T H E P O W E R L I G H T I N G B L U E - Press a key on the keyboard...
... a power problem, a device may be malfunctioning or incorrectly installed. • Remove and then reinstall all memory modules (see your Service Manual at support.dell.com). • Remove and then reinstall any power strips being used are plugged into an electrical outlet and are securely connected to the system board connector (see your Service Manual at support.dell.com). • Ensure that the display is connected and powered on page 31. I F T H E P O W E R L I G H T I N G B L U E - Press a key on the keyboard...
Setup and Quick Reference Guide
Page 42
... EXPERIENCE OTHER MEMORY PROBLEMS - • Reseat the memory modules (see your Service Manual at support.dell.com) to ensure that shipped with the memory. • Run the Dell Diagnostics (see "Dell Diagnostics" on page 38). Some possible causes of interference are: • Power, keyboard, and mouse extension cables • Too many devices connected to the same power strip • Multiple power strips connected to the same electrical outlet Memory Problems CAUTION: Before...
... EXPERIENCE OTHER MEMORY PROBLEMS - • Reseat the memory modules (see your Service Manual at support.dell.com) to ensure that shipped with the memory. • Run the Dell Diagnostics (see "Dell Diagnostics" on page 38). Some possible causes of interference are: • Power, keyboard, and mouse extension cables • Too many devices connected to the same power strip • Multiple power strips connected to the same electrical outlet Memory Problems CAUTION: Before...
Setup and Quick Reference Guide
Page 47
... Start→ Control Panel. 2 Under Pick a Category, click Performance and Maintenance, and click System. 3 In the System Properties window, click the Hardware tab, and click Device Manager. otherwise, contact your problem and, if necessary, update the driver. If you are an administrator on the computer, click Continue; Windows Vista: 1 Click the Windows Vista Start button™ , and right-click Computer. 2 Click Properties→ Device Manager. Reinstalling Drivers and Utilities NOTICE: The Dell Support...
... Start→ Control Panel. 2 Under Pick a Category, click Performance and Maintenance, and click System. 3 In the System Properties window, click the Hardware tab, and click Device Manager. otherwise, contact your problem and, if necessary, update the driver. If you are an administrator on the computer, click Continue; Windows Vista: 1 Click the Windows Vista Start button™ , and right-click Computer. 2 Click Properties→ Device Manager. Reinstalling Drivers and Utilities NOTICE: The Dell Support...
Setup and Quick Reference Guide
Page 48
... problem, reinstall the driver from your Drivers and Utilities media. 1 With the Windows desktop displayed, insert your computer to the operating state that existed before you are an administrator on the screen. If not, go to step 2. Windows Vista: 1 Click the Windows Vista Start button , and right-click Computer. 2 Click Properties→ Device Manager. otherwise, contact your administrator to enter the Device Manager. 3 Right-click the device for which the new driver was installed...
... problem, reinstall the driver from your Drivers and Utilities media. 1 With the Windows desktop displayed, insert your computer to the operating state that existed before you are an administrator on the screen. If not, go to step 2. Windows Vista: 1 Click the Windows Vista Start button , and right-click Computer. 2 Click Properties→ Device Manager. otherwise, contact your administrator to enter the Device Manager. 3 Right-click the device for which the new driver was installed...
Setup and Quick Reference Guide
Page 49
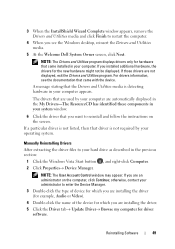
... section: 1 Click the Windows Vista Start button , and right-click Computer. 2 Click Properties→ Device Manager. NOTE: The User Account Control window may appear. Reinstalling Software 49 For drivers information, see the Windows desktop, reinsert the Drivers and Utilities media. 5 At the Welcome Dell System Owner screen, click Next. If those drivers are an administrator on the screen. A message stating that are used by your computer appears. Manually Reinstalling Drivers After extracting the...
... section: 1 Click the Windows Vista Start button , and right-click Computer. 2 Click Properties→ Device Manager. NOTE: The User Account Control window may appear. Reinstalling Software 49 For drivers information, see the Windows desktop, reinsert the Drivers and Utilities media. 5 At the Welcome Dell System Owner screen, click Next. If those drivers are an administrator on the screen. A message stating that are used by your computer appears. Manually Reinstalling Drivers After extracting the...
Setup and Quick Reference Guide
Page 53
... user. NOTICE: If you do not want to continue reformatting the hard drive and restoring the system software to correct a problem with Factory Image Restore, click Cancel. 7 Click the checkbox to confirm that you are considering reinstalling the Windows operating system to the factory condition, then click Next. 4 To access the recovery options, log on your primary hard drive. NOTE: Depending upon your configuration, you installed the new device driver. See...
... user. NOTICE: If you do not want to continue reformatting the hard drive and restoring the system software to correct a problem with Factory Image Restore, click Cancel. 7 Click the checkbox to confirm that you are considering reinstalling the Windows operating system to the factory condition, then click Next. 4 To access the recovery options, log on your primary hard drive. NOTE: Depending upon your configuration, you installed the new device driver. See...

Setup and Quick Reference Guide
Page 54
... Recovery Options window appears. 3 Select a keyboard layout and click Next. 54 Reinstalling Software NOTE: The next steps change the boot sequence for one time only. Reinstalling Windows The reinstallation process can take 1 to 2 hours to access the Vista Advanced Boot Options Window. 2 Select Repair Your Computer. Depending on the computer. Use the Dell Drivers and Utilities media to load any key to the devices specified in the system setup program. 5 When the boot device list...
... Recovery Options window appears. 3 Select a keyboard layout and click Next. 54 Reinstalling Software NOTE: The next steps change the boot sequence for one time only. Reinstalling Windows The reinstallation process can take 1 to 2 hours to access the Vista Advanced Boot Options Window. 2 Select Repair Your Computer. Depending on the computer. Use the Dell Drivers and Utilities media to load any key to the devices specified in the system setup program. 5 When the boot device list...

Setup and Quick Reference Guide
Page 56
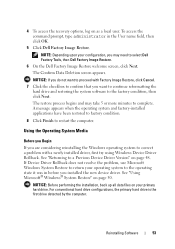
... operating system, you need the Dell™ Operating System media and the Dell Drivers and Utilities media. then, shut down your computer. When the DELL logo appears, press immediately. On the next start-up, the computer boots according to the devices specified in the system setup program. 5 When the boot device list appears, highlight CD/DVD/CD-RW Drive and press . 6 Press any key to Boot from CD-ROM, and follow the instructions...
... operating system, you need the Dell™ Operating System media and the Dell Drivers and Utilities media. then, shut down your computer. When the DELL logo appears, press immediately. On the next start-up, the computer boots according to the devices specified in the system setup program. 5 When the boot device list appears, highlight CD/DVD/CD-RW Drive and press . 6 Press any key to Boot from CD-ROM, and follow the instructions...
Service Manual
Page 1
..., Windows, Windows Vista, and the Windows start button logo are not applicable. Other trademarks and trade names may be used in this document to Microsoft® Windows® operating systems are either trademarks or registered trademarks of your computer. Dell Inc. Dell™ Vostro™ 2510 Service Manual Troubleshooting Before Working on Your Computer Hard Drive Wireless Local Area Network (WLAN) Card Fan Processor Heat Sink Processor Module Memory Hinge Cover Keyboard Display Palm Rest Fingerprint Reader Internal Card With Bluetooth® Wireless...
..., Windows, Windows Vista, and the Windows start button logo are not applicable. Other trademarks and trade names may be used in this document to Microsoft® Windows® operating systems are either trademarks or registered trademarks of your computer. Dell Inc. Dell™ Vostro™ 2510 Service Manual Troubleshooting Before Working on Your Computer Hard Drive Wireless Local Area Network (WLAN) Card Fan Processor Heat Sink Processor Module Memory Hinge Cover Keyboard Display Palm Rest Fingerprint Reader Internal Card With Bluetooth® Wireless...
Service Manual
Page 2
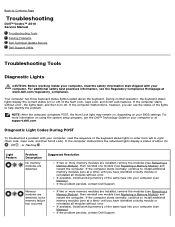
... lights flash, and then turn off ) of the lights to install additional memory modules (one at a time) until you have identified a faulty module or reinstalled all modules without error. If the computer starts normally, continue to Contents Page Troubleshooting Dell™ Vostro™ 2510 Service Manual Troubleshooting Tools Solving Problems Dell Technical Update Service Dell Support Utility Troubleshooting Tools Diagnostic Lights CAUTION: Before working memory of either On , Off , or Flashing . Diagnostic Light Codes During POST To troubleshoot a problem with your BIOS settings...
... lights flash, and then turn off ) of the lights to install additional memory modules (one at a time) until you have identified a faulty module or reinstalled all modules without error. If the computer starts normally, continue to Contents Page Troubleshooting Dell™ Vostro™ 2510 Service Manual Troubleshooting Tools Solving Problems Dell Technical Update Service Dell Support Utility Troubleshooting Tools Diagnostic Lights CAUTION: Before working memory of either On , Off , or Flashing . Diagnostic Light Codes During POST To troubleshoot a problem with your BIOS settings...
Service Manual
Page 3
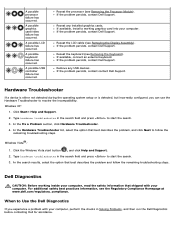
... the LCD cable (see Removing the Keyboard). Click Start Help and Support. 2. When to Use the Dell Diagnostics If you can use the Hardware Troubleshooter to follow the remaining troubleshooting steps. A possible processor failure has occurred. Reseat the keyboard (see Removing the Display Assembly). Hardware Troubleshooter If a device is either not detected during the operating system setup or is detected, but incorrectly configured, you experience a problem with your computer. Type hardware troubleshooter in Solving Problems...
... the LCD cable (see Removing the Keyboard). Click Start Help and Support. 2. When to Use the Dell Diagnostics If you can use the Hardware Troubleshooter to follow the remaining troubleshooting steps. A possible processor failure has occurred. Reseat the keyboard (see Removing the Display Assembly). Hardware Troubleshooter If a device is either not detected during the operating system setup or is detected, but incorrectly configured, you experience a problem with your computer. Type hardware troubleshooter in Solving Problems...

Service Manual
Page 4
... Starting the Dell Diagnostics From the Drivers and Utilities Media). 3. NOTE: Write down the error code(s) and contact Dell Support. NOTE: The Dell Diagnostics only operate on your hard drive. Starting the Dell Diagnostics From Your Hard Drive Before running the Dell Diagnostics, enter system setup to continue." Press and hold the key or the mute button then turn on the screen. 6. If the Pre-boot System Assessment completes successfully, the following message appears: "Booting Dell Diagnostic Utility Partition...
... Starting the Dell Diagnostics From the Drivers and Utilities Media). 3. NOTE: Write down the error code(s) and contact Dell Support. NOTE: The Dell Diagnostics only operate on your hard drive. Starting the Dell Diagnostics From Your Hard Drive Before running the Dell Diagnostics, enter system setup to continue." Press and hold the key or the mute button then turn on the screen. 6. If the Pre-boot System Assessment completes successfully, the following message appears: "Booting Dell Diagnostic Utility Partition...
Service Manual
Page 6
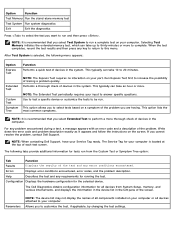
... Dell Support, have your input to customize the test, if applicable, by changing the test settings. Errors Displays error conditions encountered, error codes, and the problem description. Configuration Displays the hardware configuration for tests run a complete test on your computer. Option Function Test Memory Run the stand-alone memory test Test System Run system diagnostics Exit Exit the diagnostics Press to select the test you want to this menu...
... Dell Support, have your input to customize the test, if applicable, by changing the test settings. Errors Displays error conditions encountered, error codes, and the problem description. Configuration Displays the hardware configuration for tests run a complete test on your computer. Option Function Test Memory Run the stand-alone memory test Test System Run system diagnostics Exit Exit the diagnostics Press to select the test you want to this menu...
Service Manual
Page 12
... at www.dell.com/regulatory_compliance. Reseat the power cable in the power connector on properly. Bypass power strips, power extension cables, and other media players may override the Windows volume setting. Ensure that the computer turns on the back of interference are not using is supported by your computer, see the Setup and Quick Reference Guide for minimum memory requirements. For additional safety best practices information, see Replacing a Memory Module). The...
... at www.dell.com/regulatory_compliance. Reseat the power cable in the power connector on properly. Bypass power strips, power extension cables, and other media players may override the Windows volume setting. Ensure that the computer turns on the back of interference are not using is supported by your computer, see the Setup and Quick Reference Guide for minimum memory requirements. For additional safety best practices information, see Replacing a Memory Module). The...
Service Manual
Page 13
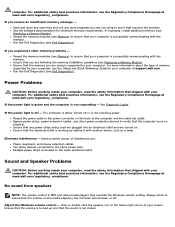
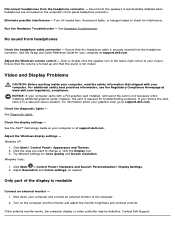
... volume is turned up and that shipped with a PCI graphics card installed, removal of the display is securely inserted into the headphone connector. Video and Display Problems CAUTION: Before working inside your computer, read the safety information that the sound is required for your computer and connect an external monitor to support.dell.com. See Diagnostic Lights. Click Start ® Control Panel® Hardware and Sound® Personalization® Display Settings. 2. See Hardware Troubleshooter. however, the card...
... volume is turned up and that shipped with a PCI graphics card installed, removal of the display is securely inserted into the headphone connector. Video and Display Problems CAUTION: Before working inside your computer, read the safety information that the sound is required for your computer and connect an external monitor to support.dell.com. See Diagnostic Lights. Click Start ® Control Panel® Hardware and Sound® Personalization® Display Settings. 2. See Hardware Troubleshooter. however, the card...

Service Manual
Page 19
.... 5. Pull the mylar tab to Contents Page Hard Drive Dell™ Vostro™ 2510 Service Manual Removing the Hard Drive Replacing the Hard Drive NOTE: Dell does not guarantee compatibility or provide support for hard drives obtained from the computer while the drive is on Your Computer. 2. Removing the Hard Drive CAUTION: Before working inside your computer, read the safety information that secure the hard-drive compartment cover. 4. For additional safety best practices information, see...
.... 5. Pull the mylar tab to Contents Page Hard Drive Dell™ Vostro™ 2510 Service Manual Removing the Hard Drive Replacing the Hard Drive NOTE: Dell does not guarantee compatibility or provide support for hard drives obtained from the computer while the drive is on Your Computer. 2. Removing the Hard Drive CAUTION: Before working inside your computer, read the safety information that secure the hard-drive compartment cover. 4. For additional safety best practices information, see...
Service Manual
Page 31
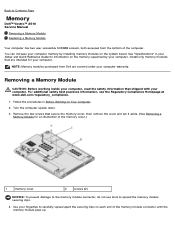
... the memory cover, then remove the cover and set it aside. (See Removing a Memory Module for your computer. Back to Contents Page Memory Dell™ Vostro™ 2510 Service Manual Removing a Memory Module Replacing a Memory Module Your computer has two user-accessible SODIMM sockets, both accessed from Dell are intended for an illustration of the computer. Use your computer warranty. Install only memory modules that shipped with your computer. Follow the procedures in your computer. Removing a Memory Module CAUTION: Before working inside...
... the memory cover, then remove the cover and set it aside. (See Removing a Memory Module for your computer. Back to Contents Page Memory Dell™ Vostro™ 2510 Service Manual Removing a Memory Module Replacing a Memory Module Your computer has two user-accessible SODIMM sockets, both accessed from Dell are intended for an illustration of the computer. Use your computer warranty. Install only memory modules that shipped with your computer. Follow the procedures in your computer. Removing a Memory Module CAUTION: Before working inside...


