
Owner's Manual
Page 2
If you make better use of your computer. Trademarks used in this text: Dell, the DELL logo, Vostro, TravelLite, and Strike Zone are trademarks of Intel Corporation; Intel, Pentium, and Celeron are registered trademarks, SpeedStep and Core are trademarks of Dell Inc.; Model DCMF July 2007 P/N DX333 Rev. Notes, Notices, and Cautions NOTE: A NOTE indicates important...
If you make better use of your computer. Trademarks used in this text: Dell, the DELL logo, Vostro, TravelLite, and Strike Zone are trademarks of Intel Corporation; Intel, Pentium, and Celeron are registered trademarks, SpeedStep and Core are trademarks of Dell Inc.; Model DCMF July 2007 P/N DX333 Rev. Notes, Notices, and Cautions NOTE: A NOTE indicates important...
Owner's Manual
Page 3
Contents 1 Finding Information 11 2 Setting Up and Using Your Computer . . . 15 Front View of the Computer 15 Back View of the Computer 18 Back Panel Connectors 20 Installing Your Computer in an Enclosure 22 Setting Up a Printer 24 Printer Cable 24 Connecting a USB Printer 24 Playing CDs and DVDs 26 Adjusting the Volume 27 Adjusting...
Contents 1 Finding Information 11 2 Setting Up and Using Your Computer . . . 15 Front View of the Computer 15 Back View of the Computer 18 Back Panel Connectors 20 Installing Your Computer in an Enclosure 22 Setting Up a Printer 24 Printer Cable 24 Connecting a USB Printer 24 Playing CDs and DVDs 26 Adjusting the Volume 27 Adjusting...
Owner's Manual
Page 4
... for RAID Using the Intel® Option ROM Utility 44 Configuring for RAID Using the Intel® Matrix Storage Manager 45 Transferring Information to a New Computer 49 Setting Up a Home and Office Network 53 Connecting to a Network Adapter 53 Network Setup Wizard 54 Connecting to the Internet 55 Setting Up Your...
... for RAID Using the Intel® Option ROM Utility 44 Configuring for RAID Using the Intel® Matrix Storage Manager 45 Transferring Information to a New Computer 49 Setting Up a Home and Office Network 53 Connecting to a Network Adapter 53 Network Setup Wizard 54 Connecting to the Internet 55 Setting Up Your...

Owner's Manual
Page 5
... Hard drive problems 62 E-Mail, Modem, and Internet Problems 62 Error Messages 65 Keyboard Problems 66 Lockups and Software Problems 67 The computer does not start up 67 The computer stops responding 67 A program stops responding 67 A program crashes repeatedly 67 A program is designed for an earlier Microsoft® Windows® operating...
... Hard drive problems 62 E-Mail, Modem, and Internet Problems 62 Error Messages 65 Keyboard Problems 66 Lockups and Software Problems 67 The computer does not start up 67 The computer stops responding 67 A program stops responding 67 A program crashes repeatedly 67 A program is designed for an earlier Microsoft® Windows® operating...
Owner's Manual
Page 7
5 Removing and Installing Parts 101 Before You Begin 101 Recommended Tools 101 Turning Off Your Computer 102 Before Working Inside Your Computer 102 Removing the Computer Cover 103 Inside View of Your Computer 105 System Board Components 106 Power Supply DC Connector Pin Assignments . . . . . 108 Memory 111 Memory Installation Guidelines 112 Installing Memory 113 Removing...
5 Removing and Installing Parts 101 Before You Begin 101 Recommended Tools 101 Turning Off Your Computer 102 Before Working Inside Your Computer 102 Removing the Computer Cover 103 Inside View of Your Computer 105 System Board Components 106 Power Supply DC Connector Pin Assignments . . . . . 108 Memory 111 Memory Installation Guidelines 112 Installing Memory 113 Removing...
Owner's Manual
Page 8
... Removing the Chassis Fan 162 Replacing the Chassis Fan 163 System Board 164 Removing the System Board 164 Installing the System Board 165 Replacing the Computer Cover 166 6 Appendix 169 Specifications 169 System Setup 174 Overview 174 Entering System Setup 174 8 Contents
... Removing the Chassis Fan 162 Replacing the Chassis Fan 163 System Board 164 Removing the System Board 164 Installing the System Board 165 Replacing the Computer Cover 166 6 Appendix 169 Specifications 169 System Setup 174 Overview 174 Entering System Setup 174 8 Contents
Owner's Manual
Page 9
Only 184 Definition of "Dell-Installed" Software and Peripherals 185 Definition of "Third-Party" Software and Peripherals 185 FCC Notice (U.S. System Setup Options 176 Boot Sequence 178 Clearing Forgotten Passwords 180 Clearing CMOS Settings 181 Flashing the BIOS 182 Cleaning Your Computer 182 Computer, Keyboard, and Monitor 183 Mouse 183 Floppy Drive 183 CDs and DVDs 184 Dell Technical Support Policy (U.S. Only 185 FCC Class B 185 Contacting Dell 187 Glossary 189 Index 207 Contents 9
Only 184 Definition of "Dell-Installed" Software and Peripherals 185 Definition of "Third-Party" Software and Peripherals 185 FCC Notice (U.S. System Setup Options 176 Boot Sequence 178 Clearing Forgotten Passwords 180 Clearing CMOS Settings 181 Flashing the BIOS 182 Cleaning Your Computer 182 Computer, Keyboard, and Monitor 183 Mouse 183 Floppy Drive 183 CDs and DVDs 184 Dell Technical Support Policy (U.S. Only 185 FCC Class B 185 Contacting Dell 187 Glossary 189 Index 207 Contents 9

Owner's Manual
Page 11
...? only) • Safety instructions • Regulatory information • Ergonomics information • End User License Agreement Dell™ Product Information Guide • How to set up my computer Setup Diagram See the setup diagram that came with your computer. Find it Here • Warranty information • Terms and Conditions (U.S. Some features or media may...
...? only) • Safety instructions • Regulatory information • Ergonomics information • End User License Agreement Dell™ Product Information Guide • How to set up my computer Setup Diagram See the setup diagram that came with your computer. Find it Here • Warranty information • Terms and Conditions (U.S. Some features or media may...

Owner's Manual
Page 12
... License Label Find it Here Service Tag and Microsoft® Windows® License These labels are located on your computer. • Use the Service Tag to identify your computer when you use support.dell.com or contact support. • Enter the Express Service Code to discourage removal of the label. 12 Finding Information...
... License Label Find it Here Service Tag and Microsoft® Windows® License These labels are located on your computer. • Use the Service Tag to identify your computer when you use support.dell.com or contact support. • Enter the Express Service Code to discourage removal of the label. 12 Finding Information...
Owner's Manual
Page 13
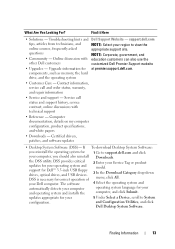
... service call status and support history, service contract, online discussions with other Dell customers NOTE: Select your region to view the appropriate support site. Computer documentation, details on my computer configuration, product specifications, and white papers • Downloads - If To download...All. 4 Select the operating system and operating system language for correct operation of your computer, you reinstall the operating system for at premier.support.dell.com. support.dell.com tips, articles from technicians, and online courses, frequently asked questions • ...
... service call status and support history, service contract, online discussions with other Dell customers NOTE: Select your region to view the appropriate support site. Computer documentation, details on my computer configuration, product specifications, and white papers • Downloads - If To download...All. 4 Select the operating system and operating system language for correct operation of your computer, you reinstall the operating system for at premier.support.dell.com. support.dell.com tips, articles from technicians, and online courses, frequently asked questions • ...
Owner's Manual
Page 15
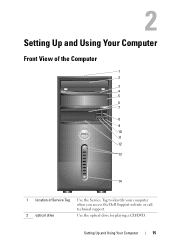
Setting Up and Using Your Computer 15 Setting Up and Using Your Computer Front View of the Computer 1 2 3 4 5 6 7 8 9 10 11 12 13 14 1 location of Service Tag Use the Service Tag to identify your computer when you access the Dell Support website or call technical support. 2 optical drive Use the optical drive for playing a CD/DVD.
Setting Up and Using Your Computer 15 Setting Up and Using Your Computer Front View of the Computer 1 2 3 4 5 6 7 8 9 10 11 12 13 14 1 location of Service Tag Use the Service Tag to identify your computer when you access the Dell Support website or call technical support. 2 optical drive Use the optical drive for playing a CD/DVD.
Owner's Manual
Page 16
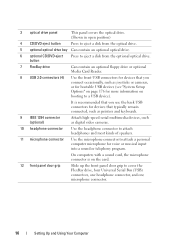
...cover the FlexBay drive, four Universal Serial Bus (USB) connectors, one headphone connector, and one microphone connector. 16 Setting Up and Using Your Computer 3 optical drive panel This panel covers the optical drive. (Shown in open position) 4 CD/DVD eject button Press to eject a disk ...from the optical drive. 5 optional optical drive bay Can contain an optional optical drive. 6 optional CD/DVD eject Press to attach a personal computer microphone for more information on page 176 for voice or musical input into a sound or telephony program. button 7 FlexBay drive Can contain an ...
...cover the FlexBay drive, four Universal Serial Bus (USB) connectors, one headphone connector, and one microphone connector. 16 Setting Up and Using Your Computer 3 optical drive panel This panel covers the optical drive. (Shown in open position) 4 CD/DVD eject button Press to eject a disk ...from the optical drive. 5 optional optical drive bay Can contain an optional optical drive. 6 optional CD/DVD eject Press to attach a personal computer microphone for more information on page 176 for voice or musical input into a sound or telephony program. button 7 FlexBay drive Can contain an ...
Owner's Manual
Page 17
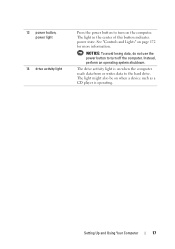
The light in the center of this button indicates power state. The drive activity light is operating. See "Controls and Lights" on when the computer reads data from or writes data to the hard drive. Instead, perform an operating system shutdown. NOTICE: To avoid losing data, do not use the power button to turn on the computer. Setting Up and Using Your Computer 17 The light might also be on when a device such as a CD player is on page 172 for more information. 13 power button, power light 14 drive activity light Press the power button to turn off the computer.
The light in the center of this button indicates power state. The drive activity light is operating. See "Controls and Lights" on when the computer reads data from or writes data to the hard drive. Instead, perform an operating system shutdown. NOTICE: To avoid losing data, do not use the power button to turn on the computer. Setting Up and Using Your Computer 17 The light might also be on when a device such as a CD player is on page 172 for more information. 13 power button, power light 14 drive activity light Press the power button to turn off the computer.
Owner's Manual
Page 18
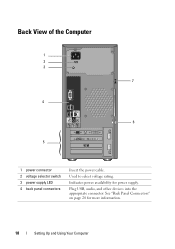
Back View of the Computer 1 2 3 7 4 6 5 1 power connector 2 voltage selector switch 3 power supply LED 4 back panel connectors Insert the power cable. Indicates power availability for more information. 18 Setting Up and Using Your Computer Plug USB, audio, and other devices into the appropriate connector. See "Back Panel Connectors" on page 20 for power supply. Used to select voltage rating.
Back View of the Computer 1 2 3 7 4 6 5 1 power connector 2 voltage selector switch 3 power supply LED 4 back panel connectors Insert the power cable. Indicates power availability for more information. 18 Setting Up and Using Your Computer Plug USB, audio, and other devices into the appropriate connector. See "Back Panel Connectors" on page 20 for power supply. Used to select voltage rating.
Owner's Manual
Page 19
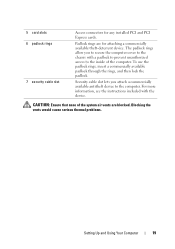
... padlock rings, insert a commercially available padlock through the rings, and then lock the padlock. CAUTION: Ensure that none of the computer. 5 card slots 6 padlock rings 7 security cable slot Access connectors for attaching a commercially available theft-deterrent device. Blocking the vents... would cause serious thermal problems. Setting Up and Using Your Computer 19 Security cable slot lets you to secure the computer cover to the chassis with the device. For more information, see the instructions included with a ...
... padlock rings, insert a commercially available padlock through the rings, and then lock the padlock. CAUTION: Ensure that none of the computer. 5 card slots 6 padlock rings 7 security cable slot Access connectors for attaching a commercially available theft-deterrent device. Blocking the vents... would cause serious thermal problems. Setting Up and Using Your Computer 19 Security cable slot lets you to secure the computer cover to the chassis with the device. For more information, see the instructions included with a ...
Owner's Manual
Page 20
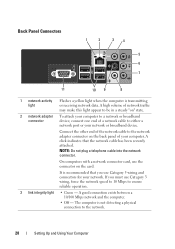
A high volume of network traffic may make this light appear to be in a steady "on" state. 2 network adapter To attach your computer to either a network port or your network. It is recommended that the network cable has been securely attached. If you use Category 5 wiring and ...other end of the network cable to the network adapter connector on the card. A good connection exists between a 10/100 Mbps network and the computer. • Off - On computers with a network connector card, use Category 3 wiring, force the network speed to 10 Mbps to the network. 20 Setting Up and Using ...
A high volume of network traffic may make this light appear to be in a steady "on" state. 2 network adapter To attach your computer to either a network port or your network. It is recommended that the network cable has been securely attached. If you use Category 5 wiring and ...other end of the network cable to the network adapter connector on the card. A good connection exists between a 10/100 Mbps network and the computer. • Off - On computers with a network connector card, use Category 3 wiring, force the network speed to 10 Mbps to the network. 20 Setting Up and Using ...
Owner's Manual
Page 21
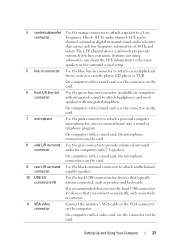
...devices that you connect occasionally, such as joysticks or cameras. 11 VGA video connector Connect the monitor's VGA cable to the VGA connector on computers connector with integrated sound) to attach headphones and most speakers with a video card, use the connector on the card. 6 front L/R ...keyboards. It is on the card. 4 center/subwoofer Use the orange connector to attach a speaker to provide extremely low bass extension. On computers with a sound card, the microphone connector is found in connector to the main speakers in the surround sound setup. 5 line-in connector ...
...devices that you connect occasionally, such as joysticks or cameras. 11 VGA video connector Connect the monitor's VGA cable to the VGA connector on computers connector with integrated sound) to attach headphones and most speakers with a video card, use the connector on the card. 6 front L/R ...keyboards. It is on the card. 4 center/subwoofer Use the orange connector to attach a speaker to provide extremely low bass extension. On computers with a sound card, the microphone connector is found in connector to the main speakers in the surround sound setup. 5 line-in connector ...
Owner's Manual
Page 22
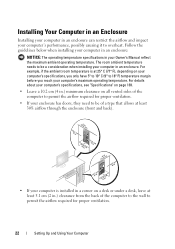
...a type that allows at least 30% airflow through the enclosure (front and back). • If your computer is at least 5.1 cm (2 in.) clearance from the back of the computer to permit the airflow required for proper ventilation. • If your enclosure has doors, they need to ...be a consideration when installing your computer in your Owner's Manual reflect the maximum ambient operating temperature. Installing Your Computer in an Enclosure Installing your computer in .) minimum clearance on all vented sides of the computer to the wall to permit the airflow required for ...
...a type that allows at least 30% airflow through the enclosure (front and back). • If your computer is at least 5.1 cm (2 in.) clearance from the back of the computer to permit the airflow required for proper ventilation. • If your enclosure has doors, they need to ...be a consideration when installing your computer in your Owner's Manual reflect the maximum ambient operating temperature. Installing Your Computer in an Enclosure Installing your computer in .) minimum clearance on all vented sides of the computer to the wall to permit the airflow required for ...

Owner's Manual
Page 23
Restricting the airflow impacts your computer in an enclosure that does not allow airflow. Setting Up and Using Your Computer 23 • Do not install your computer's performance, possibly causing it to overheat.
Restricting the airflow impacts your computer in an enclosure that does not allow airflow. Setting Up and Using Your Computer 23 • Do not install your computer's performance, possibly causing it to overheat.
Owner's Manual
Page 24
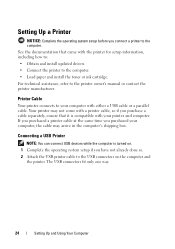
...done so. 2 Attach the USB printer cable to your computer with your computer, the cable may not come with a printer cable, so if you connect a printer to the computer. Connecting a USB Printer NOTE: You can connect USB devices while the computer is compatible with either a USB cable or a parallel ...or contact the printer manufacturer. The USB connectors fit only one way. 24 Setting Up and Using Your Computer Printer Cable Your printer connects to the USB connectors on the computer and the printer. See the documentation that it is turned on. 1 Complete the operating system setup if...
...done so. 2 Attach the USB printer cable to your computer with your computer, the cable may not come with a printer cable, so if you connect a printer to the computer. Connecting a USB Printer NOTE: You can connect USB devices while the computer is compatible with either a USB cable or a parallel ...or contact the printer manufacturer. The USB connectors fit only one way. 24 Setting Up and Using Your Computer Printer Cable Your printer connects to the USB connectors on the computer and the printer. See the documentation that it is turned on. 1 Complete the operating system setup if...


