Owner's Manual
Page 10
... Your Computer 153 Before Working Inside Your Computer 154 Hard Drive 155 Removing the Hard Drive 156 Replacing the Hard Drive 157 Returning a Hard Drive to Dell 158 Optical Drive 158 Removing the Optical Drive 158 Hinge Cover 159 Removing the Hinge Cover 160 Replacing the Hinge Cover 160 Keyboard 161 Removing the Keyboard 161 Replacing the Keyboard 162 Memory 163 Removing the DIMM...
... Your Computer 153 Before Working Inside Your Computer 154 Hard Drive 155 Removing the Hard Drive 156 Replacing the Hard Drive 157 Returning a Hard Drive to Dell 158 Optical Drive 158 Removing the Optical Drive 158 Hinge Cover 159 Removing the Hinge Cover 160 Replacing the Hinge Cover 160 Keyboard 161 Removing the Keyboard 161 Replacing the Keyboard 162 Memory 163 Removing the DIMM...
Owner's Manual
Page 117
...appeared. Contact Dell (see "Dell Diagnostics" on page 105). The hard drive failed initialization. DRIVE NOT READY - The operation requires a hard drive in the Dell Diagnostics (see "Contacting Dell" on page...hard drive in the system setup program (see "Drive Problems" on page 195). ER R O R READING PCMCIA C A R D - (your program may require an upgrade) to the microprocessor has failed. DATA ERROR - The computer cannot identify the ExpressCard. Troubleshooting 117 For an external mouse, check the cable connection. Reinstall the memory modules and, if necessary, replace...
...appeared. Contact Dell (see "Dell Diagnostics" on page 105). The hard drive failed initialization. DRIVE NOT READY - The operation requires a hard drive in the Dell Diagnostics (see "Contacting Dell" on page...hard drive in the system setup program (see "Drive Problems" on page 195). ER R O R READING PCMCIA C A R D - (your program may require an upgrade) to the microprocessor has failed. DATA ERROR - The computer cannot identify the ExpressCard. Troubleshooting 117 For an external mouse, check the cable connection. Reinstall the memory modules and, if necessary, replace...

Owner's Manual
Page 118
... amount of paper. Shut down the computer, reinstall the hard drive, and restart the computer. Reinstall the memory modules and, if necessary, replace them (see "Hard Drive" on page 105). GATE A20 FAILURE - D I S K D R I V E R E A D F A I O N E R R O R - D I S K D R I V E C O N F I G U R A T I L U R E - If the problem persists, try another drive. Run the Hard Disk Drive tests in the Dell Diagnostics (see "Hard Drive" on page 155), and boot the computer from...
... amount of paper. Shut down the computer, reinstall the hard drive, and restart the computer. Reinstall the memory modules and, if necessary, replace them (see "Hard Drive" on page 105). GATE A20 FAILURE - D I S K D R I V E R E A D F A I O N E R R O R - D I S K D R I V E C O N F I G U R A T I L U R E - If the problem persists, try another drive. Run the Hard Disk Drive tests in the Dell Diagnostics (see "Hard Drive" on page 155), and boot the computer from...
Owner's Manual
Page 120
... U I L A B L E - A memory module may be faulty or improperly seated. Reinstall the memory modules and, if necessary, replace them (see "Memory" on page 163). N O B O O T D E V I C E A V A I R E D . The computer cannot find the hard drive. Reinstall the hard drive (see "Dell Diagnostics" on page 155). Windows XP: 1 Click Start→ Control Panel→ Add or Remove Programs→ Programs... NOT ENOUGH MEMORY OR RESOURCES. If the problem persists, contact Dell (see "Hard Drive" on page 105). A memory module may be malfunctioning. MEMORY WRITE/READ FAILURE AT ADDRESS,...
... U I L A B L E - A memory module may be faulty or improperly seated. Reinstall the memory modules and, if necessary, replace them (see "Memory" on page 163). N O B O O T D E V I C E A V A I R E D . The computer cannot find the hard drive. Reinstall the hard drive (see "Dell Diagnostics" on page 155). Windows XP: 1 Click Start→ Control Panel→ Add or Remove Programs→ Programs... NOT ENOUGH MEMORY OR RESOURCES. If the problem persists, contact Dell (see "Hard Drive" on page 105). A memory module may be malfunctioning. MEMORY WRITE/READ FAILURE AT ADDRESS,...
Owner's Manual
Page 155
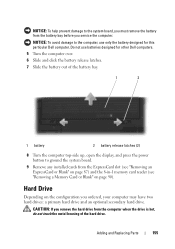
..., and press the power button to the computer, use batteries designed for this particular Dell computer. Adding and Replacing Parts 155 Do not use only the battery designed for other Dell computers. 5 Turn the computer over. 6 Slide and click the battery release latches. 7 Slide the battery out of the hard drive. Hard Drive Depending on page 90).
..., and press the power button to the computer, use batteries designed for this particular Dell computer. Adding and Replacing Parts 155 Do not use only the battery designed for other Dell computers. 5 Turn the computer over. 6 Slide and click the battery release latches. 7 Slide the battery out of the hard drive. Hard Drive Depending on page 90).
Owner's Manual
Page 156
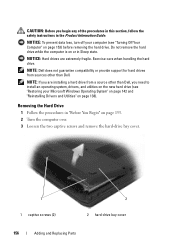
... two captive screws and remove the hard-drive bay cover. 1 1 captive screws (2) 2 2 hard-drive bay cover 156 Adding and Replacing Parts Removing the Hard Drive 1 Follow the procedures in "Before You Begin" on or in the Product Information Guide. NOTICE: Hard drives are installing a hard drive from sources other than Dell. Exercise care when handling the hard drive. NOTE: Dell does not guarantee compatibility or...
... two captive screws and remove the hard-drive bay cover. 1 1 captive screws (2) 2 2 hard-drive bay cover 156 Adding and Replacing Parts Removing the Hard Drive 1 Follow the procedures in "Before You Begin" on or in the Product Information Guide. NOTICE: Hard drives are installing a hard drive from sources other than Dell. Exercise care when handling the hard drive. NOTE: Dell does not guarantee compatibility or...
Owner's Manual
Page 157
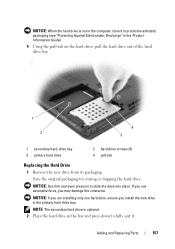
... seat it in protective antistatic packaging (see "Protecting Against Electrostatic Discharge" in the Product Information Guide). 4 Using the pull-tab on the hard drive, pull the hard drive out of the hard drive bay. 1 2 4 3 1 secondary hard-drive bay 3 primary hard drive 2 hard drive screws (3) 4 pull-tab Replacing the Hard Drive 1 Remove the new drive from its packaging. Save the original packaging for storing or shipping the...
... seat it in protective antistatic packaging (see "Protecting Against Electrostatic Discharge" in the Product Information Guide). 4 Using the pull-tab on the hard drive, pull the hard drive out of the hard drive bay. 1 2 4 3 1 secondary hard-drive bay 3 primary hard drive 2 hard drive screws (3) 4 pull-tab Replacing the Hard Drive 1 Remove the new drive from its packaging. Save the original packaging for storing or shipping the...

Owner's Manual
Page 158
... in "Before You Begin" on page 153. 2 Turn the computer over. 158 Adding and Replacing Parts 3 Replace and tighten the screws on the hard drive. 4 Replace the hard drive cover and tighten the captive screws. 5 Install the operating system for your old hard drive to Dell Return your computer, as needed (see "Restoring your Microsoft Windows Operating System" on page...
... in "Before You Begin" on page 153. 2 Turn the computer over. 158 Adding and Replacing Parts 3 Replace and tighten the screws on the hard drive. 4 Replace the hard drive cover and tighten the captive screws. 5 Install the operating system for your old hard drive to Dell Return your computer, as needed (see "Restoring your Microsoft Windows Operating System" on page...

Owner's Manual
Page 235
... installing, 171 Internet connection about, 35 options, 35 setting up, 36 F FCM. See Flash Cache Module Flash Cache Module, 179 H hard drive description, 27, 34 problems, 114 replacing, 155 returning to Dell, 158 hardware Dell Diagnostics, 105 Hardware Troubleshooter, 141 hinge cover removing, 159 K keyboard numeric keypad, 47 problems, 123 removing, 161 shortcuts, 47 keyboard...
... installing, 171 Internet connection about, 35 options, 35 setting up, 36 F FCM. See Flash Cache Module Flash Cache Module, 179 H hard drive description, 27, 34 problems, 114 replacing, 155 returning to Dell, 158 hardware Dell Diagnostics, 105 Hardware Troubleshooter, 141 hinge cover removing, 159 K keyboard numeric keypad, 47 problems, 123 removing, 161 shortcuts, 47 keyboard...


