
Owner's Manual
Page 11
Travel Tips 162 Traveling by Air 163 15 Contacting Dell 165 16 Specifications 167 17 Appendix 175 Using the System Setup Program 175 Viewing the System Setup Screens 176 Commonly Used Options 177 Cleaning Your Computer 179 Computer, Keyboard, and Display 179 Touch Pad 180 Mouse 180 Floppy Drive 181 CDs and DVDs 181 FCC Notice (U.S. Only 182 FCC Class B 182 Macrovision Product Notice 183 Glossary 185 Index 203 Contents 11
Travel Tips 162 Traveling by Air 163 15 Contacting Dell 165 16 Specifications 167 17 Appendix 175 Using the System Setup Program 175 Viewing the System Setup Screens 176 Commonly Used Options 177 Cleaning Your Computer 179 Computer, Keyboard, and Display 179 Touch Pad 180 Mouse 180 Floppy Drive 181 CDs and DVDs 181 FCC Notice (U.S. Only 182 FCC Class B 182 Macrovision Product Notice 183 Glossary 185 Index 203 Contents 11
Owner's Manual
Page 90
..., not on the locking tabs before you begin working inside the computer. 1 Ensure that the work surface is not covered by Dell is flat and clean to the computer, use other batteries designed for several seconds until the computer turns off your own personal safety. NOTICE: To disconnect...your computer. 2 Ensure that the computer and any connector pins. If your operating system, press and hold the power button for other Dell computers. 90 Adding and Replacing Parts Before Working Inside Your Computer Use the following steps before you disconnect the cable. As you begin any...
..., not on the locking tabs before you begin working inside the computer. 1 Ensure that the work surface is not covered by Dell is flat and clean to the computer, use other batteries designed for several seconds until the computer turns off your own personal safety. NOTICE: To disconnect...your computer. 2 Ensure that the computer and any connector pins. If your operating system, press and hold the power button for other Dell computers. 90 Adding and Replacing Parts Before Working Inside Your Computer Use the following steps before you disconnect the cable. As you begin any...
Owner's Manual
Page 119
Viruses can sometimes prevent Windows from recognizing the drive. C LEAN THE DRIVE O R DISK - See "Cleaning Your Computer" on page 111. See "Dell Diagnostics" on page 179. TEST THE DRIVE - • Insert another floppy disk, CD, or DVD to check for and remove viruses. See ... formats, not all DVD drives. Optical drive problems NOTE: High-speed optical drive vibration is not listed, perform a full scan with a Dell associate: 1 Click the Dell Support Center icon on page 147. Drive Problems CAUTION: Before you begin a live session with your computer's desktop. 2 Click Assistance From...
Viruses can sometimes prevent Windows from recognizing the drive. C LEAN THE DRIVE O R DISK - See "Cleaning Your Computer" on page 111. See "Dell Diagnostics" on page 179. TEST THE DRIVE - • Insert another floppy disk, CD, or DVD to check for and remove viruses. See ... formats, not all DVD drives. Optical drive problems NOTE: High-speed optical drive vibration is not listed, perform a full scan with a Dell associate: 1 Click the Dell Support Center icon on page 147. Drive Problems CAUTION: Before you begin a live session with your computer's desktop. 2 Click Assistance From...
Owner's Manual
Page 179
...: To help prevent damage to the selected device. Do not use products specifically designed for cleaning displays, and follow the safety instructions located in this procedure to boot the Dell Diagnostics on the diagnostics utility partition on your hard drive.) 1 Shut down the computer through... CAUTION: Before you reboot the computer, the previous boot order is clean and any installed batteries. When the DELL logo appears, press immediately. Do not use alcohol or an ammonia-based cleaner. The next time you clean your computer with a soft cloth dampened with either water or a ...
...: To help prevent damage to the selected device. Do not use products specifically designed for cleaning displays, and follow the safety instructions located in this procedure to boot the Dell Diagnostics on the diagnostics utility partition on your hard drive.) 1 Shut down the computer through... CAUTION: Before you reboot the computer, the previous boot order is clean and any installed batteries. When the DELL logo appears, press immediately. Do not use alcohol or an ammonia-based cleaner. The next time you clean your computer with a soft cloth dampened with either water or a ...

Owner's Manual
Page 180
... from the cloth to the antiglare coating, do not wipe the display with soap or alcohol. • Moisten a soft, lint-free cloth with a mild cleaning solution. 2 Turn the retainer ring on page 53. If your computer or keyboard. See "Using a Battery" on the underside of the mouse with a ...-free cloth. 180 Appendix Do not allow water from the cloth to seep between the touch pad and the surrounding palm rest. Cleaning a Non-Optical Mouse 1 Clean the outside casing of your mouse counterclockwise, and then remove the ball. 3 Wipe the ball with water, and wipe it gently across ...
... from the cloth to the antiglare coating, do not wipe the display with soap or alcohol. • Moisten a soft, lint-free cloth with a mild cleaning solution. 2 Turn the retainer ring on page 53. If your computer or keyboard. See "Using a Battery" on the underside of the mouse with a ...-free cloth. 180 Appendix Do not allow water from the cloth to seep between the touch pad and the surrounding palm rest. Cleaning a Non-Optical Mouse 1 Clean the outside casing of your mouse counterclockwise, and then remove the ball. 3 Wipe the ball with water, and wipe it gently across ...

Owner's Manual
Page 181
... retainer ring, and turn the retainer ring clockwise until it clicks into the ball cage or use compressed air to clean drive heads with a mild cleaning solution. If you notice problems, such as skipping, with the compressed-air product. Ensure that fluff from operating.... Cleaning an Optical Mouse Clean the outside casing of your floppy drive using a commercially available cleaning kit. Clean your CDs or DVDs, try cleaning the discs. 1 Hold the disc by its outer edge. Floppy Drive NOTICE: ...
... retainer ring, and turn the retainer ring clockwise until it clicks into the ball cage or use compressed air to clean drive heads with a mild cleaning solution. If you notice problems, such as skipping, with the compressed-air product. Ensure that fluff from operating.... Cleaning an Optical Mouse Clean the outside casing of your floppy drive using a commercially available cleaning kit. Clean your CDs or DVDs, try cleaning the discs. 1 Hold the disc by its outer edge. Floppy Drive NOTICE: ...

Owner's Manual
Page 182
Cleaning products for a Class B digital device pursuant to use on DVDs. This device complies with radio and television reception. NOTICE: The FCC regulations provide that may ... provide reasonable protection against harmful interference in a residential installation. could void your authority to correct the interference by Dell Inc. Only) FCC Class B This equipment generates, uses, and can also purchase commercial products that clean discs and provide some protection from dust, fingerprints, and scratches. For stubborn dirt, try to operate this...
Cleaning products for a Class B digital device pursuant to use on DVDs. This device complies with radio and television reception. NOTICE: The FCC regulations provide that may ... provide reasonable protection against harmful interference in a residential installation. could void your authority to correct the interference by Dell Inc. Only) FCC Class B This equipment generates, uses, and can also purchase commercial products that clean discs and provide some protection from dust, fingerprints, and scratches. For stubborn dirt, try to operate this...
Owner's Manual
Page 203
... cards, 72 carnet, 162 CD CD-RW drive problems, 120 drive problems, 119 CDs, 63 about, 63 operating system, 18 playing, 61 Check Disk, 120 cleaning touch pad, 180 coin-cell battery replacing, 106 computer crashes, 131-132 protecting, 86 restore to previous operating state, 154 slow performance, 122, 133 specifications...
... cards, 72 carnet, 162 CD CD-RW drive problems, 120 drive problems, 119 CDs, 63 about, 63 operating system, 18 playing, 61 Check Disk, 120 cleaning touch pad, 180 coin-cell battery replacing, 106 computer crashes, 131-132 protecting, 86 restore to previous operating state, 154 slow performance, 122, 133 specifications...
Owner's Manual
Page 209
telephone numbers, 165 touch pad cleaning, 180 customizing, 51 description, 22 tracking software protecting your computer, 86 transferring information to a new computer, 33 traveling with the computer by air, 163 identification tag, 161 packing, 161 tips, 162 troubleshooting Dell Diagnostics, 111 Hardware Troubleshooter, 147 Help and Support Center, 17 restore computer to previous...
telephone numbers, 165 touch pad cleaning, 180 customizing, 51 description, 22 tracking software protecting your computer, 86 transferring information to a new computer, 33 traveling with the computer by air, 163 identification tag, 161 packing, 161 tips, 162 troubleshooting Dell Diagnostics, 111 Hardware Troubleshooter, 147 Help and Support Center, 17 restore computer to previous...
Service Manual
Page 4
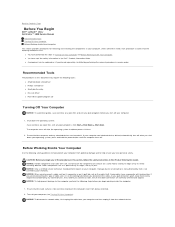
... the following steps before you connect a cable, ensure that is not authorized by Dell is flat and clean to prevent the computer cover from being scratched. 2. Back to Contents Page Before You Begin Dell™ Latitude™ 131L/ Dell Vostro™ 1000 Service Manual Recommended Tools Turning Off Your Computer Before Working Inside Your Computer This...
... the following steps before you connect a cable, ensure that is not authorized by Dell is flat and clean to prevent the computer cover from being scratched. 2. Back to Contents Page Before You Begin Dell™ Latitude™ 131L/ Dell Vostro™ 1000 Service Manual Recommended Tools Turning Off Your Computer Before Working Inside Your Computer This...
Service Manual
Page 13
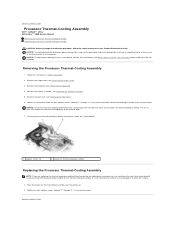
...the following procedure, follow the safety instructions in consecutive order. Back to Contents Page Processor Thermal-Cooling Assembly Dell™ Latitude™ 131L/ Dell Vostro™ 1000 Service Manual Removing the Processor Thermal-Cooling Assembly Replacing the Processor Thermal-Cooling Assembly CAUTION: Before you can...cover (see Removing the Keyboard). 4. Remove the keyboard (see Removing the Hinge Cover). 3. NOTICE: To help prevent damage to clean the surface. 1. NOTICE: To ensure maximum cooling for the processor, do not touch the heat transfer areas on the computer. ...
...the following procedure, follow the safety instructions in consecutive order. Back to Contents Page Processor Thermal-Cooling Assembly Dell™ Latitude™ 131L/ Dell Vostro™ 1000 Service Manual Removing the Processor Thermal-Cooling Assembly Replacing the Processor Thermal-Cooling Assembly CAUTION: Before you can...cover (see Removing the Keyboard). 4. Remove the keyboard (see Removing the Hinge Cover). 3. NOTICE: To help prevent damage to clean the surface. 1. NOTICE: To ensure maximum cooling for the processor, do not touch the heat transfer areas on the computer. ...


