Owner's Manual
Page 183
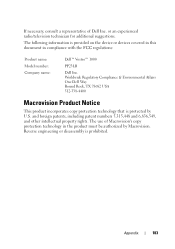
... TX 78682 USA 512-338-4400 Macrovision Product Notice This product incorporates copy protection technology that is prohibited. The use of Dell Inc. The following information is provided on the device or devices covered in this document in the product must be authorized ... consult a representative of Macrovision's copy protection technology in compliance with the FCC regulations: Product name: Model number: Company name: Dell™ Vostro™ 1000 PP23LB Dell Inc. and foreign patents, including patent numbers 5,315,448 and 6,836,549, and other intellectual property rights.
... TX 78682 USA 512-338-4400 Macrovision Product Notice This product incorporates copy protection technology that is prohibited. The use of Dell Inc. The following information is provided on the device or devices covered in this document in the product must be authorized ... consult a representative of Macrovision's copy protection technology in compliance with the FCC regulations: Product name: Model number: Company name: Dell™ Vostro™ 1000 PP23LB Dell Inc. and foreign patents, including patent numbers 5,315,448 and 6,836,549, and other intellectual property rights.
Service Manual
Page 1
... Cautions NOTE: A NOTE indicates important information that helps you purchased a Dell n Series computer, any references in this text: Dell, the DELL logo, Vostro, and Latitude are trademarks of Dell Inc.; NOTE: The color of Dell Inc. All rights reserved. Other trademarks and trade names may vary from...are not applicable. If you make better use of Microsoft Corporation. Trademarks used in the User's Guide. Dell™ Latitude™ 131L/Dell Vostro™ 1000 Service Manual Before You Begin Optical Drive Hard Drive Memory Module(s) Modem Mini-Card Keyboard Hinge Cover Display ...
... Cautions NOTE: A NOTE indicates important information that helps you purchased a Dell n Series computer, any references in this text: Dell, the DELL logo, Vostro, and Latitude are trademarks of Dell Inc.; NOTE: The color of Dell Inc. All rights reserved. Other trademarks and trade names may vary from...are not applicable. If you make better use of Microsoft Corporation. Trademarks used in the User's Guide. Dell™ Latitude™ 131L/Dell Vostro™ 1000 Service Manual Before You Begin Optical Drive Hard Drive Memory Module(s) Modem Mini-Card Keyboard Hinge Cover Display ...
Service Manual
Page 2
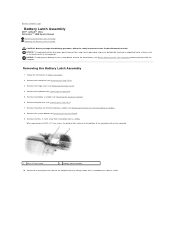
... rest (see Before Working Inside Your Computer) before working inside the computer. NOTICE: To help prevent damage to Contents Page Battery Latch Assembly Dell™ Latitude™ 131L/ Dell Vostro™ 1000 Service Manual Removing the Battery Latch Assembly Replacing the Battery Latch Assembly CAUTION: Before you remove the M2 x 2.7-mm screw, the battery...
... rest (see Before Working Inside Your Computer) before working inside the computer. NOTICE: To help prevent damage to Contents Page Battery Latch Assembly Dell™ Latitude™ 131L/ Dell Vostro™ 1000 Service Manual Removing the Battery Latch Assembly Replacing the Battery Latch Assembly CAUTION: Before you remove the M2 x 2.7-mm screw, the battery...
Service Manual
Page 4
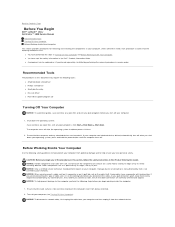
...Working Inside Your Computer Use the following safety guidelines to help prevent damage to Contents Page Before You Begin Dell™ Latitude™ 131L/ Dell Vostro™ 1000 Service Manual Recommended Tools Turning Off Your Computer Before Working Inside Your Computer This section provides procedures for removing... and hold the power button until the computer turns off . Also, before you connect a cable, ensure that is not authorized by Dell is not covered by its pins. If your computer and attached devices did not automatically turn off your computer from being scratched. 2. ...
...Working Inside Your Computer Use the following safety guidelines to help prevent damage to Contents Page Before You Begin Dell™ Latitude™ 131L/ Dell Vostro™ 1000 Service Manual Recommended Tools Turning Off Your Computer Before Working Inside Your Computer This section provides procedures for removing... and hold the power button until the computer turns off . Also, before you connect a cable, ensure that is not authorized by Dell is not covered by its pins. If your computer and attached devices did not automatically turn off your computer from being scratched. 2. ...

Service Manual
Page 6
... properly. Press , select Save changes and reboot, and press to enter the system setup program. 4. Back to Contents Page Flashing the BIOS Dell™ Latitude™ 131L/ Dell Vostro™ 1000 Service Manual 1. Ensure that the AC adapter is plugged in your region. 2. Follow the instructions that the main battery is complete, the computer...
... properly. Press , select Save changes and reboot, and press to enter the system setup program. 4. Back to Contents Page Flashing the BIOS Dell™ Latitude™ 131L/ Dell Vostro™ 1000 Service Manual 1. Ensure that the AC adapter is plugged in your region. 2. Follow the instructions that the main battery is complete, the computer...
Service Manual
Page 7
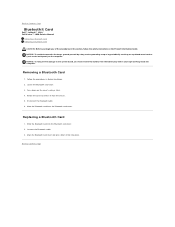
... help prevent damage to the system board, you must remove the battery from the Bluetooth card cover. Back to Contents Page Bluetooth® Card Dell™ Latitude™ 131L/ Dell Vostro™ 1000 Service Manual Removing a Bluetooth Card Replacing a Bluetooth Card CAUTION: Before you begin working inside the computer. Locate the Bluetooth card cover. 3.
... help prevent damage to the system board, you must remove the battery from the Bluetooth card cover. Back to Contents Page Bluetooth® Card Dell™ Latitude™ 131L/ Dell Vostro™ 1000 Service Manual Removing a Bluetooth Card Replacing a Bluetooth Card CAUTION: Before you begin working inside the computer. Locate the Bluetooth card cover. 3.
Service Manual
Page 8
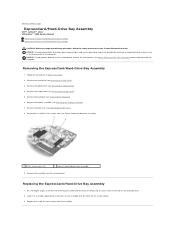
NOTICE: To help prevent damage to Contents Page ExpressCard/Hard-Drive Bay Assembly Dell™ Latitude™ 131L/ Dell Vostro™ 1000 Service Manual Removing the ExpressCard/Hard-Drive Bay Assembly Replacing the ExpressCard/Hard-Drive Bay Assembly CAUTION: Before you begin the following procedure, follow the ...
NOTICE: To help prevent damage to Contents Page ExpressCard/Hard-Drive Bay Assembly Dell™ Latitude™ 131L/ Dell Vostro™ 1000 Service Manual Removing the ExpressCard/Hard-Drive Bay Assembly Replacing the ExpressCard/Hard-Drive Bay Assembly CAUTION: Before you begin the following procedure, follow the ...
Service Manual
Page 10
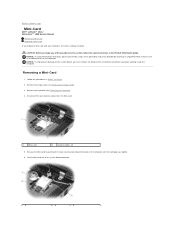
... the procedures in this section, follow the safety instructions in Before You Begin. 2. NOTICE: To help prevent damage to Contents Page Mini-Card Dell™ Latitude™ 131L/ Dell Vostro™ 1000 Service Manual Removing a Mini-Card Replacing a Mini-Card If you begin working inside the computer. Remove the keyboard (see Removing the Hinge...
... the procedures in this section, follow the safety instructions in Before You Begin. 2. NOTICE: To help prevent damage to Contents Page Mini-Card Dell™ Latitude™ 131L/ Dell Vostro™ 1000 Service Manual Removing a Mini-Card Replacing a Mini-Card If you begin working inside the computer. Remove the keyboard (see Removing the Hinge...
Service Manual
Page 12
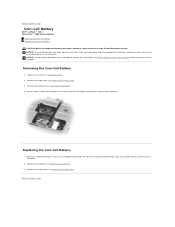
... (see Replacing the Keyboard). 3. Remove the keyboard (see Removing the Keyboard). 4. Back to Contents Page Back to Contents Page Coin-Cell Battery Dell™ Latitude™ 131L/ Dell Vostro™ 1000 Service Manual Removing the Coin-Cell Battery Replacing the Coin-Cell Battery CAUTION: Before you replace the battery, insert it into the guide...
... (see Replacing the Keyboard). 3. Remove the keyboard (see Removing the Keyboard). 4. Back to Contents Page Back to Contents Page Coin-Cell Battery Dell™ Latitude™ 131L/ Dell Vostro™ 1000 Service Manual Removing the Coin-Cell Battery Replacing the Coin-Cell Battery CAUTION: Before you replace the battery, insert it into the guide...
Service Manual
Page 13
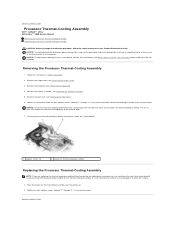
... to remove an existing pad or to Contents Page Back to clean the surface. 1. Back to Contents Page Processor Thermal-Cooling Assembly Dell™ Latitude™ 131L/ Dell Vostro™ 1000 Service Manual Removing the Processor Thermal-Cooling Assembly Replacing the Processor Thermal-Cooling Assembly CAUTION: Before you can place the new thermal pad...
... to remove an existing pad or to Contents Page Back to clean the surface. 1. Back to Contents Page Processor Thermal-Cooling Assembly Dell™ Latitude™ 131L/ Dell Vostro™ 1000 Service Manual Removing the Processor Thermal-Cooling Assembly Replacing the Processor Thermal-Cooling Assembly CAUTION: Before you can place the new thermal pad...
Service Manual
Page 15
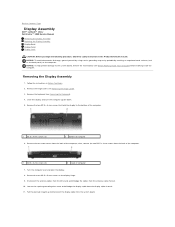
Back to Contents Page Display Assembly Dell™ Latitude™ 131L/ Dell Vostro™ 1000 Service Manual Removing the Display Assembly Replacing the Display Assembly Display Bezel Display Panel Display Latch CAUTION: Before you begin the following procedure, follow the ...
Back to Contents Page Display Assembly Dell™ Latitude™ 131L/ Dell Vostro™ 1000 Service Manual Removing the Display Assembly Replacing the Display Assembly Display Bezel Display Panel Display Latch CAUTION: Before you begin the following procedure, follow the ...

Service Manual
Page 21
... in the Product Information Guide. NOTICE: To help prevent damage to the connector on the computer. Removing a Fan 1. Back to Contents Page Fan Dell™ Latitude™ 131L/ Dell Vostro™ 1000 Service Manual Removing a Fan Replacing a Fan CAUTION: Before you begin the following procedure, follow the safety instructions in the fan. 3. Remove the...
... in the Product Information Guide. NOTICE: To help prevent damage to the connector on the computer. Removing a Fan 1. Back to Contents Page Fan Dell™ Latitude™ 131L/ Dell Vostro™ 1000 Service Manual Removing a Fan Replacing a Fan CAUTION: Before you begin the following procedure, follow the safety instructions in the fan. 3. Remove the...
Service Manual
Page 25
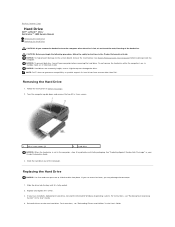
...mode. NOTICE: Hard drives are extremely fragile; For instructions, see "Restoring Your Operating System" in the User's Guide. 4. NOTE: Dell™ does not guarantee compatibility or provide support for hard drives from the computer when the drive is not in the computer, store...reinstall the Microsoft® Windows® operating system. NOTICE: To help prevent damage to Contents Page Hard Drive Dell™ Latitude™ 131L/ Dell Vostro™ 1000 Service Manual Removing the Hard Drive Replacing the Hard Drive CAUTION: If you begin the following procedure, follow the ...
...mode. NOTICE: Hard drives are extremely fragile; For instructions, see "Restoring Your Operating System" in the User's Guide. 4. NOTE: Dell™ does not guarantee compatibility or provide support for hard drives from the computer when the drive is not in the computer, store...reinstall the Microsoft® Windows® operating system. NOTICE: To help prevent damage to Contents Page Hard Drive Dell™ Latitude™ 131L/ Dell Vostro™ 1000 Service Manual Removing the Hard Drive Replacing the Hard Drive CAUTION: If you begin the following procedure, follow the ...
Service Manual
Page 27
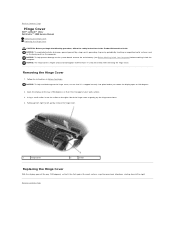
... hinge cover. 1 hinge cover 2 scribe Replacing the Hinge Cover With the display open to 180 degrees. 2. Back to Contents Page Hinge Cover Dell™ Latitude™ 131L/ Dell Vostro™ 1000 Service Manual Removing the Hinge Cover Replacing the Hinge Cover CAUTION: Before you rotate the display open all the way (180 degrees) so...
... hinge cover. 1 hinge cover 2 scribe Replacing the Hinge Cover With the display open to 180 degrees. 2. Back to Contents Page Hinge Cover Dell™ Latitude™ 131L/ Dell Vostro™ 1000 Service Manual Removing the Hinge Cover Replacing the Hinge Cover CAUTION: Before you rotate the display open all the way (180 degrees) so...

Service Manual
Page 28
... as the back panel) on the system board and close the connector latch. 2. NOTICE: To help prevent damage to Contents Page Keyboard Dell™ Latitude™ 131L/ Dell Vostro™ 1000 Service Manual Removing the Keyboard Replacing the Keyboard CAUTION: Before you begin the following procedure, follow the safety instructions in Before You Begin...
... as the back panel) on the system board and close the connector latch. 2. NOTICE: To help prevent damage to Contents Page Keyboard Dell™ Latitude™ 131L/ Dell Vostro™ 1000 Service Manual Removing the Keyboard Replacing the Keyboard CAUTION: Before you begin the following procedure, follow the safety instructions in Before You Begin...
Service Manual
Page 30
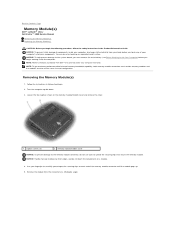
Back to Contents Page Memory Module(s) Dell™ Latitude™ 131L/ Dell Vostro™ 1000 Service Manual Removing the Memory Module(s) Replacing the Memory Module(s) CAUTION: Before you begin working inside your computer, discharge static electricity from your ... Memory Module(s) 1. Loosen the two captive screws on a module. 4. NOTICE: Handle memory modules by touching an unpainted metal surface. Remove the module from Dell™ are covered under your computer's electronic components. You can do so by their edges, and do not touch the components on the memory module...
Back to Contents Page Memory Module(s) Dell™ Latitude™ 131L/ Dell Vostro™ 1000 Service Manual Removing the Memory Module(s) Replacing the Memory Module(s) CAUTION: Before you begin working inside your computer, discharge static electricity from your ... Memory Module(s) 1. Loosen the two captive screws on a module. 4. NOTICE: Handle memory modules by touching an unpainted metal surface. Remove the module from Dell™ are covered under your computer's electronic components. You can do so by their edges, and do not touch the components on the memory module...
Service Manual
Page 32
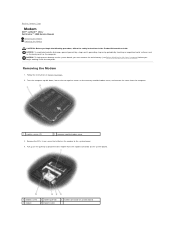
... 3. Turn the computer upside-down, loosen the two captive screws on the computer. NOTICE: To help prevent damage to Contents Page Modem Dell™ Latitude™ 131L/ Dell Vostro™ 1000 Service Manual Removing the Modem Replacing the Modem CAUTION: Before you begin the following procedure, follow the safety instructions in Before You Begin...
... 3. Turn the computer upside-down, loosen the two captive screws on the computer. NOTICE: To help prevent damage to Contents Page Modem Dell™ Latitude™ 131L/ Dell Vostro™ 1000 Service Manual Removing the Modem Replacing the Modem CAUTION: Before you begin the following procedure, follow the safety instructions in Before You Begin...
Service Manual
Page 34
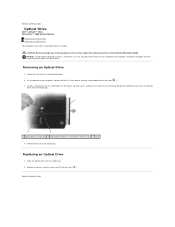
Back to Contents Page Optical Drive Dell™ Latitude™ 131L/ Dell Vostro™ 1000 Service Manual Removing an Optical Drive Replacing an Optical Drive Your computer ships with a lock icon ( ). 3. CAUTION: Before you begin any of the computer, remove ...
Back to Contents Page Optical Drive Dell™ Latitude™ 131L/ Dell Vostro™ 1000 Service Manual Removing an Optical Drive Replacing an Optical Drive Your computer ships with a lock icon ( ). 3. CAUTION: Before you begin any of the computer, remove ...
Service Manual
Page 35
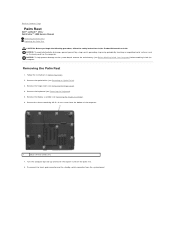
... working inside the computer. Remove the keyboard (see Removing an Optical Drive). 3. NOTICE: To help prevent damage to Contents Page Palm Rest Dell™ Latitude™ 131L/ Dell Vostro™ 1000 Service Manual Removing the Palm Rest Replacing the Palm Rest CAUTION: Before you begin the following procedure, follow the safety instructions in Before...
... working inside the computer. Remove the keyboard (see Removing an Optical Drive). 3. NOTICE: To help prevent damage to Contents Page Palm Rest Dell™ Latitude™ 131L/ Dell Vostro™ 1000 Service Manual Removing the Palm Rest Replacing the Palm Rest CAUTION: Before you begin the following procedure, follow the safety instructions in Before...
Service Manual
Page 38
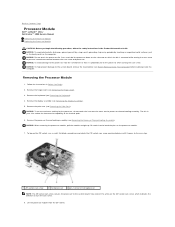
... inside the computer. Remove the hinge cover (see Removing the Hinge Cover). 3. NOTICE: To help prevent damage to Contents Page Processor Module Dell™ Latitude™ 131L/ Dell Vostro™ 1000 Service Manual Removing the Processor Module Replacing the Processor Module CAUTION: Before you begin the following procedure, follow the safety instructions in Before...
... inside the computer. Remove the hinge cover (see Removing the Hinge Cover). 3. NOTICE: To help prevent damage to Contents Page Processor Module Dell™ Latitude™ 131L/ Dell Vostro™ 1000 Service Manual Removing the Processor Module Replacing the Processor Module CAUTION: Before you begin the following procedure, follow the safety instructions in Before...


