User Manual
Page 3
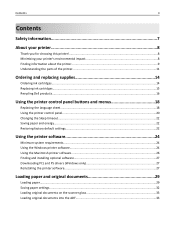
... printer's environmental impact 8 Finding information about the printer...9 Understanding the parts of the printer 11 Ordering and replacing supplies 14 Ordering ink cartridges...14 Replacing ink cartridges...15 Recycling Dell products...16 Using the printer control panel buttons and menus 18 Replacing the language sheet...18 Using the printer control panel...20 Changing...
... printer's environmental impact 8 Finding information about the printer...9 Understanding the parts of the printer 11 Ordering and replacing supplies 14 Ordering ink cartridges...14 Replacing ink cartridges...15 Recycling Dell products...16 Using the printer control panel buttons and menus 18 Replacing the language sheet...18 Using the printer control panel...20 Changing...
User Manual
Page 5
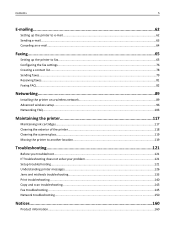
... Faxing FAQ...82 Networking 89 Installing the printer on a wireless network 89 Advanced wireless setup...96 Networking FAQ...103 Maintaining the printer 117 Maintaining ink cartridges...117 Cleaning the exterior of the printer...118 Cleaning the scanner glass...119 Moving the printer to another location 119 Troubleshooting 121 Before you troubleshoot...
... Faxing FAQ...82 Networking 89 Installing the printer on a wireless network 89 Advanced wireless setup...96 Networking FAQ...103 Maintaining the printer 117 Maintaining ink cartridges...117 Cleaning the exterior of the printer...118 Cleaning the scanner glass...119 Moving the printer to another location 119 Troubleshooting 121 Before you troubleshoot...
User Manual
Page 9
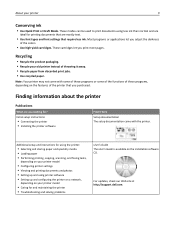
... User's Guide The User's Guide is available on the features of the printer that you purchased. For updates, check our Web site at http://support.dell.com. These cartridges let you adjust the darkness of the colors. • Use high‑yield...
... User's Guide The User's Guide is available on the features of the printer that you purchased. For updates, check our Web site at http://support.dell.com. These cartridges let you adjust the darkness of the colors. • Use high‑yield...
User Manual
Page 10
... Code appear on labels located on your printer. • Software and Drivers-Certified drivers for your printer and installers for Dell printer software • Readme files-Last‑minute technical changes, or advanced technical reference material for experienced users or technicians .... About your printer 10 What are already installed on your computer. • Supplies and accessories for your printer • Replacement cartridges Dell Printer Supplies Web site- Click to view the appropriate support site. Note: Your printer may not come with the printer software. ...
... Code appear on labels located on your printer. • Software and Drivers-Certified drivers for your printer and installers for Dell printer software • Readme files-Last‑minute technical changes, or advanced technical reference material for experienced users or technicians .... About your printer 10 What are already installed on your computer. • Supplies and accessories for your printer • Replacement cartridges Dell Printer Supplies Web site- Click to view the appropriate support site. Note: Your printer may not come with the printer software. ...

User Manual
Page 13
About your printer 13 Use the To 22 Jam clearance cover Access and clear paper jams. 23 Ink cartridge access area Install, replace, or remove ink cartridges. 24 Scanner unit • Access the ink cartridges and printhead. • Clear paper jams.
About your printer 13 Use the To 22 Jam clearance cover Access and clear paper jams. 23 Ink cartridge access area Install, replace, or remove ink cartridges. 24 Scanner unit • Access the ink cartridges and printhead. • Clear paper jams.
User Manual
Page 14
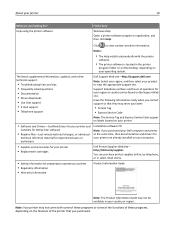
...ink cartridges Page yields are unopened and placed on the Dell Web site at www.dell.com/supplies. Item Licensed cartridge1 Regular cartridge Black cartridge Series 31 Not available Yellow color cartridge Series 31 Not available Cyan color cartridge Series 31 Not available Magenta color cartridge Series...1 Licensed for a single use , return this cartridge to Dell for printing photos. • When storing new ink cartridges, make sure they are available at www.dell.com/supplies. For more ink, order high‑yield ink cartridges. • Depending on your country or region,...
...ink cartridges Page yields are unopened and placed on the Dell Web site at www.dell.com/supplies. Item Licensed cartridge1 Regular cartridge Black cartridge Series 31 Not available Yellow color cartridge Series 31 Not available Cyan color cartridge Series 31 Not available Magenta color cartridge Series...1 Licensed for a single use , return this cartridge to Dell for printing photos. • When storing new ink cartridges, make sure they are available at www.dell.com/supplies. For more ink, order high‑yield ink cartridges. • Depending on your country or region,...
User Manual
Page 15
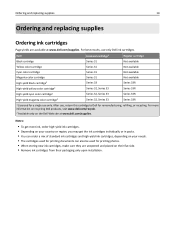
... the pack, and then remove the protective cap from the ink cartridge. Note: The printhead moves to the cartridge installation position. 3 Press the release tab, and then remove the used ink cartridge or cartridges. You must install new cartridges immediately after removing the old ones, or the ink remaining in the printhead nozzles may dry...
... the pack, and then remove the protective cap from the ink cartridge. Note: The printhead moves to the cartridge installation position. 3 Press the release tab, and then remove the used ink cartridge or cartridges. You must install new cartridges immediately after removing the old ones, or the ink remaining in the printhead nozzles may dry...
User Manual
Page 16
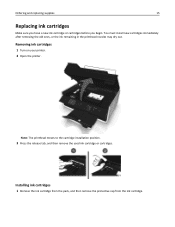
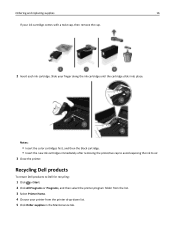
... If your finger along the ink cartridge until the cartridge clicks into place. Notes: • Insert the color cartridges first, and then the black cartridge. • Insert the new ink cartridges immediately after removing the protective cap to avoid exposing the ink to Dell for recycling: 1 Click or Start... your printer from the printer drop‑down list. 5 Click Order supplies in the Maintenance tab. Slide your ink cartridge comes with a twist cap, then remove the cap. 2 Insert each ink cartridge. Recycling Dell products To return Dell products to air. 3 Close the printer.
... If your finger along the ink cartridge until the cartridge clicks into place. Notes: • Insert the color cartridges first, and then the black cartridge. • Insert the new ink cartridges immediately after removing the protective cap to avoid exposing the ink to Dell for recycling: 1 Click or Start... your printer from the printer drop‑down list. 5 Click Order supplies in the Maintenance tab. Slide your ink cartridge comes with a twist cap, then remove the cap. 2 Insert each ink cartridge. Recycling Dell products To return Dell products to air. 3 Close the printer.
User Manual
Page 25
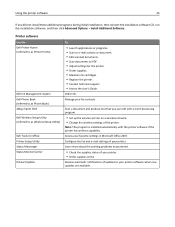
... supplies online. Printer software Use the Dell Printer Home (referred to as Printer Home) Dell Ink Management System Dell Phone Book (referred to as Phone Book) Abbyy Sprint OCR Dell Wireless Setup Utility (referred to as Wireless Setup Utility) Dell Tools for the printer. • Order supplies. • Maintain ink cartridges. • Register the printer. •...
... supplies online. Printer software Use the Dell Printer Home (referred to as Printer Home) Dell Ink Management System Dell Phone Book (referred to as Phone Book) Abbyy Sprint OCR Dell Wireless Setup Utility (referred to as Wireless Setup Utility) Dell Tools for the printer. • Order supplies. • Maintain ink cartridges. • Register the printer. •...

User Manual
Page 34
... collated). Printing 34 Printing Tips for printing • Use the appropriate paper for better prints. • Make sure there is enough ink in the ink cartridges. • Remove each copy as a set the printer, paper size, and orientation. 3 Click OK. 4 From the menu bar, choose File > Print. 5 From the Printer pop...
... collated). Printing 34 Printing Tips for printing • Use the appropriate paper for better prints. • Make sure there is enough ink in the ink cartridges. • Remove each copy as a set the printer, paper size, and orientation. 3 Click OK. 4 From the menu bar, choose File > Print. 5 From the Printer pop...

User Manual
Page 117
...Supplies Status For Macintosh users 1 From the Apple menu, navigate to: System Preferences > Print & Fax > select your document again. If you aligned the cartridges to improve print quality, then print your printer 2 Click Options & Supplies or Print Queue. 3 Click Supply Levels. It will briefly come out of ... if it is plugged into a properly grounded, working electrical outlet. Maintaining the printer 117 Maintaining the printer Maintaining ink cartridges In addition to the following tasks that you can perform, your printer performs automatic maintenance cycles if it is finished.
...Supplies Status For Macintosh users 1 From the Apple menu, navigate to: System Preferences > Print & Fax > select your document again. If you aligned the cartridges to improve print quality, then print your printer 2 Click Options & Supplies or Print Queue. 3 Click Supply Levels. It will briefly come out of ... if it is plugged into a properly grounded, working electrical outlet. Maintaining the printer 117 Maintaining the printer Maintaining ink cartridges In addition to the following tasks that you can perform, your printer performs automatic maintenance cycles if it is finished.
User Manual
Page 118
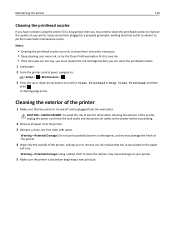
... more ink, so try the Clean Printhead option first to save ink. • If the ink levels are too low, you must replace the ink cartridges before you may need to clean the printhead nozzles to Clean Printhead or Deep Clean Printhead, and then press . Maintaining the printer 118 Cleaning the...
... more ink, so try the Clean Printhead option first to save ink. • If the ink levels are too low, you must replace the ink cartridges before you may need to clean the printhead nozzles to Clean Printhead or Deep Clean Printhead, and then press . Maintaining the printer 118 Cleaning the...
User Manual
Page 121
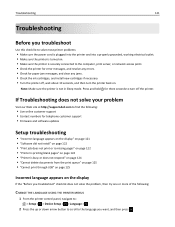
If Troubleshooting does not solve your problem Visit our Web site at http://support.dell.com to find the following : CHANGE THE LANGUAGE USING THE PRINTER MENUS 1 From the printer control panel, navigate to: > Setup > > Device Setup > > Language > 2 Press ...the printer for error messages, and resolve any errors. • Check for paper jam messages, and clear any jams. • Check the ink cartridges, and install new cartridges if necessary. • Turn the printer off the printer. Troubleshooting 121 Troubleshooting Before you want, and then press . Press and hold for three seconds...
If Troubleshooting does not solve your problem Visit our Web site at http://support.dell.com to find the following : CHANGE THE LANGUAGE USING THE PRINTER MENUS 1 From the printer control panel, navigate to: > Setup > > Device Setup > > Language > 2 Press ...the printer for error messages, and resolve any errors. • Check for paper jam messages, and clear any jams. • Check the ink cartridges, and install new cartridges if necessary. • Turn the printer off the printer. Troubleshooting 121 Troubleshooting Before you want, and then press . Press and hold for three seconds...
User Manual
Page 122
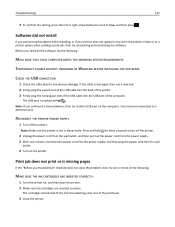
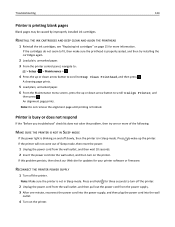
... pages If the "Before you reinstall the software, do the following : MAKE SURE THE INK CARTRIDGES ARE INSERTED CORRECTLY 1 Turn the printer on, and then open the printer. 2 Make sure the cartridges are inserted correctly. If the cable is not in the printers folder or as a printer option...for any obvious damage. Troubleshooting 122 3 To confirm the setting, press the left or right arrow button to scroll to a defective port. The cartridges should click firmly into the wall outlet. 4 Turn on the computer. You may have problems, then try another USB port on the printer. ...
... pages If the "Before you reinstall the software, do the following : MAKE SURE THE INK CARTRIDGES ARE INSERTED CORRECTLY 1 Turn the printer on, and then open the printer. 2 Make sure the cartridges are inserted correctly. If the cable is not in the printers folder or as a printer option...for any obvious damage. Troubleshooting 122 3 To confirm the setting, press the left or right arrow button to scroll to a defective port. The cartridges should click firmly into the wall outlet. 4 Turn on the computer. You may have problems, then try another USB port on the printer. ...
User Manual
Page 124
... the power cord into the power supply, and then plug the power cord into the wall outlet, and then turn off the printer. If the cartridges do not seem to : > Setup > > Maintenance > 4 Press the up the printer. Printer is busy or does not respond If the "Before you troubleshoot" checklist ...does not solve the problem, then try installing the cartridges again. 2 Load plain, unmarked paper. 3 From the printer control panel, navigate to fit, then make sure the printhead is not in Sleep mode...
... the power cord into the power supply, and then plug the power cord into the wall outlet, and then turn off the printer. If the cartridges do not seem to : > Setup > > Maintenance > 4 Press the up the printer. Printer is busy or does not respond If the "Before you troubleshoot" checklist ...does not solve the problem, then try installing the cartridges again. 2 Load plain, unmarked paper. 3 From the printer control panel, navigate to fit, then make sure the printhead is not in Sleep mode...
User Manual
Page 126
.... to clear the message. Change to [Size] [Type] Paper Try one or more of the following : • Check the ink cartridges. 1 Open the printer, and then remove and reinstall the ink cartridges. 2 Load a plain and unmarked A4‑ or letter‑size paper. to clear the message. Change to [Size] Paper Try...
.... to clear the message. Change to [Size] [Type] Paper Try one or more of the following : • Check the ink cartridges. 1 Open the printer, and then remove and reinstall the ink cartridges. 2 Load a plain and unmarked A4‑ or letter‑size paper. to clear the message. Change to [Size] Paper Try...
User Manual
Page 127
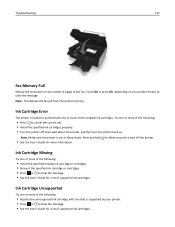
... of the fax. Try one or more of the following: • Press to cancel the current job. • Install the specified ink cartridges properly. • Turn the printer off, then wait about 10 seconds, and then turn off the printer. • See the User's... Guide for a list of supported ink cartridges. Ink Cartridge Missing Try one or more of the installed ink cartridges. Ink Cartridge Unsupported Try one or more of the following : • Install the specified missing ink cartridge or cartridges. • Reinsert the specified ink cartridge or cartridges. • Press or to clear the...
... of the fax. Try one or more of the following: • Press to cancel the current job. • Install the specified ink cartridges properly. • Turn the printer off, then wait about 10 seconds, and then turn off the printer. • See the User's... Guide for a list of supported ink cartridges. Ink Cartridge Missing Try one or more of the installed ink cartridges. Ink Cartridge Unsupported Try one or more of the following : • Install the specified missing ink cartridge or cartridges. • Reinsert the specified ink cartridge or cartridges. • Press or to clear the...
User Manual
Page 128
... and then back on to reset the printer. to continue printing. Note: Depending on your printer settings, you may need to replace the specified ink cartridge soon. Printer Memory Full Try one or more of the following : • Load the correct paper size in the paper support, and then press •... the print job, and then try printing again. Troubleshooting 128 Ink Low You may not be allowed to continue printing until you replace the specified cartridge. • See the User's Guide for a list of supported ink...
... and then back on to reset the printer. to continue printing. Note: Depending on your printer settings, you may need to replace the specified ink cartridge soon. Printer Memory Full Try one or more of the following : • Load the correct paper size in the paper support, and then press •... the print job, and then try printing again. Troubleshooting 128 Ink Low You may not be allowed to continue printing until you replace the specified cartridge. • See the User's Guide for a list of supported ink...

User Manual
Page 129
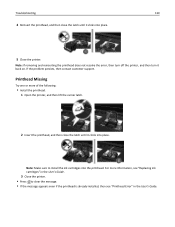
Printhead Error Remove and reinsert the printhead Warning-Potential Damage: Do not touch the cartridge contacts with bare hands to clear the message. Troubleshooting 129 Printhead Cannot Move Try one or more of the following: • Open the printer to remove any obstructions to the printhead, and then close the printer. • Press to avoid damage and print quality problems. 1 Open the printer, and then lift the latch. 2 Remove the printhead. 3 Wipe the printhead contacts and the contacts inside the printhead carrier using a clean, lint‑free cloth.
Printhead Error Remove and reinsert the printhead Warning-Potential Damage: Do not touch the cartridge contacts with bare hands to clear the message. Troubleshooting 129 Printhead Cannot Move Try one or more of the following: • Open the printer to remove any obstructions to the printhead, and then close the printer. • Press to avoid damage and print quality problems. 1 Open the printer, and then lift the latch. 2 Remove the printhead. 3 Wipe the printhead contacts and the contacts inside the printhead carrier using a clean, lint‑free cloth.
User Manual
Page 130
... Missing Try one or more information, see "Printhead Error" in the User's Guide. 3 Close the printer. • Press to install the ink cartridges into the printhead. For more of the following: • Install the printhead. 1 Open the printer, and then lift the carrier latch. 2 Insert... Note: Make sure to clear the message. • If the message appears even if the printhead is already installed, then see "Replacing ink cartridges" in the User's Guide. If the problem persists, then contact customer support. Note: If removing and reinserting the printhead does not resolve the ...
... Missing Try one or more information, see "Printhead Error" in the User's Guide. 3 Close the printer. • Press to install the ink cartridges into the printhead. For more of the following: • Install the printhead. 1 Open the printer, and then lift the carrier latch. 2 Insert... Note: Make sure to clear the message. • If the message appears even if the printhead is already installed, then see "Replacing ink cartridges" in the User's Guide. If the problem persists, then contact customer support. Note: If removing and reinserting the printhead does not resolve the ...


