
User Guide
Page 7
...paper type that the printer detects. When your ink cartridge levels are learned and a more information, see Replacing Ink Cartridges. For more accurate ...cartridge. Draft is installed. Orientation - Select the check box if you expect. Layout - Maintenance Install Ink Cartridges Clean Ink Cartridges Align Ink Cartridges Print a Test Page Network Support Dell Ink...cartridge is cleared from Normal, Banner, Mirror, N-up, Poster, Booklet, or Borderless. Print Setup Quality/Speed - When one or both sides of cartridge use, until after the low ink cartridge...
...paper type that the printer detects. When your ink cartridge levels are learned and a more information, see Replacing Ink Cartridges. For more accurate ...cartridge. Draft is installed. Orientation - Select the check box if you expect. Layout - Maintenance Install Ink Cartridges Clean Ink Cartridges Align Ink Cartridges Print a Test Page Network Support Dell Ink...cartridge is cleared from Normal, Banner, Mirror, N-up, Poster, Booklet, or Borderless. Print Setup Quality/Speed - When one or both sides of cartridge use, until after the low ink cartridge...

User Guide
Page 12
... unit that power is still present on the main body of the printer. 10 Supplies To order ink cartridges or paper, visit www.dell.com/supplies. Code Enter the Express Service Code to the printer. cartridge carrier 12 Express Service Identify your computer. Number: Part: Description: ... printer, but remains plugged into your printer when you that keeps the printer open while you lift to gain access to the ink cartridges. When the power supply is removable. Reorder Label 11 Ink Part that holds two ink cartridges, one color ink and the other end of the printer,...
... unit that power is still present on the main body of the printer. 10 Supplies To order ink cartridges or paper, visit www.dell.com/supplies. Code Enter the Express Service Code to the printer. cartridge carrier 12 Express Service Identify your computer. Number: Part: Description: ... printer, but remains plugged into your printer when you that keeps the printer open while you lift to gain access to the ink cartridges. When the power supply is removable. Reorder Label 11 Ink Part that holds two ink cartridges, one color ink and the other end of the printer,...
User Guide
Page 13
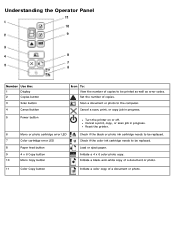
...paper. Set the number of a document or photo. Reset the printer. 6 Mono or photo cartridge error LED 7 Color cartridge error LED 8 Paper feed button 9 4 x 6 Copy button 10 Mono Copy button Check if the black or photo ink cartridge needs to be replaced. Cancel a print, copy, or scan... job in progress. 5 Power button Turn the printer on or off. Check if the color ink cartridge needs to be replaced. Initiate a 4 x 6 color photo copy. ...
...paper. Set the number of a document or photo. Reset the printer. 6 Mono or photo cartridge error LED 7 Color cartridge error LED 8 Paper feed button 9 4 x 6 Copy button 10 Mono Copy button Check if the black or photo ink cartridge needs to be replaced. Cancel a print, copy, or scan... job in progress. 5 Power button Turn the printer on or off. Check if the color ink cartridge needs to be replaced. Initiate a 4 x 6 color photo copy. ...

User Guide
Page 14
... provide warranty coverage for your Owner's Manual. Replacing Ink Cartridges 1. Dell™ ink cartridges are available only through Dell. The ink cartridge carrier moves and stops at www.dell.com/supplies or by Dell. Maintenance Replacing Ink Cartridges Aligning Ink Cartridges Cleaning the Ink Cartridge Nozzles Cleaning the Exterior of the Printer CAUTION: Before performing any of the procedures listed in this section, read and follow the...
... provide warranty coverage for your Owner's Manual. Replacing Ink Cartridges 1. Dell™ ink cartridges are available only through Dell. The ink cartridge carrier moves and stops at www.dell.com/supplies or by Dell. Maintenance Replacing Ink Cartridges Aligning Ink Cartridges Cleaning the Ink Cartridge Nozzles Cleaning the Exterior of the Printer CAUTION: Before performing any of the procedures listed in this section, read and follow the...

User Guide
Page 15
... the scanner base unit until it rests on the bottom of the printer. Snap each ink cartridge. NOTE: For normal printing, use a black cartridge and a color cartridge. Ensure that the black or photo ink cartridge is secure in the left ink cartridge carrier, and the color ink cartridge is secure in an air-tight container, such as the storage unit you...
... the scanner base unit until it rests on the bottom of the printer. Snap each ink cartridge. NOTE: For normal printing, use a black cartridge and a color cartridge. Ensure that the black or photo ink cartridge is secure in the left ink cartridge carrier, and the color ink cartridge is secure in an air-tight container, such as the storage unit you...
User Guide
Page 16
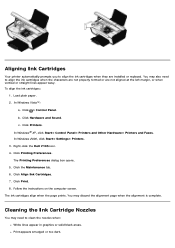
...; Settings® Printers. 3. Click Align Ink Cartridges. 7. Aligning Ink Cartridges Your printer automatically prompts you to align the ink cartridges when they are not aligned at the left margin, or when vertical or straight lines appear wavy. You may discard the alignment page when the alignment is complete. Click Hardware and Sound. Click Printers. Right-click the Dell V105 icon. 4. Click...
...; Settings® Printers. 3. Click Align Ink Cartridges. 7. Aligning Ink Cartridges Your printer automatically prompts you to align the ink cartridges when they are not aligned at the left margin, or when vertical or straight lines appear wavy. You may discard the alignment page when the alignment is complete. Click Hardware and Sound. Click Printers. Right-click the Dell V105 icon. 4. Click...
User Guide
Page 17
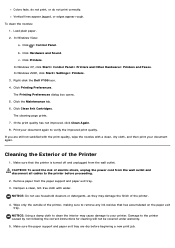
...tray. Right-click the Dell V105 icon. 4. Wipe only the outside of the printer, making sure to clean the interior may damage the finish of the printer. 4. c. In Windows XP, click Start® Control Panel® Printers and Other Hardware® Printers and Faxes. In ...the risk of the Printer 1. Dampen a clean, lint-free cloth with a clean, dry cloth, and then print your document again to the printer caused by not following the correct instructions for cleaning will not be covered under warranty. 5. Click Clean Ink Cartridges. Click Printing Preferences. ...
...tray. Right-click the Dell V105 icon. 4. Wipe only the outside of the printer, making sure to clean the interior may damage the finish of the printer. 4. c. In Windows XP, click Start® Control Panel® Printers and Other Hardware® Printers and Faxes. In ...the risk of the Printer 1. Dampen a clean, lint-free cloth with a clean, dry cloth, and then print your document again to the printer caused by not following the correct instructions for cleaning will not be covered under warranty. 5. Click Clean Ink Cartridges. Click Printing Preferences. ...

User Guide
Page 24
...printer. In Windows Vista: a. Right-click the Dell V105 icon. 3. Delete the other copies of the printer in your printer. 3. In Windows XP, click Start® Control Panel® Printers and Other Hardware® Printers and Faxes. Print a job to each cartridge. In Windows 2000, click Start® Settings® Printers....option. Click Hardware and Sound. Click Printers. Ensure that was originally used for your Printers folder, ensure you always plug the USB cable back into the same USB port that you have installed the ink cartridges correctly and removed the sticker and ...
...printer. In Windows Vista: a. Right-click the Dell V105 icon. 3. Delete the other copies of the printer in your printer. 3. In Windows XP, click Start® Control Panel® Printers and Other Hardware® Printers and Faxes. Print a job to each cartridge. In Windows 2000, click Start® Settings® Printers....option. Click Hardware and Sound. Click Printers. Ensure that was originally used for your Printers folder, ensure you always plug the USB cable back into the same USB port that you have installed the ink cartridges correctly and removed the sticker and ...
User Guide
Page 25
... your print job to be replaced immediately. The printer is too far into the printer, and then press the Paper Feed button . It needs to be replaced immediately. To order supplies, visit the Dell is bad. Replacing Ink Cartridges. Replace the ink cartridge with a new one . For more information, see Replacing Ink Cartridges. flash slowly. Remove obstructions from the carrier...
... your print job to be replaced immediately. The printer is too far into the printer, and then press the Paper Feed button . It needs to be replaced immediately. To order supplies, visit the Dell is bad. Replacing Ink Cartridges. Replace the ink cartridge with a new one . For more information, see Replacing Ink Cartridges. flash slowly. Remove obstructions from the carrier...

User Guide
Page 26
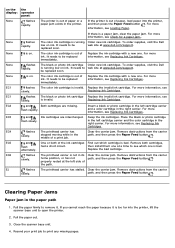
... exit tray. Printing Problems Check the ink levels, and install new print cartridges if necessary. For more information, see Replacing Ink Cartridges. Lift the scanner base unit. 3. Orient the media according to dry: Photo/glossy paper Transparencies Labels Paper jam not visible 1. Do not remove media from the printer. 4. Ensure that the media is properly...
... exit tray. Printing Problems Check the ink levels, and install new print cartridges if necessary. For more information, see Replacing Ink Cartridges. Lift the scanner base unit. 3. Orient the media according to dry: Photo/glossy paper Transparencies Labels Paper jam not visible 1. Do not remove media from the printer. 4. Ensure that the media is properly...
User Guide
Page 32
... lettering, perforations, or a texture that can cause paper jams and poor print quality. For example, use Dell™ Premium Photo Paper if you are printing photos with a photo ink cartridge. For more information, see Aligning Ink Cartridges and Cleaning the Ink Cartridge Nozzles. Paper jams may occur. During storage, you are several different ways to http://support...
... lettering, perforations, or a texture that can cause paper jams and poor print quality. For example, use Dell™ Premium Photo Paper if you are printing photos with a photo ink cartridge. For more information, see Aligning Ink Cartridges and Cleaning the Ink Cartridge Nozzles. Paper jams may occur. During storage, you are several different ways to http://support...

User Guide
Page 42
From here, you want to set as default from the Maintenance tab. From the Advanced tab, you can: Specify layouts that you can: Install, clean, and align ink cartridges. From the Maintenance tab: There are no print settings to set as default. Print a test page. Get information on sharing your printer on a network. Change the default orientation. Make black and white printing and borderless printing the default setting. Change the default number of copies.
From here, you want to set as default from the Maintenance tab. From the Advanced tab, you can: Specify layouts that you can: Install, clean, and align ink cartridges. From the Maintenance tab: There are no print settings to set as default. Print a test page. Get information on sharing your printer on a network. Change the default orientation. Make black and white printing and borderless printing the default setting. Change the default number of copies.


