
UltraSharp Monitor Users Guide
Page 3
Contents About Your Monitor 5 Package Contents 5 Product Features 7 Identifying Parts and Controls 8 Monitor Specifications 12 Plug and Play Capability 20 Universal Serial Bus (USB) Interface 20 LCD Monitor Quality and Pixel Policy 22 Maintenance Guidelines 22 Setting Up the Monitor 24 Attaching the Stand 24 Connecting Your Monitor 27 Organizing Your Cables 30 Removing the Monitor Stand 31 Wall Mounting (Optional 31 Operating the Monitor 33 Power On the Monitor 33 Using the Front Panel Controls 33 Contents | 3
Contents About Your Monitor 5 Package Contents 5 Product Features 7 Identifying Parts and Controls 8 Monitor Specifications 12 Plug and Play Capability 20 Universal Serial Bus (USB) Interface 20 LCD Monitor Quality and Pixel Policy 22 Maintenance Guidelines 22 Setting Up the Monitor 24 Attaching the Stand 24 Connecting Your Monitor 27 Organizing Your Cables 30 Removing the Monitor Stand 31 Wall Mounting (Optional 31 Operating the Monitor 33 Power On the Monitor 33 Using the Front Panel Controls 33 Contents | 3

UltraSharp Monitor Users Guide
Page 4
Only) and Other Regulatory Information 65 Contact Dell 65 4 | Contents Using the On-Screen Display (OSD) Menu 35 Setting the Maximum Resolution 52 Setting the KVM Switch 53 Setting the Auto KVM 56 Using the Tilt, Swivel, and Vertical Extension 58 Troubleshooting 59 Self-Test 59 Built-in Diagnostics 60 Always On USB Type-C Charging 60 Common Problems 61 Product Specific Problems 63 Universal Serial Bus (USB) Specific Problems 63 Speakers Specific Problems 64 Appendix 65 FCC Notices (U.S.
Only) and Other Regulatory Information 65 Contact Dell 65 4 | Contents Using the On-Screen Display (OSD) Menu 35 Setting the Maximum Resolution 52 Setting the KVM Switch 53 Setting the Auto KVM 56 Using the Tilt, Swivel, and Vertical Extension 58 Troubleshooting 59 Self-Test 59 Built-in Diagnostics 60 Always On USB Type-C Charging 60 Common Problems 61 Product Specific Problems 63 Universal Serial Bus (USB) Specific Problems 63 Speakers Specific Problems 64 Appendix 65 FCC Notices (U.S.
UltraSharp Monitor Users Guide
Page 7
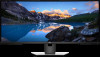
... set of 99% sRGB with an average Delta E < 2. • Supports HDMI, USB Type-C, DisplayPort sources. • Single USB Type-C to supply power to a compatible notebook while receiving video & data signal. • Tilt, swivel, and vertical extension adjustment capabilities. • Ultra-thin bezel minimizes the bezel gap in Picture (PIP) Select mode. Product Features The Dell U3818DW monitor has an active matrix, Thin-Film Transistor (TFT), Liquid Crystal Display (LCD) and LED backlight. About Your Monitor...
... set of 99% sRGB with an average Delta E < 2. • Supports HDMI, USB Type-C, DisplayPort sources. • Single USB Type-C to supply power to a compatible notebook while receiving video & data signal. • Tilt, swivel, and vertical extension adjustment capabilities. • Ultra-thin bezel minimizes the bezel gap in Picture (PIP) Select mode. Product Features The Dell U3818DW monitor has an active matrix, Thin-Film Transistor (TFT), Liquid Crystal Display (LCD) and LED backlight. About Your Monitor...

UltraSharp Monitor Users Guide
Page 11
... Monitor | 11 Connect your speakers.* Connect the USB cable that came with your monitor to charge your monitor to the monitor using a M3 x 6 mm screw (screw not included). Connect your computer with security lock (security lock not included). Bottom View Bottom view without monitor stand Label Description 1 AC power connector 2 Security lock slot 3 HDMI port connector (1, 2) 4 DisplayPort in connector 5 USB Type-C port 6 Audio-Line out 7 USB upstream port (1, 2) 8-1 USB downstream port 8-2 USB downstream port with DP cable. Connect your USB device. To lock the stand...
... Monitor | 11 Connect your speakers.* Connect the USB cable that came with your monitor to charge your monitor to the monitor using a M3 x 6 mm screw (screw not included). Connect your computer with security lock (security lock not included). Bottom View Bottom view without monitor stand Label Description 1 AC power connector 2 Security lock slot 3 HDMI port connector (1, 2) 4 DisplayPort in connector 5 USB Type-C port 6 Audio-Line out 7 USB upstream port (1, 2) 8-1 USB downstream port 8-2 USB downstream port with DP cable. Connect your USB device. To lock the stand...
UltraSharp Monitor Users Guide
Page 13
... stand lock slot (to 85 Hz (automatic) 3840 x 1600 at 60Hz About Your Monitor | 13 Resolution Specifications Model Horizontal scan range (HDMI & DP & USB Type-C alternate mode) Vertical scan range (HDMI & DP & USB Type-C alternate mode) Maximum preset resolution U3818DW 25 kHz to 115 kHz (automatic) 24 Hz to panel) * At panel native only, under Custom Mode preset. Dell Display Manager (DDM) Easy Arrange, Input Manager, Auto Source, etc. Connectivity • 2 x HDMI 2.0 (HDCP 2.2) • 1 x DP 1.2 (HDCP 2.2) • 2 x USB 3.0 Upstream port • 2 x USB...
... stand lock slot (to 85 Hz (automatic) 3840 x 1600 at 60Hz About Your Monitor | 13 Resolution Specifications Model Horizontal scan range (HDMI & DP & USB Type-C alternate mode) Vertical scan range (HDMI & DP & USB Type-C alternate mode) Maximum preset resolution U3818DW 25 kHz to 115 kHz (automatic) 24 Hz to panel) * At panel native only, under Custom Mode preset. Dell Display Manager (DDM) Easy Arrange, Input Manager, Auto Source, etc. Connectivity • 2 x HDMI 2.0 (HDCP 2.2) • 1 x DP 1.2 (HDCP 2.2) • 2 x USB 3.0 Upstream port • 2 x USB...
UltraSharp Monitor Users Guide
Page 15
...;C (cold start) * Not Support HDMI 2.0 optional specification, include HDMI Ethernet Channel (HEC), Audio Return Channel (ARC), standard for 3D format and resolutions, and standard for 4K digital cinema resolution. Speaker Specifications Model Speaker Frequency Response Impedance U3818DW 2 x 9.0 W 100 Hz - 20 kHz 8 ohm Physical Characteristics Model Signal cable type Dimensions (with stand) Height (extended) Height (compressed) Width Depth Dimensions (without stand) Height Width Depth Stand dimensions Height (extended) Height (compressed) Width U3818DW • Digital: HDMI, 19 pins...
...;C (cold start) * Not Support HDMI 2.0 optional specification, include HDMI Ethernet Channel (HEC), Audio Return Channel (ARC), standard for 3D format and resolutions, and standard for 4K digital cinema resolution. Speaker Specifications Model Speaker Frequency Response Impedance U3818DW 2 x 9.0 W 100 Hz - 20 kHz 8 ohm Physical Characteristics Model Signal cable type Dimensions (with stand) Height (extended) Height (compressed) Width Depth Dimensions (without stand) Height Width Depth Stand dimensions Height (extended) Height (compressed) Width U3818DW • Digital: HDMI, 19 pins...

UltraSharp Monitor Users Guide
Page 17
... or implied. VESA Modes Horizontal Vertical Video Sync Sync Power Indicator Power Consumption Normal operation Active Active Active White 250 W (maximum)** 56 W (typical) Active-off mode Inactive Inactive Blanked White (blinking) Less than 0.3 W The OSD functions only in the normal operation mode. Accordingly, the customer should not rely upon this automatic power saving feature. This is referred to as to the connected input signal. * Zero power consumption in OFF mode can automatically...
... or implied. VESA Modes Horizontal Vertical Video Sync Sync Power Indicator Power Consumption Normal operation Active Active Active White 250 W (maximum)** 56 W (typical) Active-off mode Inactive Inactive Blanked White (blinking) Less than 0.3 W The OSD functions only in the normal operation mode. Accordingly, the customer should not rely upon this automatic power saving feature. This is referred to as to the connected input signal. * Zero power consumption in OFF mode can automatically...
UltraSharp Monitor Users Guide
Page 30
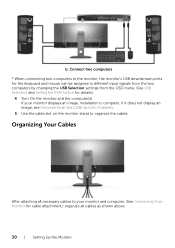
...(s). Connect two computers * When connecting two computers to the monitor, the monitor's USB downstream ports for cable attachment,) organize all cables as shown above. 30 | Setting Up the Monitor If your monitor and computer, (See Connecting Your Monitor for the keyboard and mouse can be assigned to your monitor displays an image, installation is complete. If it does not display an image, see Universal Serial Bus (USB) Specific Problems. 5 Use the cable slot on the monitor stand...
...(s). Connect two computers * When connecting two computers to the monitor, the monitor's USB downstream ports for cable attachment,) organize all cables as shown above. 30 | Setting Up the Monitor If your monitor and computer, (See Connecting Your Monitor for the keyboard and mouse can be assigned to your monitor displays an image, installation is complete. If it does not display an image, see Universal Serial Bus (USB) Specific Problems. 5 Use the cable slot on the monitor stand...

UltraSharp Monitor Users Guide
Page 37
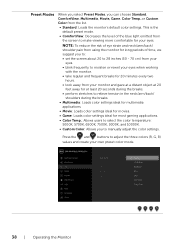
... input sources. Turning on the function allows you are using the DisplayPort (DP) connector. Use Color to adjust the color setting mode. Reset your monitor. Input Source Use the Input Source menu to select between the different video signals that may be connected to your monitor input settings to the factory settings. Select the HDMI 1 input when you are using the HDMI 2 connector. Select the HDMI 2 input when you are using the HDMI 1 connector. Operating the Monitor | 37 USB Type-C DP HDMI 1 HDMI 2 Auto Select Reset Input Source Color Select the USB Type-C input...
... input sources. Turning on the function allows you are using the DisplayPort (DP) connector. Use Color to adjust the color setting mode. Reset your monitor. Input Source Use the Input Source menu to select between the different video signals that may be connected to your monitor input settings to the factory settings. Select the HDMI 1 input when you are using the HDMI 2 connector. Select the HDMI 2 input when you are using the HDMI 1 connector. Operating the Monitor | 37 USB Type-C DP HDMI 1 HDMI 2 Auto Select Reset Input Source Color Select the USB Type-C input...
UltraSharp Monitor Users Guide
Page 38
... make viewing more comfortable for 20 minutes every two hours. • look away from the list. • Standard: Loads the monitor's default color settings. NOTE: To reduce the risk of eye strain and neck/arm/back/ shoulder pain from using the monitor for long periods of the blue light emitted from the screen to manually adjust the color settings. Press the and buttons to adjust the three colors...
... make viewing more comfortable for 20 minutes every two hours. • look away from the list. • Standard: Loads the monitor's default color settings. NOTE: To reduce the risk of eye strain and neck/arm/back/ shoulder pain from using the monitor for long periods of the blue light emitted from the screen to manually adjust the color settings. Press the and buttons to adjust the three colors...

UltraSharp Monitor Users Guide
Page 40
... This feature can make the image look sharper or softer. For optimal screen performance, Brightness and Contrast for some preset modes (Standard, Color Temp.) will be disabled when Uniformity Compensation is factory Compensation calibrated setting by default. Dynamic Contrast Allows you select Game or Movie preset mode. Press the button to Wide 21:9, Auto Resize, 4:3, or 1:1. Calibrated is turned On. Reset Display Select this option to adjust images. NOTE: Dynamic Contrast provides higher contrast if you...
... This feature can make the image look sharper or softer. For optimal screen performance, Brightness and Contrast for some preset modes (Standard, Color Temp.) will be disabled when Uniformity Compensation is factory Compensation calibrated setting by default. Dynamic Contrast Allows you select Game or Movie preset mode. Press the button to Wide 21:9, Auto Resize, 4:3, or 1:1. Calibrated is turned On. Reset Display Select this option to adjust images. NOTE: Dynamic Contrast provides higher contrast if you...

UltraSharp Monitor Users Guide
Page 45
... the Monitor | 45 Reset Menu • Menu Buttons: All Menu/function buttons (except the Power button) are locked and not accessible by the user. • Power Button: Only the Power button is Disable. The default setting is locked and not accessible by the user. • Menu + Power Buttons: Both the Menu/function & Power buttons are locked and not accessible by -side setup. Reset all OSD settings to the Power button for 4 seconds. NOTE: To unlock the button(s), press and hold the Menu/function button next to the factory...
... the Monitor | 45 Reset Menu • Menu Buttons: All Menu/function buttons (except the Power button) are locked and not accessible by the user. • Power Button: Only the Power button is Disable. The default setting is locked and not accessible by the user. • Menu + Power Buttons: Both the Menu/function & Power buttons are locked and not accessible by -side setup. Reset all OSD settings to the Power button for 4 seconds. NOTE: To unlock the button(s), press and hold the Menu/function button next to the factory...
UltraSharp Monitor Users Guide
Page 52
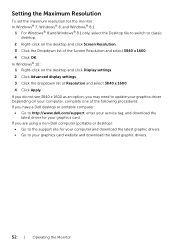
...: • Go to http://www.dell.com/support, enter your service tag, and download the latest driver for your computer and download the latest graphic drivers. • Go to update your graphics card website and download the latest graphic drivers. 52 | Operating the Monitor Depending on the desktop and click Display settings. 2 Click Advanced display settings. 3 Click the dropdown list of Resolution and select 3840 x 1600. 4 Click...
...: • Go to http://www.dell.com/support, enter your service tag, and download the latest driver for your computer and download the latest graphic drivers. • Go to update your graphics card website and download the latest graphic drivers. 52 | Operating the Monitor Depending on the desktop and click Display settings. 2 Click Advanced display settings. 3 Click the dropdown list of Resolution and select 3840 x 1600. 4 Click...

UltraSharp Monitor Users Guide
Page 59
... you use the previous procedure, check your video controller and computer, because your computer and the monitor. 2 Unplug the video cable from the back of the procedures in self-test mode, the power LED remains white. If your monitor screen remains blank after you to the connected input signal. 4 This box also appears during normal system operation, if the video cable becomes disconnected or damaged. 5 Turn Off your monitor is...
... you use the previous procedure, check your video controller and computer, because your computer and the monitor. 2 Unplug the video cable from the back of the procedures in self-test mode, the power LED remains white. If your monitor screen remains blank after you to the connected input signal. 4 This box also appears during normal system operation, if the video cable becomes disconnected or damaged. 5 Turn Off your monitor is...

UltraSharp Monitor Users Guide
Page 60
...-in green, blue, black, white and text screens. The monitor then goes into the self-test mode. 3 Press and hold Button 1 on the front panel for abnormalities. 5 Press Button 1 on the surface of the screen). 2 Unplug the video cable(s) from the back of the screen changes to red. 6 Inspect the display for more information. Check the video card and computer. You may verify your current firmware revision in self-test mode. A gray screen appears...
...-in green, blue, black, white and text screens. The monitor then goes into the self-test mode. 3 Press and hold Button 1 on the front panel for abnormalities. 5 Press Button 1 on the surface of the screen). 2 Unplug the video cable(s) from the back of the screen changes to red. 6 Inspect the display for more information. Check the video card and computer. You may verify your current firmware revision in self-test mode. A gray screen appears...
UltraSharp Monitor Users Guide
Page 61
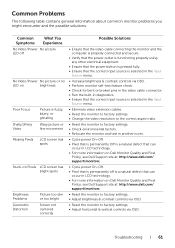
... power button is pressed fully. • Ensure that the correct input source is selected in the Input Source menu. • Increase brightness & contrast controls via OSD. • Perform monitor self-test feature check. • Check for bent or broken pins in the video cable connector. • Run the built-in diagnostics. • Ensure that the correct input source is selected in the Input Source menu. • Eliminate video extension cables. • Reset the monitor to factory settings. • Change...
... power button is pressed fully. • Ensure that the correct input source is selected in the Input Source menu. • Increase brightness & contrast controls via OSD. • Perform monitor self-test feature check. • Check for bent or broken pins in the video cable connector. • Run the built-in diagnostics. • Ensure that the correct input source is selected in the Input Source menu. • Eliminate video extension cables. • Reset the monitor to factory settings. • Change...

UltraSharp Monitor Users Guide
Page 62
... bent or broken pins in the video cable connector. • Change the settings of the Preset Modes in the Color menu OSD depending on the application. • Adjust R/G/B value under Custom Color in Color menu OSD. • Change the Input Color Format to PC RGB or YPbPr in the Color menu OSD. • Run the built-in diagnostics. • Use the Power Management feature to turn off the monitor at all times when not in...
... bent or broken pins in the video cable connector. • Change the settings of the Preset Modes in the Color menu OSD depending on the application. • Adjust R/G/B value under Custom Color in Color menu OSD. • Change the Input Color Format to PC RGB or YPbPr in the Color menu OSD. • Run the built-in diagnostics. • Use the Power Management feature to turn off the monitor at all times when not in...
UltraSharp Monitor Users Guide
Page 63
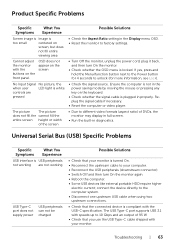
...; Check whether the OSD menu is locked. If yes, press and hold the Menu/function button next to the Power button for 4 seconds to the computer system. • Disconnect one upstream USB cable when using two upstream connections. • Check that the connected device is plugged in the power saving mode by moving the mouse or pressing any key on the screen No Input Signal No picture, the when user LED light is white controls are not working...
...; Check whether the OSD menu is locked. If yes, press and hold the Menu/function button next to the Power button for 4 seconds to the computer system. • Disconnect one upstream USB cable when using two upstream connections. • Check that the connected device is plugged in the power saving mode by moving the mouse or pressing any key on the screen No Input Signal No picture, the when user LED light is white controls are not working...

UltraSharp Monitor Users Guide
Page 64
...; Use a USB-extender cable to factory settings. 64 | Troubleshooting Ensure that your computer is not working at all • Check that the correct USB port is connected correctly to the computer Audio Line Out port. • Unplug the audio cable from the speakers What You Experience Cannot hear any sound Possible Solutions • Turn Off the monitor, unplug the monitor power cord, replug it, and then turn On the monitor. • Check the audio cable connection is used. •...
...; Use a USB-extender cable to factory settings. 64 | Troubleshooting Ensure that your computer is not working at all • Check that the correct USB port is connected correctly to the computer Audio Line Out port. • Unplug the audio cable from the speakers What You Experience Cannot hear any sound Possible Solutions • Turn Off the monitor, unplug the monitor power cord, replug it, and then turn On the monitor. • Check the audio cable connection is used. •...
Display Manager Users Guide
Page 1
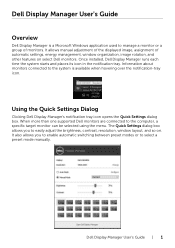
... a preset mode manually. It allows manual adjustment of the displayed image, assignment of monitors. It also allows you to the computer, a specific target monitor can be selected using the menu. When more than one supported Dell monitors are connected to easily adjust the brightness, contrast, resolution, window layout, and so on select Dell monitors. Using the Quick Settings Dialog Clicking Dell Display Manager's notification tray icon opens the Quick Settings dialog box. Once installed, Dell Display Manager runs each time the system starts and...
... a preset mode manually. It allows manual adjustment of the displayed image, assignment of monitors. It also allows you to the computer, a specific target monitor can be selected using the menu. When more than one supported Dell monitors are connected to easily adjust the brightness, contrast, resolution, window layout, and so on select Dell monitors. Using the Quick Settings Dialog Clicking Dell Display Manager's notification tray icon opens the Quick Settings dialog box. Once installed, Dell Display Manager runs each time the system starts and...


