
User Guide
Page 2
... or loss of data if instructions are trademarks of Dell Inc. As an ENERGY STAR partner, Dell Inc. A00 Dell™ U2413/U2713H Monitor User's Guide About Your Monitor Setting Up the Monitor Operating the Monitor Troubleshooting Appendix Notes, Cautions, and ...used in trademarks and trade names other countries; Model U2413f / U2713Hb November 2012 Rev. Reproduction of your computer. is a registered trademark of Advanced Micro Devices, Inc. disclaims any manner whatsoever without notice. © 2012 Dell Inc. and other than its own. has determined that helps you make better use...
... or loss of data if instructions are trademarks of Dell Inc. As an ENERGY STAR partner, Dell Inc. A00 Dell™ U2413/U2713H Monitor User's Guide About Your Monitor Setting Up the Monitor Operating the Monitor Troubleshooting Appendix Notes, Cautions, and ...used in trademarks and trade names other countries; Model U2413f / U2713Hb November 2012 Rev. Reproduction of your computer. is a registered trademark of Advanced Micro Devices, Inc. disclaims any manner whatsoever without notice. © 2012 Dell Inc. and other than its own. has determined that helps you make better use...
User Guide
Page 3
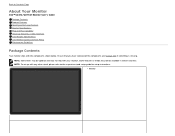
Back to Contents Page About Your Monitor Dell™ U2413/U2713H Monitor User's Guide Package Contents Product Features Identifying Parts and Controls Monitor Specifications Plug and Play Capability Universal Serial Bus (USB) Interface Card Reader Specifications LCD Monitor Quality and Pixel Policy Maintenance Guidelines Package Contents Your monitor ships with any other stand, please refer to the respective stand setup guide for setup instructions. Some features or media may not be optional and may be available...
Back to Contents Page About Your Monitor Dell™ U2413/U2713H Monitor User's Guide Package Contents Product Features Identifying Parts and Controls Monitor Specifications Plug and Play Capability Universal Serial Bus (USB) Interface Card Reader Specifications LCD Monitor Quality and Pixel Policy Maintenance Guidelines Package Contents Your monitor ships with any other stand, please refer to the respective stand setup guide for setup instructions. Some features or media may not be optional and may be available...
User Guide
Page 5
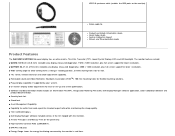
... Contrast Ratio (2,000,000:1). ■ BFR/PVC-reduced. ■ Energy Gauge shows the energy level being consumed by the monitor in real time. USB 3.0 upstream cable (enables the USB ports on the monitor) Velcro cable tie Product and Safety Information Guide Quick Setup Guide Factory Calibration Report Drivers and Documentation media Product Features The Dell U2413/U2713H flat panel display has an active matrix, Thin-Film Transistor (TFT), Liquid Crystal Display (LCD) and LED backlight...
... Contrast Ratio (2,000,000:1). ■ BFR/PVC-reduced. ■ Energy Gauge shows the energy level being consumed by the monitor in real time. USB 3.0 upstream cable (enables the USB ports on the monitor) Velcro cable tie Product and Safety Information Guide Quick Setup Guide Factory Calibration Report Drivers and Documentation media Product Features The Dell U2413/U2713H flat panel display has an active matrix, Thin-Film Transistor (TFT), Liquid Crystal Display (LCD) and LED backlight...
User Guide
Page 6
... to instruction on section "Connecting the Monitor for brand new Dell U2413/U2713H monitor. ■ EPEAT Gold Rating. ■ Energy Saver feature for Energy Star compliance. ■ Compatible with Adobe and sRGB color standards. ■ Factory calibrated sRGB and Adobe RGB input source for DP MST Function" ). ■ Supports Picture by Picture (PBP) and Picture in Picture (PIP) Select mode. Dedicated Custom Color Mode (6-axis Color-control) for Saturation , Hue, Gain (RGB) and offset (RGB). ■...
... to instruction on section "Connecting the Monitor for brand new Dell U2413/U2713H monitor. ■ EPEAT Gold Rating. ■ Energy Saver feature for Energy Star compliance. ■ Compatible with Adobe and sRGB color standards. ■ Factory calibrated sRGB and Adobe RGB input source for DP MST Function" ). ■ Supports Picture by Picture (PBP) and Picture in Picture (PIP) Select mode. Dedicated Custom Color Mode (6-axis Color-control) for Saturation , Hue, Gain (RGB) and offset (RGB). ■...
User Guide
Page 9
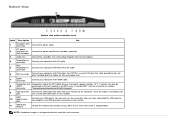
...USB device. USB 10 downstream port Connect your monitor to the monitor using a M3 x 6 mm screw (the screw is not supported for the soundbar (optional). Bottom View Bottom view without monitor stand Label Description Use 1 AC power cord connector Connect the power cable. DC power 2 connector for Connect the power cord for the audio line out connector. Dell Soundbar 3 Audio Out Connect the soundbar mini stereo plug (Support two channel output ). 4 DisplayPort in Connect your computer with Mini DP to DP cable connector 6 DVI connector Connect your computer with DVI...
...USB device. USB 10 downstream port Connect your monitor to the monitor using a M3 x 6 mm screw (the screw is not supported for the soundbar (optional). Bottom View Bottom view without monitor stand Label Description Use 1 AC power cord connector Connect the power cable. DC power 2 connector for Connect the power cord for the audio line out connector. Dell Soundbar 3 Audio Out Connect the soundbar mini stereo plug (Support two channel output ). 4 DisplayPort in Connect your computer with Mini DP to DP cable connector 6 DVI connector Connect your computer with DVI...

User Guide
Page 14
... display card or software installed in your PC, the monitor can only be displayed: Activate the computer and the monitor to gain access to as Power Save Mode*. If the computer detects input from the monitor. ** Maximum power consumption with max luminance, Dell Soundbar, and USB active. The following table shows the power consumption and signaling of the following messages will be achieved by disconnecting the power cord from...
... display card or software installed in your PC, the monitor can only be displayed: Activate the computer and the monitor to gain access to as Power Save Mode*. If the computer detects input from the monitor. ** Maximum power consumption with max luminance, Dell Soundbar, and USB active. The following table shows the power consumption and signaling of the following messages will be achieved by disconnecting the power cord from...

User Guide
Page 30
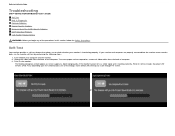
Connect the upstream USB 3.0 port (cable supplied) to the downstream USB 3.0 ports on the monitor. 3. Connect the USB 3.0 peripherals to an appropriate USB 3.0 port on the monitor stand to the computer and complete your computer. (See bottom view for your monitor displays an image, installation is complete. Plug the power cables for details.) 2. Turn On the monitor and the computer. Use the cable slot on your monitor setup: 1. Connecting the USB 3.0 cable After you have completed connecting the DVI/Mini DP/DP/HDMI cable, follow the...
Connect the upstream USB 3.0 port (cable supplied) to the downstream USB 3.0 ports on the monitor. 3. Connect the USB 3.0 peripherals to an appropriate USB 3.0 port on the monitor stand to the computer and complete your computer. (See bottom view for your monitor displays an image, installation is complete. Plug the power cables for details.) 2. Turn On the monitor and the computer. Use the cable slot on your monitor setup: 1. Connecting the USB 3.0 cable After you have completed connecting the DVI/Mini DP/DP/HDMI cable, follow the...

User Guide
Page 37
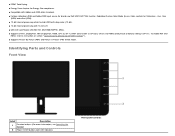
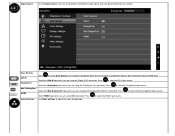
... functional. Exit Use the Power key to adjust (increase ranges) items in the OSD menu. Shortcut Key 1 2 Front Panel Icon Description Use the Up key to turn the monitor On and Off. 6 The white LED indicates the monitor is in DPMS power save mode. Power (with power light indicator) Front Panel Button Use the buttons on the front of the monitor to launch the On-Screen Display (OSD) and select the OSD Menu. 4 Use the Menu key to adjust the image settings. Menu 5 Use the Exit...
... functional. Exit Use the Power key to adjust (increase ranges) items in the OSD menu. Shortcut Key 1 2 Front Panel Icon Description Use the Up key to turn the monitor On and Off. 6 The white LED indicates the monitor is in DPMS power save mode. Power (with power light indicator) Front Panel Button Use the buttons on the front of the monitor to launch the On-Screen Display (OSD) and select the OSD Menu. 4 Use the Menu key to adjust the image settings. Menu 5 Use the Exit...
User Guide
Page 40
... using the Digital (DVI) connector. to select the DisplayPort input source. Select the DVI-D input when you are using the Mini DisplayPort (Mini DP) connector. Select the DisplayPort input when you are using HDMI connector. Press to select the HDMI input source. Press to your monitor. Input Source Use the Input Source menu to select between the different video signals that may be connected to select the DVI input source. Press Use Color Settings to select Scan Sources, the monitor auto detects either the DVI-D input or DislpayPort input...
... using the Digital (DVI) connector. to select the DisplayPort input source. Select the DVI-D input when you are using the Mini DisplayPort (Mini DP) connector. Select the DisplayPort input when you are using HDMI connector. Press to select the HDMI input source. Press to your monitor. Input Source Use the Input Source menu to select between the different video signals that may be connected to select the DVI input source. Press Use Color Settings to select Scan Sources, the monitor auto detects either the DVI-D input or DislpayPort input...
User Guide
Page 44
... Reset your monitor color settings to adjust the three colors (R, G, B) values and create your monitor base color. ngs Press the and keys to the Factory Settings. Saturation: Select it to Off. This feature can adjust the color saturation of sRGB and AdobeRGB, turn Uniformity Compensation to adjust RGB black-level offset value (default value are 50). Use or to adjust the hue from '0' to increase the purple shade of the video image...
... Reset your monitor color settings to adjust the three colors (R, G, B) values and create your monitor base color. ngs Press the and keys to the Factory Settings. Saturation: Select it to Off. This feature can adjust the color saturation of sRGB and AdobeRGB, turn Uniformity Compensation to adjust RGB black-level offset value (default value are 50). Use or to adjust the hue from '0' to increase the purple shade of the video image...

User Guide
Page 45
... is turned On, Energy Smart cannot be disabled when Uniformity Compensation is factory calibrated setting by reducing noise on the screen, and applies enhancements to achieve uniform brightness and color over the entire screen. Dynamic Contrast Dynamic Contrast adjusts the contrast ratio to 2M to adjust image. Only the video window is reserved for movie or multimedia video clips. Use or Noise Reduction Improve the motion picture quality by default. User is...
... is turned On, Energy Smart cannot be disabled when Uniformity Compensation is factory calibrated setting by reducing noise on the screen, and applies enhancements to achieve uniform brightness and color over the entire screen. Dynamic Contrast Dynamic Contrast adjusts the contrast ratio to 2M to adjust image. Only the video window is reserved for movie or multimedia video clips. Use or Noise Reduction Improve the motion picture quality by default. User is...
User Guide
Page 46
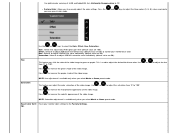
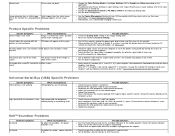
... a window displaying image from another input source. U2413 U2713H Main Window DVI-D Sub-Window DP Mini DP HDMI Main Window DVI-D Sub-Window DP Mini DP HDMI DVI-D X DVI-D X X DP X X DP X X Mini DP X X Mini DP X X HDMI X HDMI X X NOTE: The images under PBP will be displayed at the center of the screen, not full screen. PIP/PBP submenu when PIP/PBP Off Displays the monitor's current settings. Select this option to enable or disable DisplayPort 1.2 To use the...
... a window displaying image from another input source. U2413 U2713H Main Window DVI-D Sub-Window DP Mini DP HDMI Main Window DVI-D Sub-Window DP Mini DP HDMI DVI-D X DVI-D X X DP X X DP X X Mini DP X X Mini DP X X HDMI X HDMI X X NOTE: The images under PBP will be displayed at the center of the screen, not full screen. PIP/PBP submenu when PIP/PBP Off Displays the monitor's current settings. Select this option to enable or disable DisplayPort 1.2 To use the...
User Guide
Page 49
... be adjustable via the software on your monitor. To turn On or Off Audio Power during Power Save mode. Enable this option to adjust the slider in the menu. Language Menu Transparency Menu Timer Menu Lock Menu Button Sound Auto Rotate Energy Smart Menu Location Power Save Audio DDC/CI Language options set the OSD display to adjustments. Use or to change the menu transparency by selecting "Disable". NOTE: Lock function - Either soft lock (through the OSD menu) or hard lock (press and hold the button above the power button for...
... be adjustable via the software on your monitor. To turn On or Off Audio Power during Power Save mode. Enable this option to adjust the slider in the menu. Language Menu Transparency Menu Timer Menu Lock Menu Button Sound Auto Rotate Energy Smart Menu Location Power Save Audio DDC/CI Language options set the OSD display to adjustments. Use or to change the menu transparency by selecting "Disable". NOTE: Lock function - Either soft lock (through the OSD menu) or hard lock (press and hold the button above the power button for...
User Guide
Page 56
... computer and download the latest graphic drivers. If you may need to your graphics driver. Depending on the desktop and click Screen resolution. 3. For Windows® 8 only, select the Desktop tile to switch to the support site for your graphics card. or See Solving Problems for the monitor: In Windows Vista® , Windows® 7 , Windows® 8: 1. Click OK. Setting the Maximum Resolution To set the maximum resolution for more...
... computer and download the latest graphic drivers. If you may need to your graphics driver. Depending on the desktop and click Screen resolution. 3. For Windows® 8 only, select the Desktop tile to switch to the support site for your graphics card. or See Solving Problems for the monitor: In Windows Vista® , Windows® 7 , Windows® 8: 1. Click OK. Setting the Maximum Resolution To set the maximum resolution for more...
User Guide
Page 62
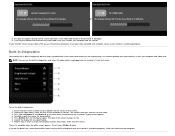
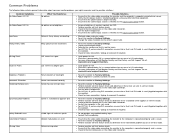
... Page Troubleshooting Dell™ U2413/U2713H Monitor User's Guide Self-Test Built-in Diagnostics Common Problems Product Specific Problems Universal Serial Bus (USB) Specific Problems Dell™ Soundbar Problems Card Reader Troubleshooting WARNING: Before you begin any of the computer. To ensure proper self-test operation, remove all video cables from the back of the procedures in self-test mode, the power LED remains white. The floating dialog box should appear on-screen (against a black background...
... Page Troubleshooting Dell™ U2413/U2713H Monitor User's Guide Self-Test Built-in Diagnostics Common Problems Product Specific Problems Universal Serial Bus (USB) Specific Problems Dell™ Soundbar Problems Card Reader Troubleshooting WARNING: Before you begin any of the computer. To ensure proper self-test operation, remove all video cables from the back of the procedures in self-test mode, the power LED remains white. The floating dialog box should appear on-screen (against a black background...
User Guide
Page 63
... Button 4 again. The monitor then goes into the self-test mode. 3. Repeat steps 5 and 6 to red. 6. Check the video card and computer. Unplug the video cable(s) from the back of the screen changes to inspect the display in diagnostic tool, the monitor is an inherent problem with your monitor, or with your computer and the monitor. Inspect the display for any screen abnormalities upon using the built-in green, blue, black, white and text screens. Turn...
... Button 4 again. The monitor then goes into the self-test mode. 3. Repeat steps 5 and 6 to red. 6. Check the video card and computer. Unplug the video cable(s) from the back of the screen changes to inspect the display in diagnostic tool, the monitor is an inherent problem with your monitor, or with your computer and the monitor. Inspect the display for any screen abnormalities upon using the built-in green, blue, black, white and text screens. Turn...
User Guide
Page 64
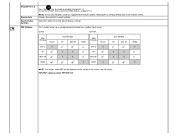
... in the video cable connector. For U2713H: If you might encounter and the possible solutions: Common Symptoms No Video/Power LED Off What You Experience No picture Possible Solutions Ensure that a Dual Link DVI cable is scrambled or appears torn Reset the monitor to Factory Settings. Check for bent or broken pins in another room. Adjust brightness & contrast controls via the Input Source Select button. Intermittent Problems Monitor malfunctions on Pixels LCD screen has bright spots Cycle power On...
... in the video cable connector. For U2713H: If you might encounter and the possible solutions: Common Symptoms No Video/Power LED Off What You Experience No picture Possible Solutions Ensure that a Dual Link DVI cable is scrambled or appears torn Reset the monitor to Factory Settings. Check for bent or broken pins in another room. Adjust brightness & contrast controls via the Input Source Select button. Intermittent Problems Monitor malfunctions on Pixels LCD screen has bright spots Cycle power On...
User Guide
Page 65
... different video formats (aspect ratio) of displayed appears on the screen No Input Signal when user controls are not working at all Possible Solutions Check that the correct USB port is used. Dell™ Soundbar Problems Common Symptoms No Sound What You Experience No power to PC RGB or YPbPr in full screen. check if the power indicator (Blue LED) on the monitor for more information, see Menu Lock). Adjust R/G/B value in use a dynamically changing screensaver. Re-plug the signal cable...
... different video formats (aspect ratio) of displayed appears on the screen No Input Signal when user controls are not working at all Possible Solutions Check that the correct USB port is used. Dell™ Soundbar Problems Common Symptoms No Sound What You Experience No power to PC RGB or YPbPr in full screen. check if the power indicator (Blue LED) on the monitor for more information, see Menu Lock). Adjust R/G/B value in use a dynamically changing screensaver. Re-plug the signal cable...

User Guide
Page 66
... Change Drive Letter and Paths. Write protect switch is not working. Check that is not assigned to a lower volume setting. Decrease the volume of drives in Explorer and choose Format from only one that your action on the soundbar clockwise to a higher volume setting. Turn the Power/Volume knob on LED was blinking. Distorted Sound Distorted Sound Unbalanced Sound Output Low Volume Computer's sound card is used as the audio source Other audio source is used Sound...
... Change Drive Letter and Paths. Write protect switch is not working. Check that is not assigned to a lower volume setting. Decrease the volume of drives in Explorer and choose Format from only one that your action on the soundbar clockwise to a higher volume setting. Turn the Power/Volume knob on LED was blinking. Distorted Sound Distorted Sound Unbalanced Sound Output Low Volume Computer's sound card is used as the audio source Other audio source is used Sound...
User Guide
Page 71
... and click Personalization. 3. Refer to the graphic card provider website for updated driver (for your computer or consider purchasing a graphics adapter that will support the video resolution. After installing the drivers for example, http://www.ATI.com OR http://www.NVIDIA.com ). 7. For Windows® 8 only, select the Desktop tile to switch to set the recommended resolution, please contact the manufacturer of the...
... and click Personalization. 3. Refer to the graphic card provider website for updated driver (for your computer or consider purchasing a graphics adapter that will support the video resolution. After installing the drivers for example, http://www.ATI.com OR http://www.NVIDIA.com ). 7. For Windows® 8 only, select the Desktop tile to switch to set the recommended resolution, please contact the manufacturer of the...


